
How to Show Metafields on a Shopify Product Page
How to turn Shopify product metafields into a clean specifications table on the product page, with each value linked to a filtered list. No app required. Tested on a Dawn store.
By AjayCodeWiz · August 14, 2026 · 9 min read
The problem
A merchant asked about this on the Shopify Community. They sell fabric by the yard, and they shared a screenshot of a product page they liked.
Under the price was a neat table of details:
Designer, Manufacturer, Fabric type, Themes, Fabric width, Fiber content, Product type.
Every value was a link. Click "Rifle Paper Co." and you would see every fabric by that designer.
They wanted the same thing on their own store, built with metafields, so they would not have to type the details into the description of every single product.
I reproduced the whole setup on a Dawn store to find the cleanest way to do it. Here is what worked.
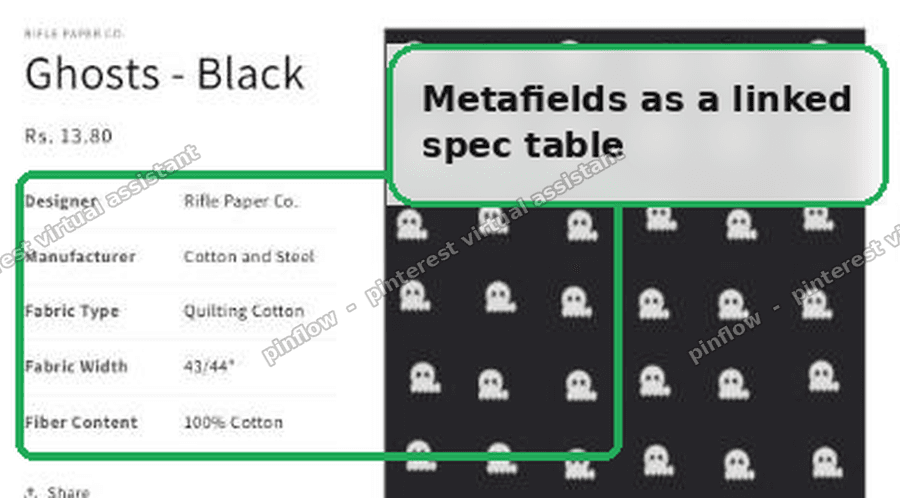 Product metafields shown as a linked specifications table on a Shopify product page
What a metafield actually is
Let me keep this in plain words, because the term scares people off.
A metafield is just an extra box on a product for a piece of information Shopify does not give you by default.
Shopify gives every product a title, a price, a description, and images. It does not give you a "Fabric width" box or a "Designer" box. A metafield is you adding that box yourself.
You create the box once. Then you fill it in on each product. Then you show it on the page.
That is the whole idea. Three steps: create, fill, show.
The reason to use metafields instead of typing everything into the description is control. The value lives in its own field, so you can display it in a tidy table, reuse it, and later make it filterable. A blob of text in the description can do none of that.
Which theme this works on
I tested this on Dawn, which is Shopify's free default theme. The steps are the same on most modern themes, because they all support a Custom Liquid block.
If you are on an older or heavily customized theme and you cannot find a Custom Liquid block, the app route near the end of this post does the same job with no code.
Step 1: Create the metafields
Go to Settings, then Custom data, then Metafields, then Products. Click Add definition.
Add one definition per row you want in the table. For a fabric shop that is:
- Designer
- Manufacturer
- Fabric type
- Fabric width
- Fiber content
Set the type of each one to Single line text.
One detail that trips people up: each definition has a Namespace and key, and you should set it deliberately. I used fabric.designer, fabric.manufacturer, fabric.fabric_type, fabric.fabric_width, and fabric.fiber_content. The code later has to match this exactly, so pick something clean and remember it.
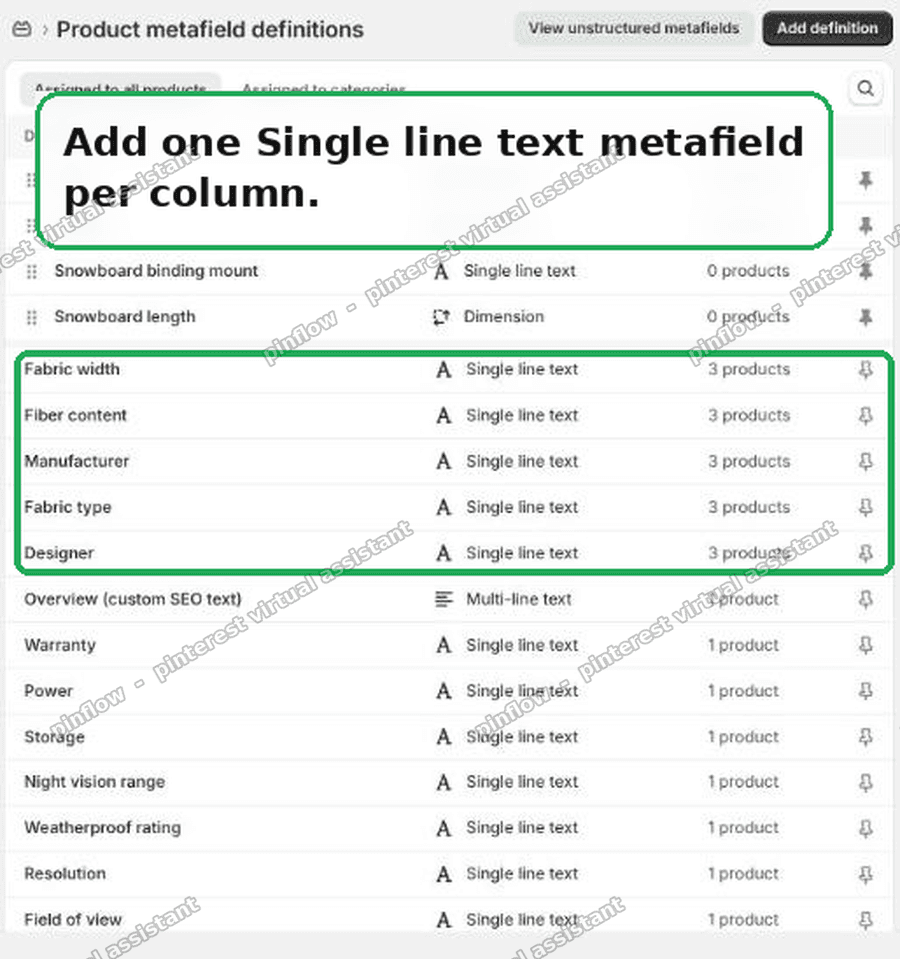 Creating one single line text metafield definition per column in Shopify settings
While you are here, pin each definition. Pinning makes it show up on every product page in the admin, so you do not have to hunt for it when you fill in values.
Step 2: Fill in the values
Open a product and scroll down to the Metafields section. If you pinned them, your new fields are right there.
Type the value for each one. Designer: Rifle Paper Co. Manufacturer: Cotton and Steel. Fabric type: Quilting Cotton. And so on.
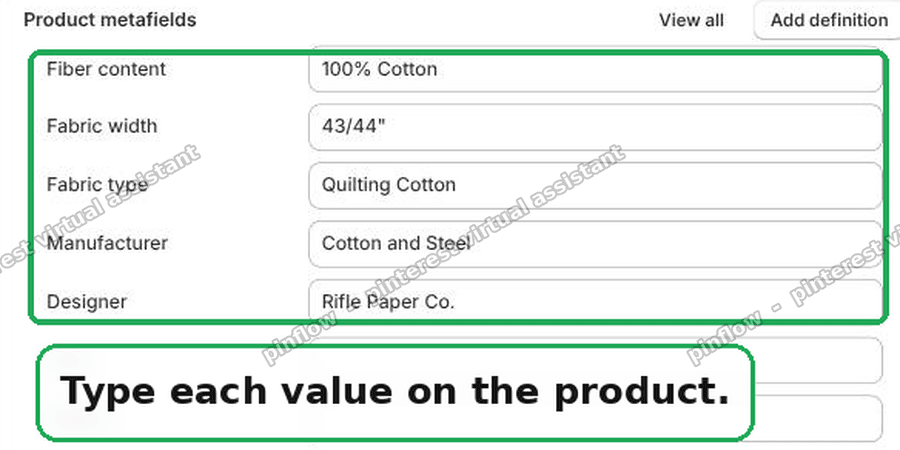 Filling in each metafield value on a Shopify product
You do this once per product. The values are now stored on the product, but nothing shows on the storefront yet. That is the next step.
Step 3: Show the table on the product page
This is where the values become a visible table.
Go to Online Store, then Themes. On your theme, click the three dots, then Customize. Open a Product template.
In the left panel, find the Product information section and click Add block. Choose Custom Liquid. Drag it to sit under the Description.
Paste this into the Custom Liquid box and hit Save:
{%- liquid
assign ns = product.metafields.fabric
assign rows = 'designer:Designer,manufacturer:Manufacturer,fabric_type:Fabric Type,fabric_width:Fabric Width,fiber_content:Fiber Content' | split: ','
assign has_specs = false
for row in rows
assign key = row | split: ':' | first
if ns[key].value != blank
assign has_specs = true
break
endif
endfor
-%}
{%- if has_specs -%}
<style>
.fabric-specs{width:100%;border-collapse:collapse;margin-top:1.5rem;font-size:1.5rem}
.fabric-specs tr{border-bottom:1px solid rgba(var(--color-foreground),0.1)}
.fabric-specs th{text-align:left;font-weight:600;white-space:nowrap;padding:1rem 2rem 1rem 0;vertical-align:top}
.fabric-specs td{padding:1rem 0;vertical-align:top}
.fabric-specs a{color:rgb(var(--color-foreground));text-decoration:none}
.fabric-specs a:hover{text-decoration:underline}
</style>
<table class="fabric-specs">
{%- for row in rows -%}
{%- assign parts = row | split: ':' -%}
{%- assign key = parts[0] -%}
{%- assign value = ns[key].value -%}
{%- if value != blank -%}
<tr>
<th>{{ parts[1] }}</th>
<td><a href="{{ routes.all_products_collection_url }}?filter.p.m.fabric.{{ key }}={{ value | url_encode }}">{{ value }}</a></td>
</tr>
{%- endif -%}
{%- endfor -%}
</table>
{%- endif -%}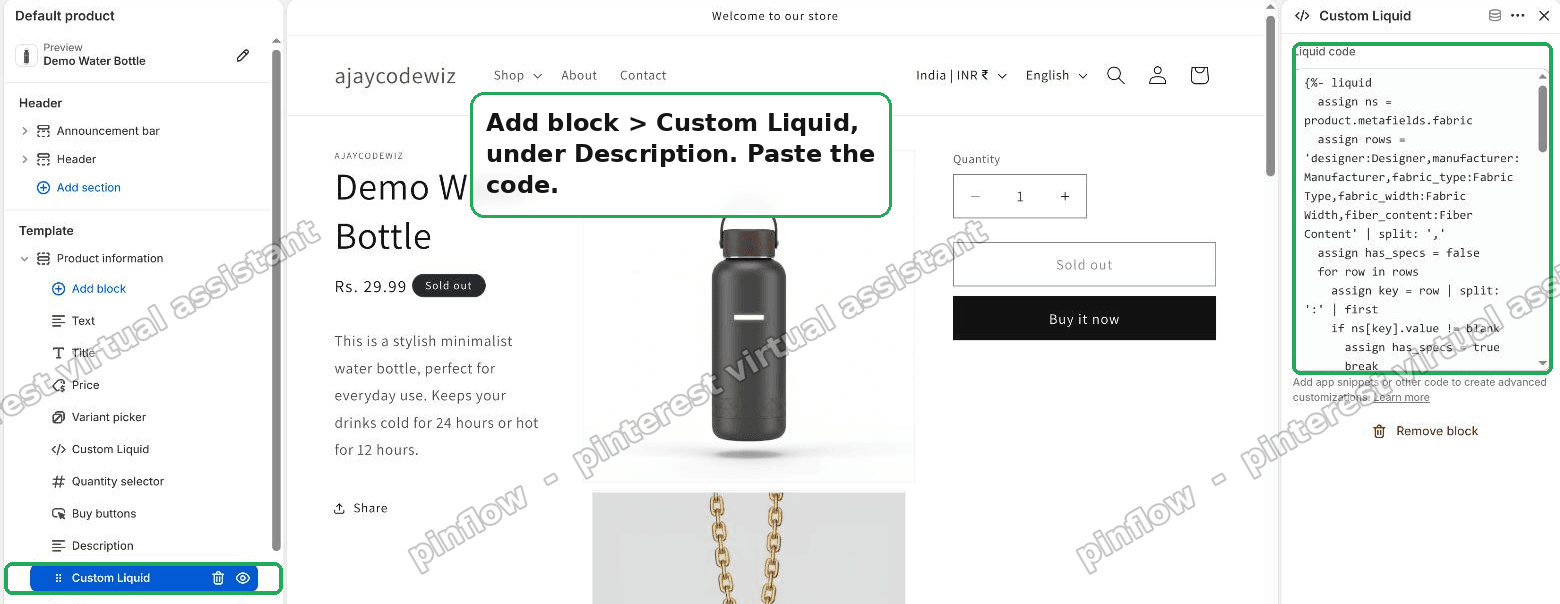 Pasting the Custom Liquid block under the description in the Shopify theme editor
A few things worth knowing about this code, in plain terms.
The namespace in the code is fabric. That has to match the Namespace and key you set in Step 1. If you used a different namespace, change the word fabric to yours.
The block only draws a table when the product actually has these metafields. On a product with none of them, it shows nothing at all, so it is safe to leave on the shared product template.
The table renders under the description, exactly like the example. Each value is a link that points at a filtered list of your products. That link is the clever part, and it needs one more step to actually work.
Step 4: Make each value clickable
Right now the values look like links but clicking them does nothing useful. Shopify ignores the filter link until you register the metafield as a filter.
You do that in a free Shopify app called Search & Discovery. It is made by Shopify and it is free to install.
Open Search & Discovery, go to Filters, click Add filter, and pick your metafield from the list. Do this for each one you want clickable: Designer, Manufacturer, Fabric type, and so on. Save each.
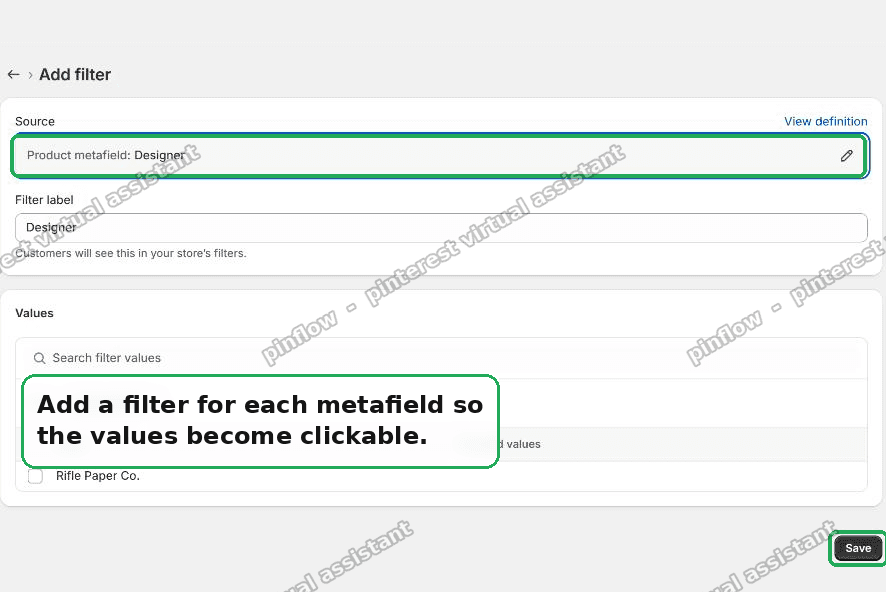 Adding a metafield as a filter in the Shopify Search and Discovery app
Now the links work. On my test store, before I added the filter, clicking "Rifle Paper Co." showed all 32 products in the store. After I added it, the same click narrowed to exactly the three Rifle Paper Co. fabrics, with an active "Designer: Rifle Paper Co." tag at the top.
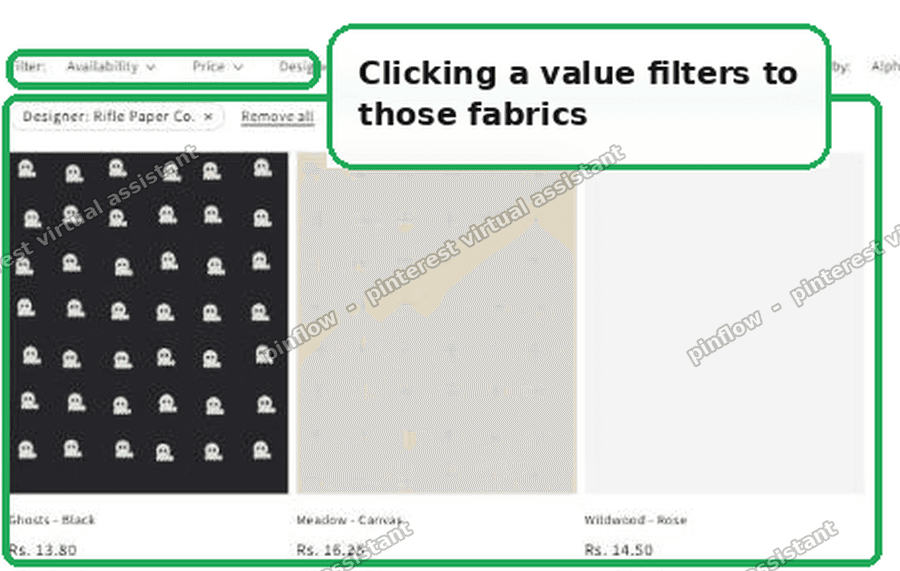 Clicking a metafield value filters the Shopify collection down to matching products
That is the finished result. A clean spec table on every product, filled from metafields, where clicking any attribute shows every product that shares it.
Prefer no code? Use an app
If you do not want to touch the theme code at all, apps do the same display job.
Accentuate Custom Fields and Easify Product Attributes both let you build a specifications table from custom fields and drop it on the product page without editing Liquid.
The one thing to keep is Step 4. Whichever route you take for the table, you still add the Search & Discovery filters if you want the values to be clickable and filterable.
What are Shopify metafields used for?
Anything Shopify does not track by default. Common uses:
- Product specs like size, material, weight, or dimensions
- Care instructions or ingredient lists
- A "how to use" section
- Warranty length
- A designer, brand, or manufacturer name
Once the value is in a metafield, you can show it, reuse it, and filter by it. That is why merchants move details out of the description and into metafields as the store grows.
Can you display metafields without code?
Partly. Some themes let you connect a metafield to a text block through the theme editor using a dynamic source, which needs no code.
But a full multi-row table, with each value linked to a filtered list, is cleaner with the small Custom Liquid block above, or with an app. The dynamic-source route is fine for one or two values, not a whole spec sheet.
Metafield versus product option versus custom field
People mix these up, so here is the difference in one line each.
A product option is a choice that changes what the buyer gets, like Size or Color. It creates variants.
A metafield is extra information about the product that does not change the variant, like Fabric width or Designer. No variants.
"Custom field" is just the everyday name for a metafield. Some apps call them custom fields, Shopify calls them metafields. Same thing.
A metaobject is a step up: a reusable record, like a full Designer entry with its own logo and bio, that many products can point to. You only need metaobjects when a value has its own details worth storing once and sharing.
What to check if it did not work
If the table does not appear or the links do nothing, it is almost always one of these.
The namespace does not match. The code says fabric but your definitions use custom or something else. Make them the same.
The metafields are empty on that product. The block hides itself when there are no values, so a blank product shows no table by design. Fill in at least one value.
The filter is not added. If the table shows but clicking a value shows every product, you skipped Step 4. Add the metafield as a filter in Search & Discovery.
The theme has no Custom Liquid block. Older themes may not offer one in the product section. Use the app route instead.
The short version
Shopify does not give you a specs table, but you can build one from metafields in about ten minutes.
Create a metafield per row. Fill in the values on each product. Add a Custom Liquid block under the description to draw the table. Then add each metafield as a filter in the free Search & Discovery app so the values become clickable.
Tested on a Dawn store: the table renders under the description, and every value links to a filtered list of matching products.
Spending too long on manual Shopify busywork?
PinFlow turns your Shopify catalog into Pinterest pins and posts them on a schedule, automatically. Same idea as the table above, let the system handle the repetitive part.
Get PinFlow on the Shopify App StoreMore Shopify fixes
More community-sourced Shopify guides, tested on a live store.
Collections & Products
Shopify Related Products by Collection, Without an App
Shopify's related products show items that do not match, because the recommendation algorithm needs sales data a small catalog does not have. Drive the block off your collections and a hand-picked list, with one Custom Liquid section on Dawn.
Collections & Products
Shopify Variants: The Complete Guide
Variants are one product sold in several forms. How they work, the 2,048 and 3-option limits, and where each variant fix lives - images, swatches, sorting, hiding and the theme-specific bugs.
Collections & Products
Shopify Collection Image Size: Why Cards Look Wrong
Collection images that look fine on desktop can turn huge on mobile, with the second card cut off the screen. The cause is not pixel dimensions, it is aspect ratio. Here is what to set, measured on a real phone viewport.