
How to Add an Image to a Shopify Accordion
Shopify's collapsible (accordion) block only accepts text, so the dynamic source picker never offers an image. Here is the no-code-file way to show a per-product image inside an accordion row, like a size guide.
By AjayCodeWiz · August 29, 2026 · 8 min read
The problem
A merchant asked about this on the Shopify Community. They run the Trade theme and wanted to show an image inside one of the collapsible rows on a product page.
An accordion, or collapsible, is one of those rows on the product page that opens when you click it. "Product features", "Materials and care", "Shipping". You click the heading and it drops open to show text.
They wanted to drop an image in there instead of text. A size chart, a certificate, a care diagram. And they wanted it to be different for each product, pulled from a dynamic source.
They got stuck fast. The collapsible block only lets you type text. They tried pasting code into the theme's Custom CSS box, and nothing happened. They tried switching a setting from text to liquid, and the image came out blank.
I reproduced the whole thing on a test store running Trade. Every part of what they hit is expected, and the fix is small.
Why you cannot pick an image in an accordion
This is worth understanding, because it tells you why the fix has to be code.
The collapsible block on the product page has one content field, and that field only accepts text or rich text. That is the whole design of it.
When you click the dynamic source icon on that field, Shopify only offers you text-based metafields. There is no image option in that list, so there is nothing to pick. A rich text field will not hold an image either.
So the accordion itself gives you no way in. The image has to be printed by a small piece of Liquid, the theme's template language. That is the only way to get an actual image tag inside the collapsible content.
Two things the merchant tried, and why neither worked:
- The Custom CSS box cannot run Liquid. It only styles what is already on the page. Pasting Liquid there does nothing.
- Changing a setting from text to liquid does not, on its own, render an image. It just changes what kind of value the field expects.
Two ways to put an image in a Shopify accordion
There are two clean routes, and you almost always want the first one.
Its own collapsible row, no theme files. You add a Custom Liquid block to the product page. Inside it you build one accordion row that holds the image. It looks exactly like the theme's other rows, and you never touch a theme code file. This is the one I recommend, and the steps below use it.
Inside an existing row. If you want the image to sit inside one of your current rows, next to its text, that needs a small edit in the theme's code. It is doable, but it means editing a core theme file, so keep it for when you specifically need the image beside existing text.
Step by step: add an image to a Shopify accordion
This works with a File metafield and a Custom Liquid block. No theme code files are edited. I tested every step on Trade.
1. Create an image field
Go to Settings, then Custom data, then Products, then Add definition.
Name it Detail image. Set the Type to File, then choose Image. Save.
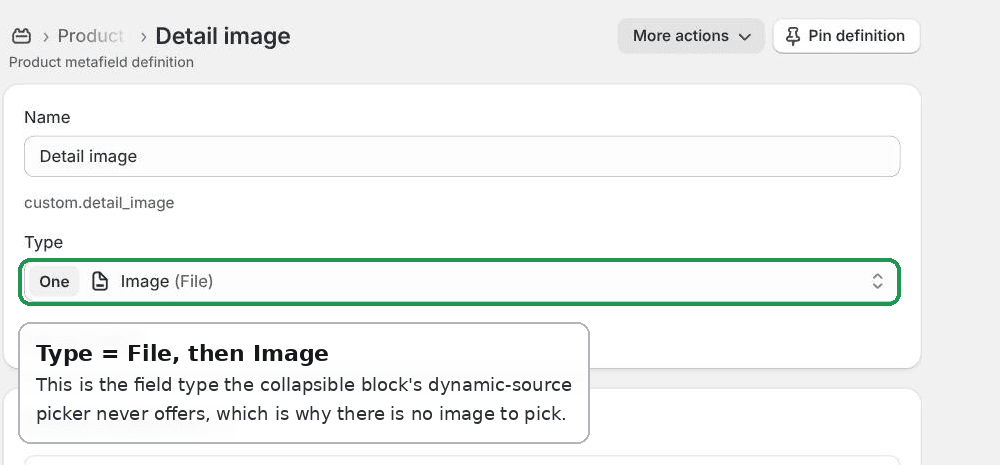 The Detail image product metafield in Shopify, set to type File then Image
That File type is the piece the accordion's dynamic source picker never offers you. Creating it as its own field is what gives you an image to work with.
2. Put an image on the product
Open a product. Scroll to its Metafields section and find Detail image. If you do not see it, click View all metafields.
Upload the image you want for that product. Each product gets its own, so a shirt can show its size chart and a candle can show its burn guide.
3. Add a Custom Liquid block
Go to Online Store, then Themes, then the three dots, then Customize. Open a product.
In the product information area, click Add block, then Custom Liquid.
Paste this and Save:
{%- assign detail_img = product.metafields.custom.detail_image.value -%}
{%- if detail_img != blank -%}
  <div class="product__accordion accordion quick-add-hidden">
    <details id="Details-detail-image-{{ section.id }}">
      <summary>
        <div class="summary__title">
          <h2 class="h4 accordion__title inline-richtext">Size guide</h2>
        </div>
        {{- 'icon-caret.svg' | inline_asset_content -}}
      </summary>
      <div class="accordion__content rte">
        {{ detail_img | image_url: width: 1200 | image_tag: loading: 'lazy' }}
      </div>
    </details>
  </div>
{%- endif -%}
That is it. You get a new collapsible row, styled like the theme's own rows, with that product's image inside it.
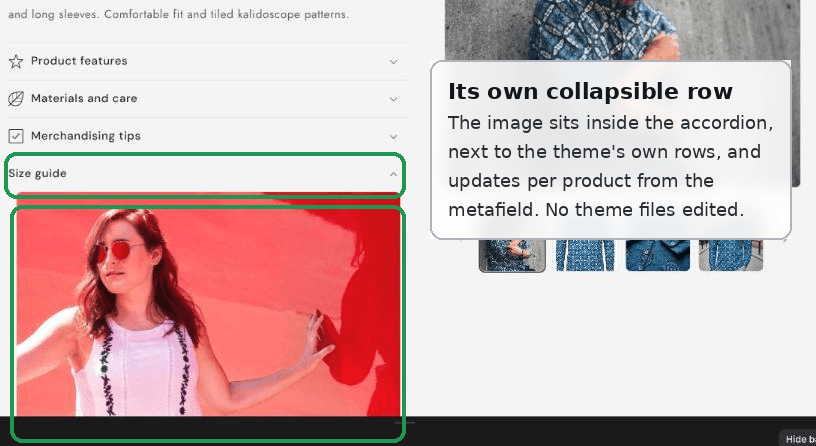 A per-product image showing inside its own collapsible accordion row on a Shopify product page
Change the word Size guide to whatever heading you want. The row only appears on products that have an image, so any product without one stays clean.
The one line that fixes the "blank image"
The merchant's earlier attempt showed a blank image. This is the most common mistake, and it is one word.
Look at the top of the snippet: detail_image.value. That .value matters.
A File metafield does not hand you the image directly. It hands you a reference. Adding .value is what turns that reference into the actual image, which the image_url and image_tag filters then need to build the tag.
Leave off .value and Shopify has nothing real to draw, so the image comes out empty. That is the blank image. Put .value back and it renders.
If yours is still blank after adding .value, the metafield on that product is probably empty. Go back to step 2 and upload the image.
Shopify accordion, collapsible content, and product tabs
People use these words for the same thing, which causes confusion when searching for help.
- Accordion is the general name for rows that expand when clicked.
- Collapsible row or collapsible content is Shopify's own name for the block, in Dawn and its family.
- Product tabs usually means the same rows, sometimes styled as side-by-side tabs by an app or a paid theme.
Underneath, they are the same idea. The block takes text, not images, so the image fix above is the same whichever name your theme uses.
Add a size guide image to a Shopify product page
The size guide is the classic reason to want this, so it is worth calling out.
The steps are exactly the ones above. Name the metafield Size guide, upload a size chart image per product, and set the heading in the snippet to Size guide.
Because the image is per product, each product shows its own chart. A dress shows dress measurements, a jacket shows jacket measurements, and you never mix them up.
If you would rather have one shared size chart for the whole store, see the next section.
Can I show the same image on every product?
Yes. If the image never changes, you do not need a metafield at all.
Upload the image under Content, then Files, and copy its URL. Then replace the metafield line in the snippet with that image, so every product shows the same one.
The metafield route is only there so each product can differ. Drop it when you want one shared image, like a store-wide shipping graphic.
What to check if it did not work
A few things trip people up. Run through these.
- Blank image. You are missing
.value, or the product has no image uploaded yet. - The row never appears. The product has no image, so the guard hides the row on purpose. Upload one. Or the Custom Liquid block was not actually added to the product page.
- The image is huge. Lower the
width: 1200number, or the image is fine and just looks big because the row is narrow. You can also cap it with a little CSS. - Nothing renders at all. Make sure you pasted into a Custom Liquid block on the product page, not into the Custom CSS box. CSS cannot run Liquid.
Would an app be easier?
If the image you want is a size chart, an app can be simpler than any code, and most have a free tier.
Size chart apps like Kiwi Sizing, Avada Size Chart, or Clean Size Chart let you build a chart, assign it by product or collection, and drop it on the product page with a button. No metafields and no Liquid.
The trade-off is that the app owns the look and adds its own script to your store. The code route above keeps everything native to your theme and adds nothing extra to load. For a plain per-product image, the code route is lighter. For a full interactive size table, an app is usually worth it.
Which themes this works on
I tested this on Trade. The same snippet works on Dawn and the free Dawn-family themes, because they share the same collapsible markup and class names.
If your theme is a paid one with a very different structure, the class names in the snippet may differ. The idea still holds: a Custom Liquid block, a File metafield, and .value. Only the wrapper classes change to match your theme.
That is the whole fix. A merchant went from a blank image and a dead end to a real, per-product image sitting inside a collapsible row, with no theme code files touched.
Spending too long on manual Shopify busywork?
PinFlow turns your Shopify catalog into Pinterest pins and posts them on a schedule, automatically. Same idea as the fix above, let the system handle the repetitive part.
Get PinFlow on the Shopify App StoreMore Shopify fixes
More community-sourced Shopify guides, tested on a live store.
Themes & Storefront
Shopify Payment Icons: Fix a Footer That Shows None
The payment icons in a Shopify footer come from your payment provider, not from the theme. When the provider sends none, the row stays empty. Here is how to add the icons yourself on Refresh, Dawn and similar themes.
Themes & Storefront
Shopify Order Notes: Turn On the Cart Note Box
Let customers leave order notes and special instructions on your Shopify cart page. Turn on the built-in cart note in Theme settings, rename its label, and find each note on the order. Tested on Dawn, no code.
Themes & Storefront
Shopify WhatsApp Integration: Add a Free Chat Button
How to add WhatsApp to Shopify with a floating chat button: shoppers tap it and WhatsApp opens a chat with you, the message already typed and naming the product.