
How to Add Scrolling Testimonials to Shopify (No App)
A merchant wanted a smooth marquee of 5-star testimonials on their Supply store. Here is a free custom section that scrolls non-stop, no app, with the full code and step-by-step screenshots.
By AjayCodeWiz · August 16, 2026 · 8 min read
The problem
A merchant asked about this on the Shopify Community, and it is a request I see a lot.
They wanted a scrolling marquee of customer testimonials on their home page. A single row of cards that glides sideways at a steady pace and never stops. Each card showing a 5-star rating, a short quote, and the customer's name. Clean, premium, on-brand.
They had years of real feedback sitting on a testimonials page and wanted it moving across the front page where new visitors would actually see it.
They run Supply, one of Shopify's older free themes. So the first thing they found is that there is no "scrolling testimonials" block anywhere in the theme. There is nothing to just switch on.
There does not need to be. This is a small custom section that lives in your theme as a text file. No app, no monthly fee. Here is the finished thing running on a store.
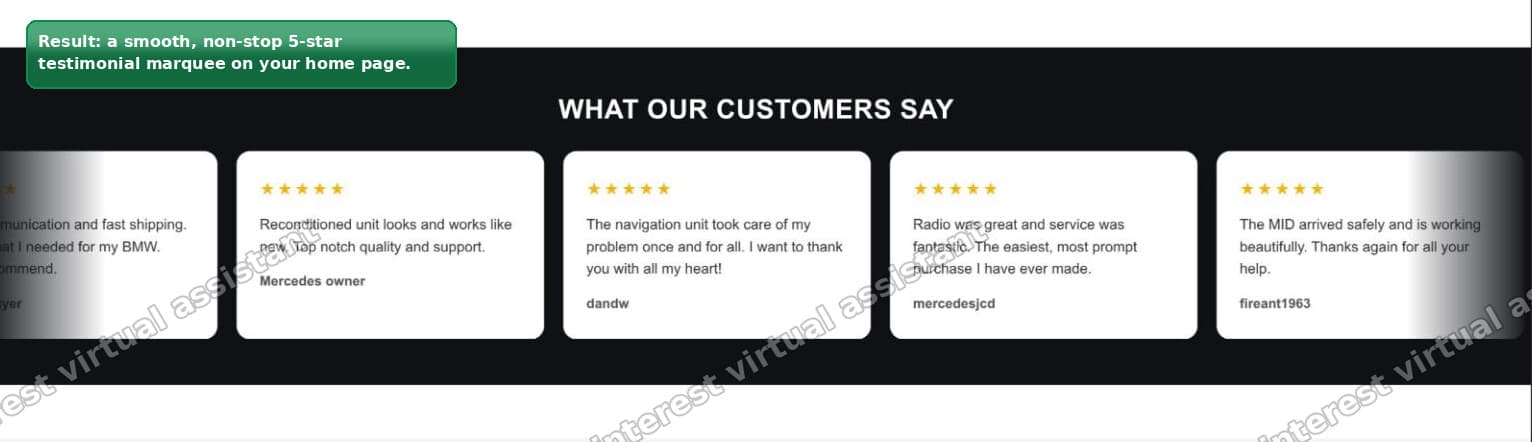 A scrolling testimonials marquee live on a Shopify home page
I reproduced this on a vintage Shopify theme and it took one file and about five minutes. The rest of this guide is that file plus the exact clicks.
Testimonials or product reviews? Pick the right one first
Before you build anything, know which of these two you actually want, because people mix them up and then install the wrong thing.
Testimonials are quotes you control. You write them, you choose which ones show, and they sit wherever you place them. Great for a home page trust strip. That is what this guide builds.
Product reviews are star ratings customers leave on individual products. Those need a reviews app that collects, verifies, and stores them per product. If your goal is "let buyers rate my products," that is a different job and an app like Judge.me or Loox is the right tool.
The marquee below is testimonials. You type the quotes in, so it works even if you have never collected a single product review. If you later want it fed by verified reviews instead, I cover that at the end.
Why older themes have no marquee block
This is worth understanding, because it decides how you add anything custom to your store.
Themes come in two broad generations. Newer themes (Dawn, Horizon, and most 2021-and-later themes) are built from sections and blocks you can drop anywhere. Older free themes like Supply, Debut, Brooklyn, and Minimal are from an earlier era. They ship a fixed set of home page sections and that is mostly it.
Supply does one helpful thing though. Its home page still supports adding sections. That means if you create a new section file, and that file declares a preset, it shows up in the theme editor's "Add section" list like any built-in one. No editing of template files, no theme surgery.
So the plan is two parts. Create the section file once in the code editor. Then drop it on the home page from the customizer like any other section. Let us do it.
What you are building
A Shopify section is a single .liquid file in your theme's sections folder. This one has three jobs.
The markup and the animation. A row of cards, printed twice, sliding left forever with a CSS animation. Printing the set twice is the trick that makes the loop seamless, and I explain it below.
The settings. A schema block at the bottom generates the controls you see in the theme editor: heading, scroll speed, card width, and colours. You never touch code again to tune it.
The testimonials. Each testimonial is a repeatable block with a quote and a name. Add, edit, reorder, and delete them from the sidebar. The 5 stars are printed on every card automatically.
Step 1: create the section file
Go to Online Store > Themes. Next to your theme, open the ... menu and click Edit code.
In the file list on the left, click the sections folder, then the New file icon. Name it testimonial-marquee and keep the type as Liquid.
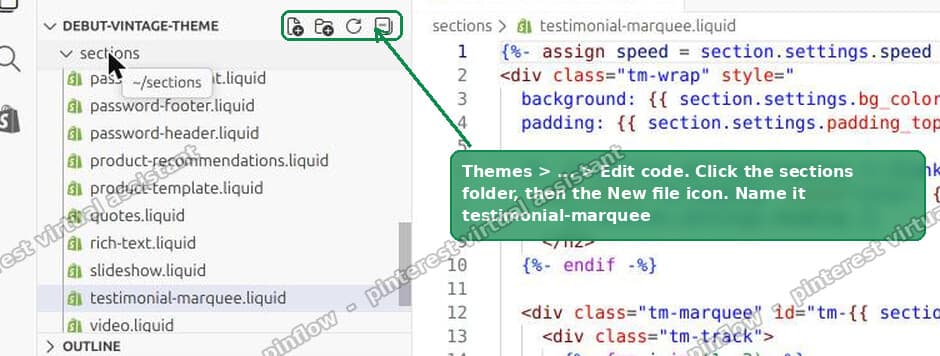 Shopify code editor, adding a new section file
Shopify creates the file with a little starter code. Delete all of it, paste in the code below, and save.
{%- assign speed = section.settings.speed | default: 40 -%}
<div class="tm-wrap" style="
background: {{ section.settings.bg_color }};
padding: {{ section.settings.padding_top }}px 0 {{ section.settings.padding_bottom }}px;">
{%- if section.settings.heading != blank -%}
<h2 class="tm-heading" style="color: {{ section.settings.heading_color }};">
{{ section.settings.heading }}
</h2>
{%- endif -%}
<div class="tm-marquee" id="tm-{{ section.id }}">
<div class="tm-track">
{%- for i in (1..2) -%}
{%- for block in section.blocks -%}
<div class="tm-card" {{ block.shopify_attributes }} style="
width: {{ section.settings.card_width }}px;
background: {{ section.settings.card_color }};
color: {{ section.settings.text_color }};">
<div class="tm-stars" aria-hidden="true">★★★★★</div>
<p class="tm-quote">{{ block.settings.quote }}</p>
{%- if block.settings.name != blank -%}
<p class="tm-name">{{ block.settings.name }}</p>
{%- endif -%}
</div>
{%- endfor -%}
{%- endfor -%}
</div>
</div>
</div>
<style>
#tm-{{ section.id }} { overflow: hidden; width: 100%; -webkit-mask-image: linear-gradient(90deg, transparent, #000 8%, #000 92%, transparent); mask-image: linear-gradient(90deg, transparent, #000 8%, #000 92%, transparent); }
#tm-{{ section.id }} .tm-track { display: flex; width: max-content; gap: 20px; animation: tm-scroll-{{ section.id }} {{ speed }}s linear infinite; }
@keyframes tm-scroll-{{ section.id }} { from { transform: translateX(0); } to { transform: translateX(-50%); } }
.tm-heading { text-align: center; margin: 0 0 26px; font-size: 28px; letter-spacing: .5px; }
#tm-{{ section.id }} .tm-card { flex: 0 0 auto; box-sizing: border-box; padding: 26px 24px; border-radius: 14px; box-shadow: 0 6px 20px rgba(0,0,0,.08); text-align: left; }
#tm-{{ section.id }} .tm-stars { color: #f5b301; font-size: 18px; letter-spacing: 2px; margin-bottom: 12px; }
#tm-{{ section.id }} .tm-quote { font-size: 15px; line-height: 1.55; margin: 0 0 14px; }
#tm-{{ section.id }} .tm-name { font-size: 14px; font-weight: 700; margin: 0; opacity: .85; }
</style>
{% schema %}
{
"name": "Testimonials marquee",
"settings": [
{ "type": "text", "id": "heading", "label": "Heading", "default": "What our customers say" },
{ "type": "range", "id": "speed", "min": 15, "max": 90, "step": 5, "unit": "s", "label": "Scroll speed (lower = faster)", "default": 40 },
{ "type": "range", "id": "card_width", "min": 240, "max": 480, "step": 10, "unit": "px", "label": "Card width", "default": 320 },
{ "type": "header", "content": "Colors" },
{ "type": "color", "id": "bg_color", "label": "Section background", "default": "#0f1115" },
{ "type": "color", "id": "heading_color", "label": "Heading text", "default": "#ffffff" },
{ "type": "color", "id": "card_color", "label": "Card background", "default": "#ffffff" },
{ "type": "color", "id": "text_color", "label": "Card text", "default": "#1a1a1a" },
{ "type": "header", "content": "Spacing" },
{ "type": "range", "id": "padding_top", "min": 0, "max": 100, "step": 4, "unit": "px", "label": "Padding top", "default": 48 },
{ "type": "range", "id": "padding_bottom", "min": 0, "max": 100, "step": 4, "unit": "px", "label": "Padding bottom", "default": 48 }
],
"blocks": [
{
"type": "testimonial",
"name": "Testimonial",
"settings": [
{ "type": "textarea", "id": "quote", "label": "Quote", "default": "Fantastic service and the radio works perfectly." },
{ "type": "text", "id": "name", "label": "Customer name", "default": "Happy customer" }
]
}
],
"presets": [
{ "name": "Testimonials marquee",
"blocks": [
{ "type": "testimonial" }, { "type": "testimonial" }, { "type": "testimonial" },
{ "type": "testimonial" }, { "type": "testimonial" }
]
}
]
}
{% endschema %}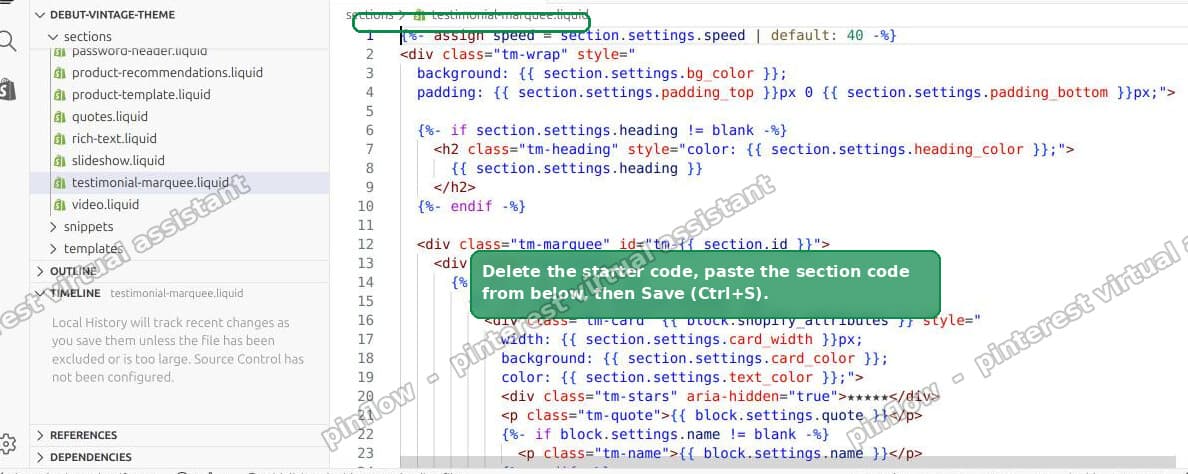 Pasting the section code into the Shopify code editor and saving
That is the whole thing. Nothing else to install.
Step 2: add it to your home page
Leave the code editor and click Customize to open the theme editor.
On the home page, click Add section. Because the file declares a preset, Testimonials marquee is right there in the list with a live preview. Click it.
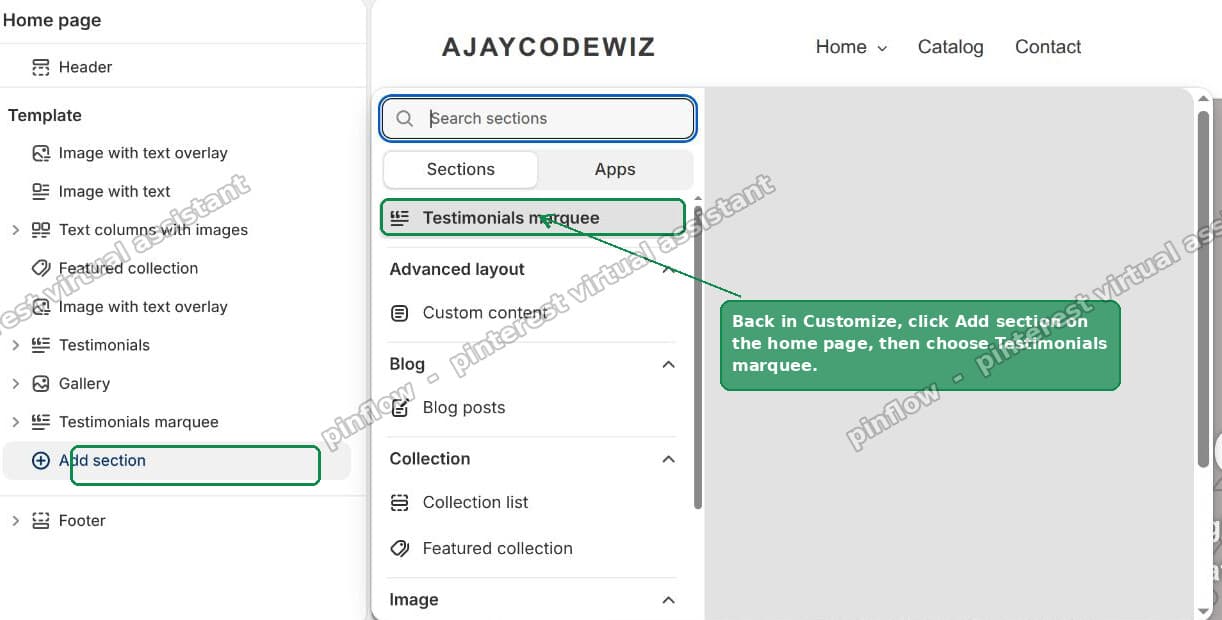 Adding the Testimonials marquee section from the Shopify theme editor
It drops onto the page already scrolling, with five sample cards so you can see the shape immediately.
Step 3: add your own reviews
In the sidebar, the section expands to show the testimonial blocks.
Click each Testimonial to set its quote and the customer's name. Use Add Testimonial to add more, drag them to reorder, and delete any you do not want. The 5 stars appear on every card automatically, so you do not type them.
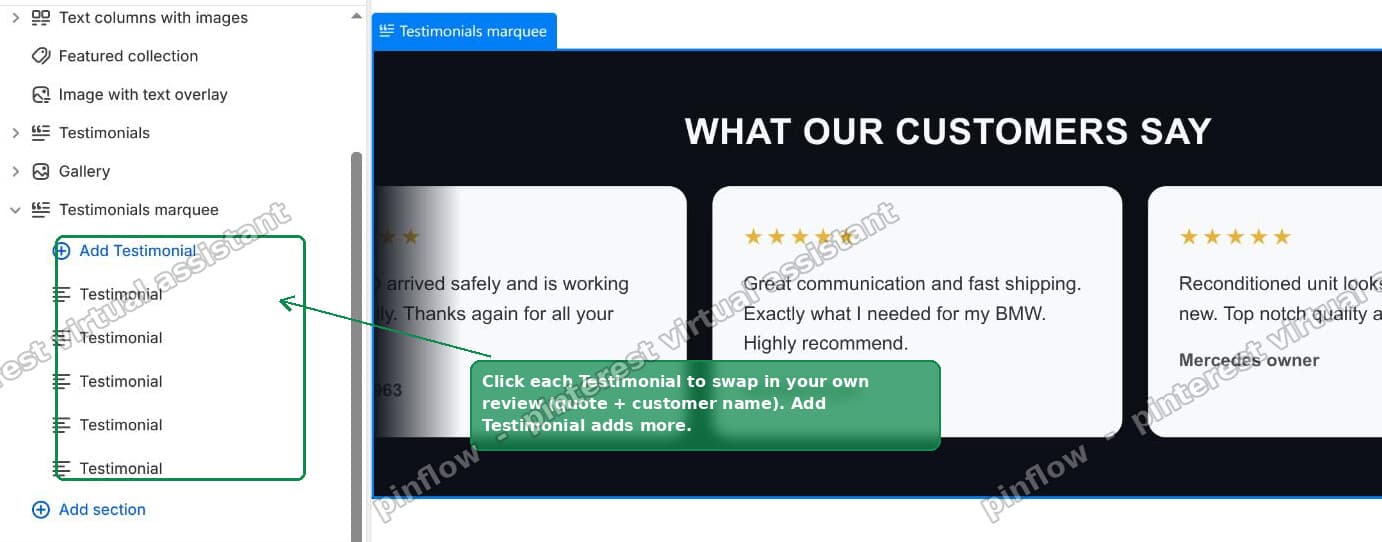 Editing the testimonial quote and name blocks in the Shopify theme editor
Add as many as you like. More cards just make a longer loop.
Step 4: speed, width, and colours
Open the section's own settings and you get the knobs.
- Scroll speed. Lower number means faster. The default of 40 is a calm, premium glide. Drop it to 20 for something livelier.
- Card width. Narrower cards fit more on screen at once.
- Colours. Section background, heading, card background, and card text. The default is a dark, premium look, but set the section background to white and the card text dark if that suits your brand better.
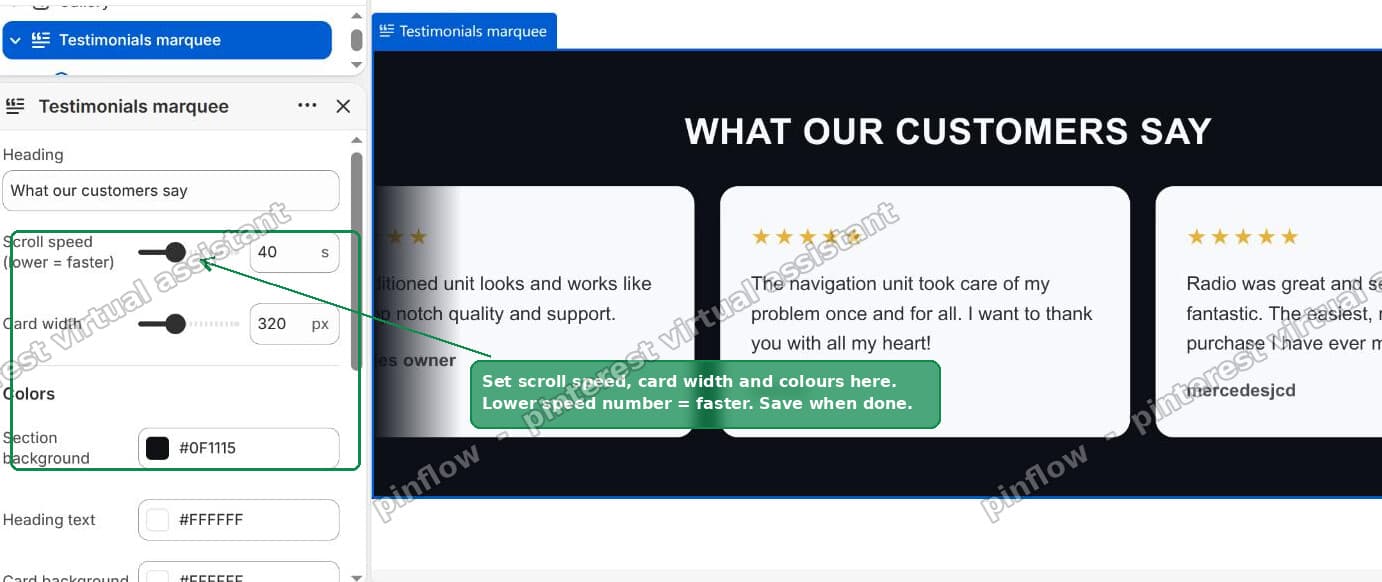 The Testimonials marquee settings: speed, card width, and colours
Save, and it is live. It stays a single smooth row on desktop and mobile.
The one trick that makes the loop seamless
This is the part people get wrong, so it is worth a minute.
A naive marquee scrolls one set of cards off the left edge, then jumps back to the start. You see the jump, and it looks broken.
The fix is in these two lines of the code you pasted:
{%- for i in (1..2) -%}
  {%- for block in section.blocks -%}
The cards are printed twice. The animation then slides the whole track left by exactly half its width (translateX(-50%)). At the moment the first copy has fully scrolled off, the second copy is sitting in precisely the position the first one started in. The animation loops, but because the two halves are identical, the seam is invisible. It looks like one endless river of cards.
That is why the loop never stutters. Do not remove the (1..2) loop or the -50%, they are a matched pair.
Common tweaks
Make it pause when someone hovers. Add this one line inside the <style> block:
#tm-{{ section.id }}:hover .tm-track { animation-play-state: paused; }Make the stars a different colour. Change color: #f5b301 in the .tm-stars rule to any hex you like.
Show four stars instead of five. Edit the star string in the markup. ★★★★☆ gives four filled and one empty.
Put it lower on the page. In the theme editor, drag the section up or down in the sidebar like any other.
If it does not scroll
A few things to check, in order.
- You saved the file. The code editor does not auto-save. Look for a saved confirmation before you leave.
- The section is actually on the page. Adding the file in the code editor does not place it. You still do Step 2, Add section, in the customizer.
- You have at least two or three cards. With a single card there is nothing to loop past, so the movement is hard to notice.
- You did not delete the
<style>block. The animation lives there. Paste the whole file, not just the top half.
Doing it without touching code
If you would rather not paste Liquid at all, or you want the cards fed by real verified reviews instead of quotes you type, an app is the cleaner route.
Review apps like Judge.me, Loox, Okendo, and Yotpo collect star reviews from your buyers, then offer a carousel or scrolling widget you drop on the home page from the theme editor. You get moderation, verified badges, and photo reviews, and the marquee updates itself as new reviews arrive.
The trade-off is the usual one. The app does more and maintains itself, but it is another subscription and another thing loading on your storefront. For a fixed set of hand-picked testimonials you control, the free section above is lighter and does exactly the job. For a growing pile of customer reviews you want verified and automatic, an app earns its keep.
Wrapping up
There is no marquee switch in older Shopify themes, but a scrolling testimonials strip is a small custom section, not an app you have to buy. One file, a preset so it shows in "Add section," repeatable blocks for the quotes, and a two-copy CSS track so the loop is seamless. Paste it once, then run the whole thing from the theme editor forever after.
Spending too long on manual Shopify busywork?
PinFlow turns your Shopify catalog into Pinterest pins and posts them on a schedule, automatically. Same idea as the section above, let the system handle the repetitive part.
Get PinFlow on the Shopify App StoreMore Shopify fixes
More community-sourced Shopify guides, tested on a live store.
Themes & Storefront
Shopify AI Section: Fix a Price Badge Hidden Behind the Image
You built a section with Shopify's AI section generator, but the price badge on each card sits behind the photo. Here is the Custom Liquid fix that brings it to the front without regenerating anything. Tested on a Dawn store.
Themes & Storefront
Hide Shipping Calculated at Checkout on One Shopify Product
The line under Add to cart that says shipping is calculated at checkout shows on every product, gift cards included. Here is how to hide it on one product only, with the code, screenshots and the Eclipse theme steps.
Themes & Storefront
Shopify Dropdown Menu Behind Page Content (Z-Index Fix)
Your Shopify dropdown or mega menu opens, but the page title and products sit on top of its links and the menu closes before you can click. The fix is one Custom CSS rule in Theme settings. Tested on a Rebel store.