
How to Assign a Template to a Page in Shopify
Created a page template and nothing changed? Creating and assigning are two separate steps, and only one happens in the theme editor. The assign step, one template across many pages, and a worked example hiding the header and footer on six pages.
By AjayCodeWiz · July 20, 2026 · 8 min read
The step that makes people think their code is broken
You built a page template. You added your code to it. You saved. You reload the page and absolutely nothing has changed.
Nine times out of ten the template is fine and the code is fine. The page is simply still using the default template, because creating a template and assigning it are two separate actions, and only the first one happens in the theme editor.
This comes up constantly on the Shopify Community. A merchant posts asking why their customisation did not apply, someone gives them correct code, and the thread stalls because the assign step never gets mentioned.
Here is how assigning works, why the theme editor is not where you do it, and a worked example from a real thread.
Create the template first
In the Shopify admin, go to Online Store, Themes, then Customize.
At the top of the editor there is a template selector showing what you are currently editing, usually "Home page". Click it, choose Pages, then Create template at the bottom of the list.
Name it something meaningful. sales, landing, no-header. Base it on Default page unless you have a reason not to.
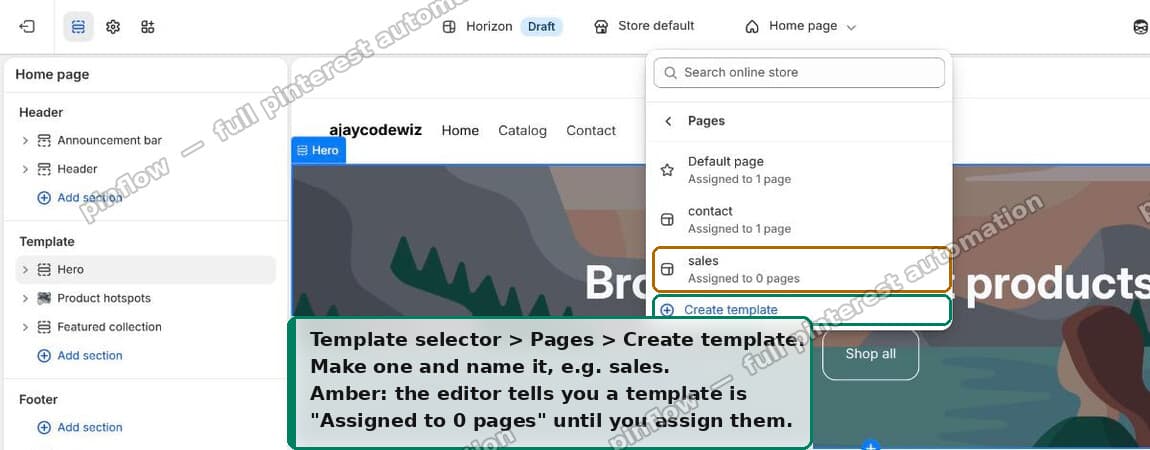 Template selector, Pages, Create template
Look at that screenshot carefully, because it contains the tell. Next to each template Shopify prints how many pages use it. Default page says "Assigned to 1 page". The new sales template says "Assigned to 0 pages".
That line is the theme editor telling you the template exists but does nothing yet. If your customisation is not applying, check that line first.
How to assign a template to a page in Shopify
The assign step does not happen in the theme editor. It happens in the page's own admin screen.
- Go to Content, then Pages.
- Click the page you want to change.
- On the right hand side, find the Template card.
- Change the dropdown from "Default page" to your new template.
- Click Save.
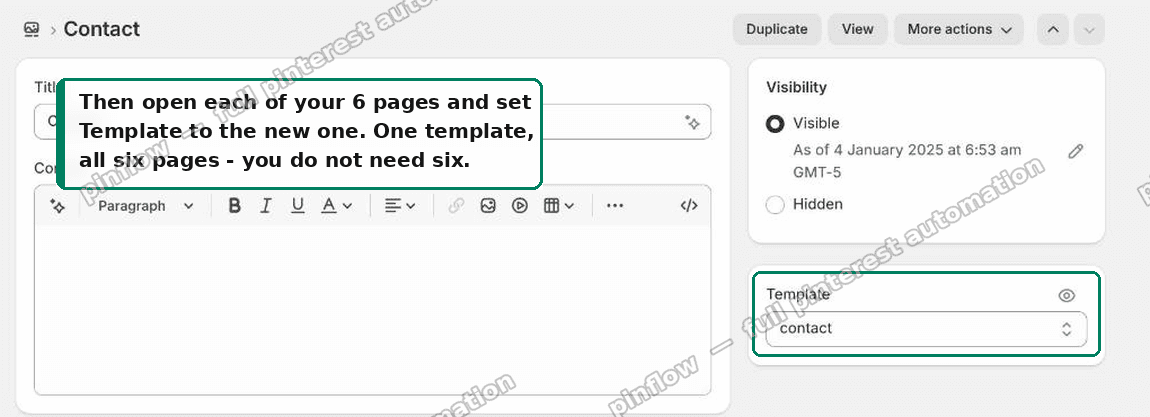 Set the page Template to your new template
That is the whole thing. Reload the storefront page and your template is live.
The reason this trips people up is that everything else about theming happens in the theme editor, so it feels like assignment should too. It does not. The theme editor edits templates. The page admin decides which page uses which template.
One template, many pages
This is the other half people get wrong, and it matters if you have more than one page to change.
You do not need a template per page. A template is a layout that any number of pages can share. Build sales once, then assign all of your sales pages to it.
The merchant whose thread prompted this article had six pages to change. Six templates would have meant six copies of the same code, and six places to edit when they want to change something. One template assigned six times means one place.
You still repeat the assign step per page, since there is no bulk template picker in the pages list. Open each page, set the dropdown, save. It is quick, and you only do it once.
Use a separate template only when the pages genuinely need different layouts.
Worked example: hiding the header and footer on six pages
Here is the thread this came from, because it is a good reason to want a page template at all.
A merchant running the Shopify Horizon theme wanted six sales pages to display with no header and no footer, so they read as focused landing pages with nothing to click away to.
They did the obvious thing first: opened the theme editor, found the header section, and switched it off. It disappeared from every page on the store.
That is not a bug. The header and footer are section groups, shared by every page in the theme. There is no per page toggle for them. Toggling them off is a store wide change, which is exactly what they saw.
The fix is to leave the global sections alone and hide them on one template only.
Turn the global sections back on first
If you already switched the header or footer off site wide, undo that before anything else. Otherwise you will be testing your new template against a store that is already broken, and nothing will look like it worked.
Add the CSS to the template
With your sales template selected in the theme editor, look at the sidebar. It has three groups: Header, Template, Footer.
Header and Footer are global. Anything you put in the Template group applies only to that template. So that is where the code goes.
In the Template group, click Add section, then choose Custom Liquid. Paste this into the Liquid code box and save.
<style>
/* hides the announcement bar, header and footer on this template only */
.shopify-section-group-header-group,
.shopify-section-group-footer-group {
display: none;
}
</style>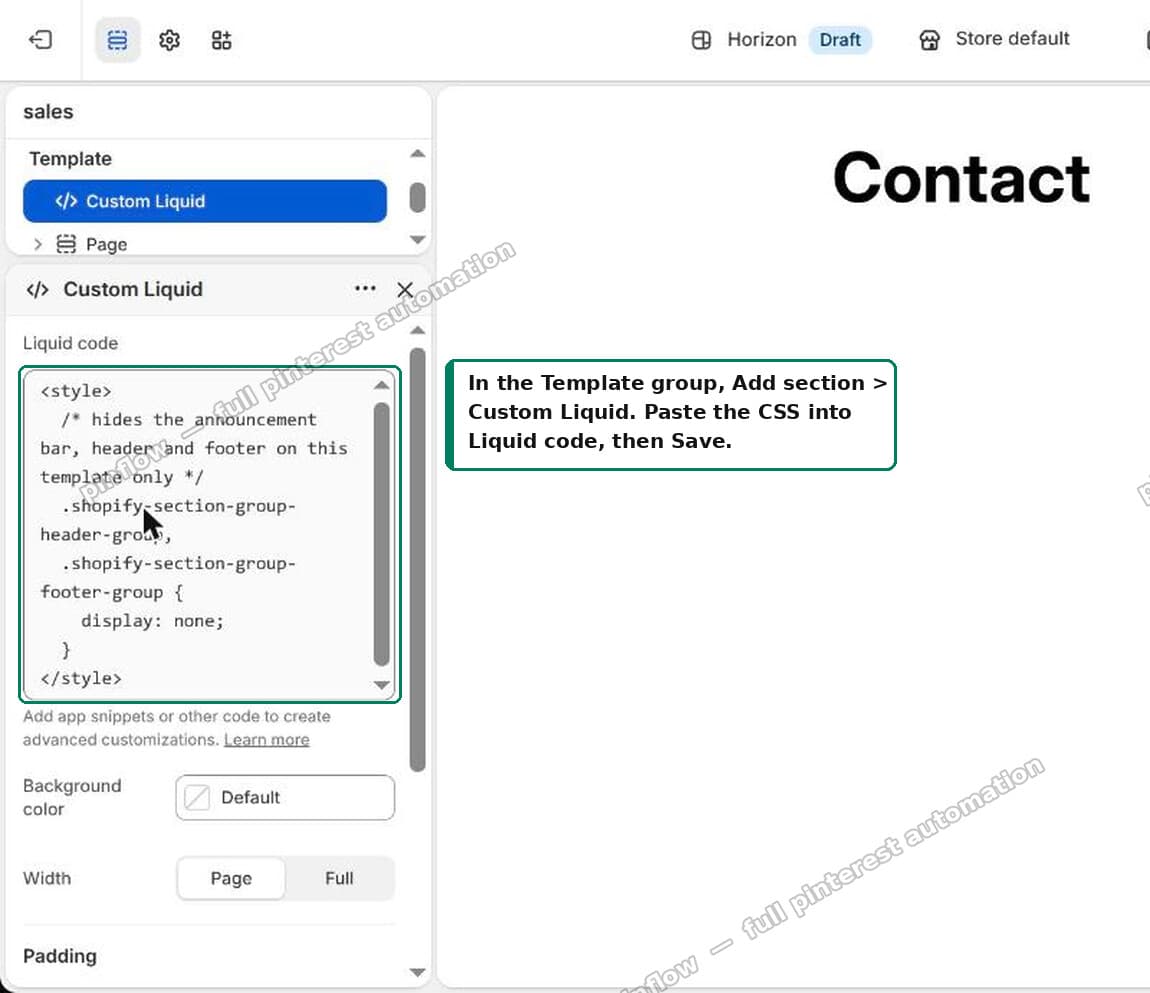 Paste the CSS into the Liquid code box
Those two class names are what Shopify puts on every section belonging to a group, which is why this catches the announcement bar, the header, the footer and the footer utilities without naming any of them individually.
Then assign your six pages to the template, as above.
Before, on the default template:
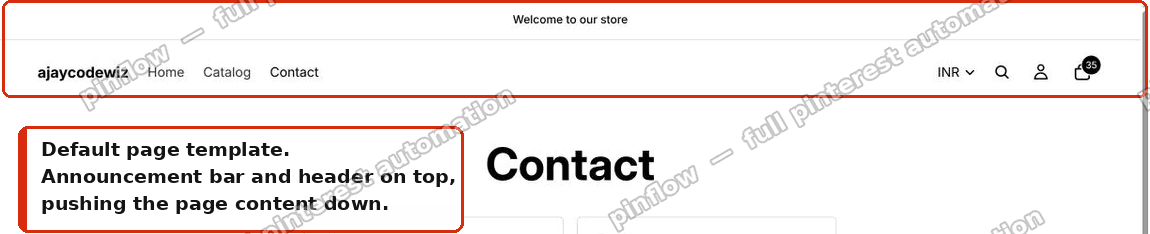 Default template: announcement bar and header on top
After, on the sales template, same page and same viewport:
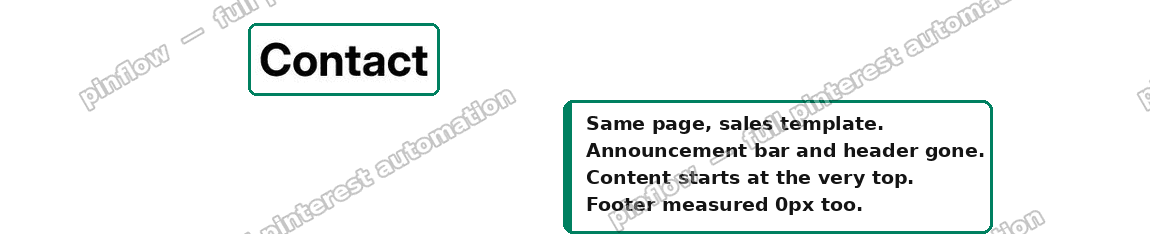 Sales template: header, announcement bar and footer gone
I tested this on Horizon 4.1.1. With the template applied, all four sections report display: none and zero height, and the page content starts at the very top of the viewport. The home page, collection pages and any page still on Default page keep their header and footer, so nothing leaks to the rest of the store.
Keeping the announcement bar
The announcement bar belongs to the header group, so the snippet above removes it along with the header. If you want to keep it and lose only the header, target the header section specifically:
<style>
  .shopify-section-group-header-group.header-section { display: none; }
</style>
That second class is header-section on Horizon. Other themes name it differently, so inspect your own header in dev tools rather than assuming this carries across.
Preview before you assign anything
There is a shortcut worth knowing, especially with six pages to update.
Add ?view= and your template name to any page URL:
https://your-store.com/pages/your-page?view=salesShopify renders that page through the sales template without assigning anything. Nothing is saved and no customer sees it.
Use it to confirm the code works on one page before you go and update all six. If the preview looks right and the real page does not, you know immediately that the problem is the assignment, not the code.
How to create a new page template in Shopify
Covered above, but to state it plainly since it is asked separately: Customize, template selector at the top, Pages, Create template, name it, base it on Default page.
On older Shopify themes you may also see templates created by duplicating a .json file in Edit code. That still works. The theme editor route is easier and does the same thing.
Templates for products and collections work identically. The selector has Products and Collections entries alongside Pages, and the assign step lives on the product or collection admin screen instead of the page one, in a Template card in the same position.
How to delete a page template in Shopify
Go to Online Store, Themes, then Edit code. Find your template under the templates folder, for example templates/page.sales.json. Use the three dot menu next to the file and choose Delete.
Reassign any pages using it before you delete, otherwise those pages fall back to the default template and any customisation on them disappears without warning.
If the template still is not applying
Check the assignment. Open the page in the admin and look at the Template dropdown. If it says "Default page", that is your answer. This is by far the most common cause.
Check which template you edited. It is easy to create sales and then add your section while the editor is still showing Home page. In the theme editor, confirm the template name at the top matches the one you assigned.
Check the section is in the Template group. Code placed in the Header or Footer group applies everywhere, which is the original problem, not the fix.
Check you saved both. Saving the theme editor and saving the page are two different saves, in two different screens.
Check the page is not a different resource type. Shopify's Pages are /pages/... in the URL. If your URL is /products/... or /collections/... you need a product or collection template, and the page template you built will never apply.
Templates, section groups, and why the difference matters
These two get conflated constantly, and the distinction is the whole reason the assign step exists.
A template describes one type of page and is chosen per resource. That is why it has an assign step: Shopify has to know which pages use it.
A section group is the header and footer region, shared by every page in the theme. There is no assign step because there is nothing to assign; it is always on, everywhere.
Once that is clear, the behaviour that confused the merchant stops being mysterious. Switching off the header section edited the section group, and section groups are global by definition. Nothing about it was per page, so the change was not either.
Spending too long on manual Shopify busywork?
PinFlow turns your Shopify catalog into Pinterest pins and posts them on a schedule, automatically. Same idea as the rule above, let the system handle the repetitive part.
Get PinFlow on the Shopify App StoreMore Shopify fixes
More community-sourced Shopify guides, tested on a live store.
Themes & Storefront
Shopify Payment Icons: Fix a Footer That Shows None
The payment icons in a Shopify footer come from your payment provider, not from the theme. When the provider sends none, the row stays empty. Here is how to add the icons yourself on Refresh, Dawn and similar themes.
Themes & Storefront
Shopify Order Notes: Turn On the Cart Note Box
Let customers leave order notes and special instructions on your Shopify cart page. Turn on the built-in cart note in Theme settings, rename its label, and find each note on the order. Tested on Dawn, no code.
Themes & Storefront
Shopify WhatsApp Integration: Add a Free Chat Button
How to add WhatsApp to Shopify with a floating chat button: shoppers tap it and WhatsApp opens a chat with you, the message already typed and naming the product.