
How to Customize the Shopify Inbox Chat Button
What you can change on the Shopify Inbox chat widget today, what you cannot, and the free code and app workarounds for a custom button text, icon, and greeting.
By AjayCodeWiz · August 12, 2026 · 12 min read
The problem
A merchant asked about this on the Shopify Community. They wanted more control over the Shopify Inbox chat widget than the app seems to allow.
Their list was clear:
- A rich-text greeting message, not a plain box.
- Their own text on the chat button, instead of picking from a fixed list.
- A custom icon they could upload.
- A name for the AI agent, so it feels personal.
These are fair requests. If you have opened the Inbox settings and felt boxed in, you are not missing a hidden toggle. Some of this is simply not built yet.
I installed Shopify Inbox on a test store and went through every chat setting it has. This post shows what you can change today, what you cannot, and the workarounds for the two that matter most: the button text and the button icon.
Shopify Inbox is Shopify's free chat app. It puts a chat button on your storefront so shoppers can message you or ask its AI assistant a question. The button, the greeting, and the colors are all set in one small settings panel.
What Shopify Inbox lets you change today
Open the Inbox app in your admin. Click Edit chat settings. That opens the theme editor on the App embeds panel, under Online store chat.
Everything you can change lives in that one panel. Here is the honest list.
- Greeting message. A single plain-text box.
- Colors. Background and font color for the chat window.
- Icon. A dropdown of preset icons.
- Label. A dropdown of preset button labels.
- Position. Left, center, or right, and three height options.
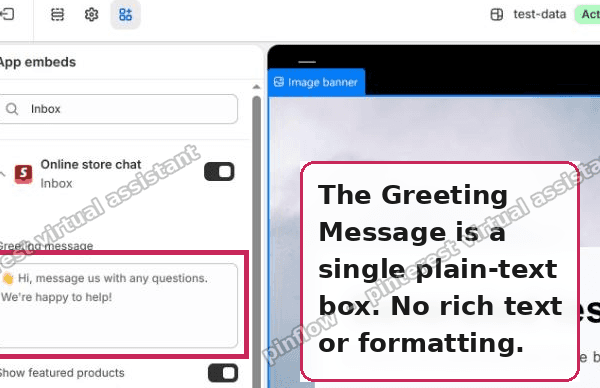 The Shopify Inbox Greeting Message is a single plain-text field|600x388
That is the whole panel. No free-text label, no icon upload, no rich text, no agent name. Below I go request by request.
How to change the Shopify Inbox chat button text
You cannot type your own text on the button in the settings. The Label field is a dropdown with a fixed set of choices: Chat, Ask anything, Assistance, Contact, Help, Support, Live chat, Message us, Need help?, and No text.
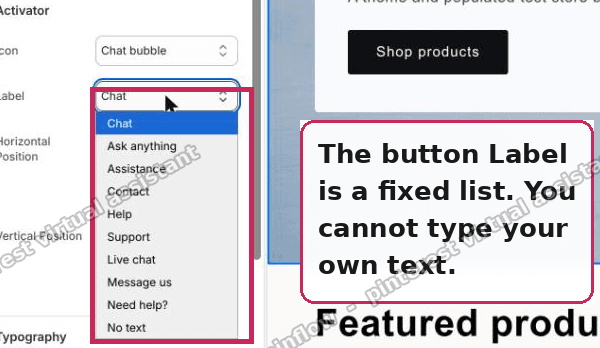 The chat button Label is a fixed preset list, not free text|600x348
If one of those fits, pick it and save. If you want wording that is not on the list, you have two routes.
The free route uses a little code. You hide Shopify's own button, then add your own button with any text you like, and have it open the chat. I show the exact steps further down.
The no-code route is an add-on app. More on that below too.
So the short answer to "how do I change my Shopify chat button text": inside Inbox you can only pick a preset. For truly custom words, you replace the button.
How to use a custom chat button icon
Same story as the text. The Icon field is a dropdown, not an upload. Your choices are Chat bubble, Email, Question mark, Smiley face, Team, Hand wave, and No icon.
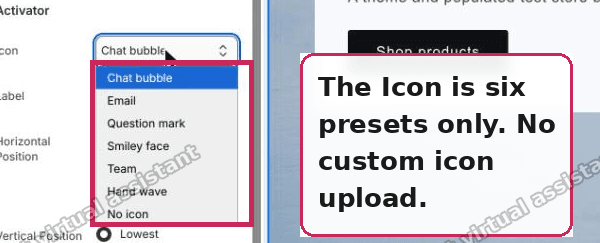 The chat button Icon is six presets with no upload option|600x243
There is no way to upload your own logo or SVG in the Inbox settings. To show a custom icon, you use the same trick as the text: hide the default button and build your own, with your own image on it.
Can you use a rich-text greeting message?
Not today. The Greeting Message is one plain-text field, as the first screenshot shows.
You can write the words you want. You cannot bold part of it, add a heading, add a link, or split it into styled blocks. There is no rich-text editor, and there is no reliable workaround. Anything that hacks formatting into that box tends to break the next time Shopify updates the app.
If your goal was to separate information for shoppers, the closest built-in tool is Instant answers inside Inbox. That lets you set up common questions and canned replies. It is not rich text in the greeting, but it does help you present information in a tidy way.
Can you name the Shopify Inbox AI agent?
Not today. Inbox does not give the assistant a name field.
You can turn the agent on or off, and you can set its tone and rules so replies sound like your brand. But you cannot label it "Ava" or "Sam" in the chat header. That is a genuine gap, not a setting you missed.
How to change the chat button color and position
Two things you asked less about are fully supported, so it is worth naming them.
Color. The settings panel has a Background and a Font color for the chat window. There is also an Invert activator colors switch for the button itself. So the chat button color is adjustable, even though the icon and text are not.
Position. You can set the button to the left, center, or right, and to one of three heights. That is how you move it off a menu or a cookie bar.
So if your real question was how to change the Shopify chat button color or move it, that part is easy and native. Set it in the same panel and save.
The free way to get a custom button text and icon
This is the route when you want your own words and your own image, without paying for an app.
The idea is simple. You hide Shopify's own chat button. You add your own button anywhere on the page. When someone clicks it, it opens the real Inbox chat. One code block does all three.
Here is the button you start with. This is the default Shopify Inbox chat button.
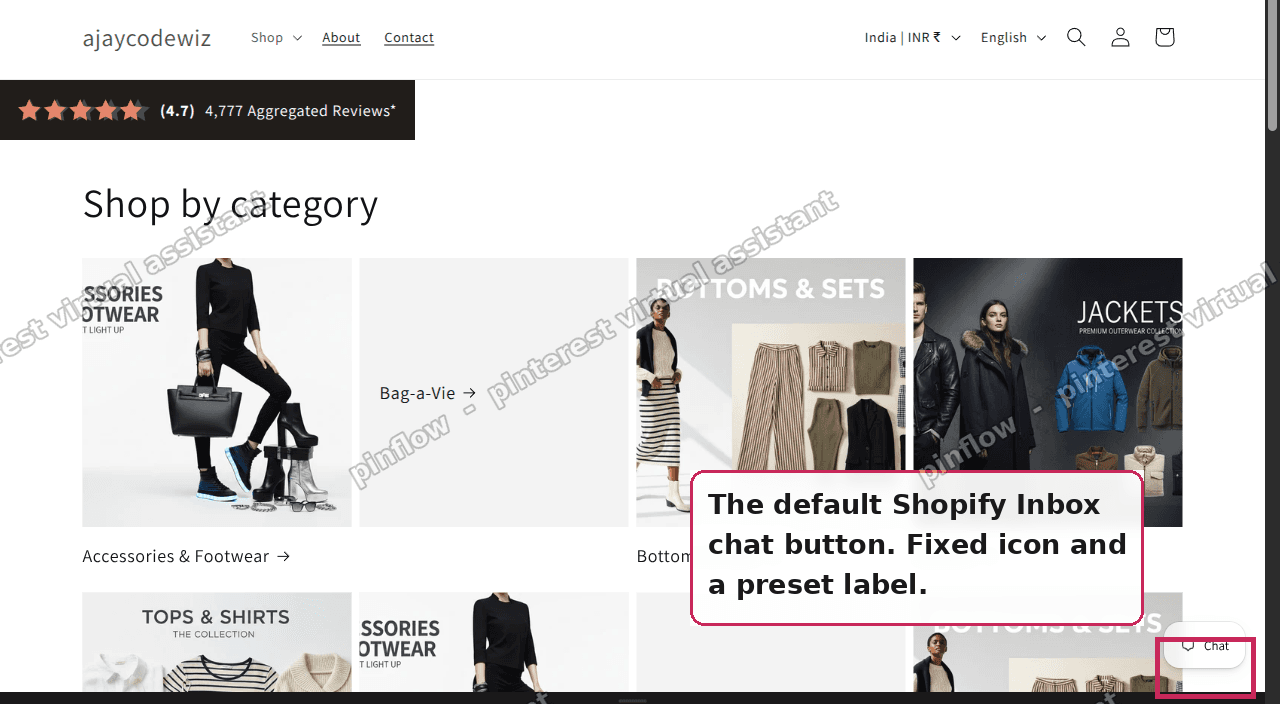 The default Shopify Inbox chat button on a test store|1280x704
Where to paste it.
The chat button is added by an app, so it does not live in your theme files. To replace it on every page, put the code in your layout, not on a single page.
Go to Online Store, then Themes, then the three dots, then Edit code. Open layout/theme.liquid and paste the block just before the closing </body> tag. A Custom Liquid section works too, but it only appears on the one page you add it to, so theme.liquid is the right place for a button that follows the whole store.
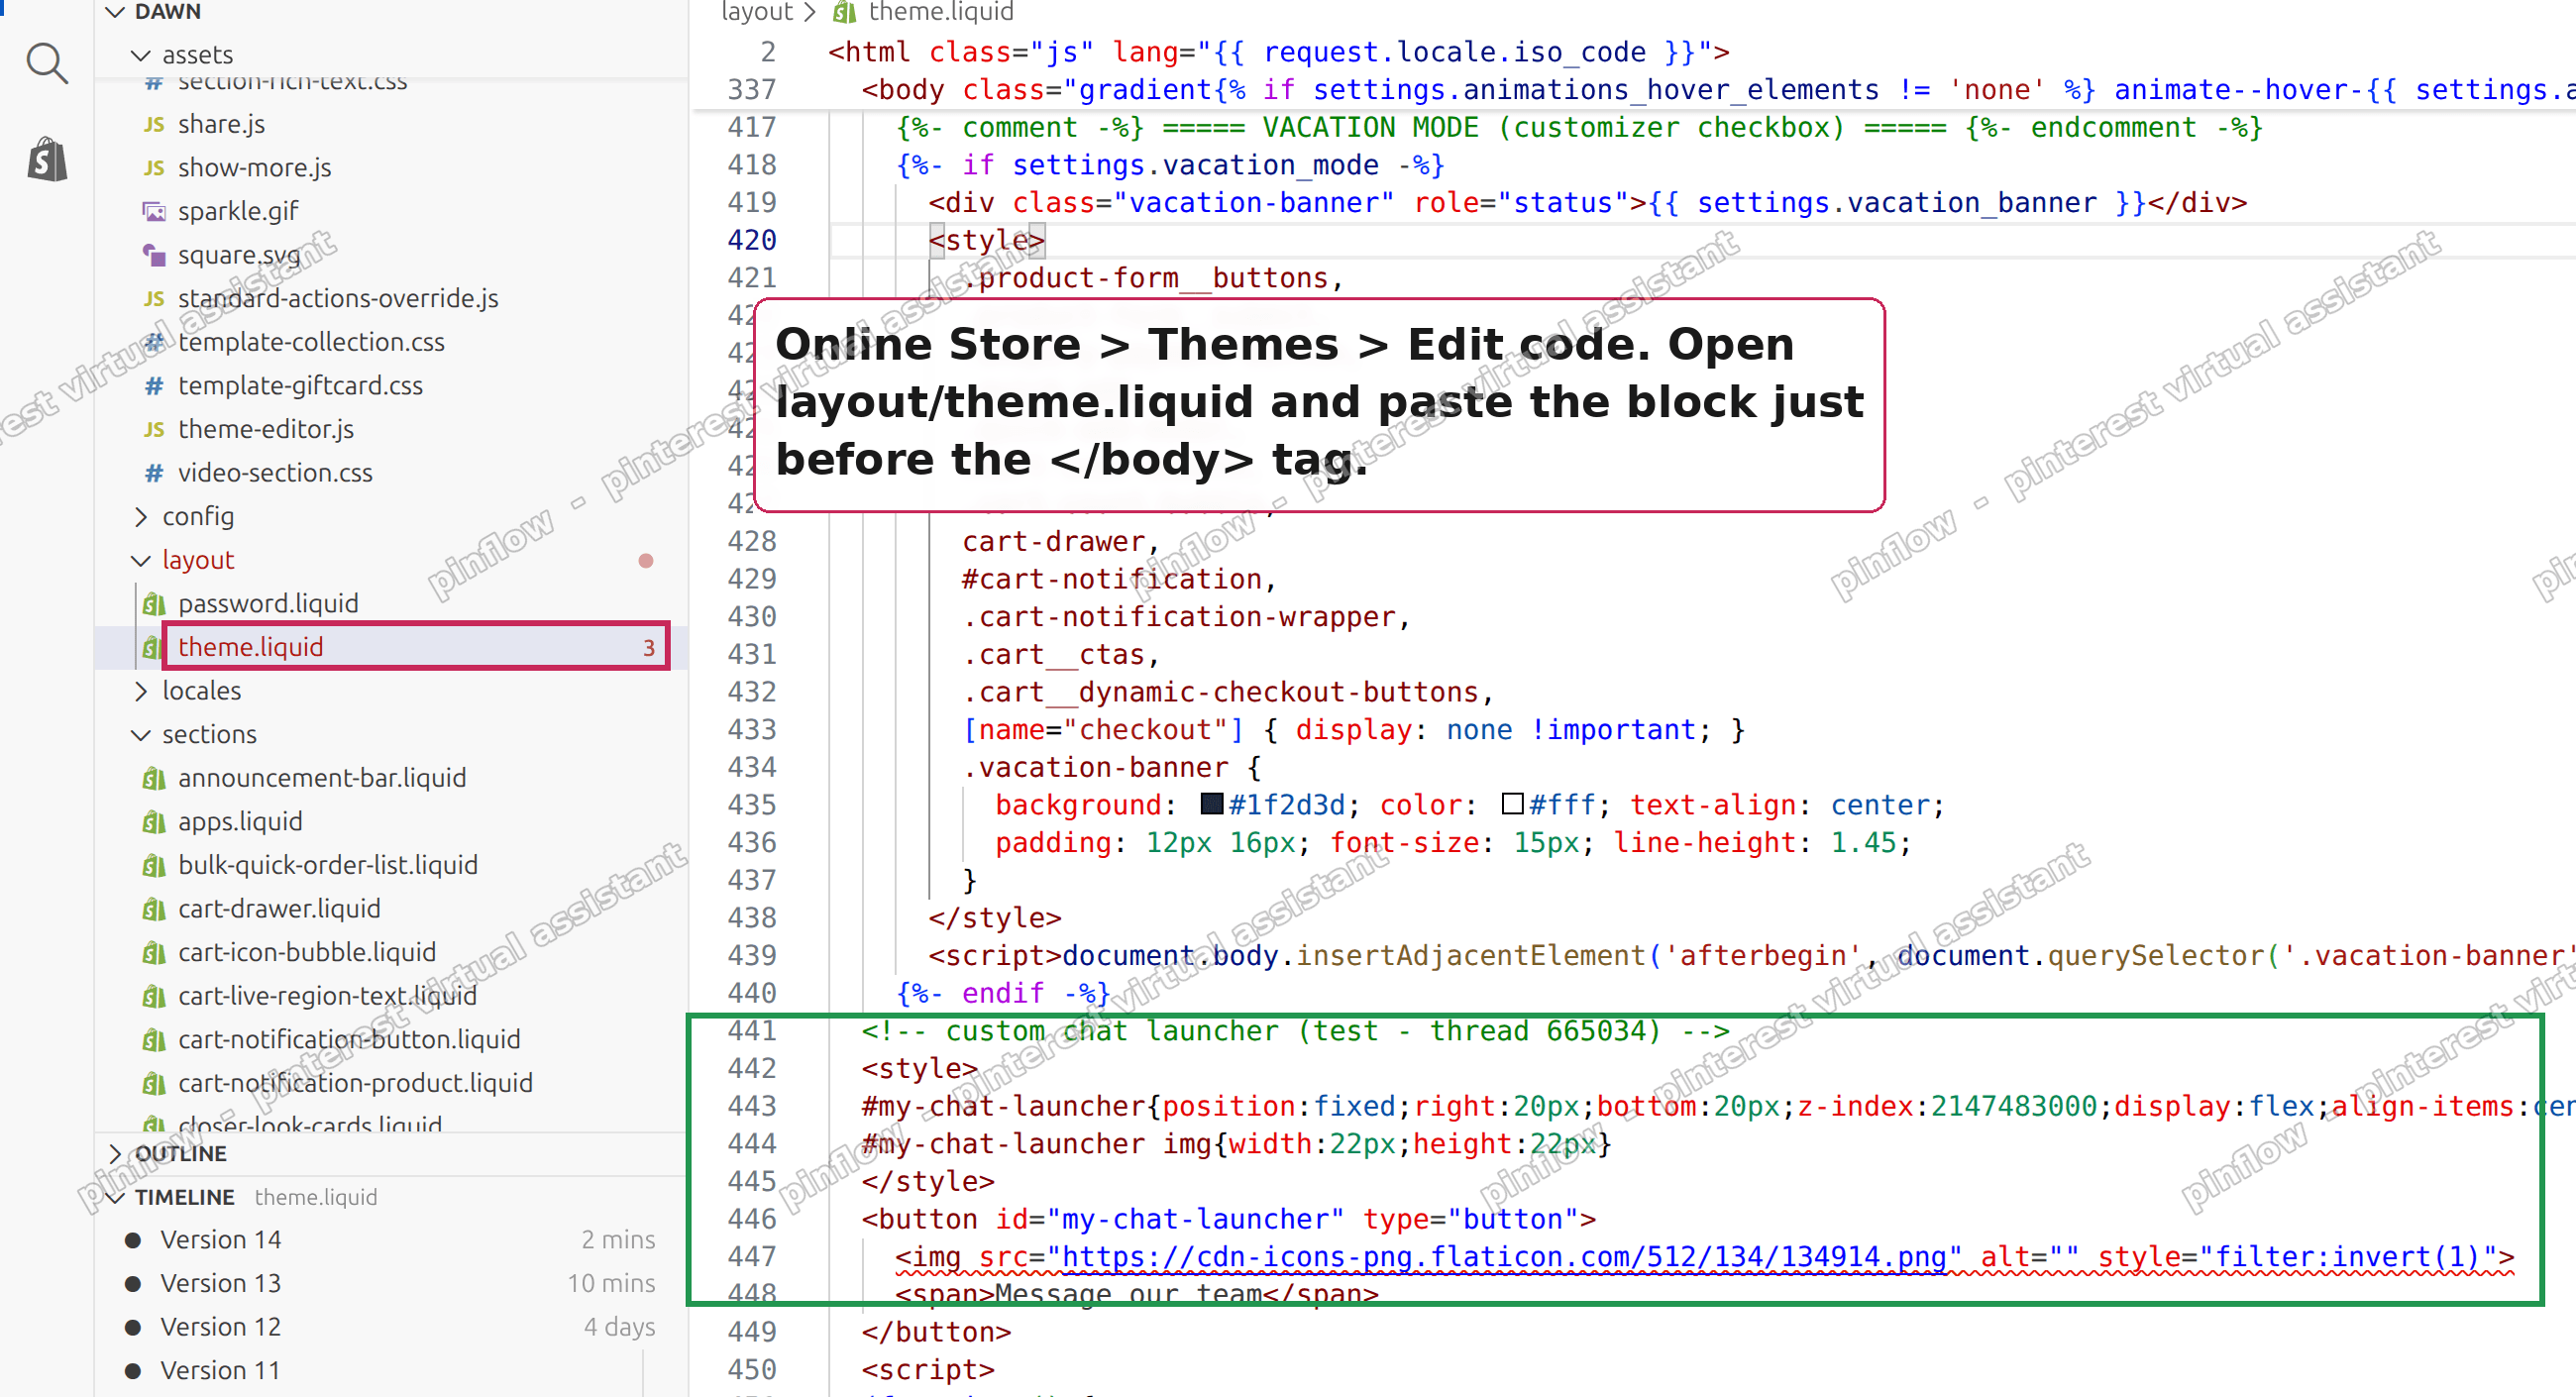 Where to paste the code: layout/theme.liquid in the theme code editor|2600x1410
Then change the text and the icon to your own. Upload a light-colored icon under Settings, Files and paste its URL in place of YOUR-ICON-URL.
<style>
#my-chat-launcher{position:fixed;right:20px;bottom:20px;z-index:2147483000;display:flex;align-items:center;gap:8px;background:#7a3cff;color:#fff;border:none;border-radius:999px;padding:12px 20px;font:600 15px/1 system-ui,sans-serif;cursor:pointer;box-shadow:0 6px 20px rgba(0,0,0,.25)}
#my-chat-launcher img{width:22px;height:22px}
</style>

<button id="my-chat-launcher" type="button">
  <img src="YOUR-ICON-URL" alt="">
  <span>Message our team</span>
</button>

<script>
(function () {
  var HIDE = '.activator{opacity:0!important;visibility:hidden!important;pointer-events:none!important;width:0!important;height:0!important;overflow:hidden!important}';
  function allRoots() {
    var rs = [document];
    (function walk(r) {
      r.querySelectorAll('*').forEach(function (el) {
        if (el.shadowRoot) { rs.push(el.shadowRoot); walk(el.shadowRoot); }
      });
    })(document);
    return rs;
  }
  function findActivator() {
    var rs = allRoots();
    for (var i = 0; i < rs.length; i++) {
      var el = rs[i].querySelector('button.activator');
      if (el) return { el: el, root: rs[i] };
    }
    return null;
  }
  function hideDefault() {
    var f = findActivator();
    if (f && !f.root.querySelector('style[data-hide-default]')) {
      var st = document.createElement('style');
      st.setAttribute('data-hide-default', '1');
      st.textContent = HIDE;
      f.root.appendChild(st);
    }
  }
  setInterval(hideDefault, 400);
  hideDefault();
  document.getElementById('my-chat-launcher').addEventListener('click', function () {
    var f = findActivator();
    if (f && f.el) f.el.click();
  });
})();
</script>
Save, then open your store. The default button is gone, and your own button shows in its place.
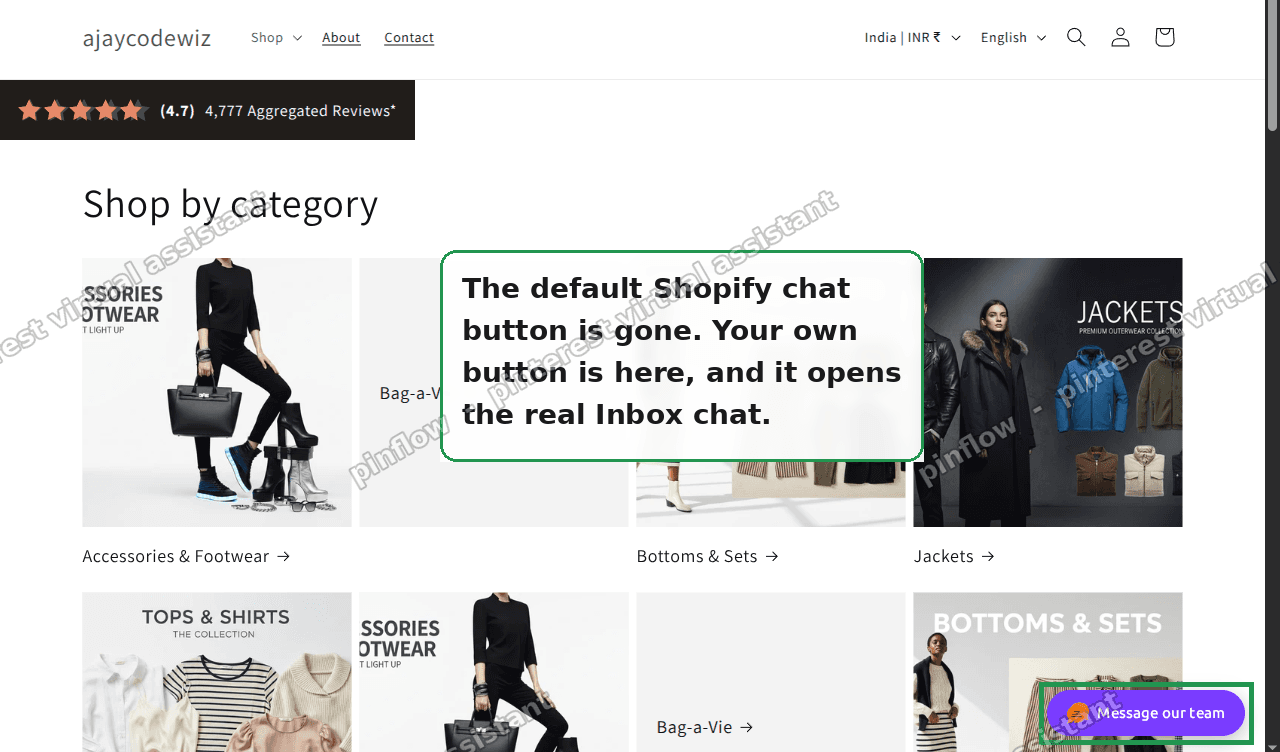 The default chat button replaced by a custom Message our team button|1280x752
Click it, and the real Shopify Inbox chat opens.
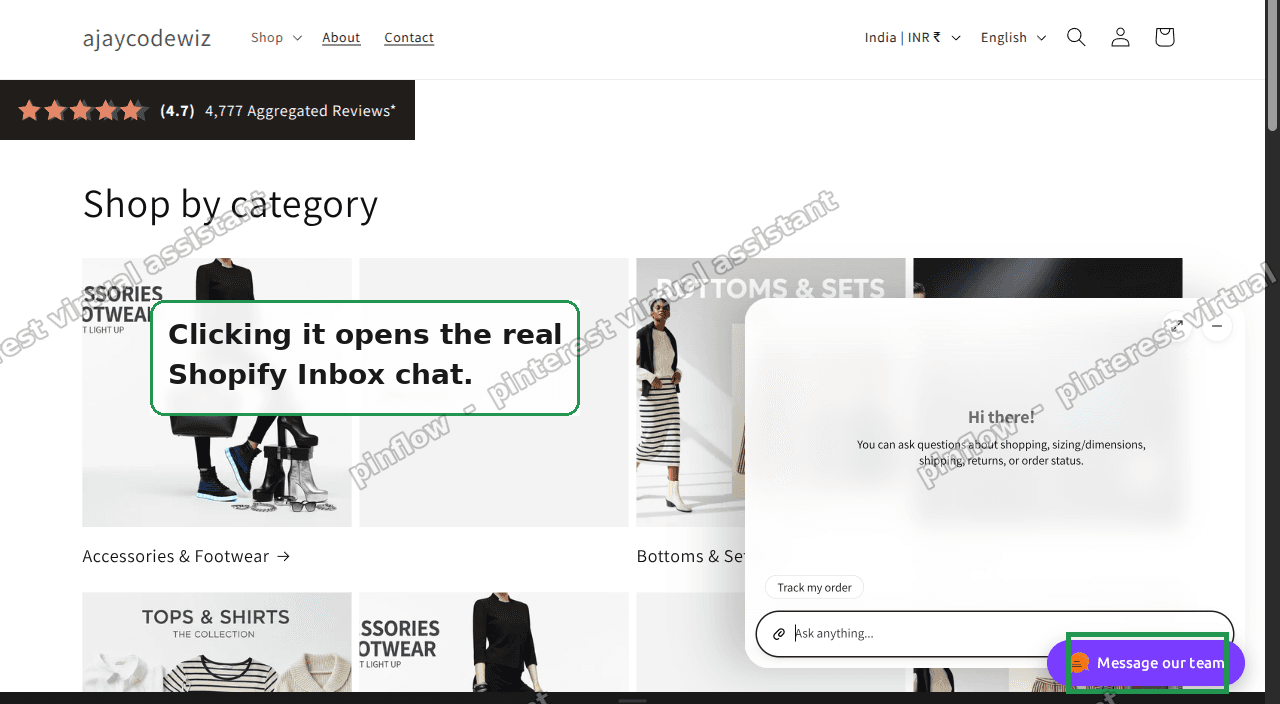 Clicking the custom button opens the real Inbox chat|1280x704
I tested this on a Dawn store with Shopify Inbox turned on. The default Chat button stayed hidden, my own purple button took its place, and clicking it opened the real chat. It also stayed hidden after opening and closing the chat, which is the part a simpler script gets wrong.
A quick note on how it works, so you can trust it. The Inbox button lives inside a <shopify-chat> element, and once the chat's agent loads, its real button (class activator) sits in a shadow DOM nested a couple of layers deep. The script walks every shadow root to find it, hides it, and forwards your click to it. It also re-checks a few times a second, because the widget rebuilds that button each time the chat opens and closes. That is why plain CSS like #shopify-chat{display:none} does not work, and why a one-time script lets the default button creep back after the first use.
The trade-off is real. This is a small custom build, and you are responsible for keeping it working after theme or app updates. If Shopify changes the widget's internals, the script may need a tweak. If you are comfortable pasting code, it costs nothing. If you are not, read the next section.
The no-code alternative: an add-on app
If you do not want to touch code, an add-on app can give the Inbox button a custom icon, your own label text, and a custom font. One example is Spark Tools for Inbox, which is a paid add-on at around $5 a month.
An app like that sits on top of Inbox. You do not rebuild anything. You install it, set your icon and text, and it restyles the existing chat button.
Weigh it against the free route. The app is faster and needs no code, but it is a monthly fee and a new app on your store. The code route is free but is yours to maintain. Both reach the same result for the button text and icon.
Neither an app nor code can add a rich-text greeting or name the AI agent. Those still live inside Shopify Inbox, which does not expose them.
How to send this as a feature request to Shopify
For the two gaps that only Shopify can fix, the rich-text greeting and the named AI agent, the best move is to ask for them properly.
- Use the feedback link inside the Shopify Inbox app. That goes to the team that builds Inbox.
- Post the request on the Shopify Community and keep the thread active. Other merchants can add their voice.
Features like these get built on demand. The more merchants who ask for the same thing, the more likely it moves up the list. A single request is easy to miss. Fifty requests for the same feature is a signal.
If the chat button is not showing at all
A quick detour, since it is a common follow-up. If your chat button is missing after setup, check these.
- The app embed is off. The chat button is an app embed on your theme. Open the theme editor, go to App embeds, and make sure Online store chat is turned on for the theme you publish.
- You edited a different theme. Settings on an unpublished theme do not affect your live store. Confirm you are editing the live theme.
- Business hours. If you set the chat to only show during staff hours, it can hide outside those hours depending on your setup.
- Cache. Old styles linger. Refresh hard, or open the store in a private window.
Definitions people mix up
A few terms get tangled here. The plain version.
Shopify Inbox versus the chat widget. Inbox is the app and the inbox where you read messages. The chat widget is the button and window shoppers see on your storefront. Same product, two parts.
The greeting versus Instant answers. The greeting is the one line that shows when the chat opens. Instant answers are preset questions and canned replies. Different features, both inside Inbox.
The Label versus custom text. The Label is the preset word on the button, chosen from a dropdown. Custom text means wording that is not on that list, which needs the code or app route.
The icon preset versus a custom icon. The icon dropdown offers a handful of built-in shapes. A custom icon is your own uploaded image, which the settings do not support.
App embed versus theme code. An app embed is a toggle that lets an app add itself to your theme, like the chat button. Theme code is the actual Liquid and CSS files. Turning the chat on or off is an embed toggle. The free custom-button route touches a bit of code.
That is the full picture. On the Shopify Inbox chat button you can change the color, the position, and pick a preset icon and label. For your own text or your own icon, you replace the button with code or an app. And for a rich-text greeting or a named AI agent, the honest answer today is to file the request and rally other merchants behind it.
Spending too long on manual Shopify busywork?
PinFlow turns your Shopify catalog into Pinterest pins and posts them on a schedule, automatically. Let the system handle the repetitive part while you run the store.
Get PinFlow on the Shopify App StoreMore Shopify fixes
More community-sourced Shopify guides, tested on a live store.
Themes & Storefront
Shopify AI Section: Fix a Price Badge Hidden Behind the Image
You built a section with Shopify's AI section generator, but the price badge on each card sits behind the photo. Here is the Custom Liquid fix that brings it to the front without regenerating anything. Tested on a Dawn store.
Themes & Storefront
Hide Shipping Calculated at Checkout on One Shopify Product
The line under Add to cart that says shipping is calculated at checkout shows on every product, gift cards included. Here is how to hide it on one product only, with the code, screenshots and the Eclipse theme steps.
Themes & Storefront
Shopify Dropdown Menu Behind Page Content (Z-Index Fix)
Your Shopify dropdown or mega menu opens, but the page title and products sit on top of its links and the menu closes before you can click. The fix is one Custom CSS rule in Theme settings. Tested on a Rebel store.