
How to Customize a Shopify POS Receipt (Visual Editor)
Shopify's new POS receipt visual editor moved things around. How to move the order code to the bottom with no code, and what is locked.
By AjayCodeWiz · August 12, 2026 · 8 min read
Shopify changed my POS receipts, how do I change them back
A merchant asked this on the Shopify Community. Shopify had swapped their printed POS receipts to a new visual editor overnight, and the layout changed on them. They wanted two things: move the QR code (their order code) to the bottom of the receipt, and add separator lines between the line items. They do not write code and wanted plain directions.
This is the new Printed receipts visual editor for Shopify POS. It is a block-based editor, and it rolled out to a lot of stores at once. One of the two changes is doable with no code. The other one is not, and it is better to know that up front than to hunt for a setting that does not exist.
I rebuilt this on a POS Pro test store and worked through both. Here is exactly what you can and cannot do.
Where the POS receipt editor is
First, so you are in the right place:
- From your Shopify admin, open the Point of Sale channel in the left sidebar.
- Go to Settings.
- Under Customization, click Printed receipts.
- Click Customize your receipts.
That opens the visual editor. On the left is a block tree: a Header section, a Content section, and a Footer section. The receipt preview is on the right.
The Header holds blocks like your logo, location details, and the Order code. The Footer holds customer information, a QR code block, a return policy, and more. The Content section in the middle is your list of items.
Move the order code to the bottom
This is the doable one, and it is no code.
The "QR code" people mean is usually the Order code block, and by default it sits in the Header, at the top. The visual editor only reorders blocks inside a section, so you cannot drag the Order code from the Header down into the Footer. That is the wall people hit.
The way around it is to hide it up top and re-add it at the bottom.
- In the left panel, open the Header section.
- Click the Order code block, then click the eye icon next to it to hide it. It stops printing at the top.
- Open the Footer section and click Add block, then choose Custom Liquid.
- Paste this into the block:
Order number: {{ order.name }} - Click Save. The order number now prints at the bottom.
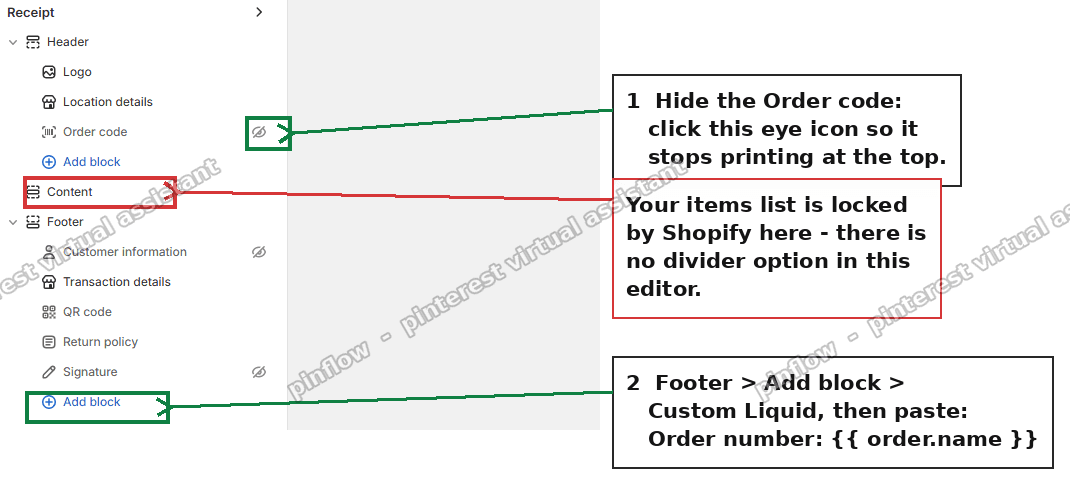 Hide the order code in the Header, then add it to the Footer
A Custom Liquid block is a small box where you can type text and Shopify variables. {{ order.name }} is the variable for the order number, so it prints the real number for each sale.
One thing to know so the result does not surprise you:
- The built-in Order code prints the register receipt number, which is prefixed by the register (something like #1-1288).
{{ order.name }}prints the plain order number (like #1425).
For most shops the plain order number at the bottom is exactly what they want. If you specifically need that exact register-prefixed number moved to the bottom, that precise format is not available without code.
Separator lines between items: the honest answer
This one is not possible in the visual editor.
The item list is the Content section, and Shopify locks it. Unlike the Header and Footer, it has no chevron to expand, no eye icon, and no Add block button. You cannot add a divider, a line, or any custom element between the line items.
So there is no toggle to find. If your goal was lines between products on the printed receipt, the visual editor cannot do it today. It is better to hear that than to keep looking.
What about the code editor
There is a code editor for printed receipts, and it is more capable. On POS Pro it lives behind an Edit code link in the receipts editor, and it supports HTML, CSS, and Liquid. In there, the item rows are styled by a rule that draws the divider under each item, so solid separator lines between products are reachable with a small CSS change.
Two honest caveats.
First, it is code, and this merchant did not want code. Editing Liquid templates is a different skill from clicking blocks.
Second, once the new visual editor is fully active on a store, the code editor is not always shown anymore. If you do not see an Edit code link in your receipts editor, that route is not open to you, and the visual editor limits above are what you have.
So the summary is: the order-code move is a clean no-code win, and item dividers are either a code job or not available, depending on what your store still exposes.
Where is the Shopify POS receipt editor?
It is inside the Point of Sale channel, not the theme editor. Point of Sale, then Settings, then Printed receipts, then Customize your receipts. This trips people up because online store receipts and POS receipts are edited in completely different places. The theme editor does not touch POS printed receipts at all.
Why did my Shopify receipts change on their own?
Shopify replaced the older printed-receipt setup with the new visual editor and rolled it out automatically. If your printed layout looks different than it used to, that is why. Nothing on your account broke. The blocks and defaults are simply new.
If the change has not shown up on your actual printed receipts yet, check the POS app version on every device. The new template only prints from a current app version, and a device on an older version keeps printing the old layout. If you run more than one device, update them all, or some will print the new layout while others print the old one.
Can I add a logo or a QR code to POS receipts?
Yes, both are blocks in the visual editor.
The logo is a Header block. A scannable QR code is a Footer block, so it prints near the bottom by default. Add it from the Footer with Add block, then set its label and the link it points to. That QR is separate from the Order code discussed above, so do not confuse the two: the Order code identifies the sale, the QR block can point anywhere you choose, such as a review page or your store.
Do I need POS Pro to customize receipts?
For the deeper edits, yes. The code editor and the fuller block controls are POS Pro features. On the base POS plan you can still edit the header and footer message text, but the advanced layout control and the code route are Pro.
If you are on Pro and still cannot find a control mentioned here, it is usually because that specific block sits in a section you have not expanded, or because the item Content section is genuinely locked, as covered above.
Visual editor vs code editor: which one am I in?
Quick way to tell.
- Visual editor: you see a block tree with Header, Content, and Footer, and you click blocks and toggle their visibility. No code.
- Code editor: you see files like
header.liquidandline-items.liquidand you edit HTML, CSS, and Liquid directly.
Most merchants are now in the visual editor by default. The code editor, where still available, is the "advanced edits" escape hatch behind an Edit code link.
What to check if it did not work
A few things trip people up on this receipt editor:
- The order code still prints at the top. The Header block was not hidden. Open the Header, select the Order code block, and confirm the eye icon shows it as hidden. Hiding is per block, so make sure you toggled the Order code, not a neighbour.
- The Custom Liquid block shows nothing. Check the text is exactly
Order number: {{ order.name }}, with the double curly braces. A typo in the variable prints blank. Theorderobject is available in the receipt template, so{{ order.name }}resolves at print time, not while you are editing. - Your edits are not on the printed paper. That is almost always the POS app version. The new template only prints from a current app, so update the app on every device, not just one.
- You changed it for one location but not another. Receipt settings can apply per location on POS Pro. If you run several, confirm you edited the location you are printing from.
- You cannot find Add block on the item list. That is expected. The Content section is locked, so there is no Add block there. It only appears on the Header and Footer.
Order code vs QR code vs receipt number
These three get mixed up, so quickly:
- The Order code block is a scannable code that encodes the sale, and it lives in the Header by default.
- A QR code block is a separate Footer block you can point at any link, like a review request or your store.
- The receipt number (register-prefixed, like #1-1288) is the printed sale reference, which differs from the plain order number (#1425) that
{{ order.name }}prints.
Knowing which one you actually want saves a lot of back and forth. The merchant here wanted the order identifier moved down, which the Custom Liquid footer block handles cleanly.
The short version
Shopify's new POS receipt visual editor is block-based, at Point of Sale, Settings, Printed receipts, Customize. To move the order code to the bottom, hide the Order code block in the Header with the eye icon, then add a Custom Liquid block in the Footer containing Order number: {{ order.name }}. Separator lines between items are not available in the visual editor, because the Content section is locked. Those need the code editor, if your store still shows one, and that is a code change rather than a click.
Spending too long on manual Shopify busywork?
PinFlow turns your Shopify catalog into Pinterest pins and posts them on a schedule, automatically. Same idea as the fix above, let the system handle the repetitive part.
Get PinFlow on the Shopify App StoreMore Shopify fixes
More community-sourced Shopify guides, tested on a live store.
Shopify Admin
How to Edit a Packing Slip on Shopify to Show Big Product Photos
Shopify's order page shows each item as a 40 pixel thumbnail with no way to enlarge it. Here is how to edit the packing slip template so every line prints that exact variant's photo at 1000 pixels, including the one-line fix Shopify's default template needs.
Shopify Admin
Shopify Shipping Zones: Fix Products Sold Out in One Country
Products show Sold out for customers in one country while your admin shows stock. The cause is a shipping profile with no zone for that country. How Shopify shipping zones and profiles decide what a customer can buy, and the six-click fix, with screenshots.
Shopify Admin
Shopify Translate: Fix Mixed Languages on Product Pages
A Swedish Shopify store showed English words on translated product pages. The titles were translated, so the English came from option names and theme text. How to fix each one in Translate & Adapt, with screenshots.