
Shopify Bulk Edit Product Descriptions (No App)
Give 200 products the same description template with each product's own name inserted, using a Shopify CSV export and one spreadsheet formula.
By AjayCodeWiz · July 31, 2026 · 11 min read
The problem
A merchant asked about this on the Shopify Community, and it is a very common one.
They had about 200 products of one type. Every product needed the same description. Not identical word for word, though. Each description had to include that product's own name.
So it is a template with one moving part. The same wording everywhere, and the product title dropped into each one.
Doing that by hand across 200 products would take hours. They wanted the easiest automated way.
They also asked a second question. They wanted to swap the photos in bulk too. Around 200 listings with 4 photos each. Did that have to be manual as well?
I worked through both on a Shopify store. The descriptions need no app at all. The photos are a bit more involved, and I will cover both below.
Why the bulk editor alone cannot insert the title
Shopify has a built-in bulk editor. You select products, click Bulk edit, and get a spreadsheet-style grid.
It looks like the right tool. It is not, for this job.
The grid lets you paste the same text into many description cells at once. That covers a description that is truly identical everywhere.
But it cannot read each product's title and drop it into that product's description. There is no formula in the bulk editor. It only holds fixed text.
The moment you need "insert this product's own name here", the grid is out. You need something that can build each line of text from the product's title.
A spreadsheet can do exactly that. So the trick is to move the data out to a spreadsheet, build the descriptions there with a formula, and bring them back.
That round trip is the whole method. Export to a CSV, edit in Google Sheets, import the CSV back. No app, and it scales to 200 products or 2,000 the same way.
The fix, step by step
Here is the exact flow I used. It takes a few minutes once the file is open.
Step 1. Export your products to a CSV
Go to Products, click Export, choose All products, and pick CSV for Excel, Numbers, or other spreadsheet programs.
Shopify does not download the file straight away for a large catalog. It emails it to you instead. The email arrives in a minute or two with a download link.
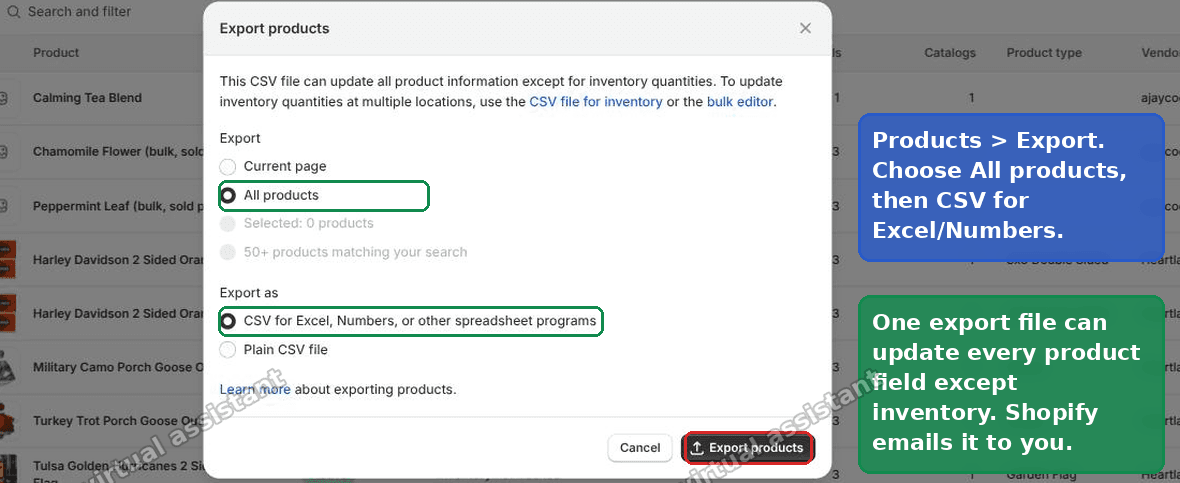 Shopify Export products dialog set to all products and CSV for spreadsheet programs
This CSV holds one row per product, plus extra rows for extra images and variants. The two columns that matter most for us are Handle and Title.
Step 2. Build the description with a formula
Open the file in Google Sheets. Excel or Numbers work the same way.
Find an empty column off to the side. A spare column, not one of the real Shopify columns. In the first product row, paste a formula like this and then fill it down the whole column:
="<p><strong>"&B2&"</strong> is handcrafted and ships free in 2 days. 30-day returns on every "&B2&".</p>"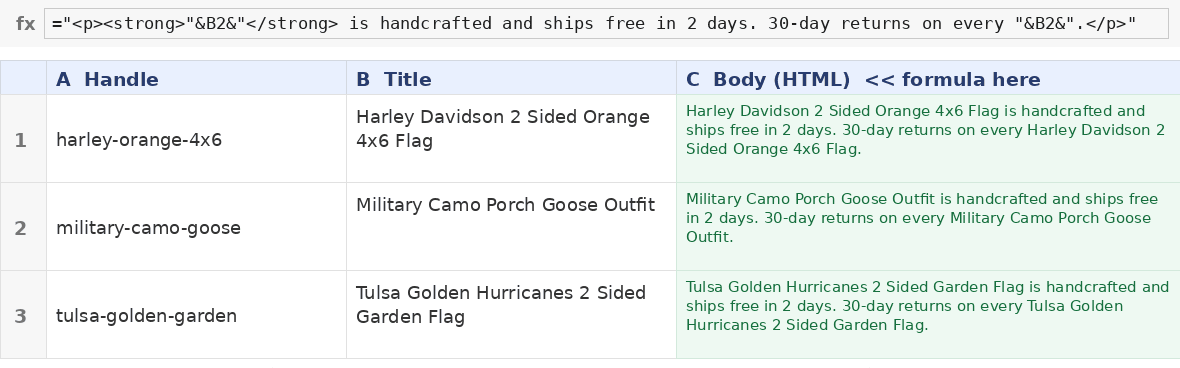 The merge formula in Google Sheets pulling the product title from column B
A few things to know about that formula.
- Title is usually column B in a Shopify export. So
B2is the first product's title. Check your own file, because if Title sits in a different column you swap the letter. - The
&B2&part is the spot where the product name drops in. It appears twice here, so each description names the product twice. Use it as many times as you like. - Everything in quotes is your own wording. Rewrite it to match your brand. Keep the
<p>and<strong>tags if you want paragraphs and bold, or drop them for plain text. - Filling down changes
B2toB3,B4and so on automatically, so every row builds from its own product's title.
The result is a full description for every product, each one carrying its own name, built in seconds.
Step 3. Turn the formulas into text, then trim the file
The formula column is live. It is not real text yet, it is a calculation. You need to freeze it into plain text before it goes into the description column.
Select the whole formula column and copy it. Then use Paste special > Values only into the Body (HTML) column. Body (HTML) is Shopify's name for the product description.
Now the description column holds finished text, not formulas.
Next comes the important part. Delete every other column except Handle and Title. You want the file trimmed down to just Handle, Title and Body (HTML). Nothing else.
I will explain why that matters in the next section, because it is the step that keeps your store safe.
Step 4. Import with overwrite turned on
Go back to Products, click Import, and add your trimmed file.
Tick the box that says Overwrite products that have the same handle. This is what tells Shopify to update your existing products instead of creating new ones.
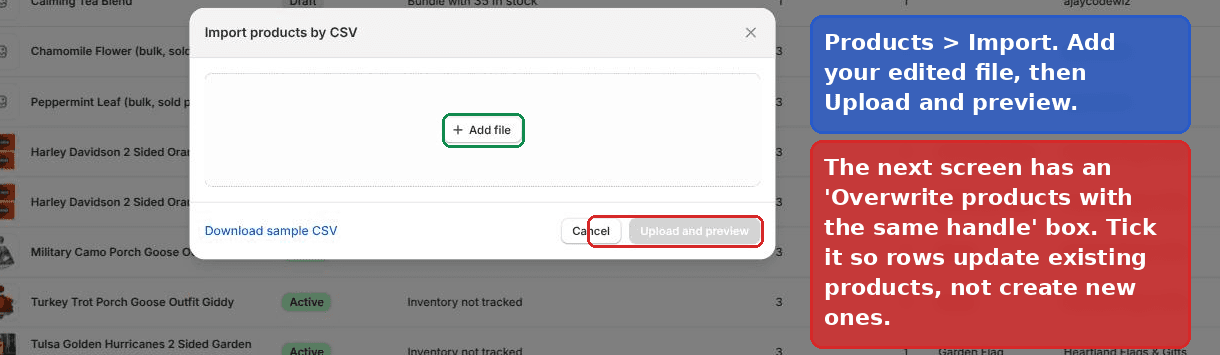 Shopify import dialog with the overwrite same handle checkbox ticked
Start the import. Shopify matches each row to a product by its Handle, then updates the description from your Body (HTML) column.
When it finishes, open a few products and check. Each description should now read from your template, with that product's name inside it.
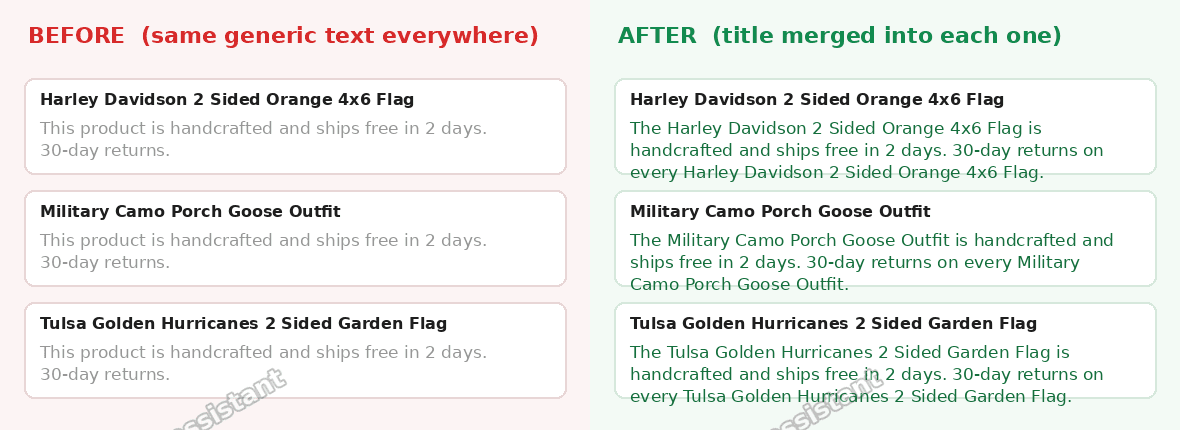 Before and after showing the same template applied with each product name inserted
That is the whole descriptions job. One export, one formula, one import.
The safety rule that stops you wiping data
This is the part that protects your store, so read it before you import anything on a live catalog.
A Shopify import to update products only needs two columns to work: Handle and Title. Handle is how Shopify finds the right product. Title has to be present for the row to be valid.
Now here is the rule that trips people up.
A column you delete from the file is left untouched. Shopify only changes the columns it can see. So if there is no Price column in your file, every price stays exactly as it is. Same for variants, tags, inventory and images.
A column you keep but leave blank gets wiped. An empty cell in a column that is present reads as "set this to nothing". So a blank Price column would zero out your prices. A blank Tags column would strip your tags.
That is the whole safety idea in one line. Delete the columns you are not changing. Never keep a column and leave it empty.
For this job that means trimming the file to Handle + Title + Body (HTML) and nothing else. With only those three columns, the import can only touch the description. Your prices, variants, photos and everything else are not in the file, so Shopify cannot change them.
If you are nervous, do a test run first. Export a fresh CSV as a backup before you import. Or import just five products, check them, then do the rest.
Changing the photos in bulk
The photos question has a catch that surprises people, so let me be clear about it.
A CSV carries image links, not the image files off your computer. The import cannot reach into your hard drive and upload pictures. It can only point Shopify at a web address where each image already lives.
That splits the answer into two cases.
Your photos are already online. Maybe they sit on your current store, a supplier site, or your own web space. In that case add three columns to the same kind of file:
- Image Src holds the full URL of each photo.
- Image Position sets the order. Use 1, 2, 3, 4 for the four photos.
- Image Alt Text is optional but good for accessibility and SEO.
You put one row per image, and you repeat the product's Handle on each of those rows. So a product with 4 photos becomes 4 rows, all sharing the same Handle, each with its own Image Src and Position.
Your photos are only on your computer. Then they have no URL yet, and the import has nothing to point at. Upload them first under Content > Files in your admin. Each uploaded file gets its own URL. Copy those URLs, drop them into the Image Src column, and import the same way.
For a full swap of all 4 photos across 200 products, that manual URL wrangling gets heavy. This is where a paid app earns its place. A tool like Matrixify can read images straight from a Google Drive or Dropbox folder and replace the whole photo set in one run. For a one-off change the CSV route is fine. For a big recurring image job an app saves real time.
How do I bulk edit products in Shopify?
Shopify gives you two built-in ways, and they are good at different things.
The bulk editor is the spreadsheet grid you get from selecting products and clicking Bulk edit. It is best for quick changes to fields that are the same across products. Set a group of products to the same price, the same vendor, or the same fixed description. It is fast and it happens right in the admin. What it cannot do is build a value from each product's own data, which is why it fails the "insert the title" test.
The CSV export and import is the heavier tool. You pull your catalog out to a file, change it in a spreadsheet, and push it back. It handles formulas, find and replace, and thousands of rows. It is the right choice whenever the change depends on each product's own values, or when there are too many products to click through.
Rule of thumb: if the new value is the same everywhere, use the bulk editor. If the new value is built from each product's title or other data, use the CSV.
Can I import product descriptions with a CSV?
Yes. The description lives in the Body (HTML) column of the Shopify product CSV.
To update descriptions without touching anything else, export your products, put your new text in Body (HTML), delete every column except Handle and Title, and import with Overwrite products that have the same handle ticked.
Handle is required so Shopify knows which product to update. Title has to stay so each row is valid. Body (HTML) carries the new description. Because no other column is in the file, no other field can change.
You can write plain text or basic HTML in Body (HTML). Tags like <p>, <strong>, <ul> and <li> all work and control how the description looks on the product page.
How do I add the product title to the description automatically?
You cannot do it inside Shopify's admin. There is no field that says "put the title here". You do it in the spreadsheet on the way through.
The move is text joining. In Google Sheets the & symbol glues pieces of text together. So "Buy the "&B2&" today" becomes Buy the Blue Mug today when B2 holds "Blue Mug".
Wrap your fixed wording in quotes, and drop &B2& wherever the product name should appear. Fill the formula down the column, paste the results as values into Body (HTML), and import. Every product ends up with the same template and its own name inside it.
This is also how you insert other fields. Point the formula at the Type column, the Vendor column, or a price column the same way, and you can weave any of them into the description.
Handle, Body (HTML), and the bulk editor versus CSV import
A few Shopify terms are worth pinning down, because the whole method rests on them.
Handle is the product's unique tag in its web address. The product at yourstore.com/products/blue-mug has the handle blue-mug. In a CSV import, Handle is the key Shopify matches on. Change it or leave it blank and Shopify thinks the row is a brand new product, which is how people end up with duplicates.
Body (HTML) is simply the product description. Shopify stores it as HTML, so the column is named after that. Whatever goes in this column becomes the text shoppers read on the product page.
The bulk editor versus CSV import is the core split. The bulk editor is a live grid inside the admin, great for setting the same fixed value across many products. The CSV route takes the data out, lets a spreadsheet do work the admin cannot, and brings it back. Descriptions built from each product's title need the CSV, because only a spreadsheet can build them.
Overwrite same handle is the import checkbox that turns "create products" into "update products". Without it, Shopify skips every row that matches an existing product and nothing changes. With it, matching products get updated from your file.
If it did not work
The import created duplicate products. Your Handle column was changed or blank. Handle has to stay exactly as it came out of the export. Re-export, keep Handle as is, and import again.
Nothing changed after the import. The overwrite box was not ticked, so every matching row was skipped. Run it again with Overwrite products that have the same handle on.
Some field went blank that you did not touch. You kept that column in the file and left it empty. An empty cell in a present column wipes the value. Trim the file back to Handle, Title and Body (HTML) only, then re-import.
The descriptions show raw code like <p>. You pasted the formula text into the wrong place, or the tags are being shown instead of rendered. Make sure the HTML tags sit inside the Body (HTML) column, and that you used Paste special values only so the cell holds text, not a live formula.
The title did not appear in the description. Your formula pointed at the wrong column. Check that the letter in &B2& matches the column that actually holds Title in your file.
The descriptions job is genuinely no-app work. Export, one formula, import, and keep the file trimmed to Handle, Title and Body (HTML) so nothing else can move. For a full image swap on hundreds of products, that is the one place a bulk app like Matrixify is worth it.
Spending too long on manual Shopify busywork?
PinFlow turns your Shopify catalog into Pinterest pins and posts them on a schedule, automatically. Same idea as the fix above, let the system handle the repetitive part.
Get PinFlow on the Shopify App StoreMore Shopify fixes
More community-sourced Shopify guides, tested on a live store.
Shopify Admin
Shopify Discount Types: Amount Off Products vs Order
Shopify has four discount types, and two of them work out a percentage in different ways. One rounds every single unit, the other rounds the order once. On low unit prices that difference is real money. Tested on a live store.
Shopify Admin
Shopify Order Printer: Print Every Order in One Go
Shopify's bulk Print menu offers packing slips and nothing else until you install Order Printer. Here is how to add it, how to change what the document says, and how to print fifty orders at once, with screenshots from a live admin.
Shopify Admin
Shopify POS UI Extensions: What They Can and Cannot Add
POS UI extensions are how an app puts its own screens inside Shopify POS. Here is what the smart grid already does for free, what an extension can add on top, and the limits worth knowing before you pay for one.