
Shopify Checkout Customization: Change Checkout Text
Change the text on your Shopify checkout, like the Email me with news and offers checkbox, without code or Plus. Why the pop-up in checkout settings will not save, and the route that does.
By AjayCodeWiz · September 24, 2026 · 8 min read
The problem: checkout text you can edit but cannot save
Every Shopify checkout has a small checkbox under the email field. By default it reads Email me with news and offers.
A merchant on the Shopify Community wanted it to say Get important updates on classes and events instead. The wording made sense for their business, since they run classes and do not send offers.
They found the text in the admin and typed the new wording. Then they looked for a way to save it and found none. There was no Save button in the box, no button below it, and the change was gone when they came back.
I reproduced this on my own test store and got exactly the same result. Then I found the route that does save, and checked the result on a real checkout.
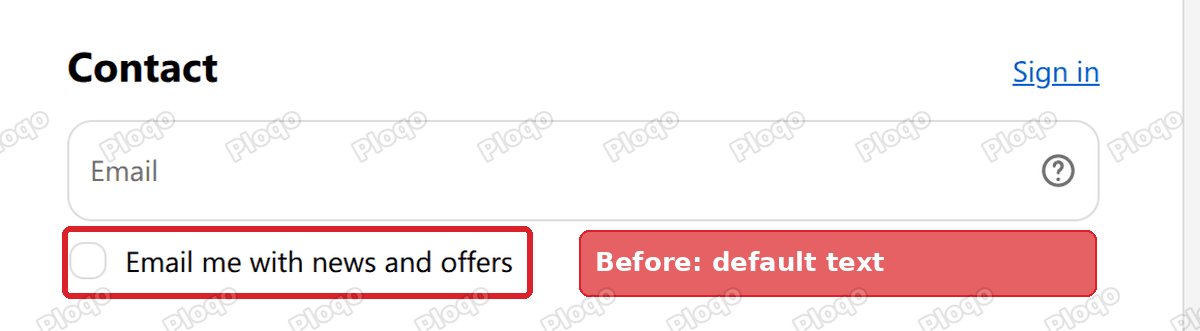 Shopify checkout showing the default Email me with news and offers checkbox
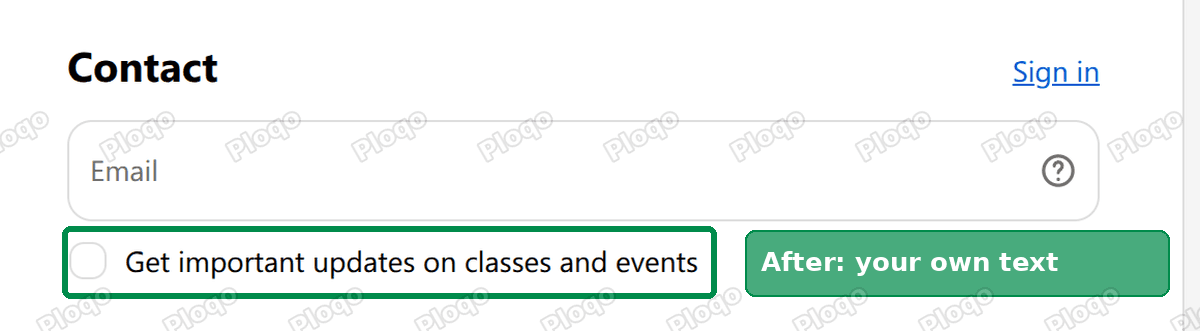 Shopify checkout showing a custom marketing checkbox label
The first screenshot is the checkout before the change. The second is the same checkout a few seconds after saving the new text.
Where the checkbox text lives
The checkbox is controlled from Settings > Checkout, in the card called Marketing opt-in. That card decides whether the checkbox shows at all.
The Email dropdown sets where it appears. On my store it was set to Checkout and sign-in, which shows it on the checkout page. The SMS and WhatsApp rows work the same way for text messages and WhatsApp, and they are set to Don't show unless you turn them on.
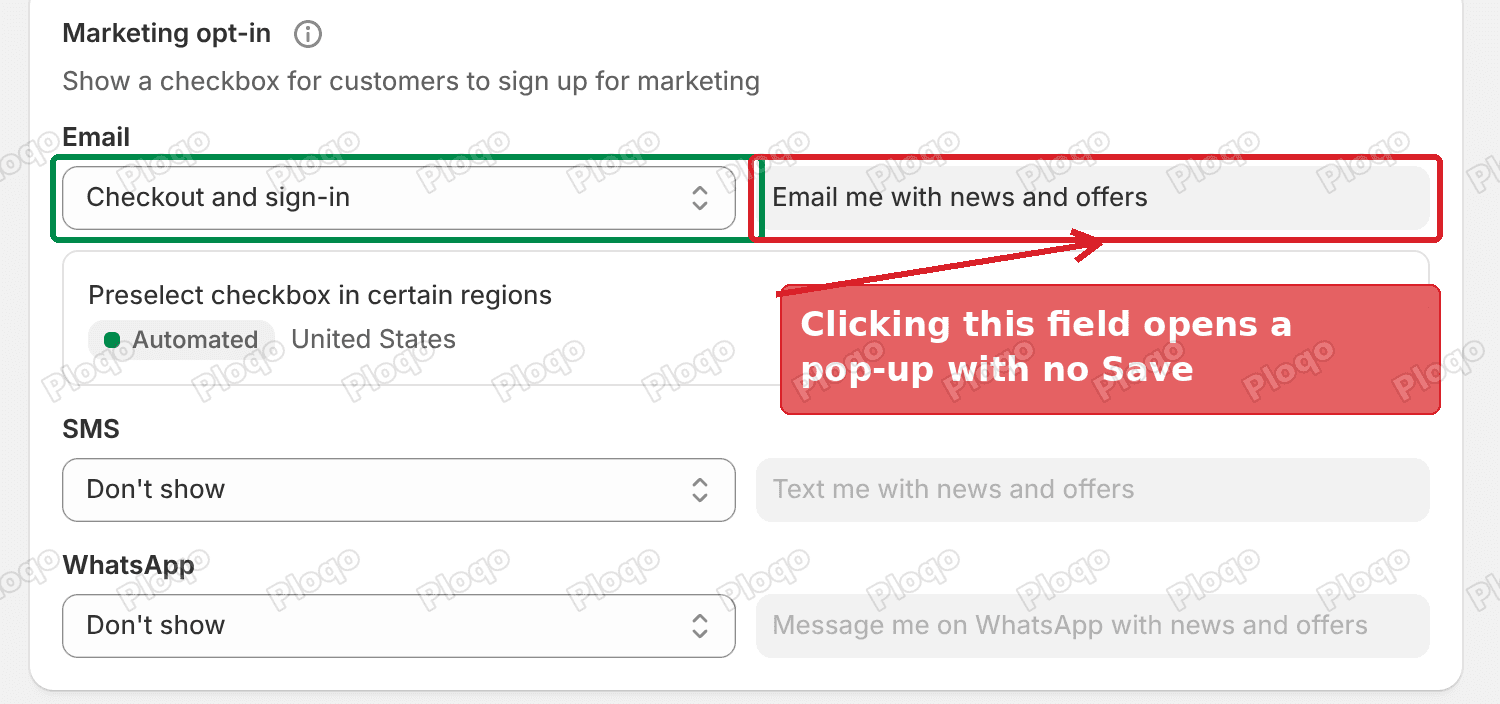 Settings, Checkout, Marketing opt-in card with the Email dropdown and the label field
Next to the Email dropdown is a grey field holding the label text. It looks like a normal text box, but you cannot type in it directly. When you hover over it, a pencil icon appears on the right, and clicking it opens a pop-up.
Why the pop-up has no Save button
Clicking the pencil opens a pop-up titled Online Store. Inside it is a heading, Checkout marketing, and a field called Accept email marketing checkbox label.
You can click into that field and type. Nothing else happens. On my store there was no Save button anywhere in the pop-up, no Unsaved changes bar at the top of the admin, and no button further down the page. Shrinking the window, as the merchant also tried, does not reveal one.
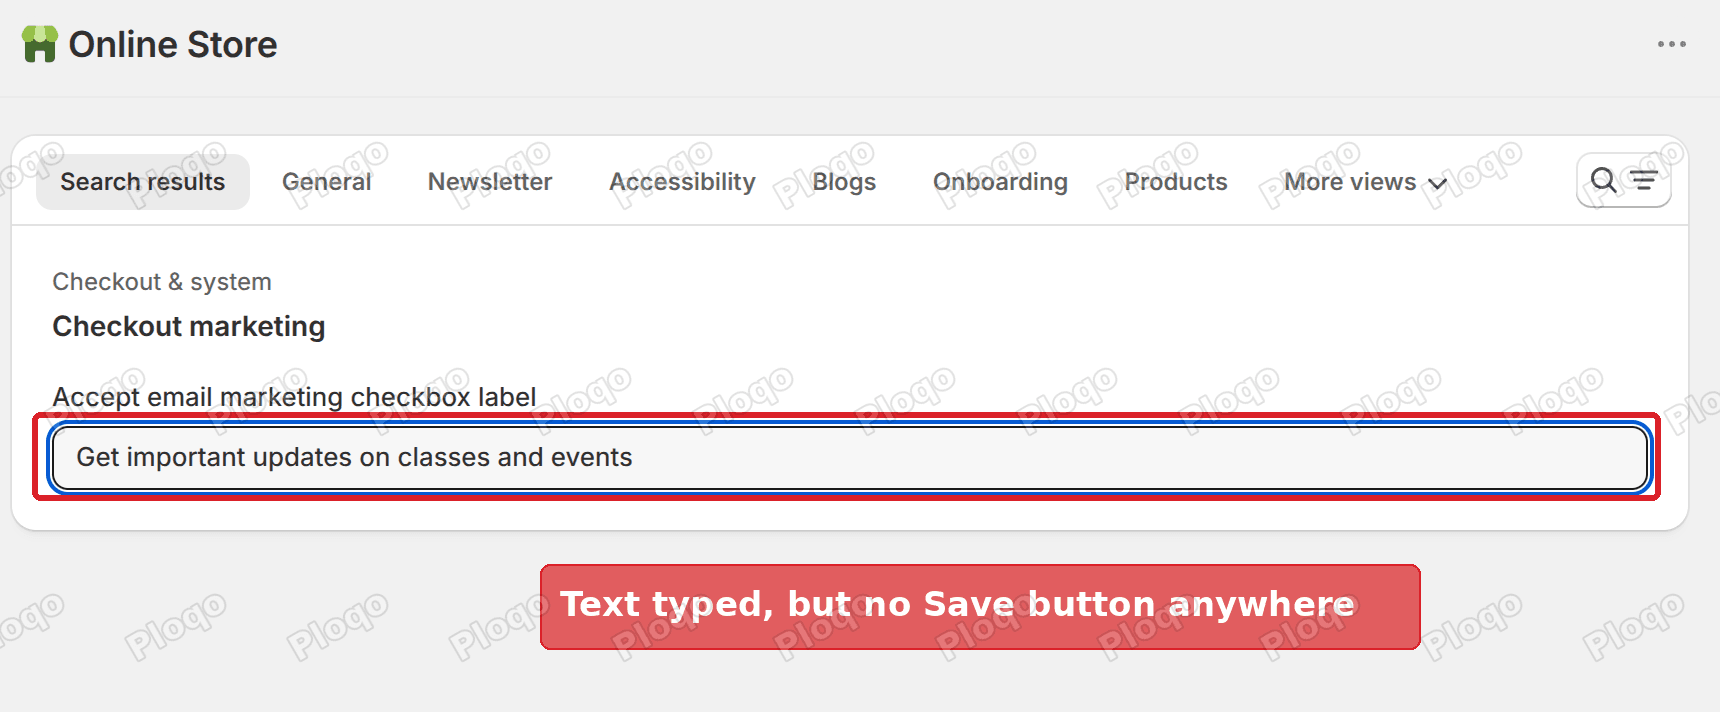 The Online Store pop-up with new text typed and no Save button
The pop-up is a shortcut into a bigger editor called Edit default theme content. That editor holds almost every piece of fixed text your store shows, from button labels to the words on the password page. It normally lives under your theme, and in its full-page form it has a working Save button.
The pop-up opens the same editor, filtered down to the one field. It just does not bring the Save button with it. So the answer is to open the full editor yourself.
The checkout text belongs to your theme. That sounds strange, since checkout is not part of your theme's design, but Shopify keeps the checkout's fixed text in the same language file as the rest of your store's text. That file is part of whichever theme is live.
How to change the checkout marketing checkbox text
This takes about a minute. You do not need an app, you do not need to edit code, and you do not need Shopify Plus.
- In your Shopify admin, go to Online Store. You land on the Themes page.
- Find your current theme, the one at the top marked as live. Click the ... button next to Edit theme.
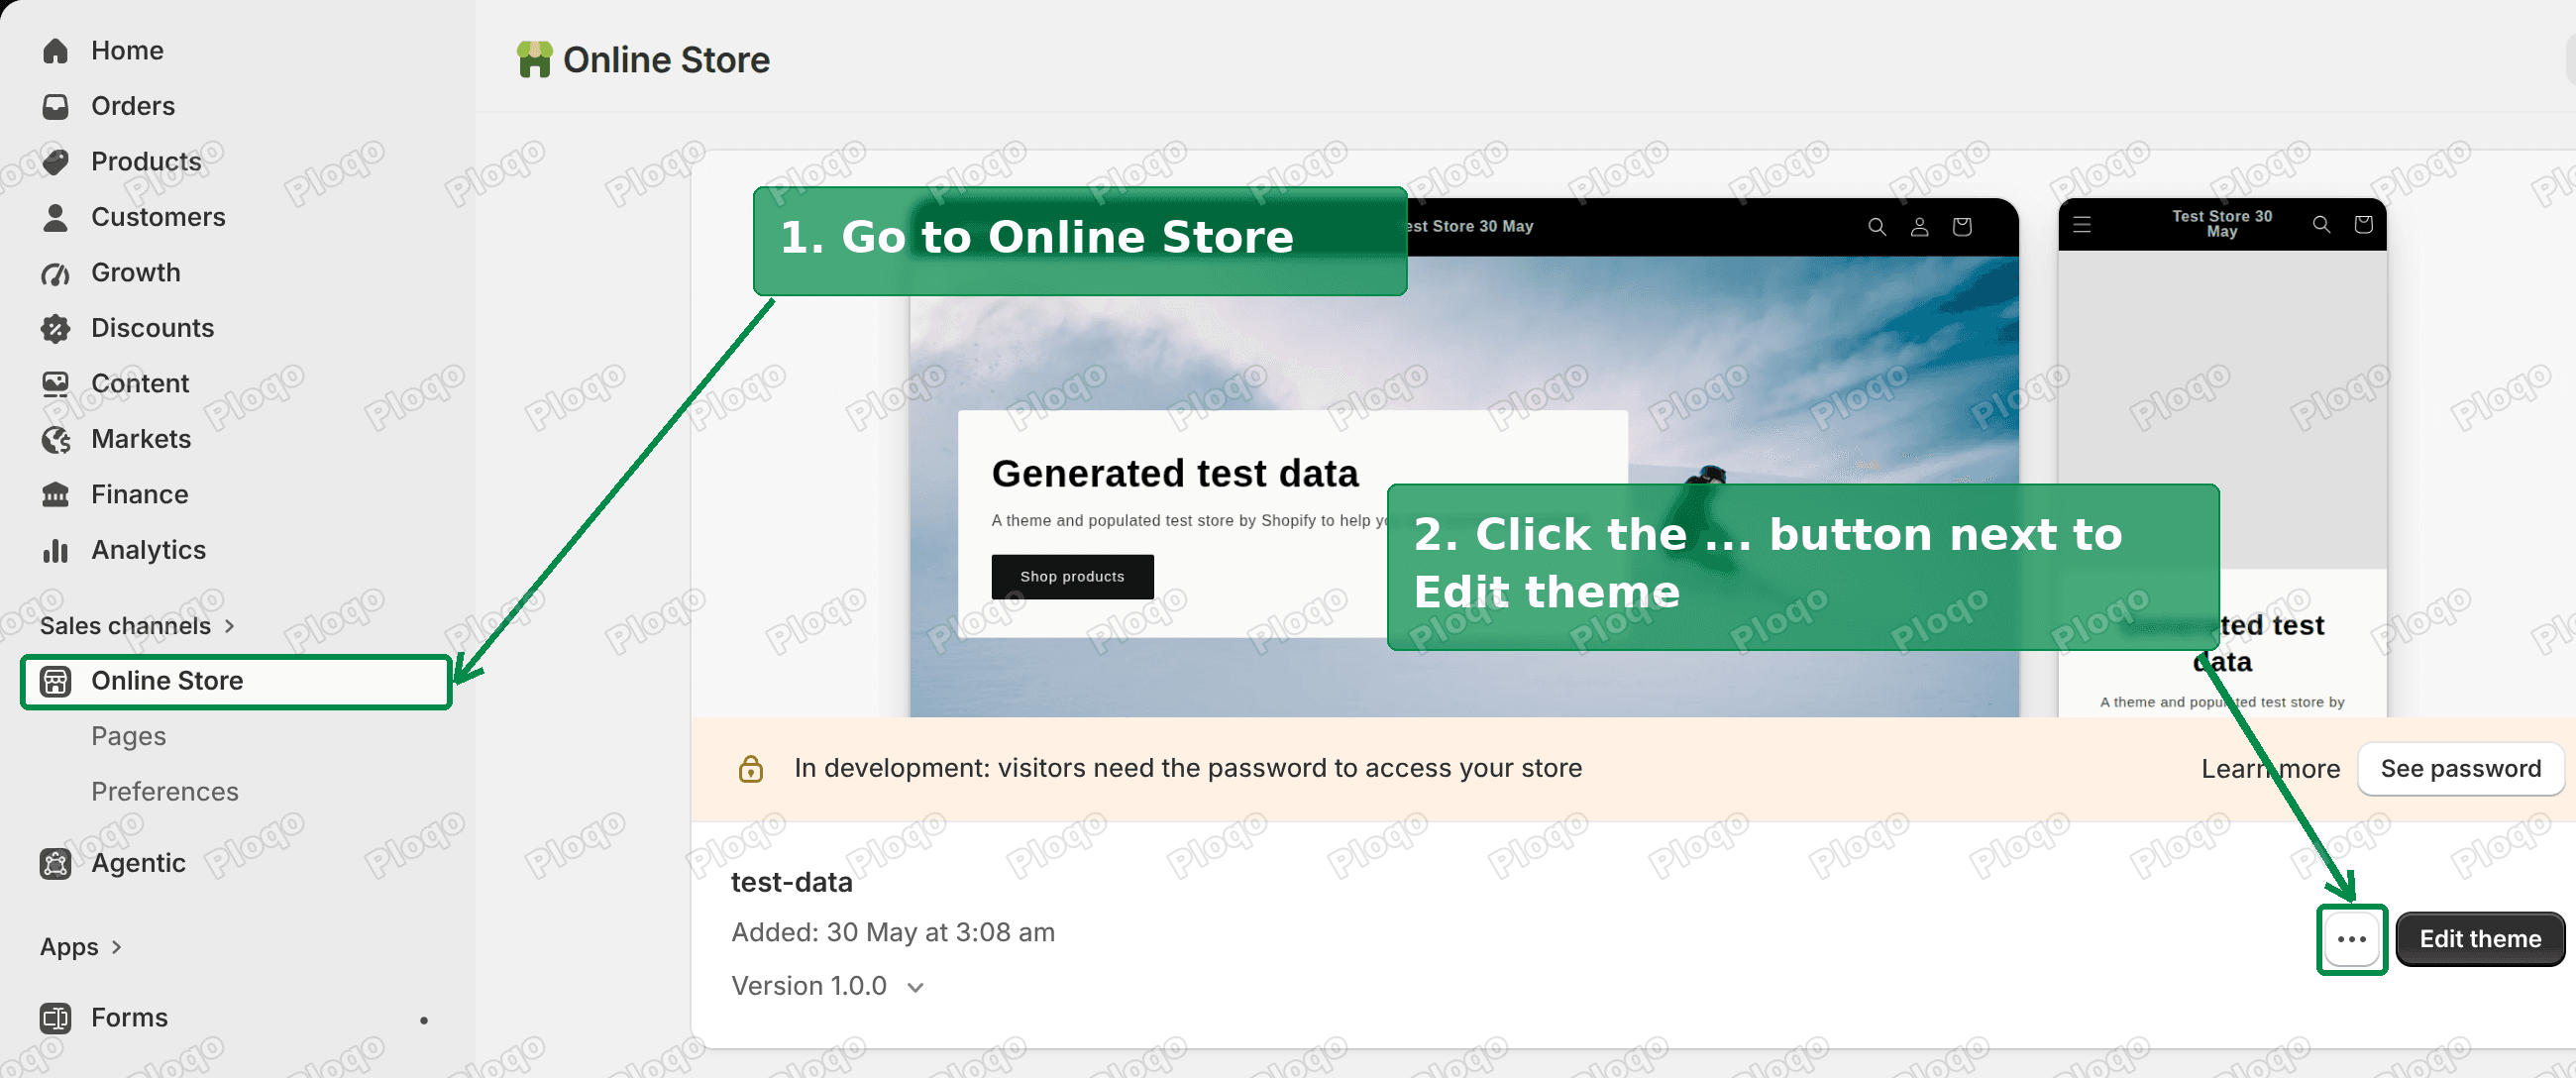 Shopify Themes page with Online Store and the theme actions button highlighted
- Click Edit default theme content in the menu.
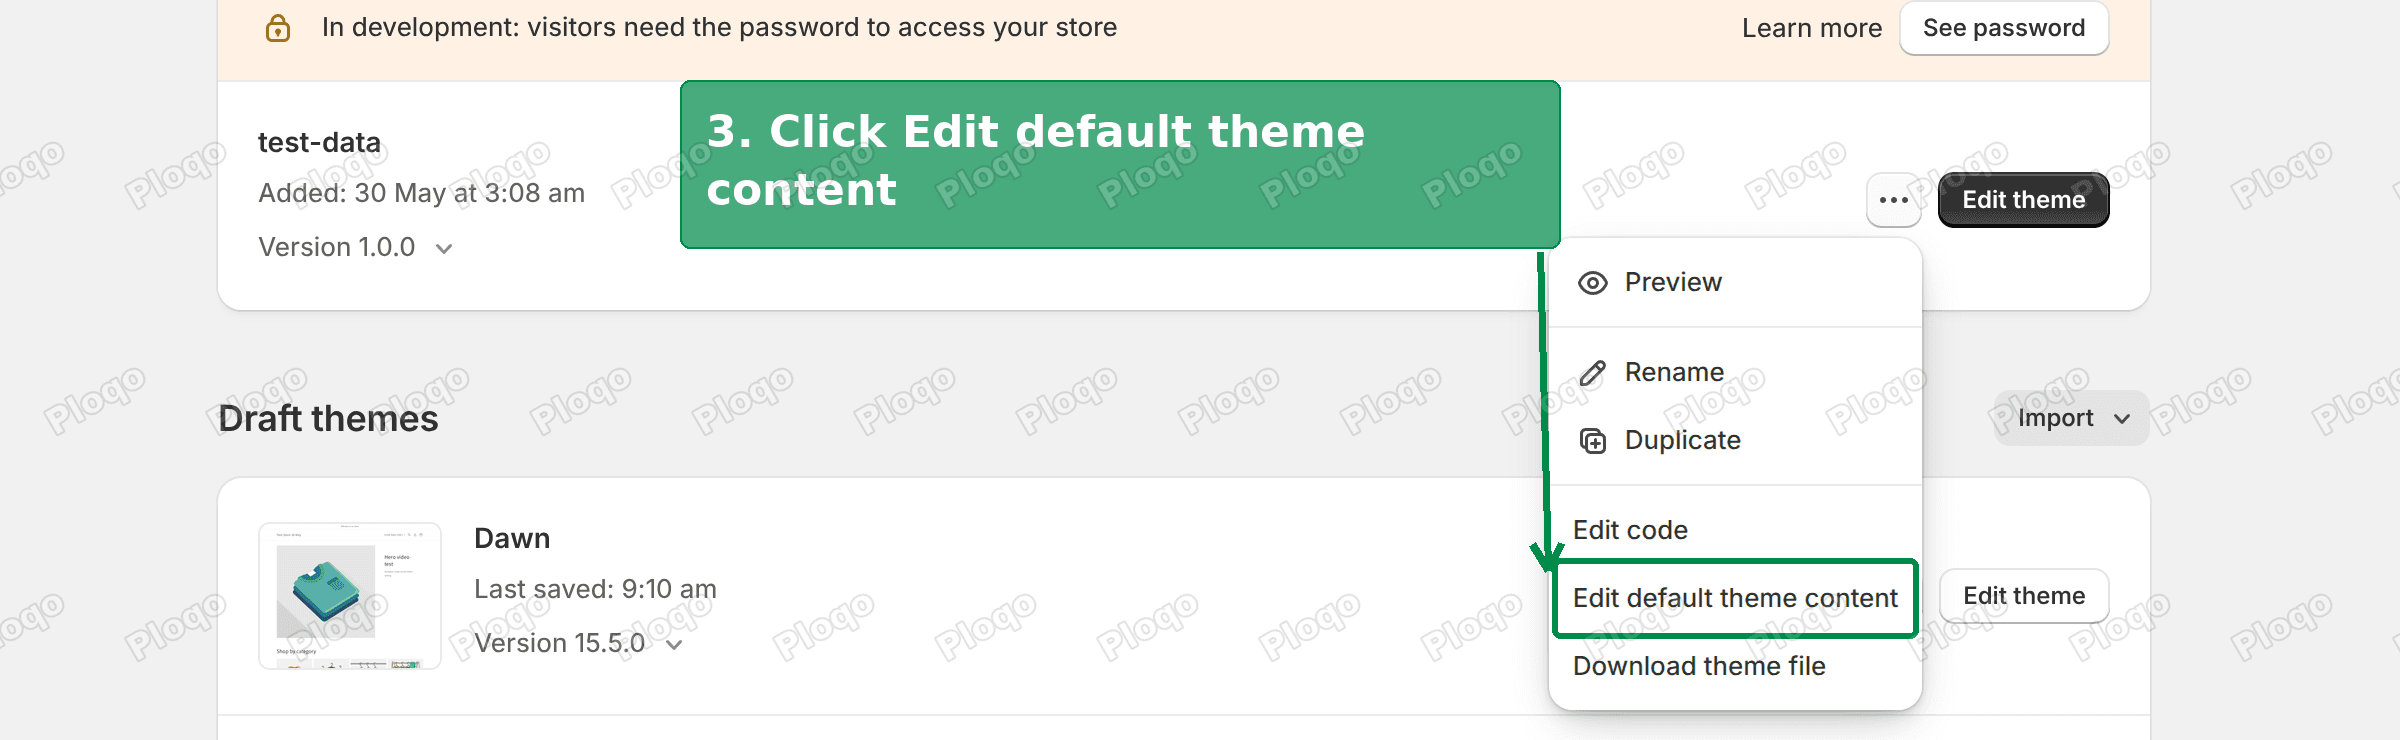 Theme actions menu with Edit default theme content highlighted
- The full-page editor opens with tabs across the top, like General, Newsletter and Accessibility. Click the search icon on the right of the tabs.
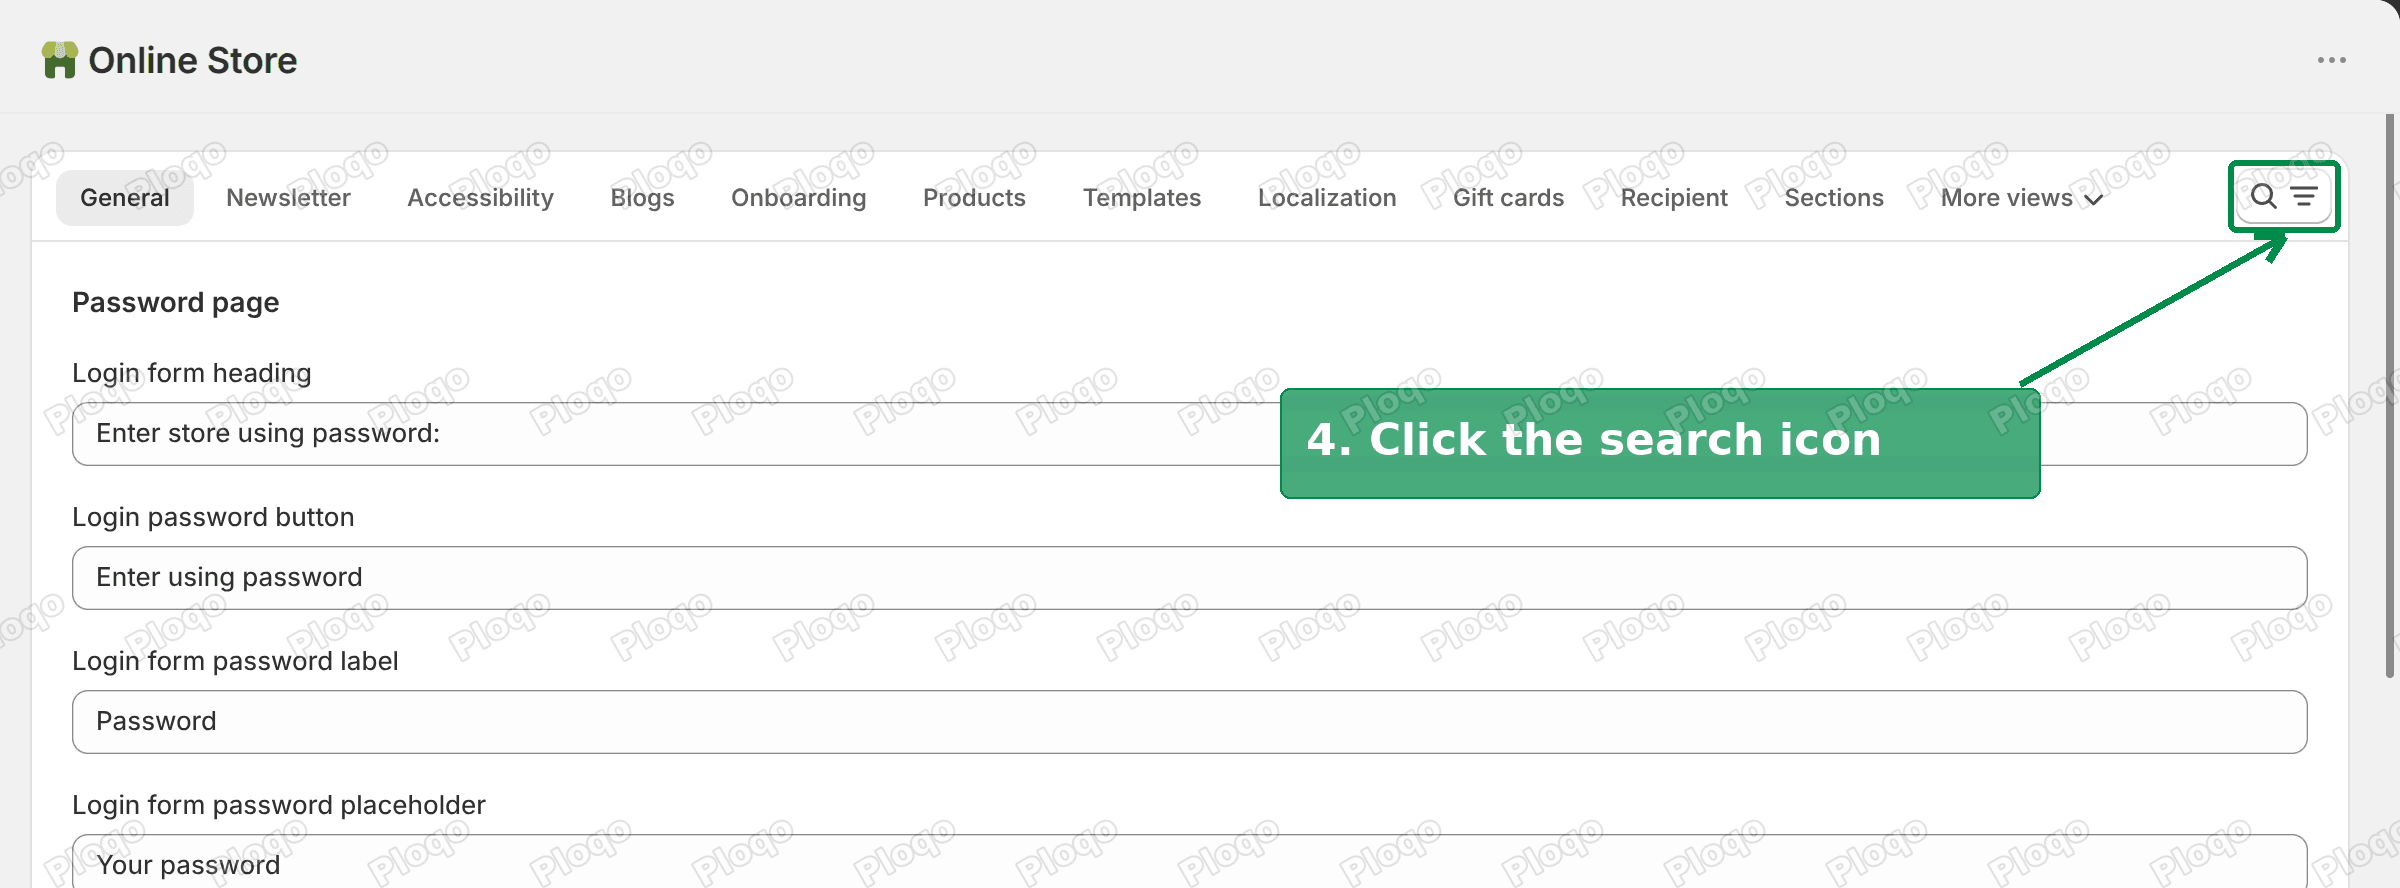 Edit default theme content page with the search icon highlighted
- Type email me in the search box. Two results come back. The first is under Checkout & system > Checkout marketing. That is the one you want.
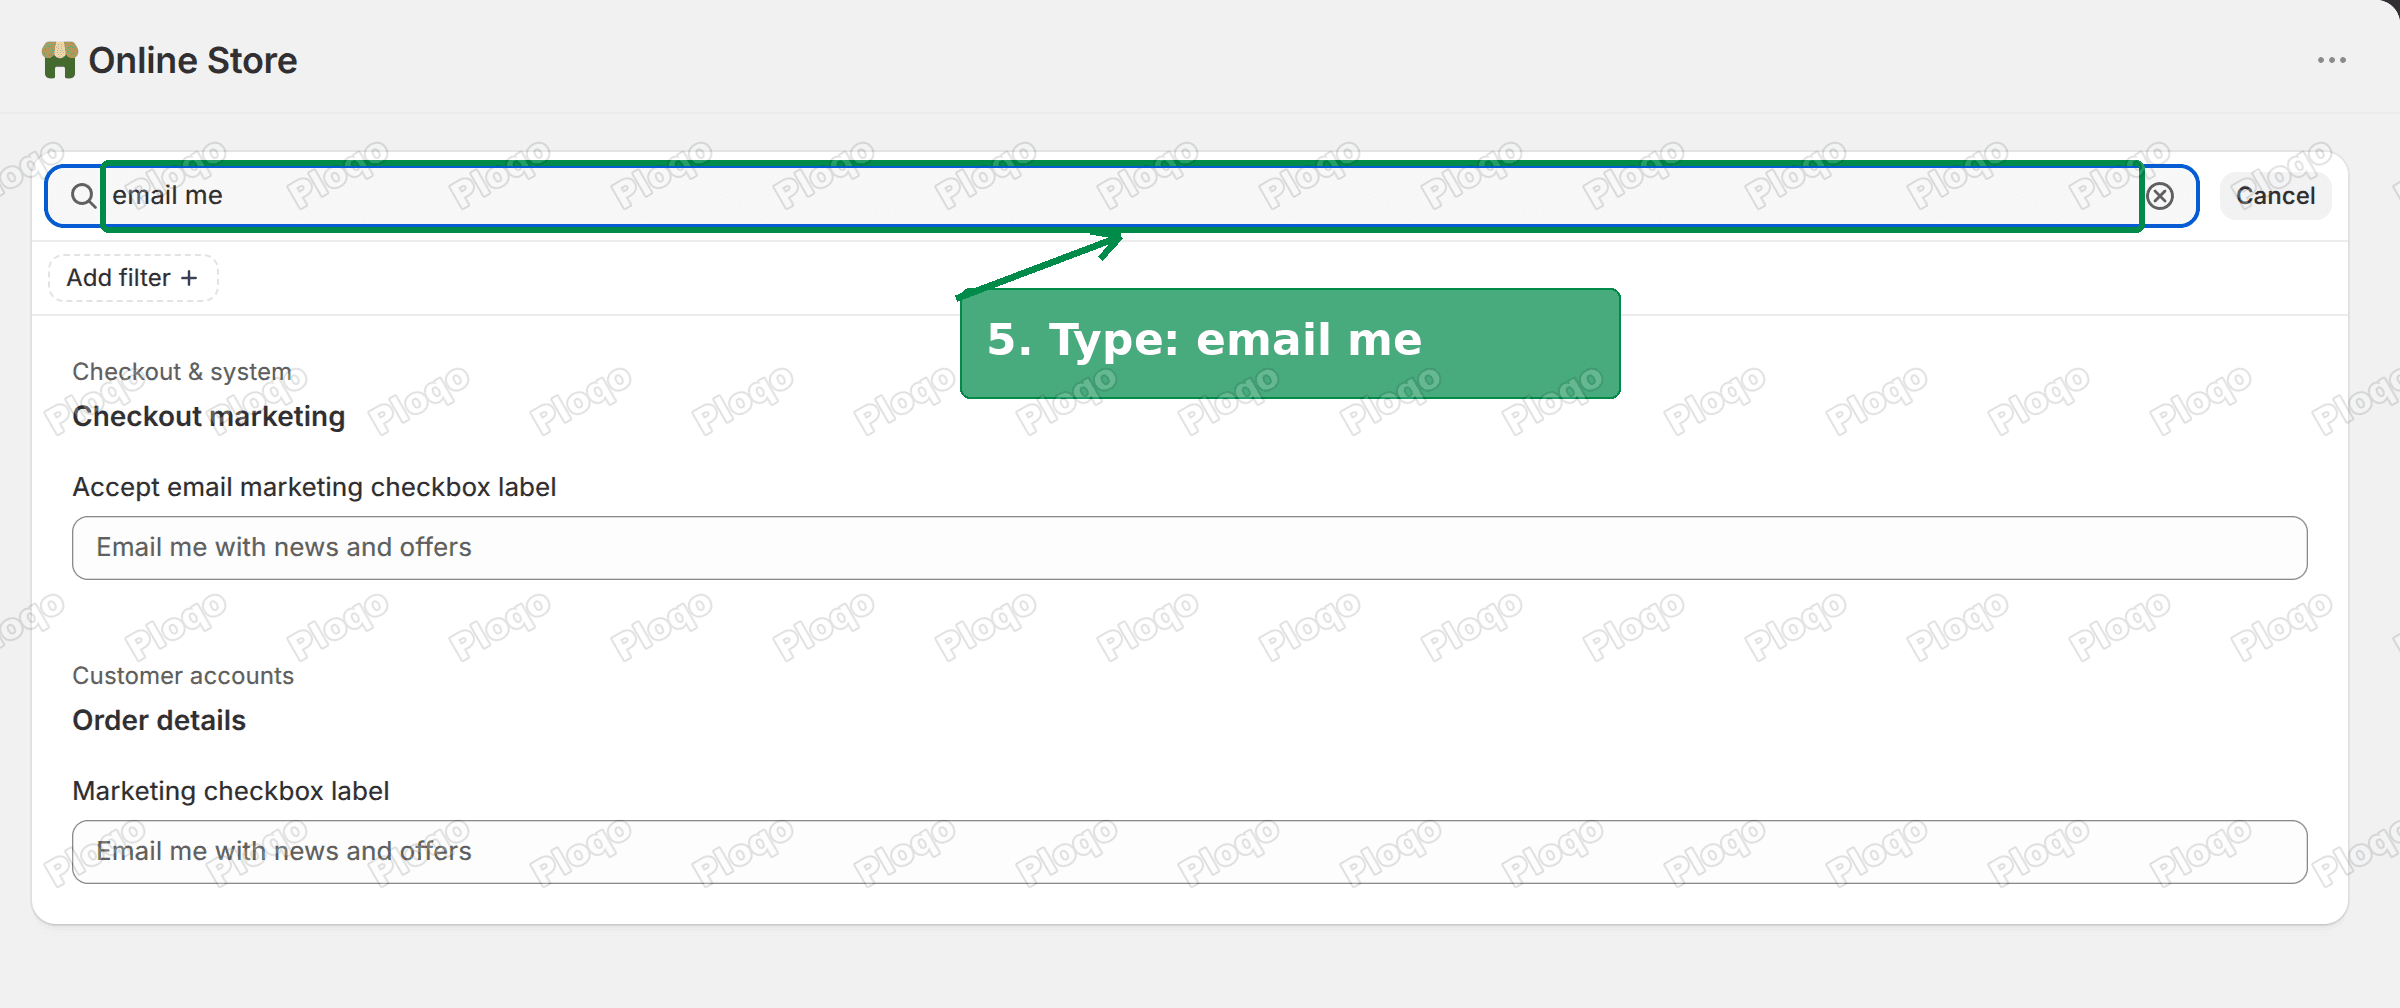 Searching default theme content for email me
- Click the box under Accept email marketing checkbox label and type your new text. The grey text you see before typing is only the default showing through, so the box is empty until you type.
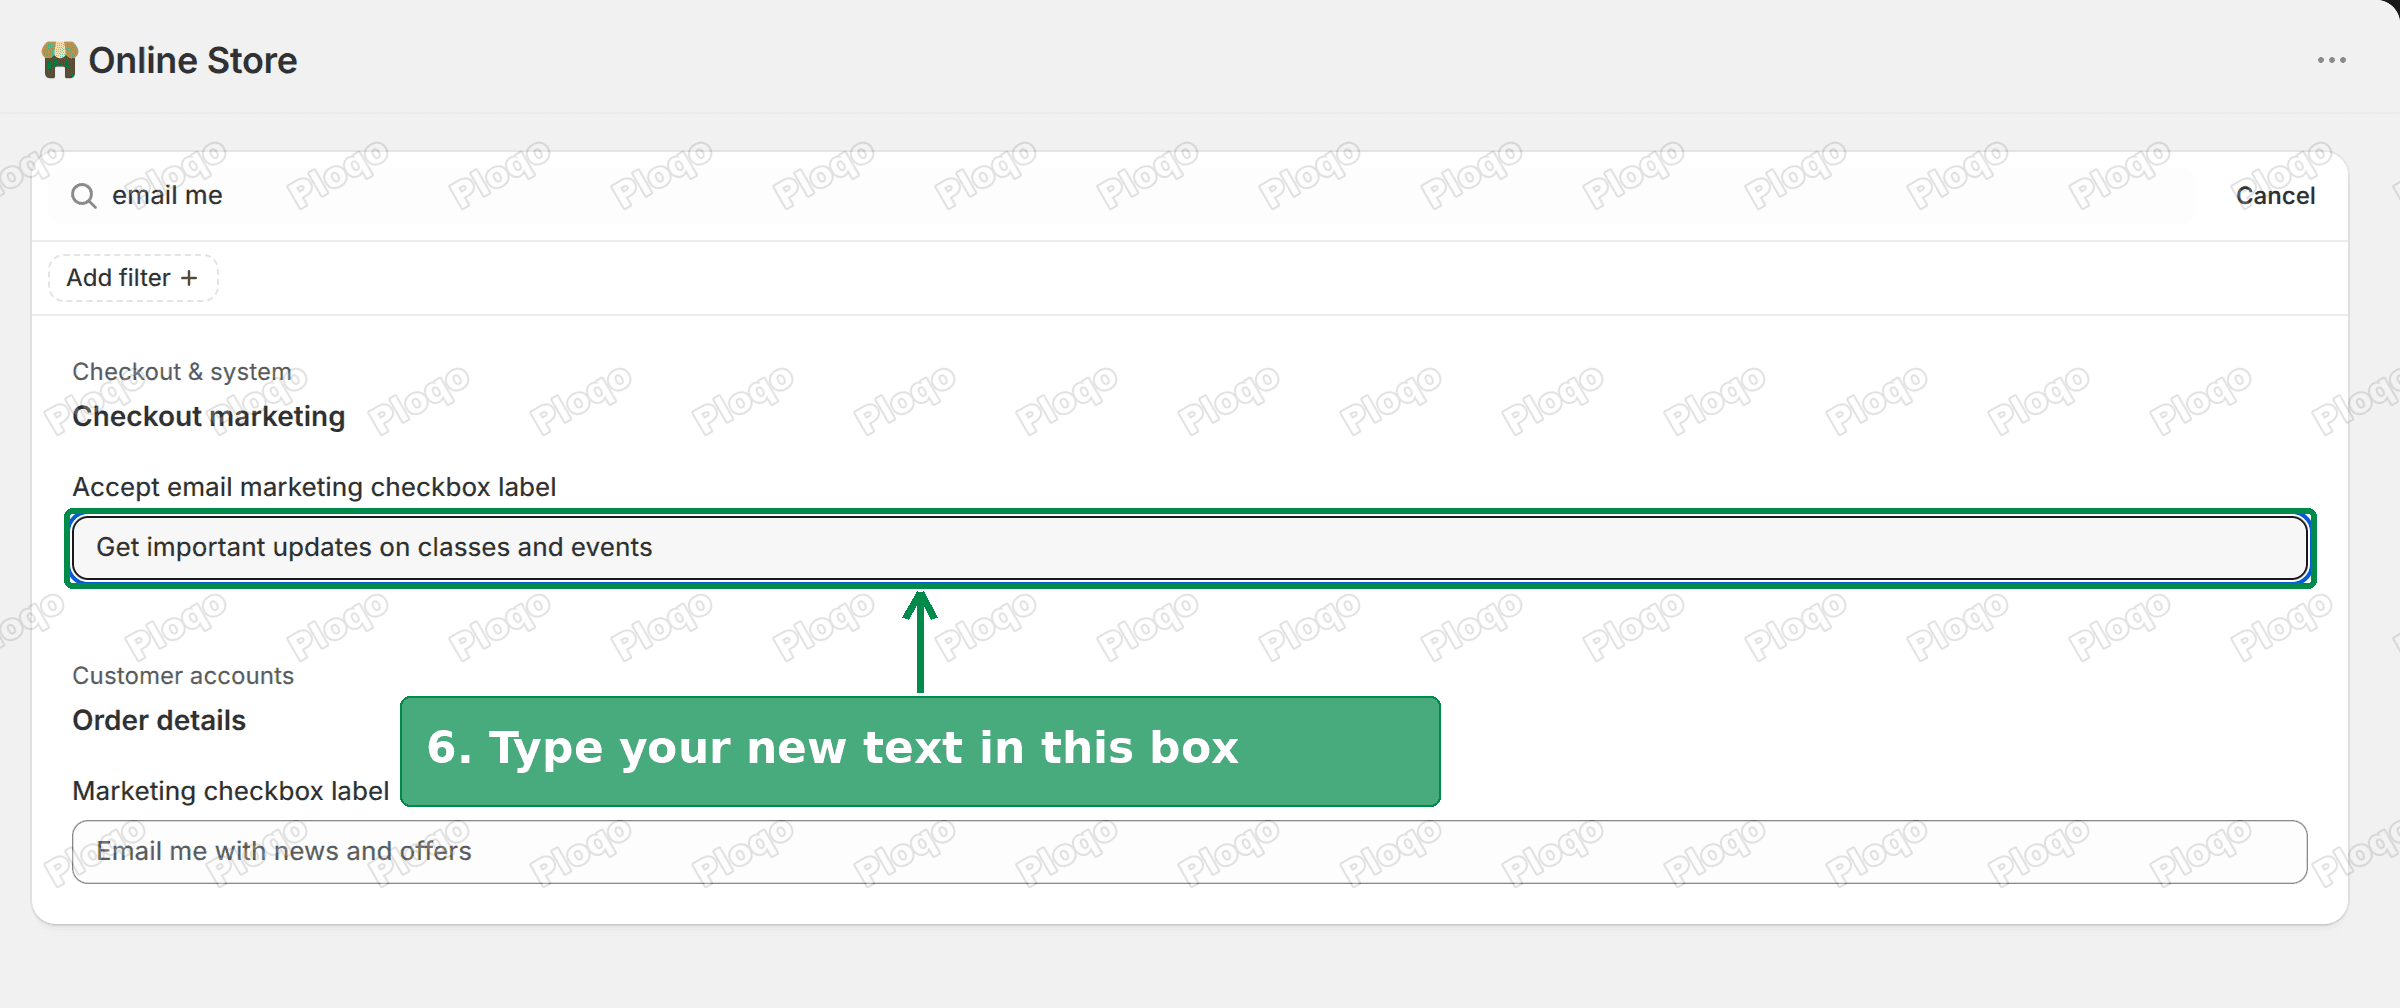 Typing new text into the Accept email marketing checkbox label field
- As soon as you type, a bar appears at the top of the admin that says Unsaved changes. Click Save in that bar.
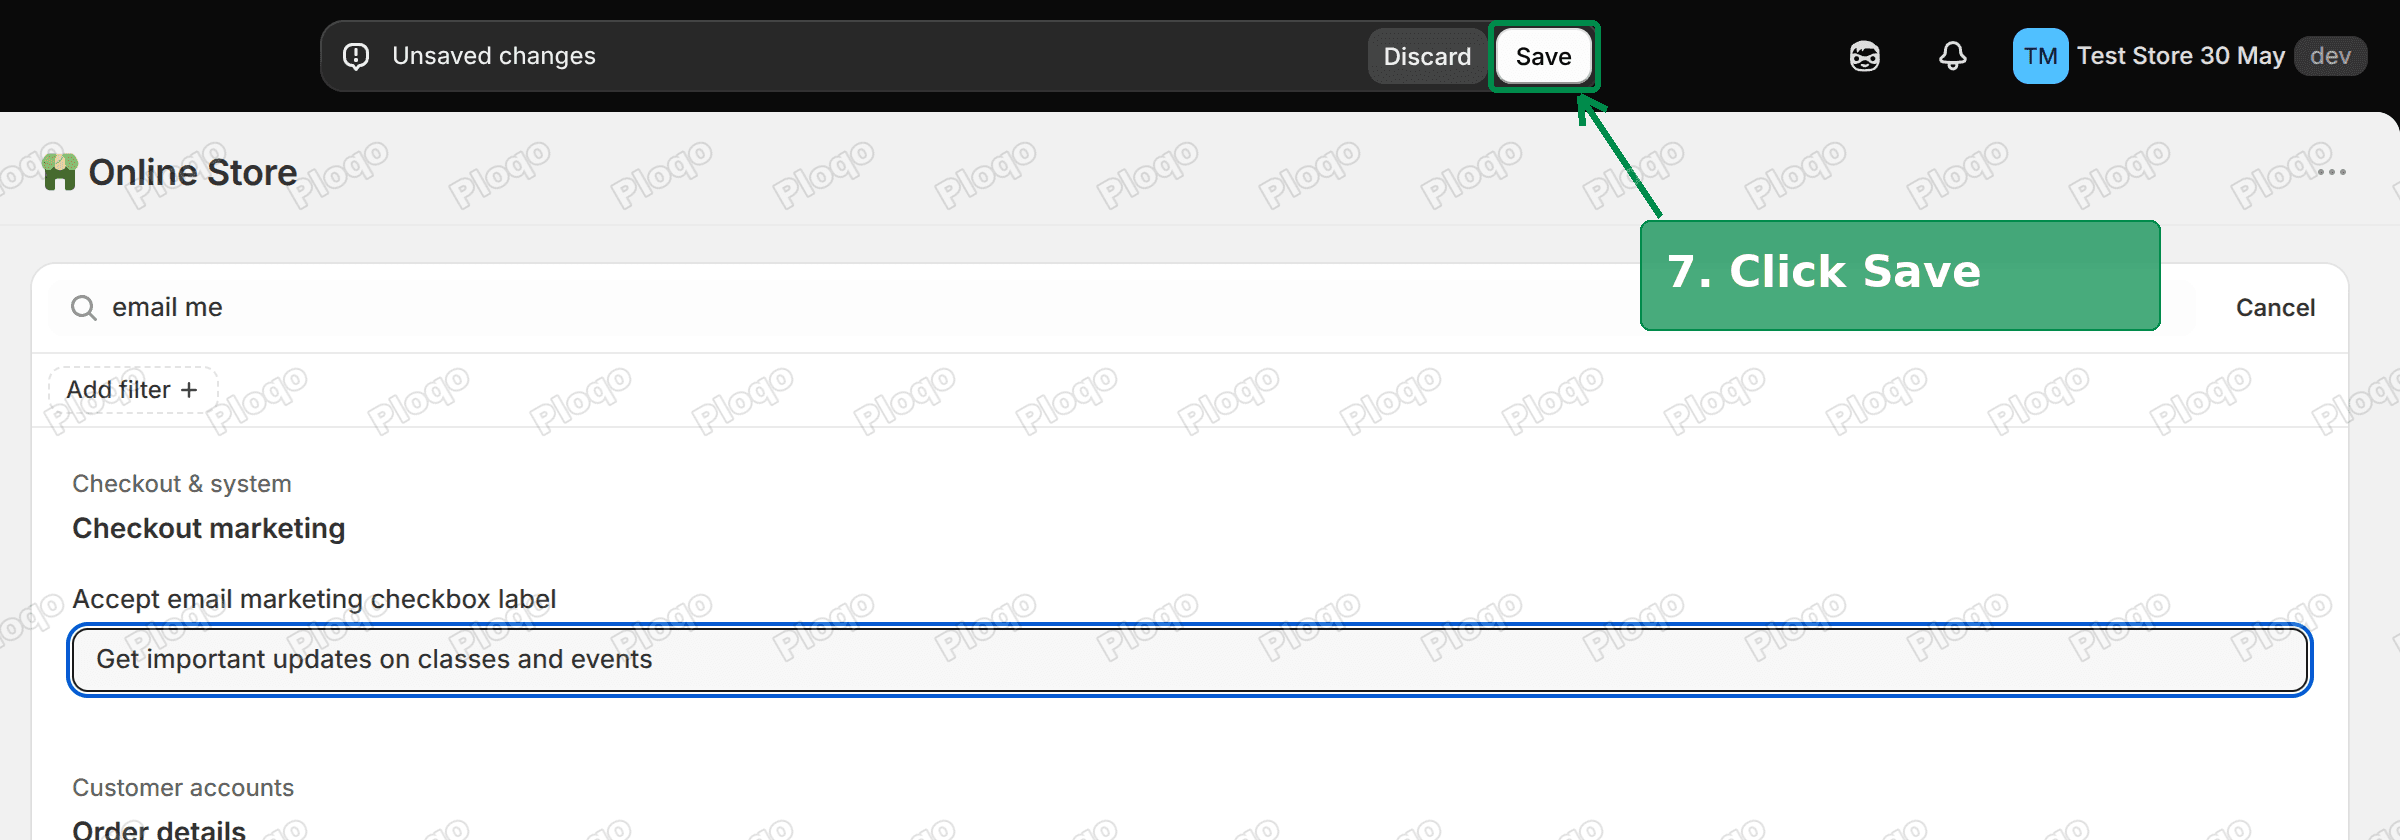 The Unsaved changes bar with the Save button highlighted
A message at the bottom of the screen confirms Theme content updated. That is the save the pop-up never gives you.
Check the result on your checkout, not in settings
After saving, I opened a fresh checkout on my store. The checkbox read Get important updates on classes and events straight away. There was no delay and no cache to clear.
Then I went back to Settings > Checkout. The grey field in the Marketing opt-in card still said Email me with news and offers, even after a full page reload.
This is easy to misread as a failed save. It is not. The settings page shows the default wording, and your checkout shows your saved wording. To check your change, add something to your cart and go to checkout. Look at the checkbox under the email field.
Your text is saved inside the live theme
Because the label is stored in your theme, it follows that theme. I checked the language file of the live theme on my store after saving. It held exactly one checkout entry, the new label. The copy of Dawn sitting unpublished on the same store had no such entry, so it still carries the default text.
In practice that means three things:
- Edit the live theme. The steps above start from the theme marked as live for a reason. Editing a draft theme changes nothing at checkout until that theme is published.
- Switching themes brings back the default. If you install a new theme later, redo the change on the new one before you publish it.
- Only the text you change is stored. The theme keeps your edits and uses Shopify's default wording for everything else. You are not copying the whole checkout into your theme.
The same label in customer accounts
When you search for email me, the second result is under Customer accounts > Order details, in a field called Marketing checkbox label. It defaults to the same words, Email me with news and offers.
That one is separate from the checkout label. If you want the wording to match everywhere a customer sees it, change both fields, then click Save.
Other checkout text you can change the same way
The Checkout marketing label is one entry in a much longer list. Edit default theme content holds the fixed text for the checkout, the customer account pages, the password page, gift cards and more.
To find a piece of checkout text, search for a few words of it exactly as your customers see it. Searching email me found the checkbox field on my store, because those are the words the checkout shows. Then change the field and save with the bar at the top, the same as above.
The checkbox label also has two companions in the same Checkout marketing group of my store's theme. One reads You are subscribed to receive email news and offers. The other reads Check your email to confirm your subscription to news and offers. Both still promise news and offers, so if you reword the checkbox, reword them too. A search for news and offers is the way to reach them, since neither contains the words email me.
Two tips from doing this:
- Search short. Two or three distinctive words find the field. A whole sentence can miss if the wording has a small difference, such as a different apostrophe.
- Check the section heading. The same words often exist in more than one place, like the checkout and customer accounts labels above. The grey heading above each field tells you where it shows up.
What else you can customize at checkout without Plus
Changing wording is one kind of Shopify checkout customization. The rest is split between two places, and both are on every plan.
The first is the Settings > Checkout page itself. On my store it holds these cards:
- Customer contact method. Whether shoppers give a phone number or email, or email only. Two checkboxes sit under it: a link to track the order with the Shop app, and an option to make shoppers sign in before checkout.
- Customer information. One dropdown per field. My store asked for first and last name, left out Company name, and kept Address line 2 and the shipping phone number optional.
- Marketing opt-in. The Email dropdown offers Checkout only, Sign-in only, Checkout and sign-in and Don't show. SMS and WhatsApp offer Checkout only and Don't show. Under Email there is also a note about preselecting the checkbox in certain regions, set to Automated for the United States on my store.
- Tipping. One checkbox to show tipping options at checkout.
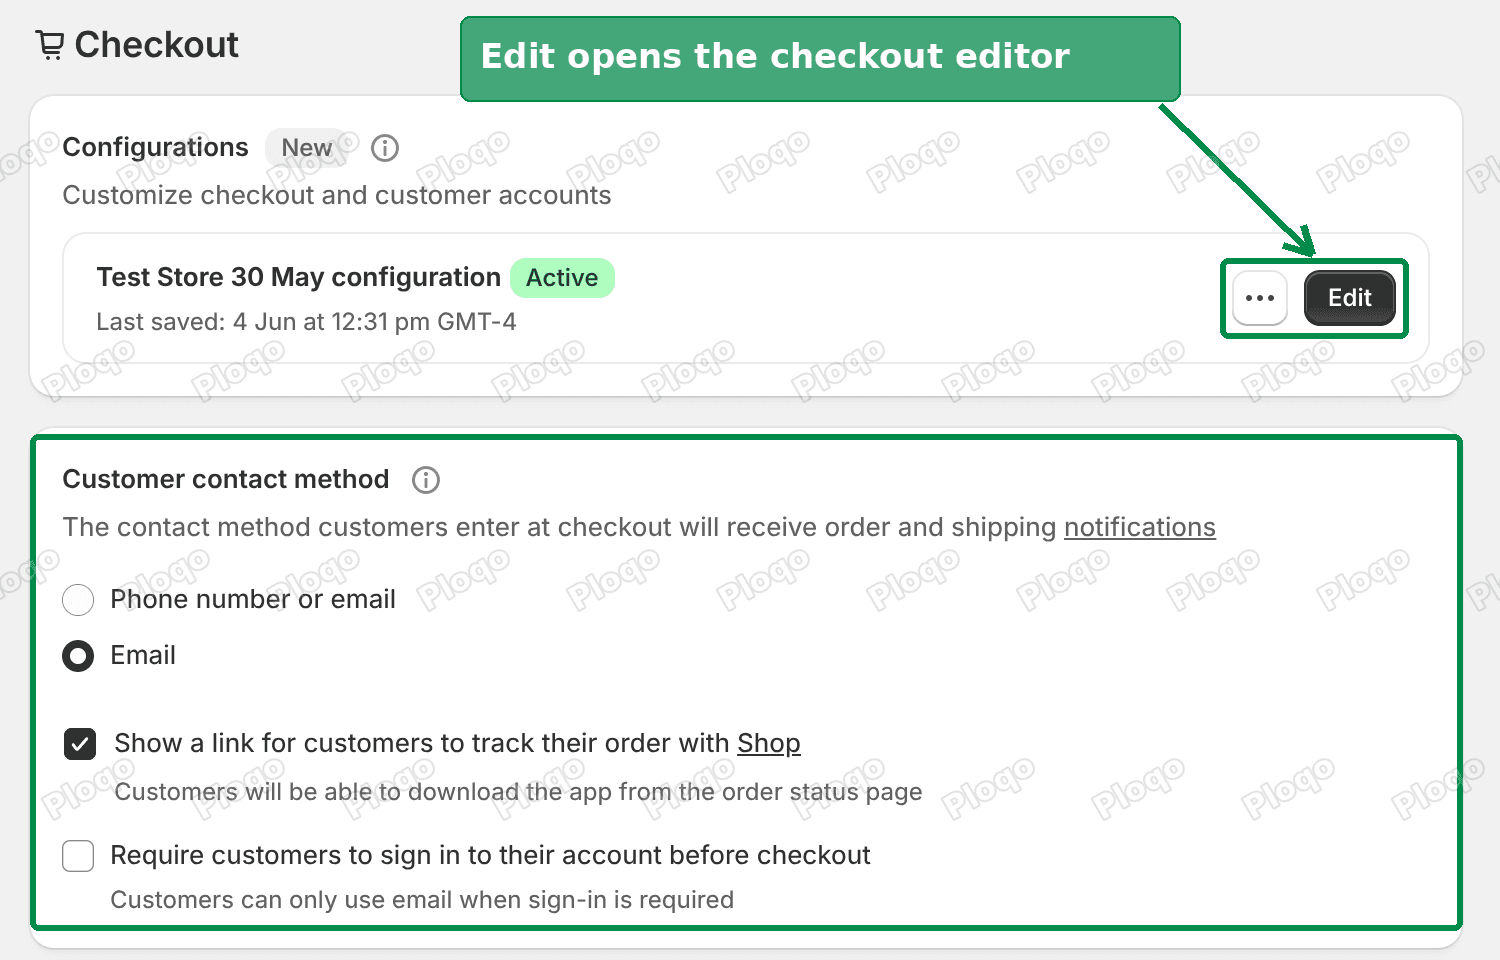 Settings, Checkout page with the Configurations Edit button and the contact method card
The checkout editor handles the look
The second place is the checkout editor. At the top of Settings > Checkout, the Configurations card has an Edit button. It opens a full-screen editor with a live preview of your checkout.
The left side lists the parts of the page: a Header with your logo and cart link, the Main column with Contact, Delivery, Shipping method and Payment, the Order summary, and a Footer with your policies. The gear icon at the top opens the style settings. On my store those were Logo, Color palette, Main, Header, Order summary, and Accent and buttons.
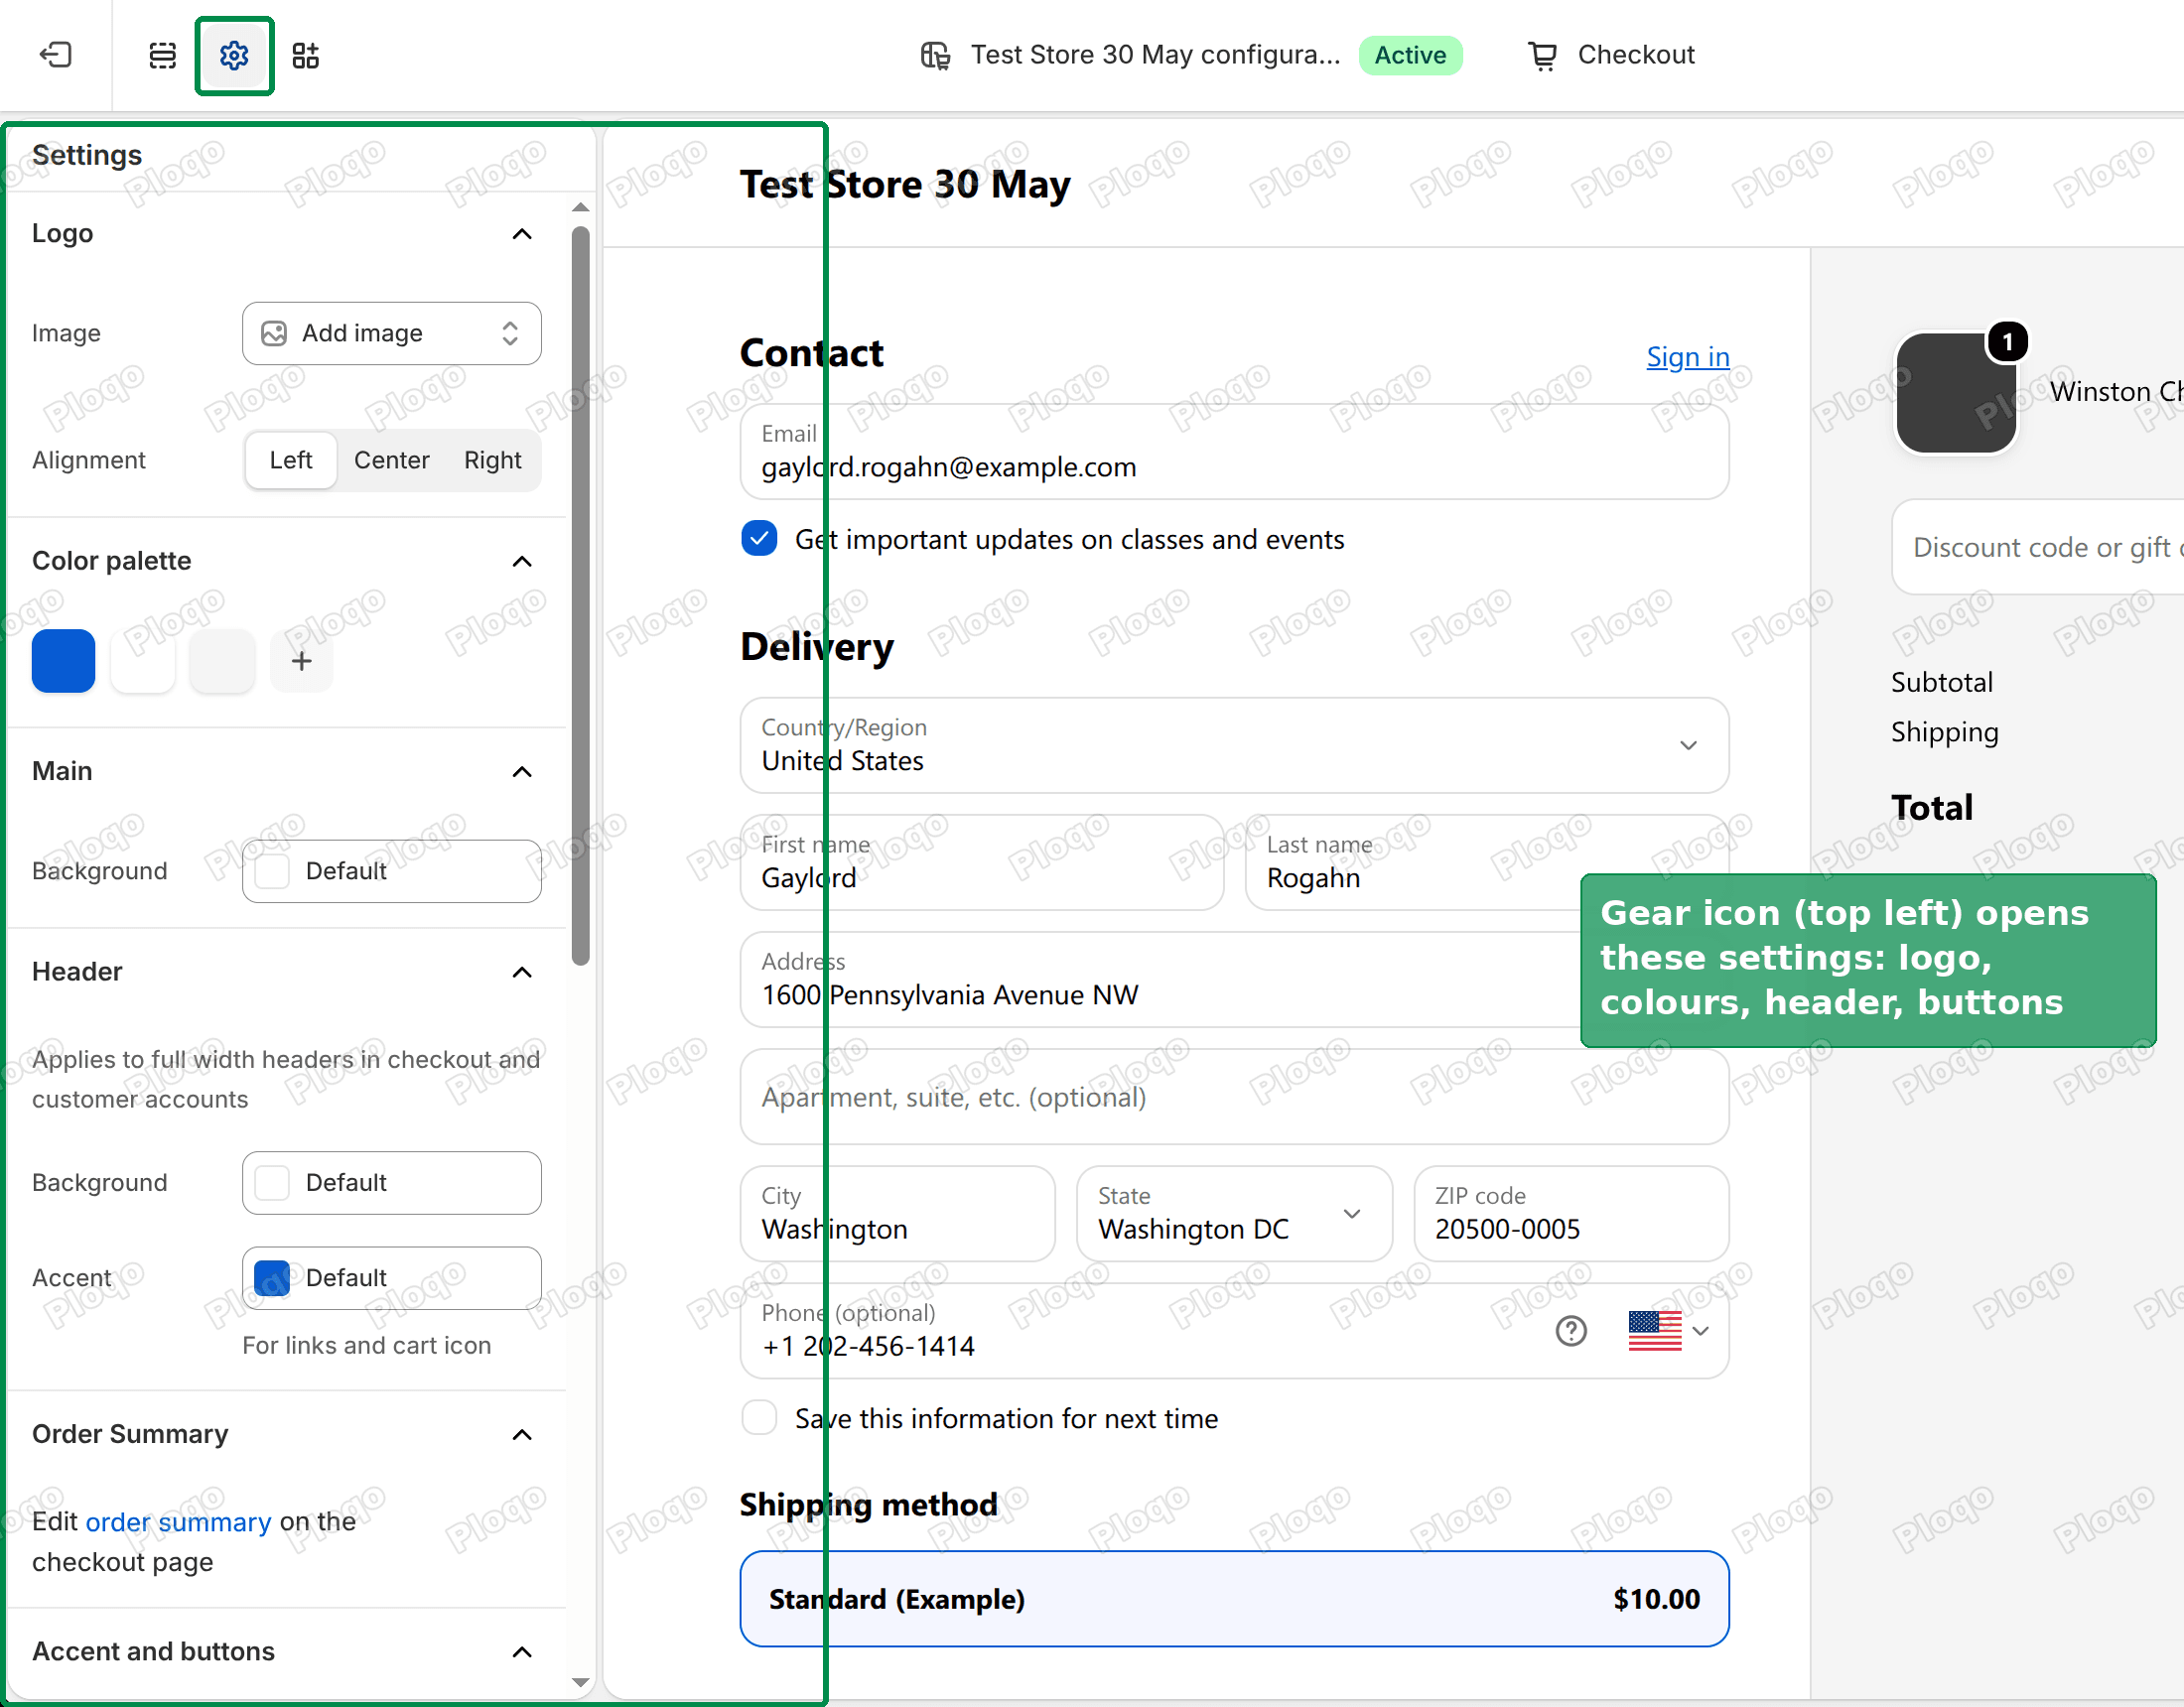 Shopify checkout editor with the Settings panel open
So the split is simple. Colours, logo and layout go in the checkout editor. Words go in Edit default theme content. Adding a new block or a new field to checkout is a separate job from both, and usually means an app.
If the new text does not show at checkout
- You typed in the pop-up. Anything typed in the pop-up from Settings > Checkout is thrown away. Go through Online Store > Themes and the full-page editor instead.
- You edited a draft theme. Go back to the Themes page and make sure you opened the ... menu on the theme marked as live.
- You did not click Save. Leaving the page without clicking Save in the Unsaved changes bar keeps nothing. Look for the Theme content updated message.
- You are checking the settings page. The grey field in Settings > Checkout keeps showing the default. Check a real checkout instead.
- The checkbox does not show at all. In Settings > Checkout > Marketing opt-in, the Email dropdown has to be set to a value that includes checkout, like Checkout and sign-in. If it is set to Don't show, there is no checkbox to relabel.
Customize, Edit default theme content, and Edit code
The theme actions on the Themes page lead to three different editors. They are easy to mix up.
- Edit theme opens the visual theme editor. It is for layout, sections, colours and images on your storefront pages. It does not hold the checkout label.
- Edit default theme content is the text editor from this article. It holds the fixed words your store and checkout use. No code is involved.
- Edit code opens the theme's code files. Store text lives in there too, but changing it through code is slower and easier to break. For wording changes, use Edit default theme content.
For relabelling a checkbox, a button or a heading, Edit default theme content is the right tool nearly every time.
Spending too long on manual Shopify busywork?
PinFlow turns your Shopify catalog into Pinterest pins and posts them on a schedule, automatically. Set it up once and let it run.
Get PinFlow on the Shopify App StoreMore Shopify fixes
More community-sourced Shopify guides, tested on a live store.
Shopify Admin
Avalara Shopify Integration vs Shopify Tax: Which to Use
Moving to Shopify with Avalara? Shopify Tax already calculates US sales tax to the street address. What the Avalara Shopify integration adds, what filing costs, and how to decide.
Shopify Admin
Shopify Discount Limit: One Code for More Than 100 Products
Shopify stops you at 100 items when a discount applies to specific products. There is no setting to raise it, but you do not need one. Point the discount at a collection and one code covers thousands of products. Tested on a store, with the B2B route too.
Shopify Admin
Shopify Shows Sold Out but It's in Stock: The Fix
Your whole store shows Sold Out while the admin shows stock. The cause is a location setting, not your products: the location holding the stock is not set to fulfill online orders. Read the Available column, flip one switch, and check the theme and shipping profile if it persists.