
Shopify Custom Section: Create One With Editable Settings
Shopify's AI section generator keeps returning half of what you asked for. Here is why, plus a complete custom section file you can paste in, tested on Dawn and Horizon.
By AjayCodeWiz · July 22, 2026 · 9 min read
The problem
A merchant asked about this on the Shopify Community and I thought the question deserved a better answer than it got.
They wanted a four column section for VIP tiers. Each column needed its own image, a bold title, a subtitle for point ranges, and a reward description. Each column needed its own background colour. Behind all four, one unified full width background image.
They tried Shopify's AI section generator repeatedly. Every attempt returned part of it. Shopify support told them it required custom Liquid code, which was true and also not much help if you do not write Liquid.
What worried them most was cost. They were just starting out, no customers yet, and did not want to pay monthly for something they had not asked for.
They are right to push back. A section like this is a text file that lives in your theme. There is no app and no subscription.
Here is the finished thing, running on two different themes from the same file.
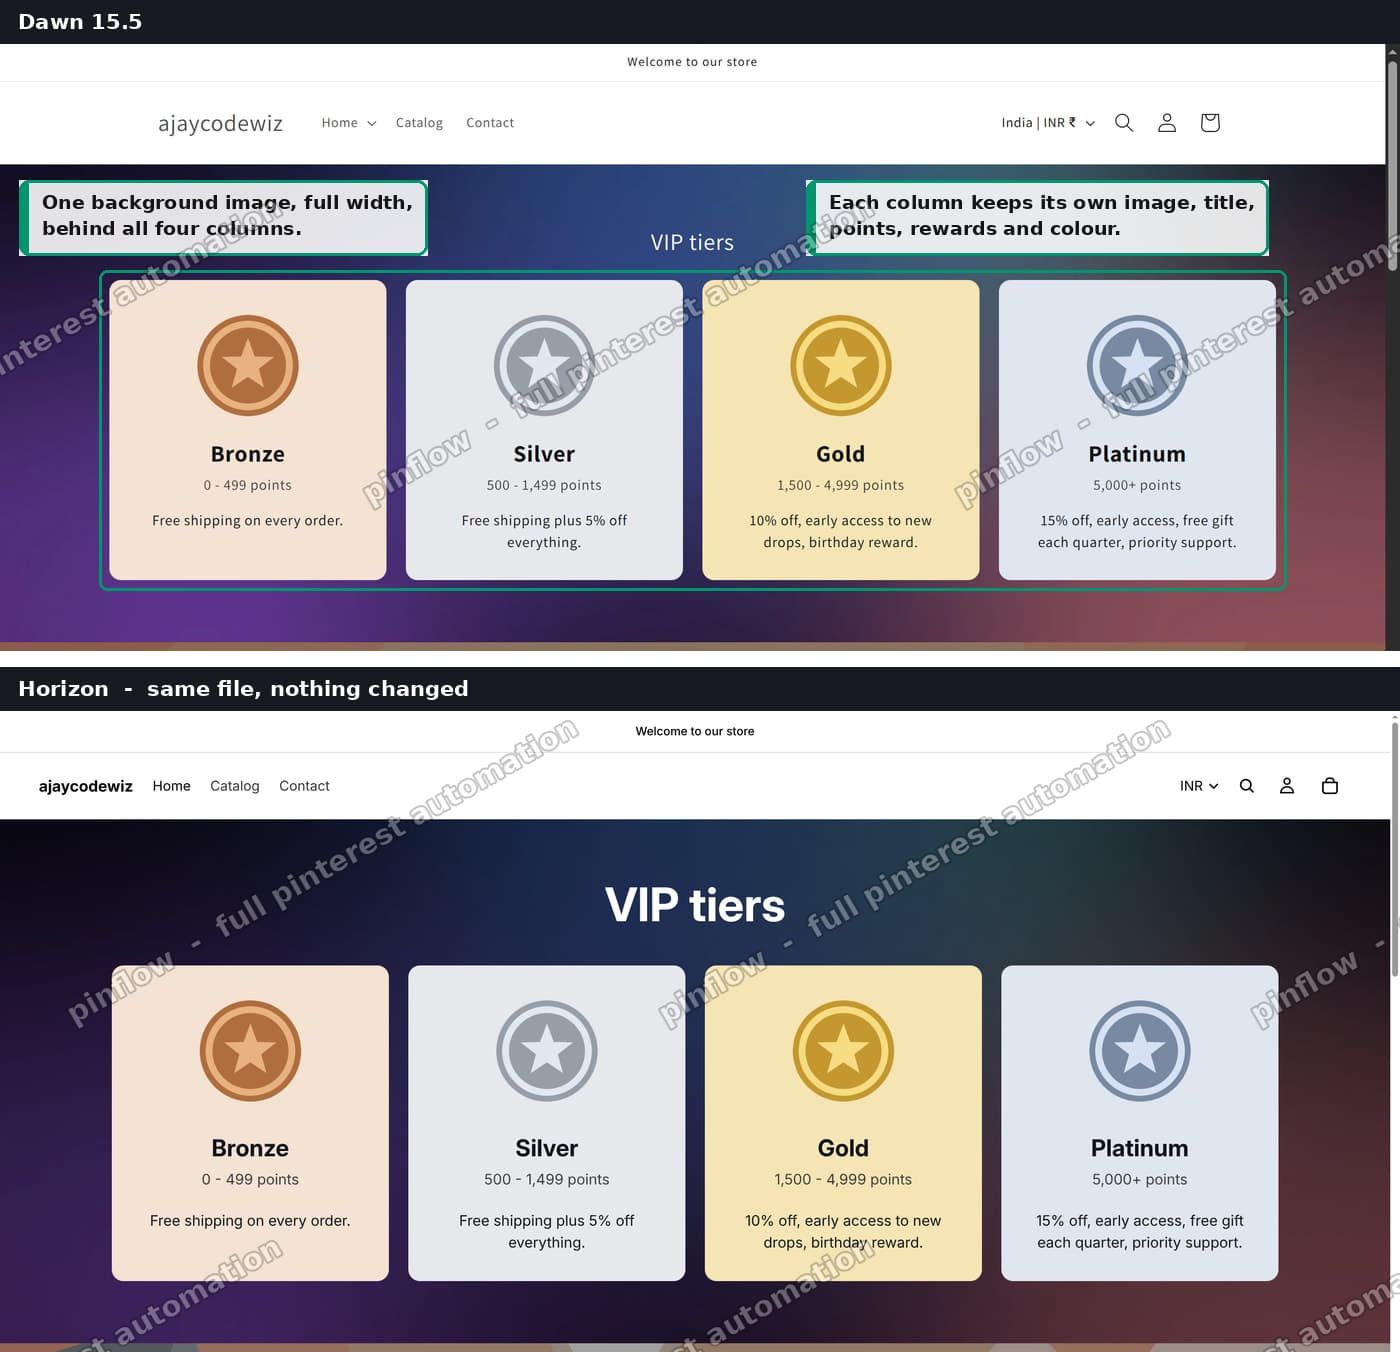 The finished custom section rendered on Dawn and on Horizon
Why the AI generator kept returning half of it
This is worth understanding, because it is not a fluke and it will happen again on your next request.
The layout is two different mechanisms at once.
The four tiers need to be blocks. A block is a repeatable child of a section. Each one carries its own settings, and the merchant can add, reorder and delete them from the theme editor.
The background image behind all four is a section setting. It belongs to the section as a whole, sitting underneath every block.
Ask a generator for one of those and it usually manages. Ask for both in the same section and it tends to pick a lane. Most often it hardcodes four fixed columns, which look right in the preview and then turn out not to be editable at all. Sometimes it keeps the blocks and drops the shared background.
So the fix is not a better prompt. It is knowing that "repeatable, editable columns" and "one thing behind all of them" are two different features of the section schema, and writing both.
What a Shopify custom section actually is
A section is a single .liquid file in your theme's sections folder. It has three parts.
The markup. Normal HTML and Liquid, rendering whatever you want.
The schema. A JSON block at the bottom, wrapped in {% schema %} tags. This is what generates the settings panel in the theme editor. Every input the merchant sees comes from here.
The presets. An optional part of the schema that makes the section appear in the "Add section" list, with sensible starting content.
That is the whole model. Settings you define in JSON become controls in the sidebar, and you read their values back in Liquid as section.settings.your_id.
Blocks work the same way, one level down. You define a block type in the schema, loop over section.blocks in the markup, and read each one's values as block.settings.your_id.
The code
This is the complete file. It builds a responsive grid whose column count follows the number of blocks, gives every block its own image, title, subtitle, rich text and colours, and puts one background image behind the lot.
{%- liquid
  assign s = section.settings
  assign cols = section.blocks.size | at_least: 1
-%}

<style>
  #shopify-section-{{ section.id }} .viptiers {
    position: relative;
    padding: {{ s.padding_top }}px 2rem {{ s.padding_bottom }}px;
    background-color: {{ s.bg_color }};
    {%- if s.bg_image != blank %}
    background-image: url({{ s.bg_image | image_url: width: 3000 }});
    background-size: cover;
    background-position: center;
    {%- endif %}
  }
  #shopify-section-{{ section.id }} .viptiers__overlay {
    position: absolute;
    inset: 0;
    background: {{ s.overlay_color }};
    opacity: {{ s.overlay_opacity | divided_by: 100.0 }};
    pointer-events: none;
  }
  #shopify-section-{{ section.id }} .viptiers__inner {
    position: relative;
    max-width: {{ s.content_width }}px;
    margin: 0 auto;
  }
  #shopify-section-{{ section.id }} .viptiers__heading {
    margin: 0 0 2.4rem;
    text-align: center;
    color: {{ s.heading_color }};
  }
  #shopify-section-{{ section.id }} .viptiers__grid {
    display: grid;
    grid-template-columns: repeat({{ cols }}, minmax(0, 1fr));
    gap: {{ s.gap }}px;
    align-items: stretch;
  }
  #shopify-section-{{ section.id }} .viptiers__card {
    display: flex;
    flex-direction: column;
    align-items: center;
    text-align: center;
    padding: {{ s.card_padding }}px;
    border-radius: {{ s.corner_radius }}px;
  }
  #shopify-section-{{ section.id }} .viptiers__img {
    display: block;
    width: {{ s.image_height }}px;
    height: {{ s.image_height }}px;
    object-fit: contain;
    margin-bottom: 1.6rem;
  }
  #shopify-section-{{ section.id }} .viptiers__title {
    margin: 0 0 0.4rem;
    font-weight: 700;
    font-size: {{ s.title_size }}px;
    line-height: 1.2;
  }
  #shopify-section-{{ section.id }} .viptiers__points {
    margin: 0 0 1.2rem;
    font-size: {{ s.points_size }}px;
    opacity: 0.8;
  }
  #shopify-section-{{ section.id }} .viptiers__text {
    font-size: {{ s.text_size }}px;
    line-height: 1.5;
  }
  #shopify-section-{{ section.id }} .viptiers__text > *:first-child { margin-top: 0; }
  #shopify-section-{{ section.id }} .viptiers__text > *:last-child { margin-bottom: 0; }

  @media screen and (max-width: 989px) {
    #shopify-section-{{ section.id }} .viptiers__grid {
      grid-template-columns: repeat(2, minmax(0, 1fr));
    }
  }
  @media screen and (max-width: 599px) {
    #shopify-section-{{ section.id }} .viptiers__grid {
      grid-template-columns: minmax(0, 1fr);
    }
  }
</style>

<div class="viptiers">
  <div class="viptiers__overlay"></div>

  <div class="viptiers__inner">
    {%- if s.heading != blank -%}
      <h2 class="viptiers__heading">{{ s.heading }}</h2>
    {%- endif -%}

    <div class="viptiers__grid">
      {%- for block in section.blocks -%}
        {%- liquid
          assign b = block.settings
          assign card_alpha = b.card_opacity | divided_by: 100.0
        -%}
        <div
          class="viptiers__card"
          style="background-color: {{ b.card_bg | color_modify: 'alpha', card_alpha }}; color: {{ b.text_color }};"
          {{ block.shopify_attributes }}
        >
          {%- if b.image != blank -%}
            <img
              class="viptiers__img"
              src="{{ b.image | image_url: width: 600 }}"
              alt="{{ b.image.alt | default: b.title | escape }}"
              width="{{ s.image_height }}"
              height="{{ s.image_height }}"
              loading="lazy"
            >
          {%- endif -%}

          {%- if b.title != blank -%}
            <h3 class="viptiers__title">{{ b.title }}</h3>
          {%- endif -%}

          {%- if b.points != blank -%}
            <p class="viptiers__points">{{ b.points }}</p>
          {%- endif -%}

          {%- if b.description != blank -%}
            <div class="viptiers__text">{{ b.description }}</div>
          {%- endif -%}
        </div>
      {%- endfor -%}
    </div>
  </div>
</div>

{% schema %}
{
  "name": "VIP tiers",
  "tag": "section",
  "settings": [
    { "type": "text", "id": "heading", "label": "Heading", "default": "VIP tiers" },
    { "type": "color", "id": "heading_color", "label": "Heading colour", "default": "#ffffff" },
    { "type": "header", "content": "Background behind all tiers" },
    { "type": "image_picker", "id": "bg_image", "label": "Background image" },
    { "type": "color", "id": "bg_color", "label": "Background colour", "default": "#12121a" },
    { "type": "color", "id": "overlay_color", "label": "Overlay colour", "default": "#000000" },
    { "type": "range", "id": "overlay_opacity", "min": 0, "max": 90, "step": 5, "unit": "%", "label": "Overlay darkness", "default": 35 },
    { "type": "header", "content": "Layout" },
    { "type": "range", "id": "content_width", "min": 800, "max": 1800, "step": 20, "unit": "px", "label": "Content width", "default": 1200 },
    { "type": "range", "id": "gap", "min": 0, "max": 60, "step": 2, "unit": "px", "label": "Space between columns", "default": 20 },
    { "type": "range", "id": "card_padding", "min": 8, "max": 60, "step": 2, "unit": "px", "label": "Padding inside each column", "default": 28 },
    { "type": "range", "id": "corner_radius", "min": 0, "max": 40, "step": 2, "unit": "px", "label": "Corner radius", "default": 12 },
    { "type": "range", "id": "image_height", "min": 40, "max": 260, "step": 10, "unit": "px", "label": "Tier image size", "default": 120 },
    { "type": "range", "id": "padding_top", "min": 0, "max": 160, "step": 4, "unit": "px", "label": "Padding top", "default": 64 },
    { "type": "range", "id": "padding_bottom", "min": 0, "max": 160, "step": 4, "unit": "px", "label": "Padding bottom", "default": 64 },
    { "type": "header", "content": "Text sizes" },
    { "type": "range", "id": "title_size", "min": 14, "max": 40, "step": 1, "unit": "px", "label": "Tier title", "default": 24 },
    { "type": "range", "id": "points_size", "min": 11, "max": 28, "step": 1, "unit": "px", "label": "Points range", "default": 15 },
    { "type": "range", "id": "text_size", "min": 11, "max": 24, "step": 1, "unit": "px", "label": "Reward description", "default": 15 }
  ],
  "blocks": [
    {
      "type": "tier",
      "name": "Tier",
      "settings": [
        { "type": "image_picker", "id": "image", "label": "Tier image" },
        { "type": "text", "id": "title", "label": "Tier title", "default": "Bronze" },
        { "type": "text", "id": "points", "label": "Points range", "default": "0 - 499 points" },
        { "type": "richtext", "id": "description", "label": "Rewards", "default": "<p>Free shipping on every order.</p>" },
        { "type": "color", "id": "card_bg", "label": "Column background colour", "default": "#ffffff" },
        { "type": "range", "id": "card_opacity", "min": 0, "max": 100, "step": 5, "unit": "%", "label": "Column background opacity", "default": 100 },
        { "type": "color", "id": "text_color", "label": "Column text colour", "default": "#12121a" }
      ]
    }
  ],
  "max_blocks": 6,
  "presets": [
    {
      "name": "VIP tiers",
      "blocks": [
        { "type": "tier", "settings": { "title": "Bronze", "points": "0 - 499 points", "card_bg": "#f4e3d2", "description": "<p>Free shipping on every order.</p>" } },
        { "type": "tier", "settings": { "title": "Silver", "points": "500 - 1,499 points", "card_bg": "#e6e8ec", "description": "<p>Free shipping plus 5% off everything.</p>" } },
        { "type": "tier", "settings": { "title": "Gold", "points": "1,500 - 4,999 points", "card_bg": "#f6e5b4", "description": "<p>10% off, early access to new drops.</p>" } },
        { "type": "tier", "settings": { "title": "Platinum", "points": "5,000+ points", "card_bg": "#dfe6ef", "description": "<p>15% off, early access, free gift each quarter.</p>" } }
      ]
    }
  ]
}
{% endschema %}
It is longer than a minimal example because every value is exposed as a setting. That is deliberate. The point of a custom section is that you never open the code again.
Step 1: create the file
Go to Online Store > Themes, click the ... next to your theme, and choose Edit code.
Find the sections folder in the left sidebar. Click Add a new section, name it vip-tiers, delete whatever Shopify prefills, paste the code, and Save.
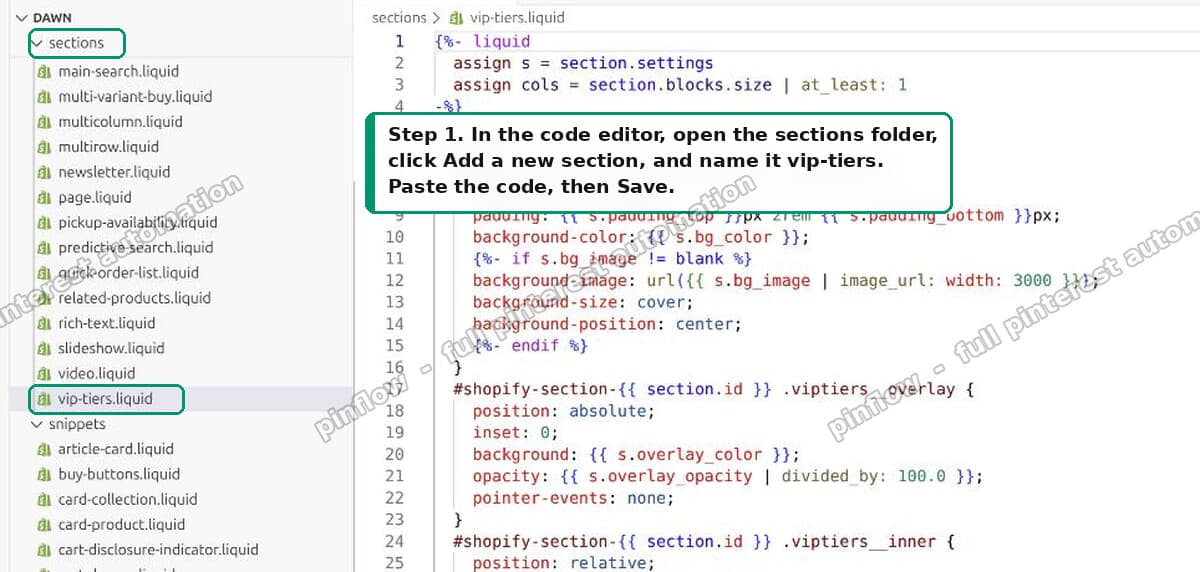 Shopify theme code editor showing the new file inside the sections folder
The file name becomes the section's identifier. Name it something descriptive and lowercase with hyphens.
A word of advice: duplicate your theme first. Online Store > Themes > ... > Duplicate. Edit the copy, confirm it works, then publish. This costs you nothing and means a mistake never touches your live store.
Step 2: add it to a page
Open the theme editor, click Add section, and search for it.
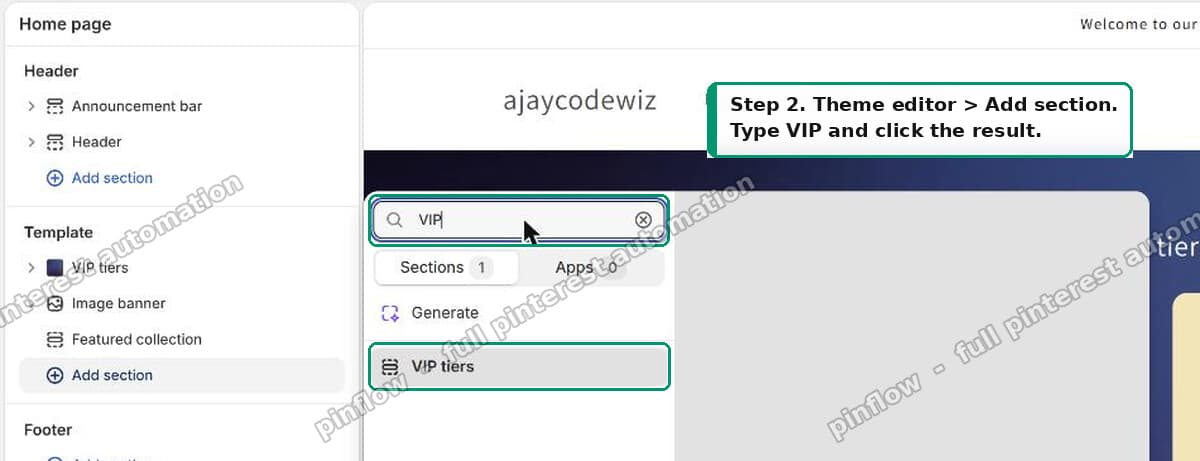 Theme editor Add section picker with the new custom section in the results
If it does not appear here, the schema has a problem. See the troubleshooting section at the end.
Step 3: edit everything from the sidebar
From this point there is no more code.
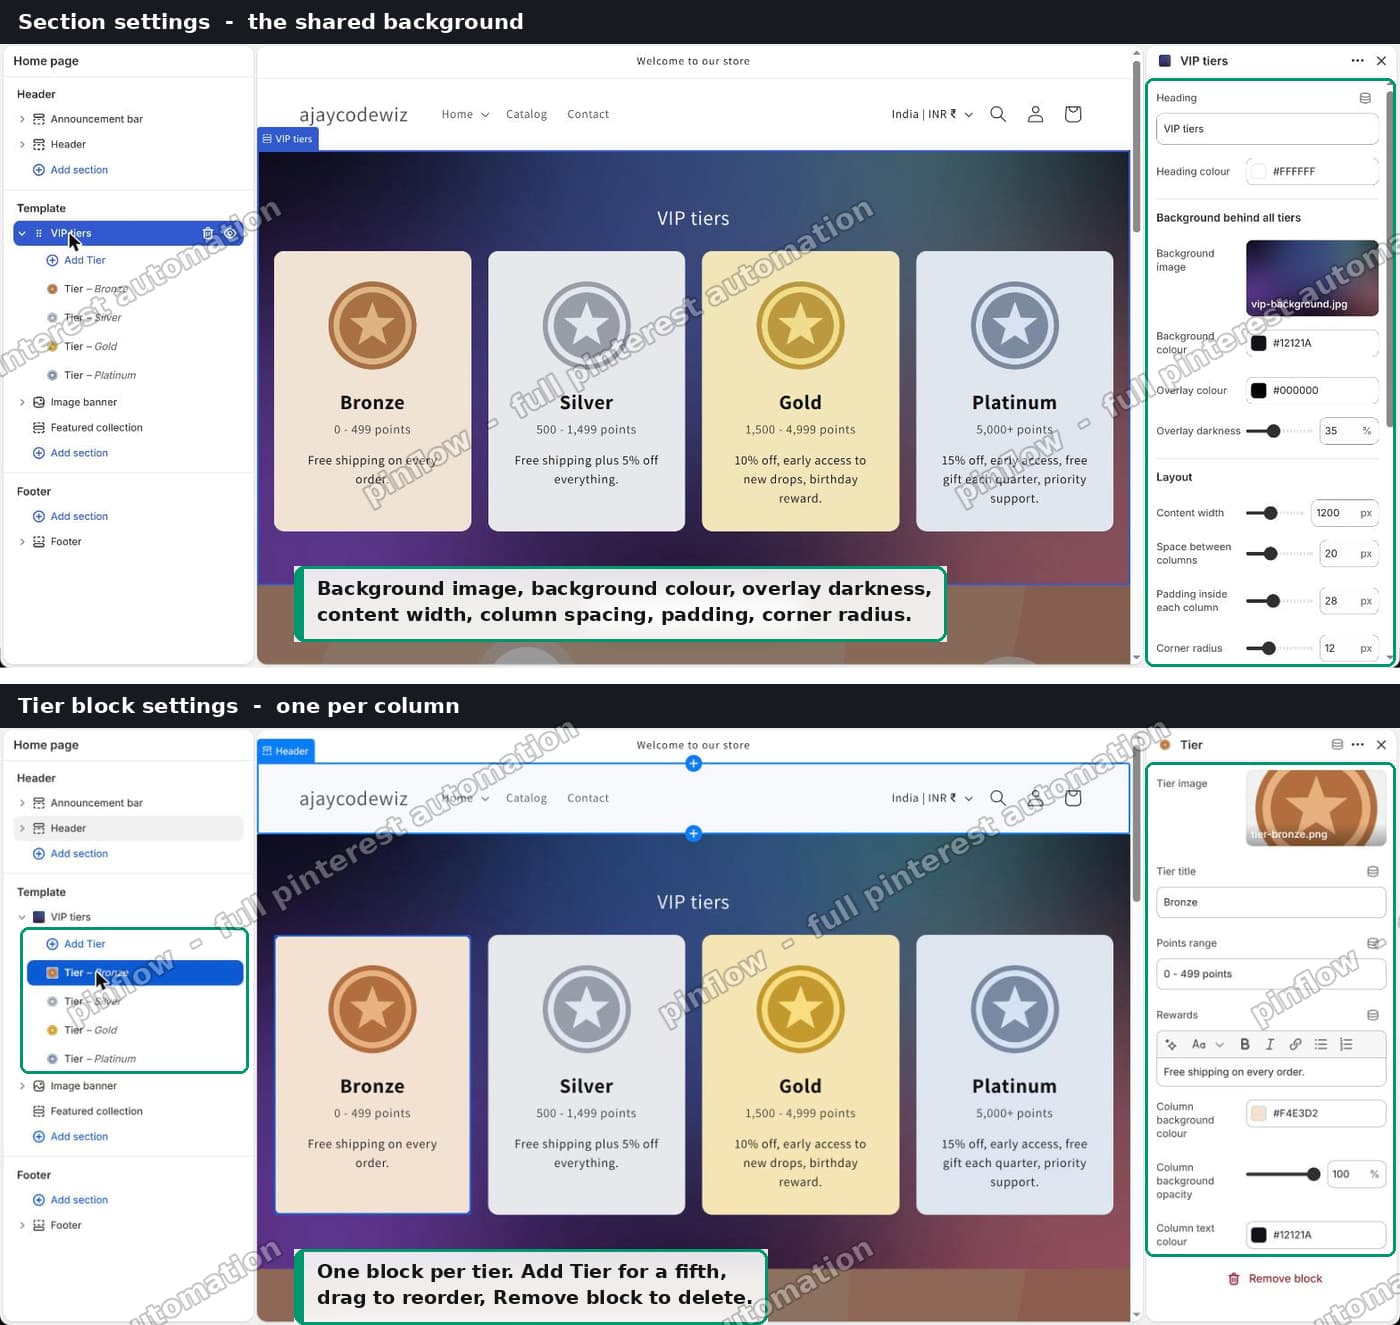 Theme editor showing the section settings and one block's settings
The section settings hold the background image, background colour, overlay darkness, content width, column spacing, padding and corner radius.
Each tier is its own block, with its own image, title, points range, rewards text, column colour and text colour.
Click Add Tier for a fifth or sixth. Drag to reorder. Delete one and the grid re-fits by itself, because the column count is driven by section.blocks.size rather than hardcoded to four.
The setting types you will actually use
The schema supports a long list of input types. These are the ones that cover most sections.
textandtextareafor plain stringsrichtextfor a small formatted editor, which is what the rewards field usesimage_pickerfor anything the merchant should be able to swapcolorfor a colour swatch, andcolor_backgroundif you want gradientsrangefor a slider with amin,max,stepandunitselectandradiofor a fixed set of choicescheckboxfor on or offurl,product,collectionandblogfor resource pickersheaderandparagraph, which render nothing but group and explain the controls
Two details that trip people up.
A range needs (max - min) / step to be a whole number no greater than 101, or the theme editor rejects the whole schema.
Every setting id must be unique inside its own settings array, and it is what you reference in Liquid. Rename an id after launch and any value the merchant already saved is orphaned.
Custom section vs Custom Liquid block
These get confused constantly, and the difference matters.
Custom Liquid is a block that ships with most themes. You paste a snippet into a textarea in the theme editor. Nothing to install, and it is the right tool for a one-off tweak or a third party embed.
But it has no schema. It cannot generate settings. Anything you want to change later means editing the raw Liquid again, and a merchant who is not comfortable in code cannot safely touch it.
A custom section is a real file with a schema. It creates its own controls, it is reusable across pages, it can be added and removed like any built-in section, and it supports blocks.
Rough rule: if it is used once and never edited, Custom Liquid is fine. If someone will change the content later, or you need it more than once, write a section.
There is also a scripting caveat worth knowing. Shopify's Custom Liquid block does not allow <script src> tags pointing at external domains. That restriction is one of the more common reasons a snippet that works elsewhere does nothing when pasted in.
Does this work on my theme?
The file above uses no theme specific classes, snippets or CSS variables. It carries its own styles, scoped by section ID so it cannot collide with anything.
I tested it on Dawn 15.5 and on Horizon, the same file with nothing changed between them.
On Dawn the section measured 1425px wide on a 1425px viewport, with four equal 285px columns. On Horizon it measured 1430px, which is exactly what Horizon's own hero and product list sections measure, so it is as full width as that theme allows any section to be.
At 989px it drops to two columns. Below 599px it goes to one. On a 390px phone all four stacked with no sideways scroll.
Anything on Online Store 2.0 will take it. That covers every free Shopify theme and effectively every paid theme sold today.
If it is not working
The section is missing from "Add section". Almost always invalid JSON in the schema. A trailing comma after the last item in an array is the usual culprit. Paste the schema block on its own into a JSON validator. A section with no presets also will not appear in that list, though it can still be assigned in a JSON template.
"Invalid schema" when you save. Read the line number in the error. Beyond bad JSON, the usual causes are a duplicate setting id, a range whose step count exceeds 101, or a block type that does not match the type you used in presets.
Blocks render but settings do nothing. Check you are reading block.settings.x inside the block loop and section.settings.x outside it. Mixing them up fails with no error, which makes it annoying to spot.
Clicking a block in the sidebar does not highlight it on the canvas. You are missing {{ block.shopify_attributes }} on the block's outer element. That attribute is what connects the editor to the DOM.
Your image is stretched or blurry. Pass a width to image_url, as in {{ b.image | image_url: width: 600 }}. Without it you can end up serving the original at whatever size it was uploaded.
The section appears but is unstyled. The <style> block is scoped with #shopify-section-{{ section.id }}. If you renamed the wrapper class in the markup and not in the CSS, or the other way round, nothing matches.
I built and tested this on a development store, on both themes, before posting it. The screenshots are from that store.
Spending too long on manual Shopify busywork?
PinFlow turns your Shopify catalog into Pinterest pins and posts them on a schedule, automatically. Build it once, then let it run.
Get PinFlow on the Shopify App StoreMore Shopify fixes
More community-sourced Shopify guides, tested on a live store.
Themes & Storefront
Shopify Horizon: Carousel Blank Until You Drag It
A Horizon carousel that shows an empty strip until you drag it, then fills in, is usually the theme skipping the painting of slides it thinks nobody is looking at. Here is how to tell that apart from a genuinely broken carousel, and the one line of CSS that covers it.
Themes & Storefront
Shopify Sold Out Overlay: Grey Out Products and Add a Sold Out Box
Shopify themes mark a sold out product with a small pill in the corner of the card. Here is how to turn that pill into a black Sold Out box across the middle of the photo, and fade the photo behind it, with no theme code and no app.
Themes & Storefront
How to Change the Price Font Size on a Shopify Collection Page
Shopify themes have no setting for the price size on a product card. Here is the one rule that shrinks it on collection pages only, where to paste it so it cannot reach your product pages, and how to keep the crossed out sale price in proportion.