
How to Edit the Shopify Thank You Page (No Plus Needed)
The Thank You page is not in your theme, which is why searching theme code never finds the text on it. Here is where it actually lives and how to edit or delete blocks on it.
By AjayCodeWiz · July 12, 2026 · 8 min read
The problem: you cannot find the text anywhere in your theme
There is a note on your order confirmation page. You added it a year ago following some forum instructions, and now you want it gone.
So you open the theme code editor and search. Nothing. You check the order status settings in the admin, and the page there looks nothing like what your customer sees. You place a test order to look at the real thing, and there it is, plain as day, in a page you apparently cannot edit.
A merchant hit exactly this. They had searched every block in their theme, could not find the text, and had been told the answer was Shopify Plus.
It is not Plus. The Thank You page is not part of your online store theme at all, and that single fact is why every search you have run has come up empty.
I reproduced this on a test store and worked out where the text actually lives.
Why your theme search finds nothing
Shopify has two separate surfaces and they are edited in two completely different places.
Your online store is the theme. Home page, collections, products, cart. Liquid files, the theme editor, Online Store > Themes.
Checkout and post-purchase is not. Checkout, the Thank You page and the Order status page are rendered by Shopify, not by your theme. They have their own editor, reached from Settings > Checkout, and their own block system.
That split is why:
- Searching theme code finds nothing. The text is not in your theme.
- The order status settings in the admin look different from what customers see. Those are two different things with confusingly similar names.
- Older forum posts tell you to paste Liquid into "Additional scripts". That field existed under the legacy checkout and is being retired. If you followed one of those guides years ago, the content may have been migrated into a block, which is what you are looking at now.
There is one more wrinkle worth knowing, because it explains a symptom that confuses people: the merchant noticed the note appeared on desktop but not mobile. Blocks in the checkout editor can render differently by device, so a block that looks absent on a phone is not necessarily absent.
What that note usually is
Nine times out of ten it is an app block. Something like Checkout Blocks, or a similar checkout-extensibility app, adds a "Static content" block that renders a heading and a paragraph.
It looks like theme content. It is not. It was added through the checkout editor, and that is the only place it can be removed.
You do not need Plus for any of this. The checkout editor is available on Basic. What Plus adds is the ability to edit the checkout steps themselves. Editing the Thank You page and the Order status page is available on every plan.
Step 1: open the checkout editor
Go to Settings > Checkout.
Find your active configuration and click Edit, or Customize depending on your admin version.
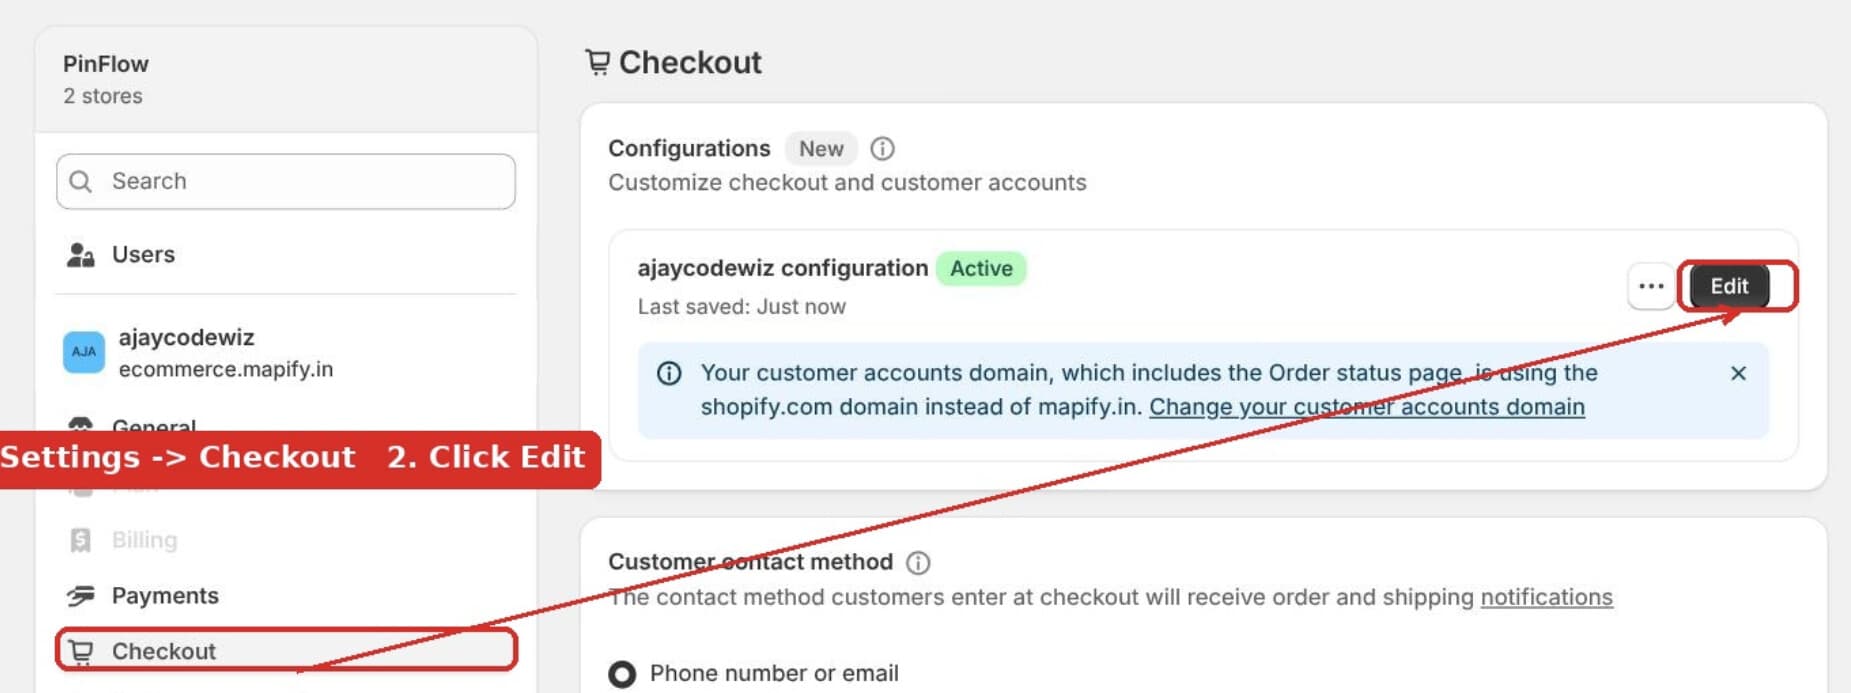 Settings then Checkout, then click Edit on the active configuration
If you have more than one configuration, edit the one marked Active. Editing an inactive configuration changes nothing that customers see, and this is an easy hour to lose.
Step 2: switch to the Thank You page
This is the step people miss, because the editor opens on Checkout and the page switcher is not obvious.
In the top bar there is a dropdown showing the current page. Open it. Under Post purchase, choose Thank you.
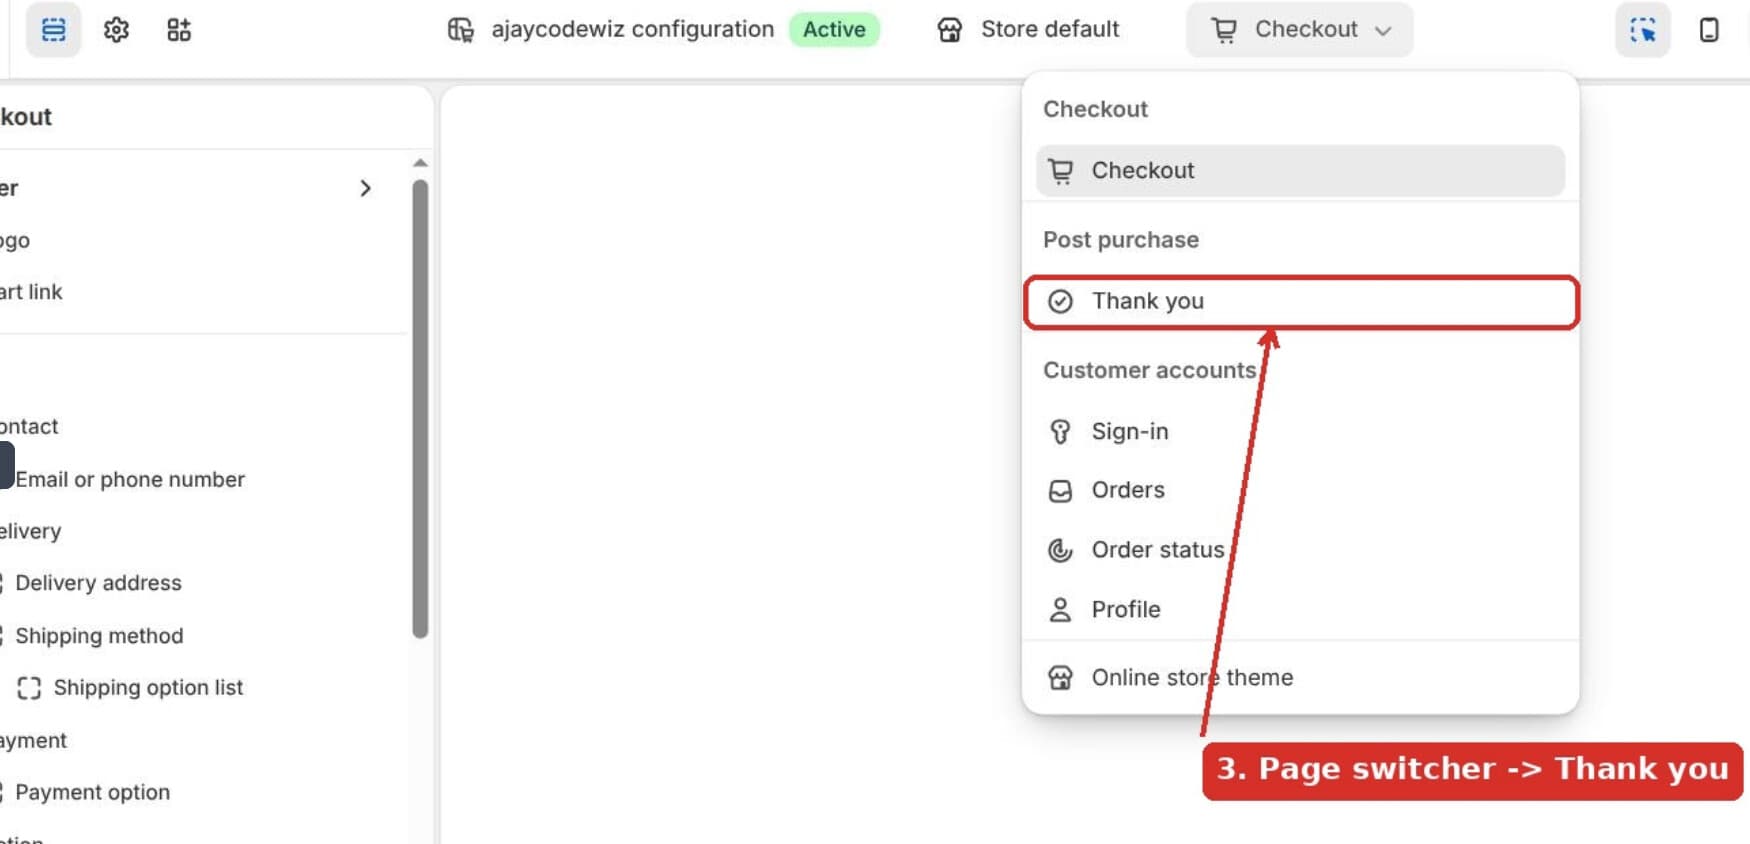 The page switcher dropdown with Thank you under Post purchase
Note what else is in that dropdown, because you will need it in step 5: Checkout, Thank you, and under Customer accounts, Sign-in, Orders, Order status and Profile.
Thank you and Order status are separate pages. That matters more than it sounds.
Step 3: find the block
The canvas now shows the Thank You page as customers see it, with your note on it.
In the left sidebar under Main, you will see the blocks that make up the page: Confirmation, Order status, Order details, Customer information, Action, and any app blocks. The one you are looking for is usually called Static content.
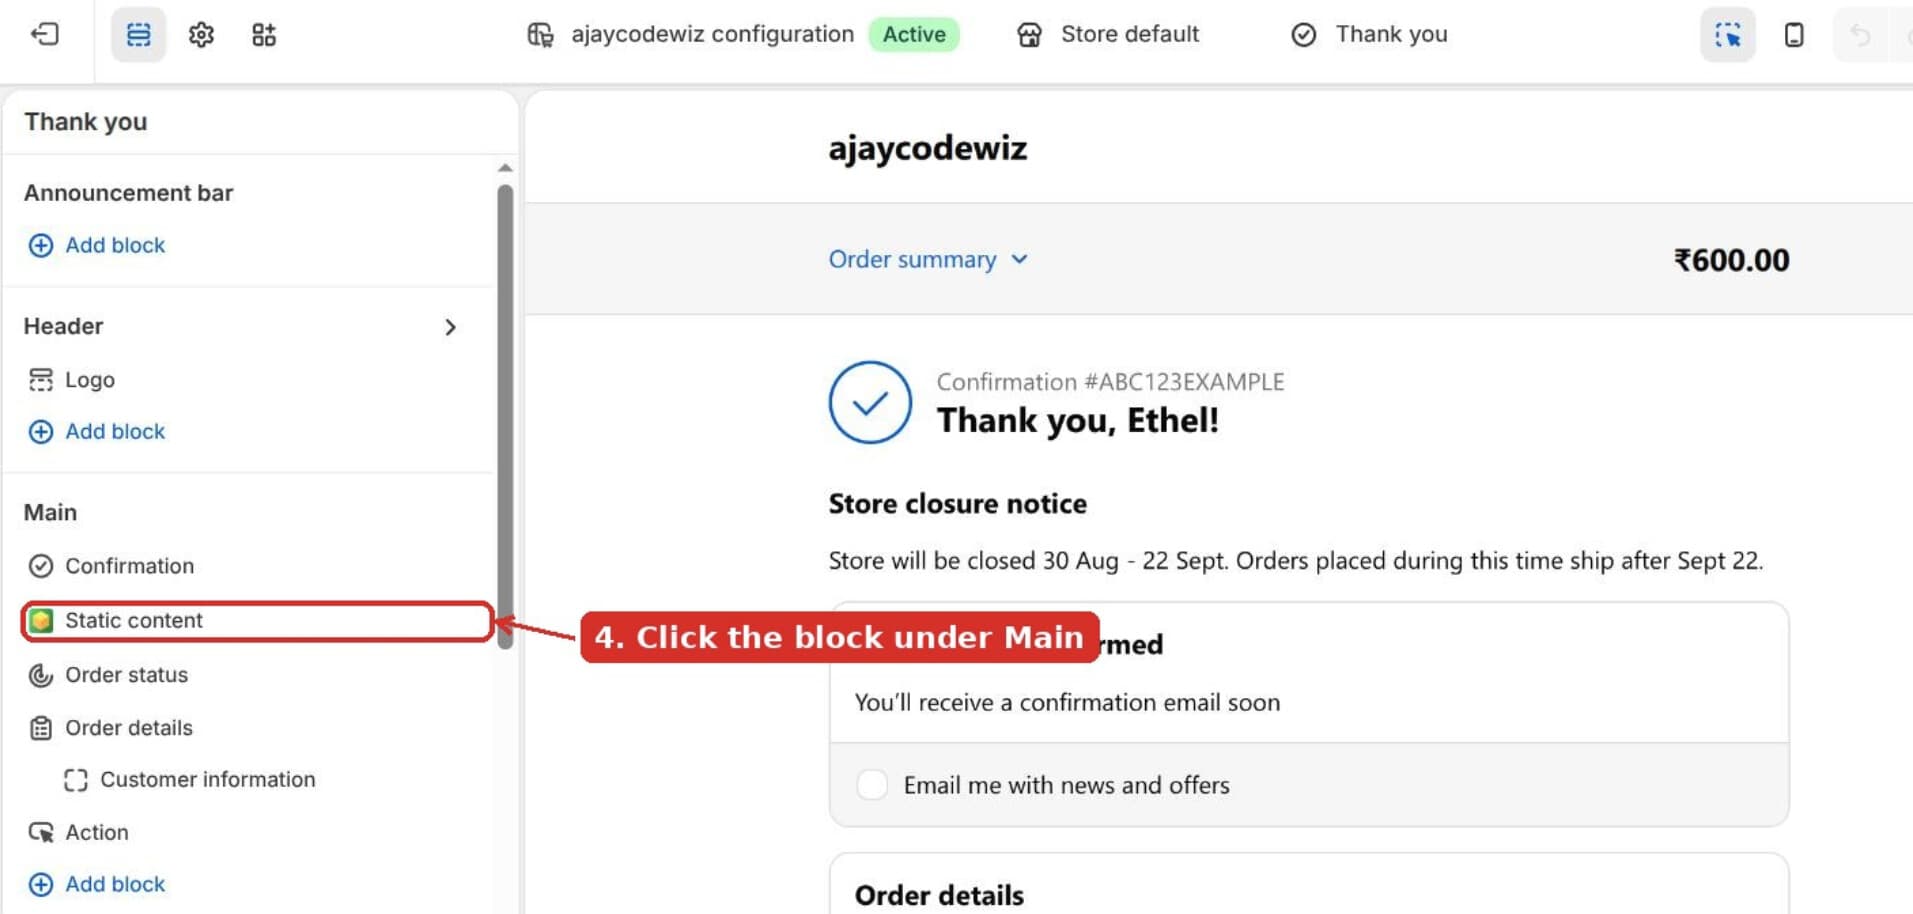 The Static content block in the left sidebar under Main
Click it. The matching content highlights on the canvas, which is how you confirm you have the right one before deleting anything.
If you have several app blocks, click each in turn and watch the canvas. Do not delete on the strength of the name alone.
Step 4: delete it
With the block selected, a small floating toolbar appears over it on the canvas: up arrow, down arrow, an eye, and a trash icon.
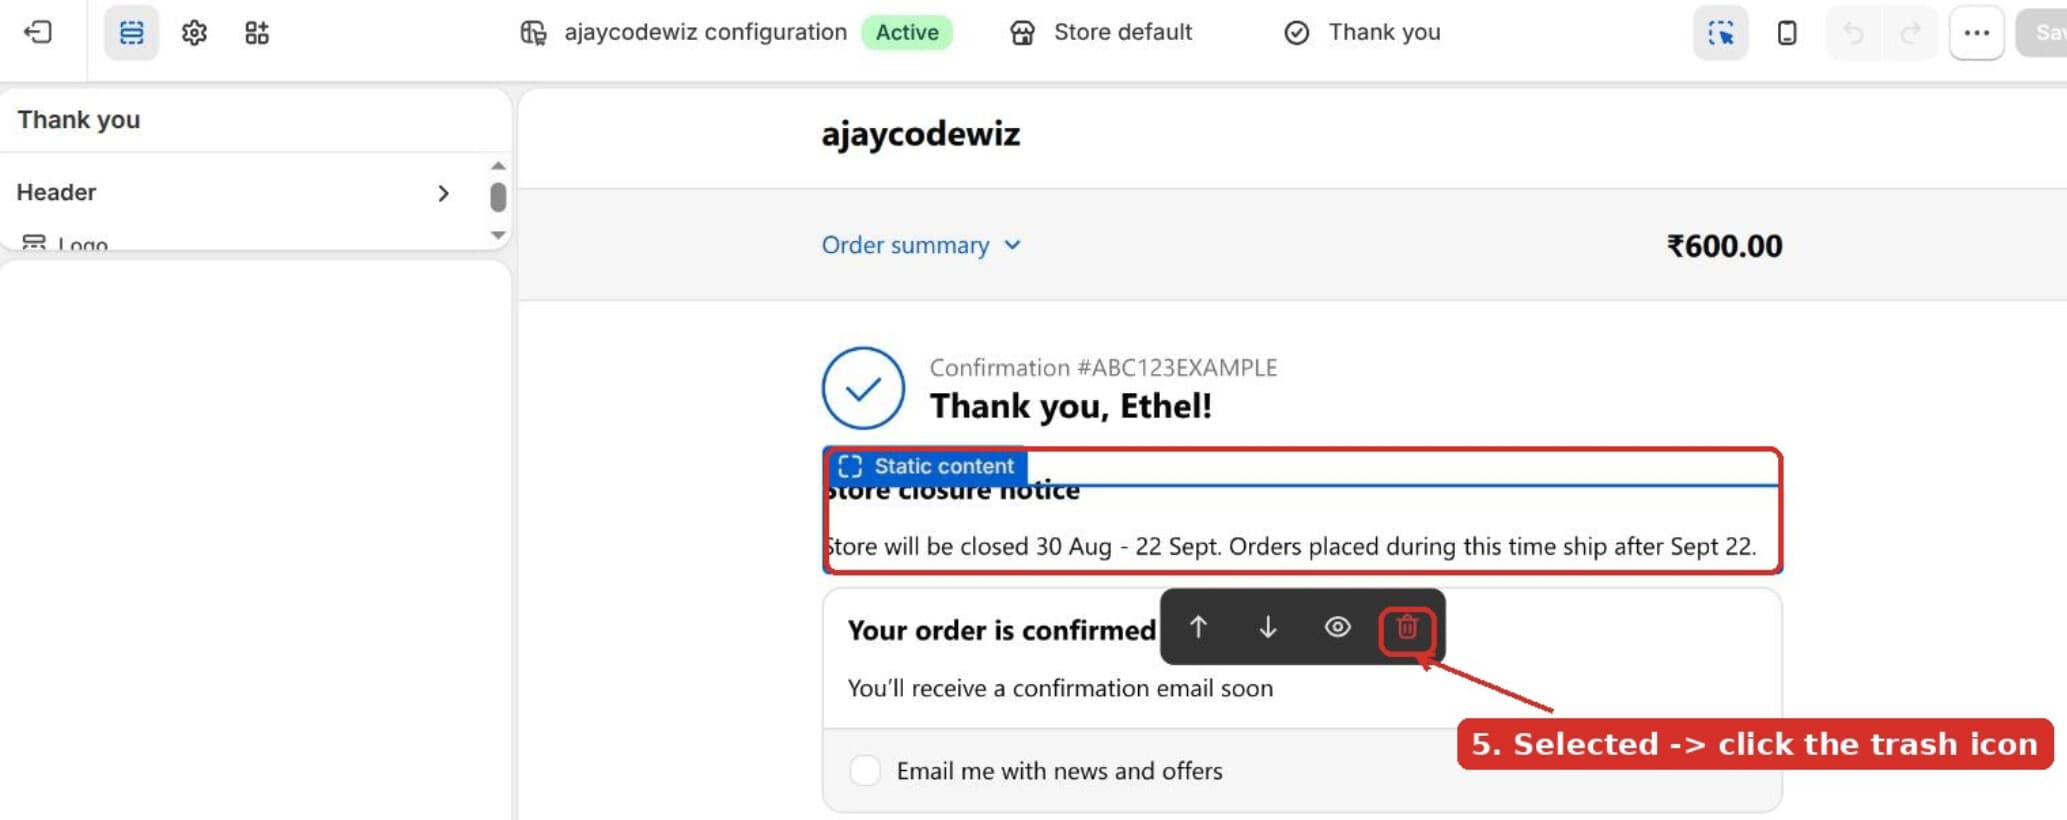 The block selected with the floating toolbar and the trash icon
Click the trash icon.
Worth knowing about the eye icon next to it: that hides the block without deleting it. If the note is seasonal, a store closure notice or a holiday shipping cutoff, hide it instead. It comes back with one click next year and you do not have to rebuild it.
The block disappears from the canvas. It is not saved yet.
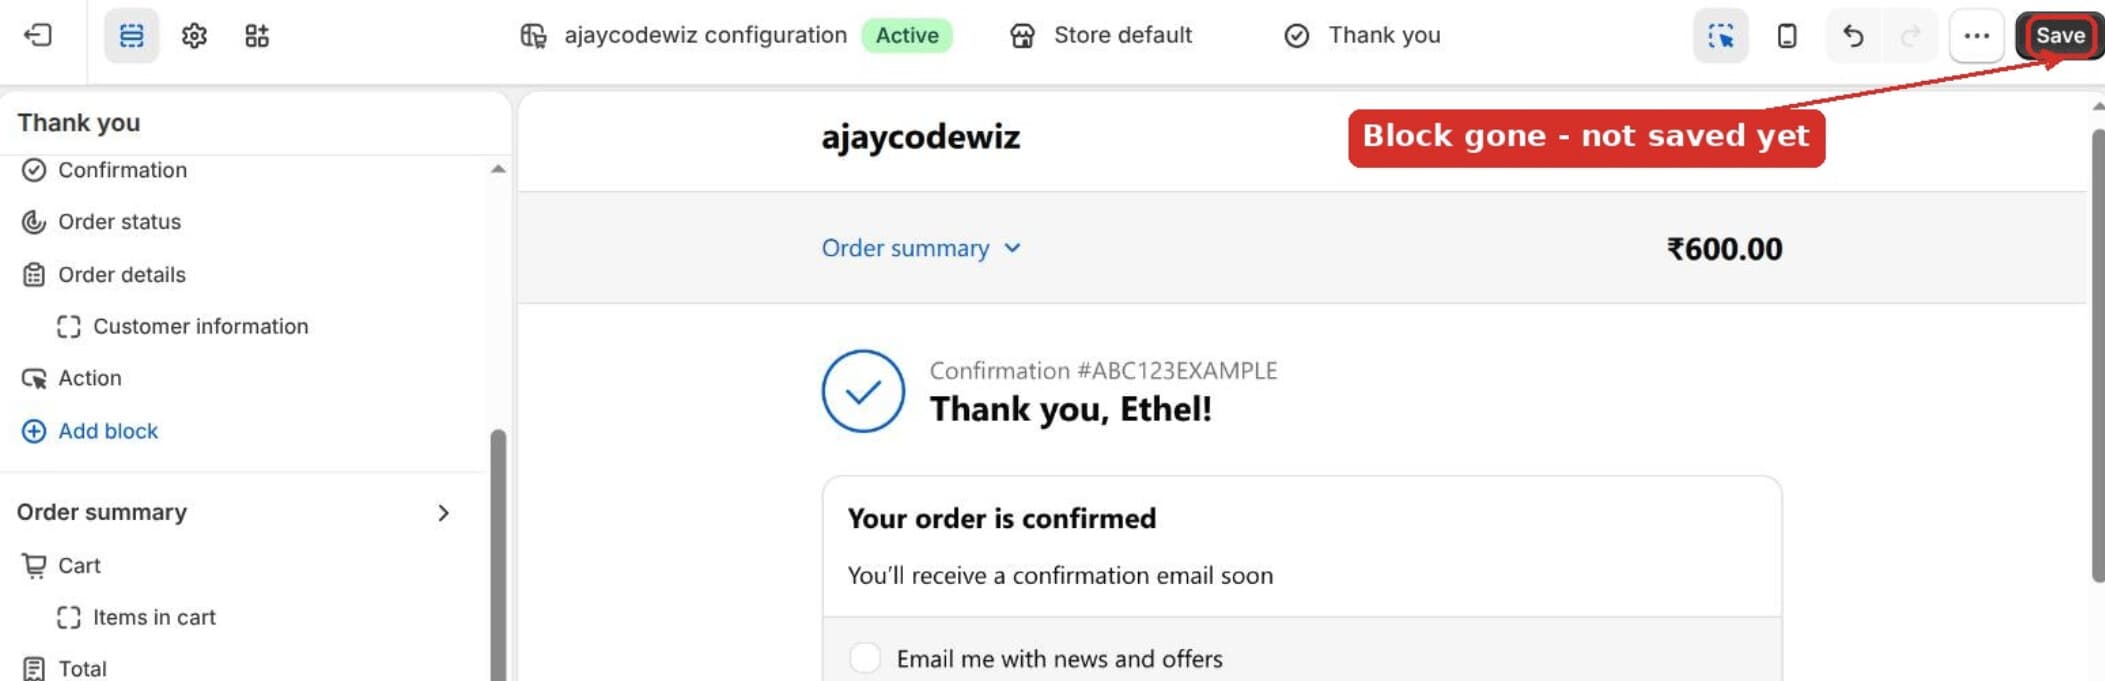 The block gone from the canvas, with Save still to click
Click Save in the top right.
Step 5: repeat on the Order status page
Here is the part that is easy to get wrong.
Thank you and Order status are two separate pages in the same editor. A block added to both has to be deleted from both. Delete it from Thank you only, and it still appears when a customer later revisits their order status link, which is the page they get from the confirmation email.
Open the page switcher again and choose Order status under Customer accounts.
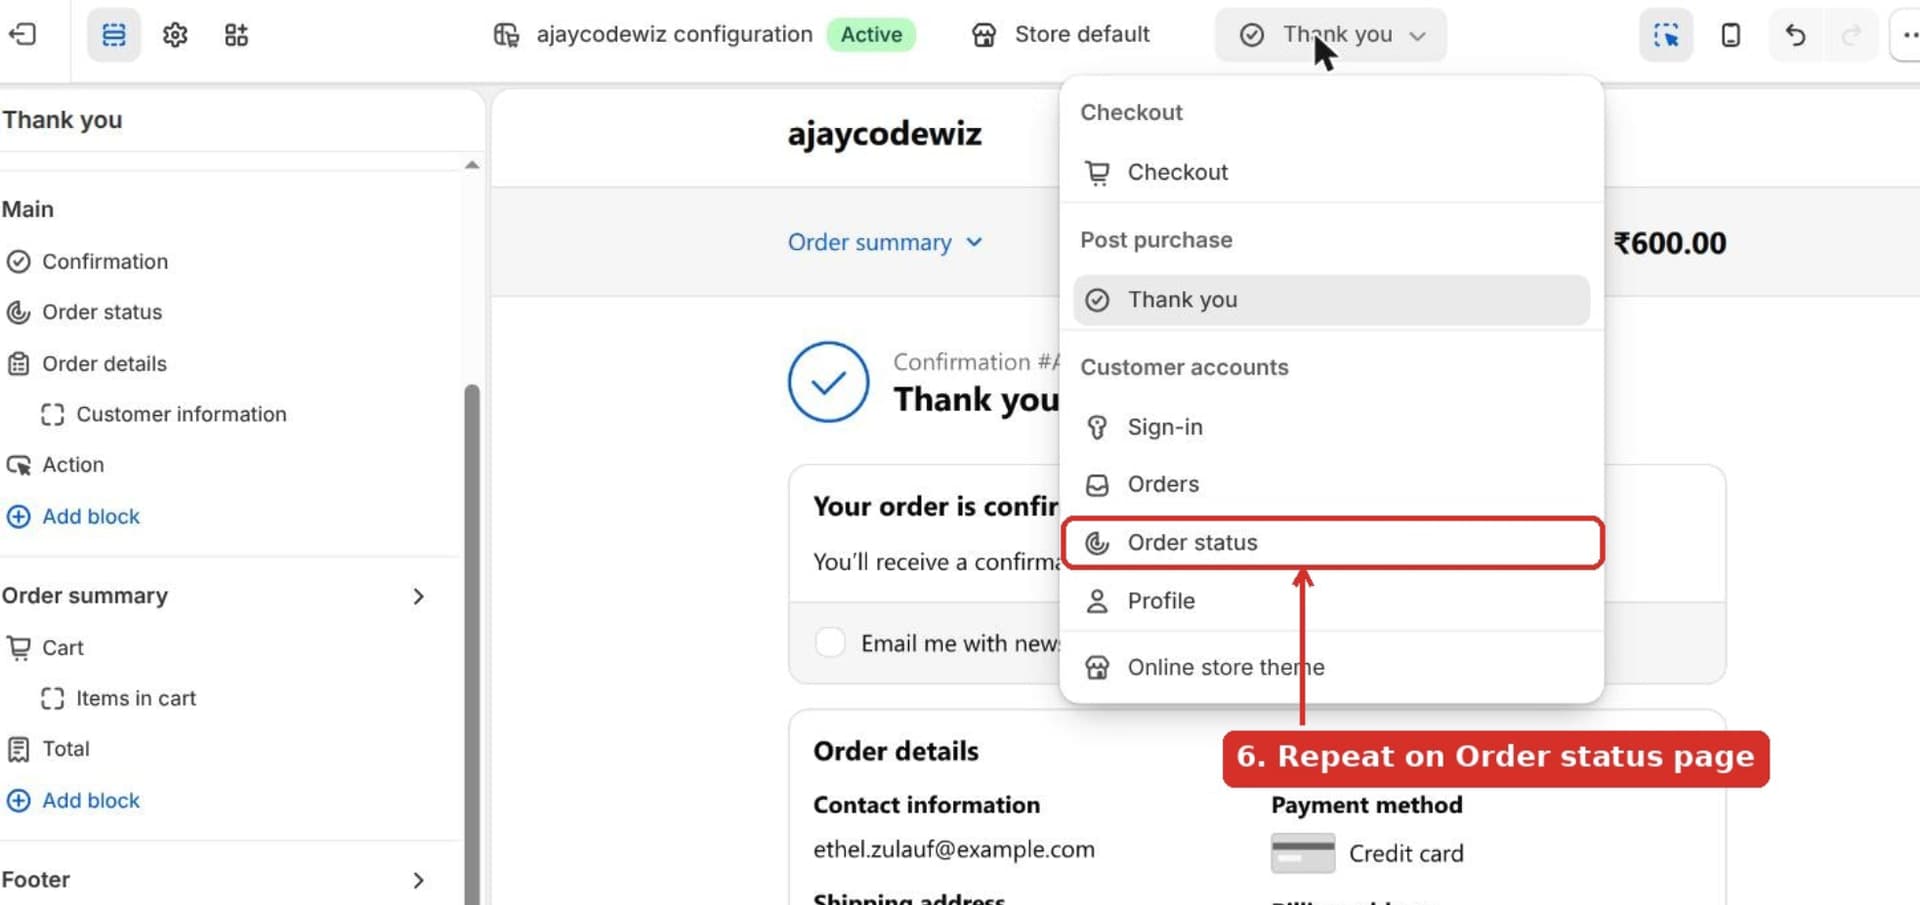 The page switcher, choosing Order status to repeat the deletion
If the block is there, delete it the same way and save again.
This is also why the note seemed to appear in some places and not others. Two pages, two copies, deleted one at a time.
Editing instead of deleting
The same route handles changing the text rather than removing it.
Select the block and the settings panel on the right shows its fields, typically a heading and a body. Edit them, then save. The canvas previews as you type.
To add a note rather than remove one, click Add block in the sidebar section where you want it. What is available depends on which apps you have installed: with no checkout apps you will see Shopify's own blocks, and app blocks appear once an app that provides them is installed.
To reorder blocks, use the up and down arrows in the floating toolbar, or drag them in the sidebar.
Which page is which
The naming here is genuinely confusing, so it is worth pinning down.
| Page | When the customer sees it | Where you edit it |
|---|---|---|
| Checkout | Entering shipping and payment | Checkout editor. Editing the steps needs Plus |
| Thank you | Immediately after paying | Checkout editor, Post purchase |
| Order status | Any later visit via the email link | Checkout editor, Customer accounts |
| Order confirmation email | In their inbox | Settings > Notifications |
The last row is a different thing entirely and gets confused with the first three constantly. If the text you want to change arrives in an email, no amount of work in the checkout editor will touch it. That lives in Settings > Notifications, and it is edited as an email template with its own Liquid.
A quick test: is the text on a web page the customer had to click to, or in a message that landed in their inbox? Web page means checkout editor. Inbox means Notifications.
If you still cannot find the block
You are in the wrong configuration. Check you clicked Edit on the one marked Active.
You are on the wrong page. Confirm the top bar reads "Thank you" and not "Checkout".
The block is in Header or Footer, not Main. The sidebar has several sections. Scroll the whole list.
It is an app block from an uninstalled app. If the app was removed, its block may linger as an empty or orphaned entry. Reinstalling the app long enough to remove the block cleanly is sometimes the fastest route.
It is genuinely in the theme after all. If the text appears on your cart page rather than after payment, that is your theme, and sections/main-cart-footer.liquid or the cart template is where to look. The cart is online store, the checkout is not, and the boundary is the moment they click Checkout.
It came from Additional scripts. On older stores, check Settings > Checkout for an Additional scripts field. It is being retired but may still hold content on stores that have not migrated.
What I confirmed on the test store
- The note was an app block on the Thank You page, added through the checkout editor, not the theme. No amount of theme searching would ever have found it.
- Deleting it took a selection, a trash click and a save, on Shopify Basic, with no Plus involved.
- The block existed separately on Thank you and Order status, and had to be removed from both.
The thing worth remembering: if you cannot find text in your theme, it is often because the page is not part of your theme. Checkout, Thank you and Order status are Shopify's, edited from Settings > Checkout. Once you know that boundary exists, this stops being a search problem and becomes a two-minute job.
The Thank You page is the last thing they read
PinFlow turns your Shopify catalog into Pinterest pins and posts them on a schedule, so new people keep arriving to place the orders that reach it.
Get PinFlow on the Shopify App StoreMore Shopify fixes
More community-sourced Shopify guides, tested on a live store.
Shopify Admin
How to Edit a Packing Slip on Shopify to Show Big Product Photos
Shopify's order page shows each item as a 40 pixel thumbnail with no way to enlarge it. Here is how to edit the packing slip template so every line prints that exact variant's photo at 1000 pixels, including the one-line fix Shopify's default template needs.
Shopify Admin
Shopify Shipping Zones: Fix Products Sold Out in One Country
Products show Sold out for customers in one country while your admin shows stock. The cause is a shipping profile with no zone for that country. How Shopify shipping zones and profiles decide what a customer can buy, and the six-click fix, with screenshots.
Shopify Admin
Shopify Translate: Fix Mixed Languages on Product Pages
A Swedish Shopify store showed English words on translated product pages. The titles were translated, so the English came from option names and theme text. How to fix each one in Translate & Adapt, with screenshots.