
How to Edit a Packing Slip on Shopify to Show Big Product Photos
Shopify's order page shows each item as a 40 pixel thumbnail with no way to enlarge it. Here is how to edit the packing slip template so every line prints that exact variant's photo at 1000 pixels, including the one-line fix Shopify's default template needs.
By AjayCodeWiz · September 30, 2026 · 9 min read
The problem
A merchant asked about this on the Shopify Community. They sell products where several variants look almost the same, such as shades of one colour.
Before they pack an order, they want to confirm the shade. The order page only shows a tiny thumbnail beside each item. To see it properly they had to leave the order, open the product, find the variant and open its media. With a stack of orders to pack, that adds up.
They asked for one thing: click the thumbnail on the order and see that variant's photo at full size.
I reproduced it on a test store. I made a lip tint with three shades, Rose 01, Rose 02 and Rose 03, deliberately close in colour. Then I placed an order for Rose 01 and two of Rose 03.
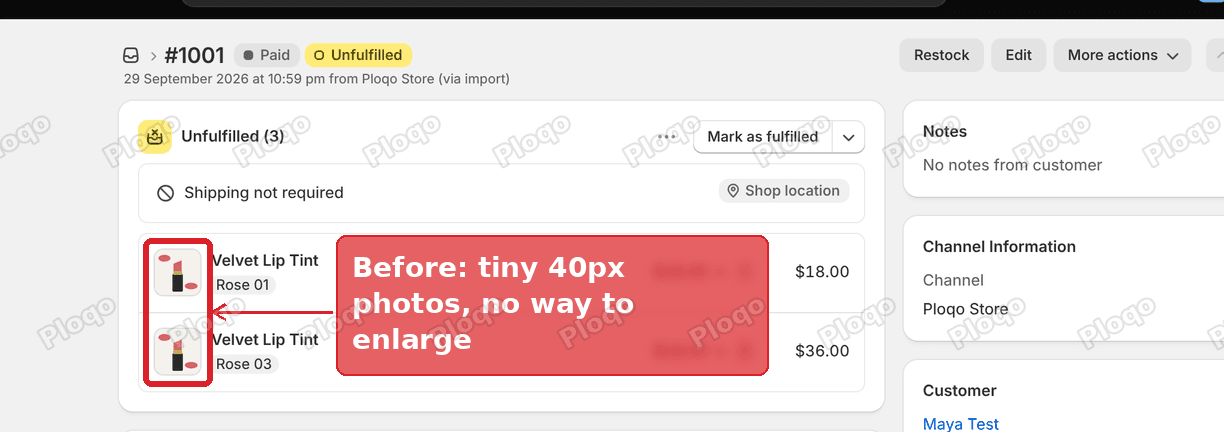 The Shopify order page with two line items shown as small thumbnails
On the order page each thumbnail measured 40 by 40 pixels. At that size Rose 01 and Rose 03 look like the same pink.
What the order page lets you do today
Clicking the thumbnail does nothing. It is a plain image, not a link or a button, so no preview or larger view opens.
The item's name is a link, but it goes to the variant's edit page in Products. On that page, clicking the photo opens the image picker used to swap the variant's picture. It does not open a larger view either. So the admin has no one-click way to see a line item's photo at a readable size.
There is no setting that changes this. The order page layout is fixed by Shopify, and themes do not reach the admin.
The packing slip is different. It is the document you print from an order to go in the box. Shopify builds it from a template you can edit, and that template already includes each line item's photo. It just prints it small.
How to edit the packing slip on Shopify
The packing slip template lives in your shipping settings. Here is the full path, one screen at a time.
Step 1. Open Settings
Click Settings at the bottom left of the admin.
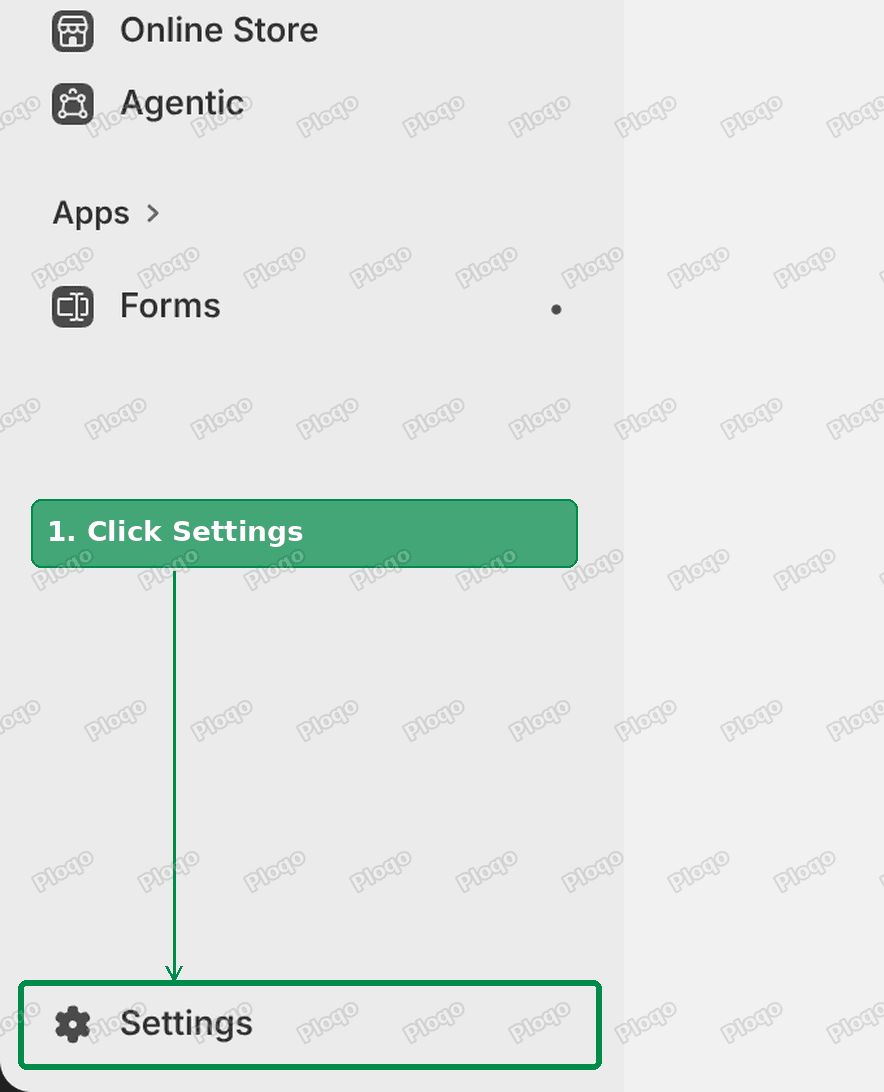 The Settings link at the bottom of the Shopify admin menu
Step 2. Open Shipping and delivery
In the settings menu, click Shipping and delivery.
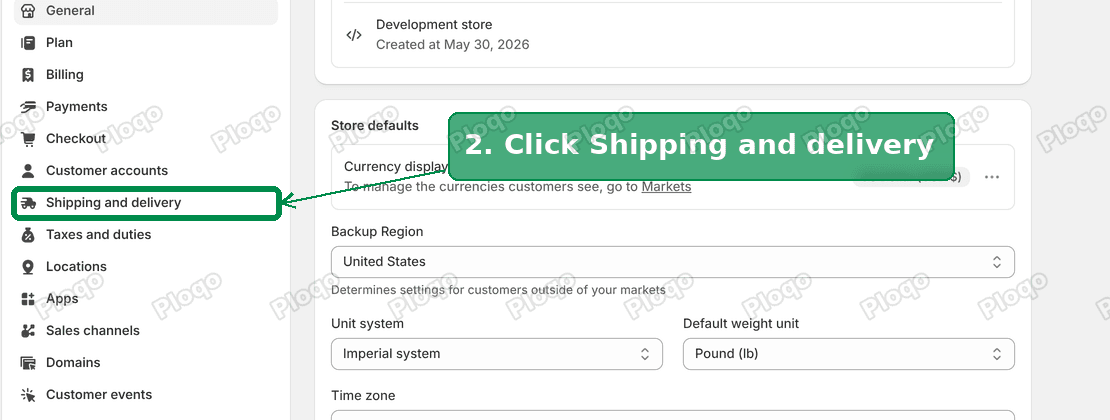 Shipping and delivery in the Shopify settings menu
Step 3. Open the document templates
Scroll down to the Documents card and click Templates. The row lists the three documents you can edit: Packing slip, Invoice and Pick list.
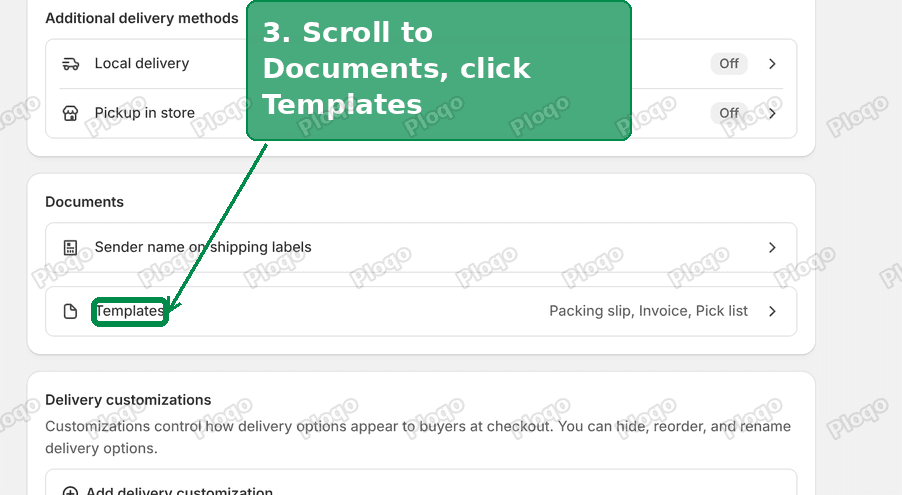 The Documents card with the Templates row
Step 4. Open the Packing Slip template
Click Packing Slip.
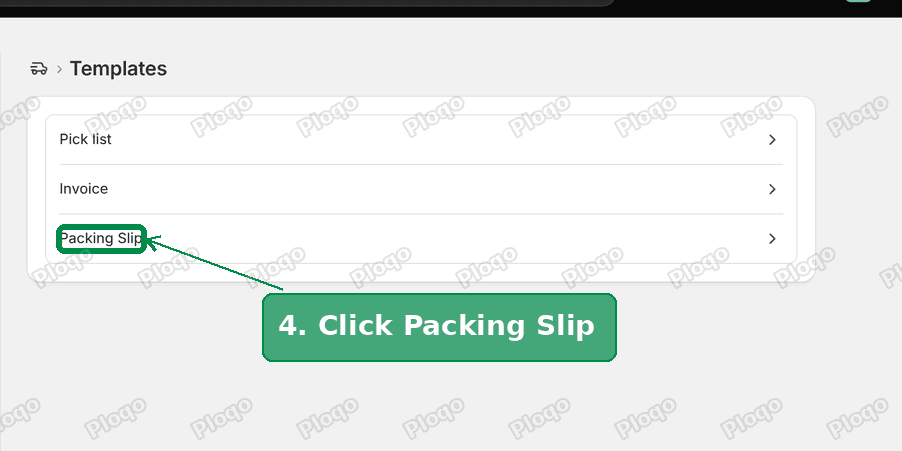 The Templates list with Packing Slip
The editor has two halves. On the left is the template's code. On the right is a preview of the slip.
The code is written in Liquid, the template language Shopify uses for its themes and documents. You do not need to know it for this change. You change one number and swap one line.
Step 5. Change the image size from 58 to 250
Around line 109, just under a comment that says "To adjust the size of line item images, change desired_image_size", there is this line:
{% assign desired_image_size = 58 %}Change the number so it reads:
{% assign desired_image_size = 250 %}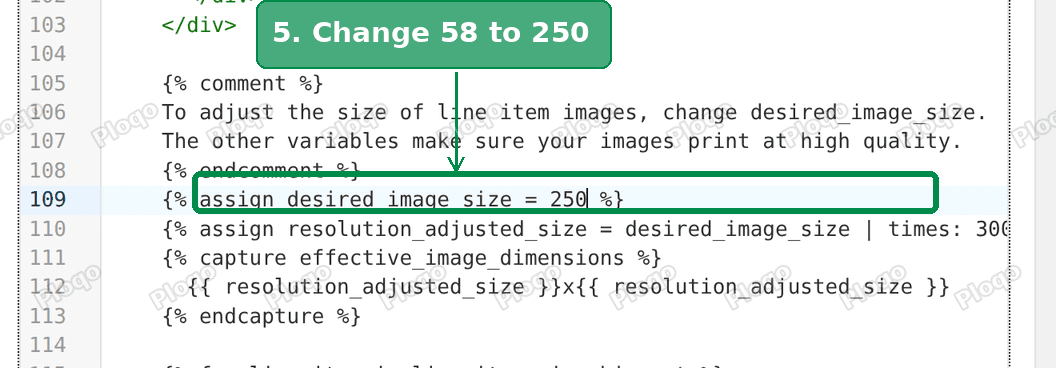 The desired_image_size line changed to 250
The number is the width of the photo frame on the slip, in pixels. Change only the number and leave the rest of the line as it is.
Step 6. Replace the image line
About ten lines further down is the line that prints the photo:
{{ line_item.image | img_url: effective_image_dimensions | img_tag: '', 'aspect-ratio__content' }}Select the whole line and replace it with this one:
{{ line_item.image | img_url: '1000x1000' | img_tag: '', 'aspect-ratio__content' }}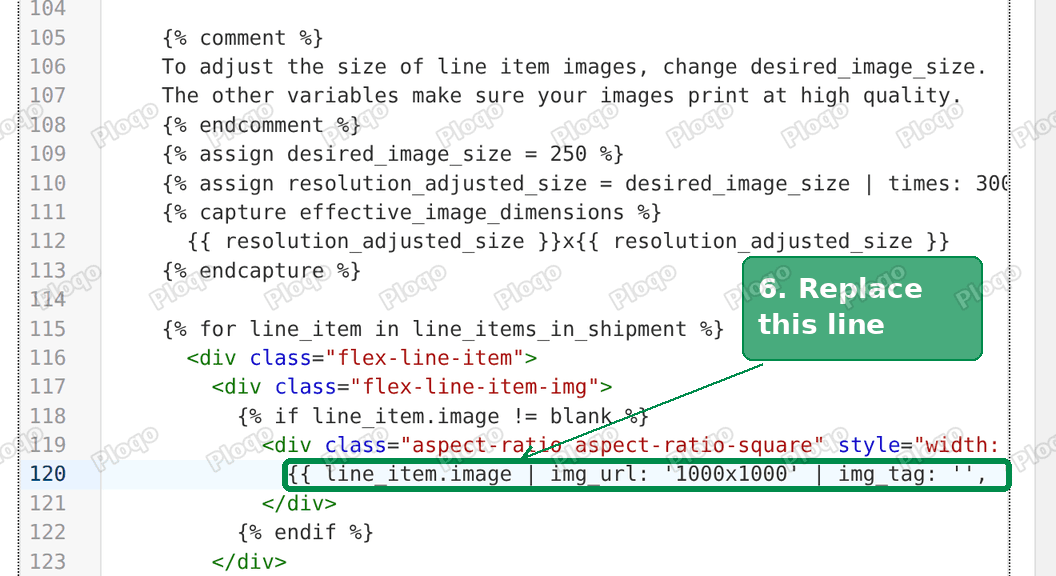 The image line replaced with the 1000x1000 version
Keep the spaces at the start of the line. They do not change anything on the slip, but they keep the code tidy.
Step 7. Save
Click Save in the bar at the top of the page.
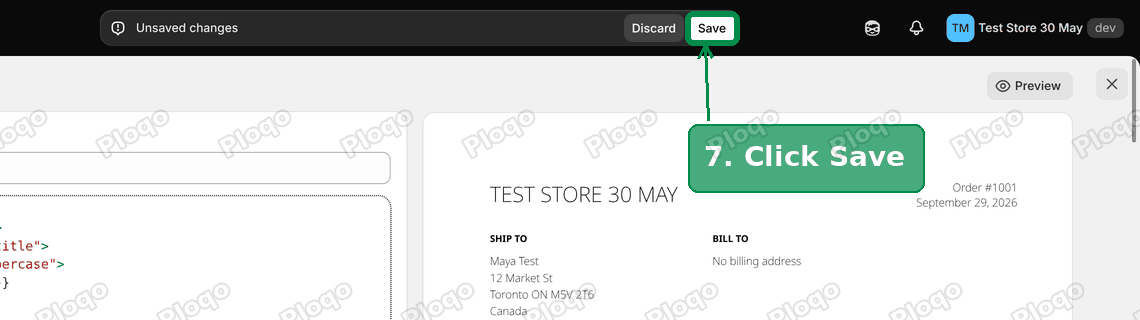 The Save button on the packing slip template
Step 8. Print a packing slip from an order
Open any order, click More actions, then Print packing slips. Shopify builds a PDF and opens it in a new tab.
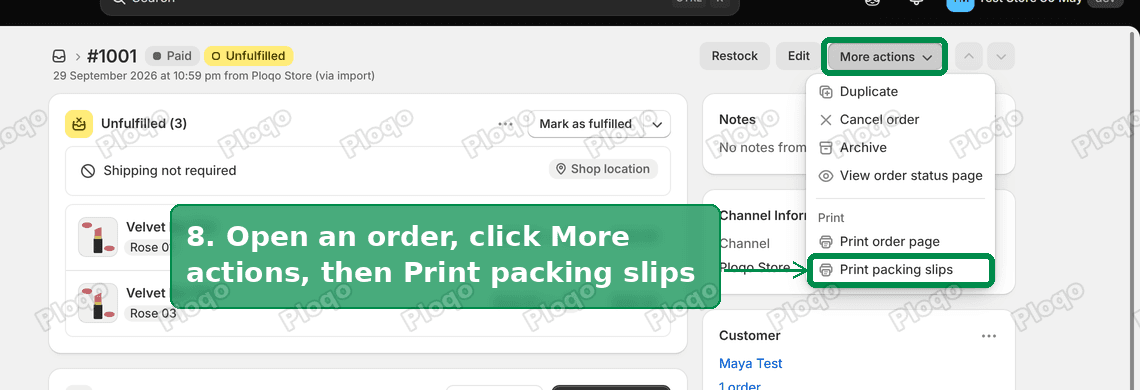 More actions menu with Print packing slips
Here is the printed slip for my test order after both changes.
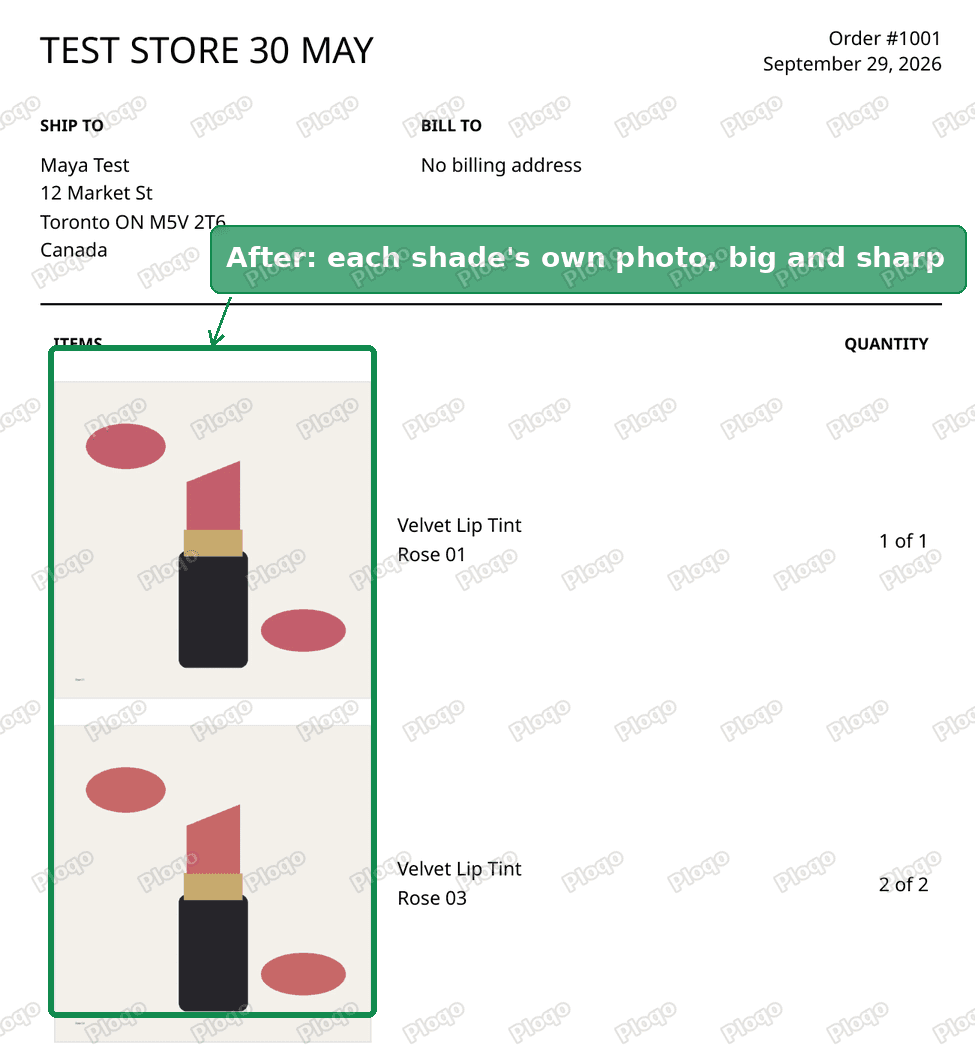 The printed packing slip with a large photo for each shade
Each line now shows the photo of the exact variant that was ordered, large enough to tell Rose 01 from Rose 03.
Why changing the number alone is not enough
Shopify's own comment says the size number is all you need to change. On my test store that was not true.
With only the number changed to 250, the frame on the slip got bigger but the photo inside it did not. I opened the printed PDF and checked the photos embedded in it. Both were 100 by 100 pixels, the same as before the change.
The cause is in the default template. The line after the size number works out a print-quality size, about 1,042 pixels for a 250 frame. But the template stores that size with spaces and line breaks around it. Shopify does not accept that as a size, so it falls back to its standard small photo, which is 100 pixels wide. The same thing happens at the default of 58, so the slip has always printed that small copy.
The replacement line in step 6 asks for the photo at a fixed 1000 by 1000 pixels instead. After that change, the PDF held both photos at 1000 by 1000 pixels. They print about 5.4 cm (2.1 inches) wide at close to 470 dots per inch, which is sharp on any office printer.
The editor's Preview pane shows the same thing. With only the number changed, its photos stayed 100 pixels wide inside the bigger frame. After the new image line, they filled the 250 pixel frame.
Which photo prints for each line
The slip prints the photo attached to the variant that was ordered, not just the first photo of the product. On my test order, Rose 01 and Rose 03 each printed their own shade.
That only works if each variant has its own photo. Check this before relying on the slip. Open the product, click each variant and confirm its photo is the right shade. If it is not, click the photo on the variant page and pick the correct one from the product's images.
Picking a size that fits your printer
250 worked well on my test store. It leaves room for the item name, the variant name and the quantity beside the photo on an A4 or US Letter page.
A few guidelines if you want to adjust it:
- 150 to 200 keeps more items per page and is still big enough for most colour checks.
- 250 to 300 suits close shades like mine, where you want to compare them side by side.
- Above 300, check the Preview first. The item name and quantity sit beside the photo, so a very wide photo leaves them less room.
The Preview pane on the right of the editor updates as you type, so you can try a size before saving. The Preview button at the top lets you pick one of your real orders to show there.
What to check if the photos did not change
The frame is bigger but the photo is still small. You changed the number but not the image line. Do step 6 as well.
The photos are still small everywhere. Make sure you edited the Packing Slip template and not Invoice or Pick list. They sit in the same list and look alike.
The Preview pane shows a small photo inside a big empty frame. The image line was not replaced, or not saved. Check step 6.
The Save button never appeared. The save bar only shows once the code changes. Click inside the code editor, make the edit again and wait for the bar at the top.
Some lines show no photo at all. The template only prints a photo when the item has one. Products without any image print as text only.
Every shade shows the same picture. Check that each variant has its own photo assigned on its variant page.
You want the old slip back. Click Revert to default at the top of the template editor. It appears once a template has been changed.
Packing slip, invoice and pick list: which is which
Shopify's Templates list has three documents, and they are easy to mix up.
- Packing slip. Goes in the box. Lists what is in this shipment. You print it from an order with Print packing slips.
- Invoice. A bill for the customer, with prices and totals.
- Pick list. A list for whoever collects the items from the shelves, grouped across orders.
The fix in this article is for the packing slip, because that is the document in your hand when you pack. If you want invoices or several orders printed in one go, Shopify's Order Printer app covers that. I wrote a separate guide to Shopify Order Printer.
Other ways to see a variant photo from an order
If printing is not how you work, there are two other routes.
Open the variant from the order. Click the item name on the order. It opens the variant page, where the photo is larger than the thumbnail. It is one click, but it takes you away from the order.
Use a pick and pack app. Apps such as iPacky and Scan Picker are built for packing checks. They show each item with its photo on a packing screen and some let you scan a barcode to confirm the right variant went in the box. They suit stores that pack many orders a day.
For most small stores, the packing slip change is enough. It takes a few minutes and costs nothing.
Spending too long on manual Shopify busywork?
PinFlow turns your Shopify catalog into Pinterest pins and posts them on a schedule, automatically. Set it up once and let it run.
Get PinFlow on the Shopify App StoreMore Shopify fixes
More community-sourced Shopify guides, tested on a live store.
Shopify Admin
Shopify Shipping Zones: Fix Products Sold Out in One Country
Products show Sold out for customers in one country while your admin shows stock. The cause is a shipping profile with no zone for that country. How Shopify shipping zones and profiles decide what a customer can buy, and the six-click fix, with screenshots.
Shopify Admin
Shopify Translate: Fix Mixed Languages on Product Pages
A Swedish Shopify store showed English words on translated product pages. The titles were translated, so the English came from option names and theme text. How to fix each one in Translate & Adapt, with screenshots.
Shopify Admin
Shopify B2B Discounts: How to Turn Them On and Set Them Up
Shopify B2B discounts are off until Shopify Support enables them. Here is how to ask, how to build a B2B market, and how to give company buyers automatic free shipping.