
Shopify Inventory Adjustment: Remove Damaged Stock
Typing a negative number no longer subtracts stock, it adds. Here is the current Adjust by flow, the reason codes worth using, and how to write off damage or theft in bulk.
By AjayCodeWiz · July 12, 2026 · 8 min read
The problem
A merchant on the Shopify Community, running a toy shop, raised a very specific complaint about Shopify's inventory management: accounting for damaged items or theft got harder.
Their words: "You can no longer enter a negative amount to quickly adjust inventory."
That is accurate, and there is a worse version of it that most people hit before they find the right screen. Typing a negative number does not fail. It adds. Enter -3 against a stock level of 45 and you get 48, not 42.
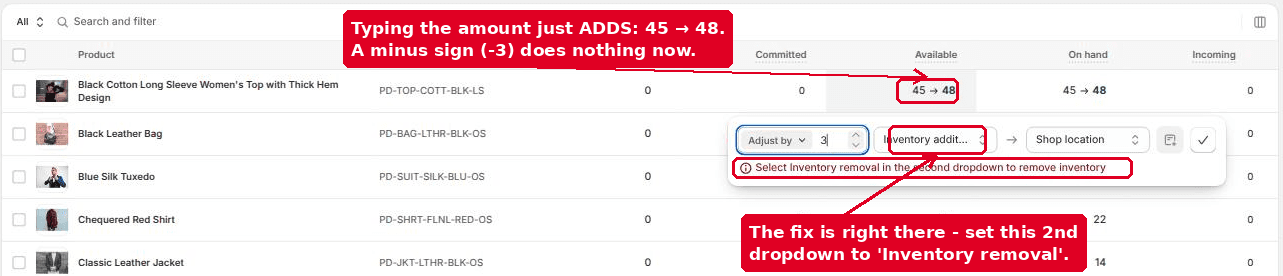 Typing a negative quantity adds instead of subtracting: 45 becomes 48
A wrong answer with no error is much worse than an error message, because you only find out at stocktake.
Here is the flow that actually works, and what changed.
The current way to write off stock
Four steps, and the third one is the one people miss.
Step 1: open Products, then Inventory
In your admin, go to Products, then Inventory in the sub-navigation. This is the list view with one row per variant, and it is where inventory edits are meant to happen.
You can do this from the product page too, but the Inventory view is faster because you never leave the list.
Step 2: click the number in the Available column
Click the quantity itself, not the row. A small editor opens.
Step 3: switch from "Set to" to "Adjust by"
This is the step that matters.
The editor opens on Set to, which replaces the number outright. What you want is Adjust by, which applies a delta.
Choose Adjust by and type the quantity as a positive number. Three damaged units is 3, not -3.
Step 4: set the movement direction
Now set the movement: Shop location to Inventory removal.
This is the piece that replaced the negative number. Instead of the sign telling Shopify which way stock moves, an explicit origin and destination do.
The preview updates live, so you can confirm before saving. Here it shows 45 going to 42.
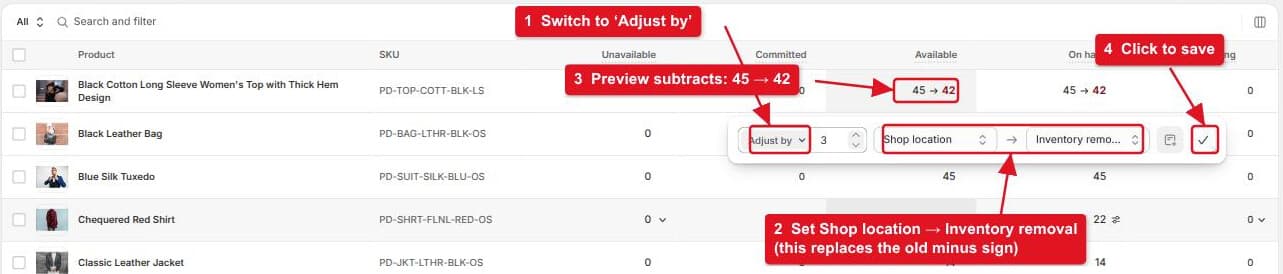 The Adjust by editor with Shop location to Inventory removal, previewing 45 to 42
Then click Add reason and choose Damaged, Theft, or whichever applies, and Save.
Why Shopify made this harder
It is worth knowing the reasoning, because it changes whether the extra clicks feel worth it.
Under the old model, inventory was a single number and an adjustment was a delta. Stock went from 45 to 42 and Shopify recorded that it changed. It did not record why, or where those three units went.
The current model tracks inventory across named states: available, committed, reserved, damaged, quality control, safety stock, and inventory removal. An adjustment is a movement between two of those states, which is why the UI asks for an origin and a destination.
The benefit is reporting. Analytics > Reports > Inventory adjustment changes can now tell you that you lost 40 units to theft and 12 to damage this quarter, broken down by product. Under the old model that data did not exist, because the reason was never captured.
The cost is that a two-second edit became a six-second edit, and the negative-number habit now produces a wrong number instead of an error.
Whether that trade is worth it depends on whether you look at the shrinkage reports. If you do, tag every adjustment with a reason. If you never will, the reason step is optional and you can skip it.
The reason codes, and which to use
Damaged is stock that existed and is no longer sellable. Broken, expired, opened.
Theft or loss is stock that has gone missing. Shoplifting, warehouse shrinkage, items that never arrived.
Quality control is stock pulled for inspection that may come back. Use this rather than Damaged when the units might return to available.
Promotion or donation is stock given away. Samples, influencer seeding, charity.
Received and Restock move stock the other way, into available.
The distinction that actually matters for your accounts is Damaged and Theft versus Quality control. The first two are write-offs and hit your cost of goods. The third is a temporary hold on stock you still own. Getting those mixed up makes your shrinkage number look worse than it is.
The states, and why the UI asks for two of them
The origin and destination selectors confuse people because they look like locations, and sometimes they are. They are actually a mix of two things: your physical locations, and Shopify's inventory states.
The states you will see:
Available is sellable stock. This is the number your storefront checks.
Committed is stock spoken for by unfulfilled orders. Shopify manages this itself; you do not move things in and out of it by hand.
Damaged, Quality control and Safety stock are holding states. Stock is still yours, still counted as on hand, but not sellable. Moving units here reduces Available without pretending they never existed.
Inventory removal is the exit. Units leave your on-hand count entirely.
That distinction, holding state versus exit, is the one worth getting right. If a customer returned a damaged item you intend to repair and resell, move it to Damaged, not Inventory removal. If it goes in the bin, Inventory removal is correct.
A useful rule: if you would still count it during a stocktake, it belongs in a holding state. If you would not, remove it.
Doing it in bulk
One at a time is fine for a broken item. For a stocktake it is not.
Bulk edit
From Products, tick the products, then click Bulk edit. Add the Available column through the Columns picker and edit the numbers directly in the grid.
The catch: bulk edit sets absolute values, it does not adjust by a delta, and it does not capture a reason. So it is right for a stocktake where you are entering counted numbers, and wrong for writing off shrinkage you want in the reports.
CSV export and import
For hundreds of rows, export your inventory to CSV, edit the quantities, and import it back. Same trade-off as bulk edit: absolute values, no reason codes.
Filter by SKU or by vendor before exporting so you are only handling the rows you need.
A note on doing this often
If you are writing off damage weekly, it is worth building a habit around the reason codes rather than optimising the clicks. The four extra seconds per adjustment is the only thing standing between you and knowing what your actual shrinkage rate is, and most stores that complain about the clicks have never opened the report the clicks produce.
Common questions
Why does typing a negative number add instead of subtract?
The field expects a magnitude, and the direction comes from the movement selector. The minus sign is discarded rather than treated as an error. It is the single most confusing part of this screen and it is worth telling your staff about explicitly.
Can I still just type the new total?
Yes, that is what Set to does, and it is the right choice after a physical count. Use Adjust by when you know the change but not the total, and Set to when you know the total.
Where do removed units actually go?
Nowhere sellable. Inventory removal is a terminal state; the units leave your on-hand count. If you want them tracked as still-owned but not sellable, use a different state such as Damaged rather than Inventory removal.
Does this affect committed inventory on open orders?
No. Adjustments act on available stock. If you have 45 available and 5 committed to unfulfilled orders, removing 3 leaves 42 available and the 5 committed untouched.
Can I automate write-offs?
Partially. Shopify Flow has inventory actions and can adjust quantities on a trigger, which is useful for things like automatically removing display units. It cannot replace a human deciding something is damaged.
Multiple locations?
The origin selector is where the location matters. Make sure you are removing from the location that actually holds the stock, because the default is not always the one you mean.
If it did not work
The number went up instead of down. You typed a negative and left the movement on a receiving direction. Adjust it back and redo it with a positive number and Inventory removal.
There is no Adjust by option. You are on the product page's inventory field rather than the Inventory list editor. Go to Products, then Inventory, and click the number in the Available column.
Add reason does not appear. Reason codes attach to movements, so they show once an origin and destination are set. If the movement is incomplete, the reason picker stays hidden.
The report shows nothing. Reports only contain adjustments that were tagged with a reason. Untagged adjustments still change your stock but do not appear in the shrinkage breakdown, which is the main argument for always adding one.
What I would do
Set a rule for whoever handles stock: positive numbers only, direction from the dropdown, always add a reason. Those three habits remove every failure mode on this screen, including the one that shows you nothing.
Then actually open Analytics > Reports > Inventory adjustment changes once a month. If the numbers there are useful, the extra clicks paid for themselves. If they are not, stop adding reasons and save the time.
Tested on
Reproduced on a Shopify dev store: confirmed the Adjust by flow with Shop location to Inventory removal previews and saves correctly, and confirmed that entering a negative quantity increases the stock level rather than decreasing it or raising an error.
Spending too long on manual Shopify busywork?
PinFlow turns your Shopify catalog into Pinterest pins and posts them on a schedule, automatically. The repetitive part stops being your job.
Get PinFlow on the Shopify App StoreMore Shopify fixes
More community-sourced Shopify guides, tested on a live store.
Shopify Admin
Shopify Discount Types: Amount Off Products vs Order
Shopify has four discount types, and two of them work out a percentage in different ways. One rounds every single unit, the other rounds the order once. On low unit prices that difference is real money. Tested on a live store.
Shopify Admin
Shopify Order Printer: Print Every Order in One Go
Shopify's bulk Print menu offers packing slips and nothing else until you install Order Printer. Here is how to add it, how to change what the document says, and how to print fifty orders at once, with screenshots from a live admin.
Shopify Admin
Shopify POS UI Extensions: What They Can and Cannot Add
POS UI extensions are how an app puts its own screens inside Shopify POS. Here is what the smart grid already does for free, what an extension can add on top, and the limits worth knowing before you pay for one.