
How to Create a Landing Page on Shopify Without an App
Every guide answers this by selling you a page builder. Shopify can publish landing pages natively, each with its own indexable URL, and the setting that does it is not called landing pages.
By AjayCodeWiz · July 27, 2026 · 10 min read
You want a landing page, and every guide tells you to install an app
Search for how to create a landing page on Shopify and you will be sold a page builder within two clicks. PageFly, Shogun, GemPages. All good tools, all a monthly fee, and all of them adding scripts to a storefront you were probably trying to keep fast.
Shopify can do this natively. The feature is not called "landing pages", which is exactly why it is so hard to find.
This article walks through the native route end to end. The worked example is a real problem a merchant posted on the Shopify Community, because it is the case that breaks every simple answer: one product, one SKU, and several landing pages that each need their own copy and photos.
Here is the finished result. Two separate URLs, two headlines, two hero images, one product underneath.
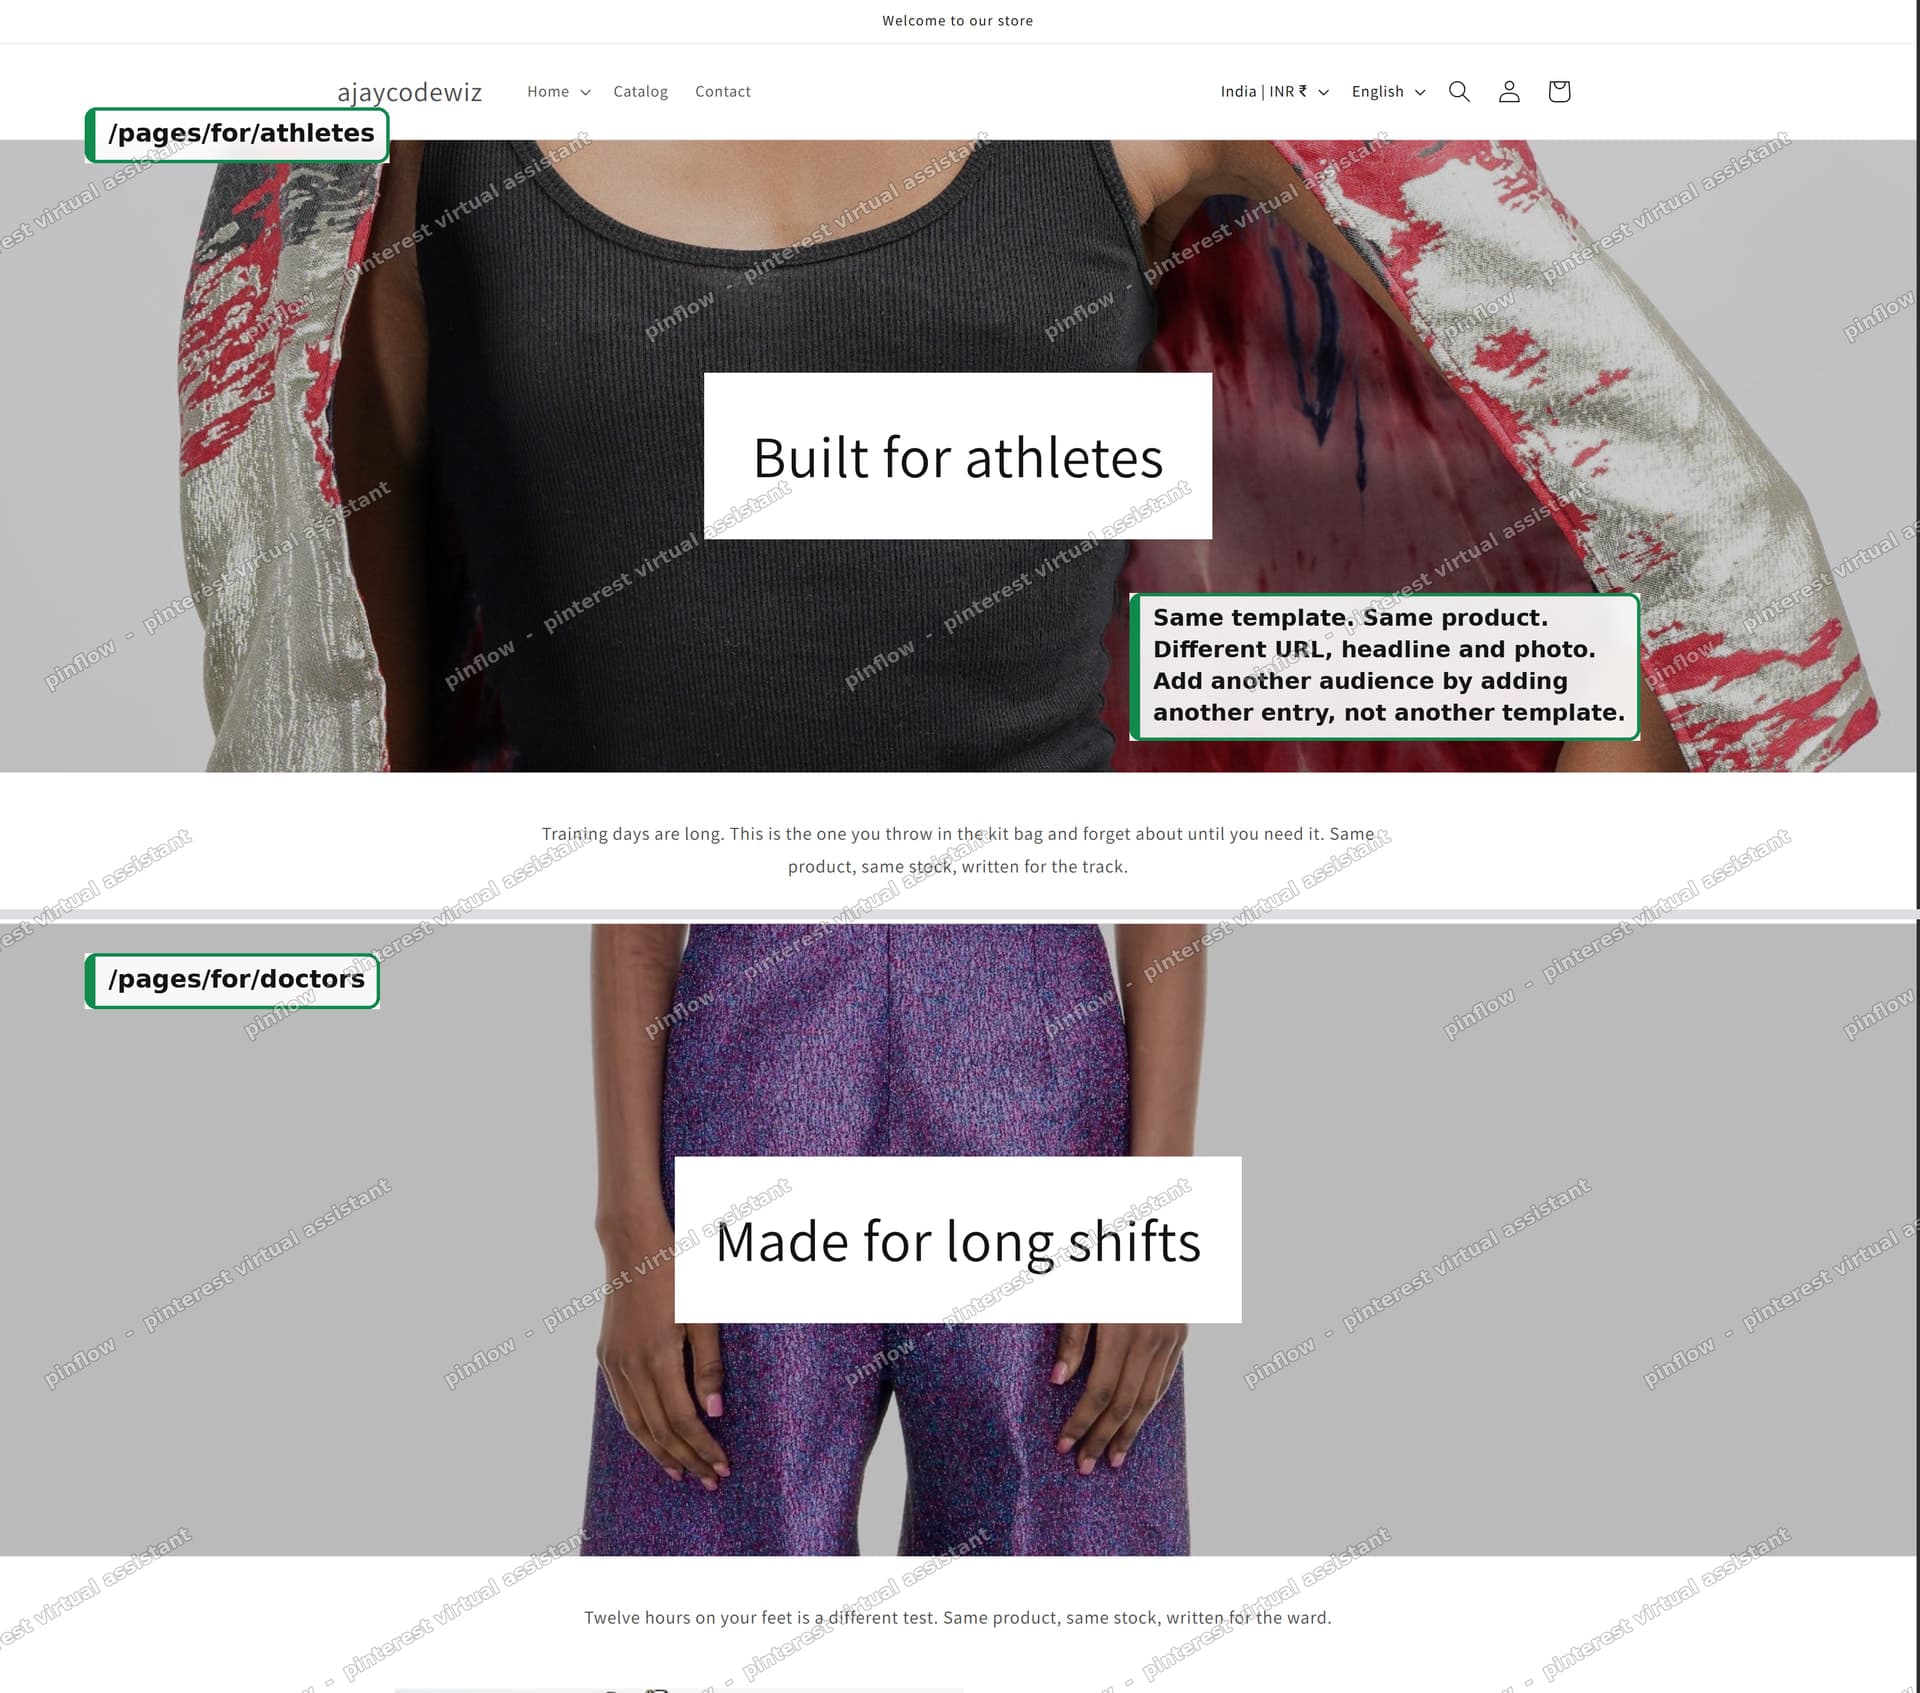 Two landing pages built from one template, one product, different URL, headline and photo
The problem, in the merchant's words
They sell a single product. One SKU. They wanted a landing page per audience: athletes, doctors, musicians, students. Each page needed different text and different images, and all of them had to share the same inventory count.
They had been doing it with alternate templates and a URL parameter:
www.example.com/products/computer?view=students
www.example.com/products/computer?view=athletes
It worked, visually. It was also, in their words, clunky. They were right, and for a reason worth knowing before you build anything.
Why the ?view= trick cannot work
Shopify themes support alternate templates through a ?view= parameter. It is a real feature and it renders correctly.
The problem is that it produces a query string, not a page.
I measured this on a test store rather than assuming. On /products/my-product?view=students, the rendered HTML contains:
<link rel="canonical" href="https://example.com/products/my-product">The canonical tag points at the plain product URL, with the parameter stripped. The og:url does the same. The page title is the base product's title, unchanged.
That is Shopify telling Google, on every single view URL, "the real page is over there". So every one of those landing pages hands its ranking signals straight back to the one product page. They will never rank as separate pages, they cannot be tracked cleanly as separate pages in analytics, and they are awkward to point ads at.
Query strings are for filtering and sorting. They are not for content you want indexed.
The two native routes, and which one to pick
Shopify gives you two ways to build a real landing page with a real URL. Most advice only mentions the first.
Route one: a Page plus a custom page template. Online Store, Pages, Add page. Then a matching template in the theme editor. This is fine for one or two landing pages.
It scales badly. Every new audience means a new Page, and a new template or some per-page wiring so the right content appears. At four audiences it is tedious. At twenty it is a maintenance problem, and you will be editing the theme every time marketing invents a new persona.
Route two: metaobject entries published as web pages. One definition, one template, and one entry per audience. Adding an audience is adding an entry. You never touch the theme again.
Route two is the one few merchants know exists, so that is what the rest of this covers.
What are metaobjects in Shopify?
A metaobject is a custom content type you define yourself.
Metafields let you add a field to something Shopify already has, like a product or a collection. Metaobjects let you invent the thing itself. You decide it has a Headline, a Body copy and a Hero image, and Shopify gives you an admin screen to create as many of them as you like.
They are already used for things like size charts and colour swatches. What most merchants miss is the setting that turns them into pages.
Step 1: Define what changes between your landing pages
Go to Settings, Custom data, Metaobjects, Add definition. Name it something that describes the audience, not the page. I used Audience.
Now add one field per thing that differs between landing pages:
- Headline, Single line text
- Body copy, Multi-line text
- Hero image, Image (File)
Add more if your pages need more. Benefits list, testimonial, CTA text, a second image. The rule is simple: anything identical on every page belongs in the template, and anything that changes belongs here as a field.
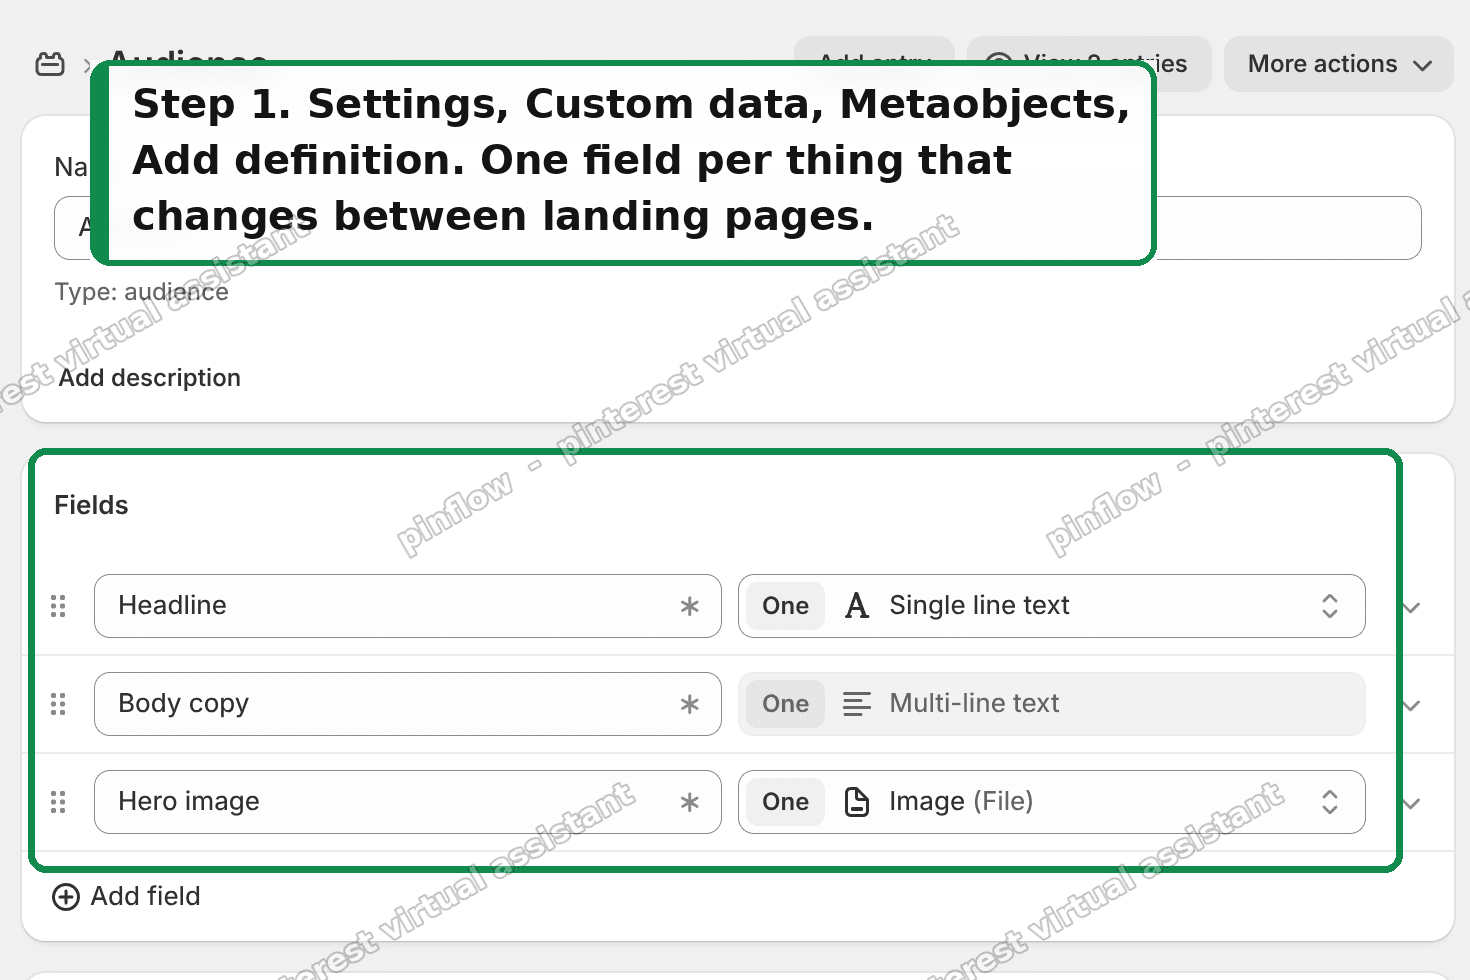 Add a metaobject definition with one field per thing that changes
Step 2: Turn on the setting that makes them pages
This is the whole trick, and it is one toggle.
Scroll to Metaobject options and switch on Publish entries as web pages.
Three things appear underneath:
- Page title. Point this at your Headline field. Every landing page then gets its own
<title>automatically. - Enable in Online Store. Leave it ticked.
- Handle. This becomes the URL prefix. I set it to
for, which produces/pages/for/athletes. Set it toaudienceand you get/pages/audience/athletes. Pick something that reads well in an address bar.
Shopify shows you the resulting URL pattern live, right under the field.
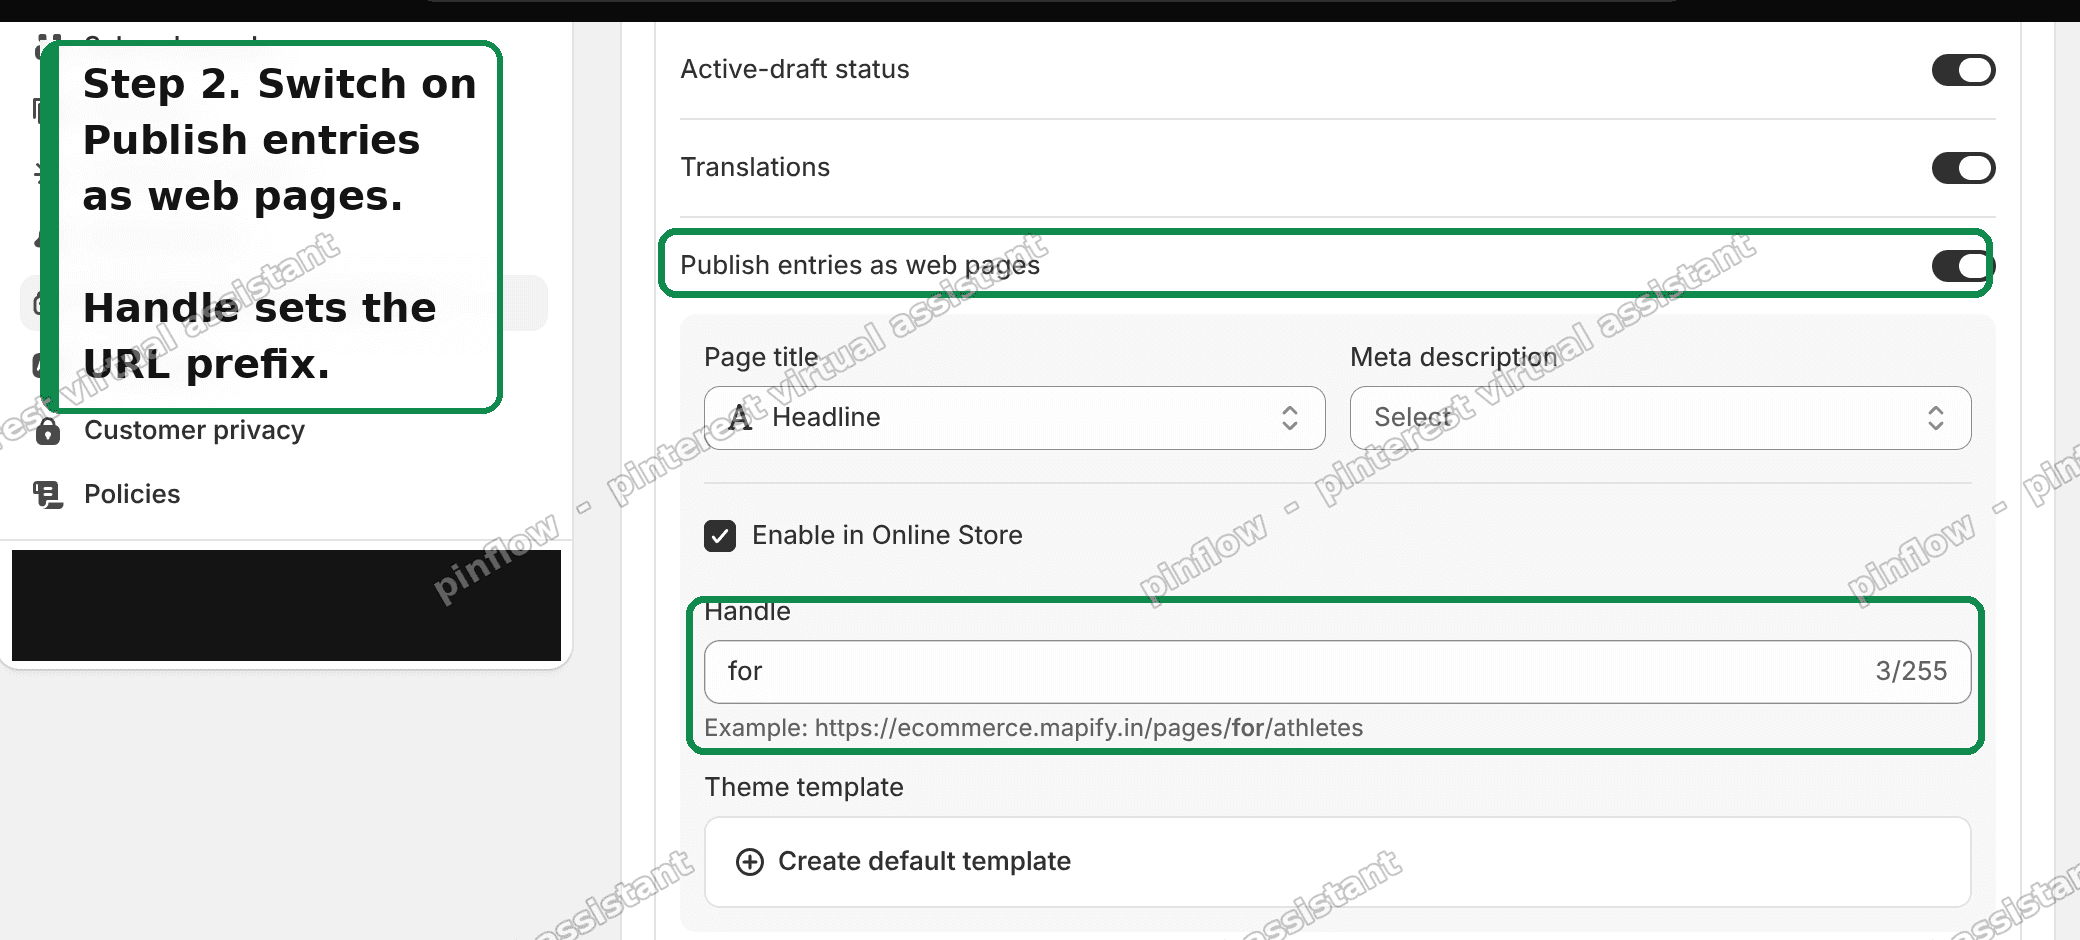 Publish entries as web pages is the setting that does the work
Step 3: Add one entry per audience
Go to Content, Metaobjects, pick your definition, Add entry.
Fill in the headline, the body copy and the image for that audience. Then open Search engine listing and set the URL handle. This is the last part of the address, so set it to athletes, doctors, musicians, students.
If you skip this, Shopify generates the handle from your headline, which gives you /pages/for/built-for-athletes instead of /pages/for/athletes. Not wrong, just uglier.
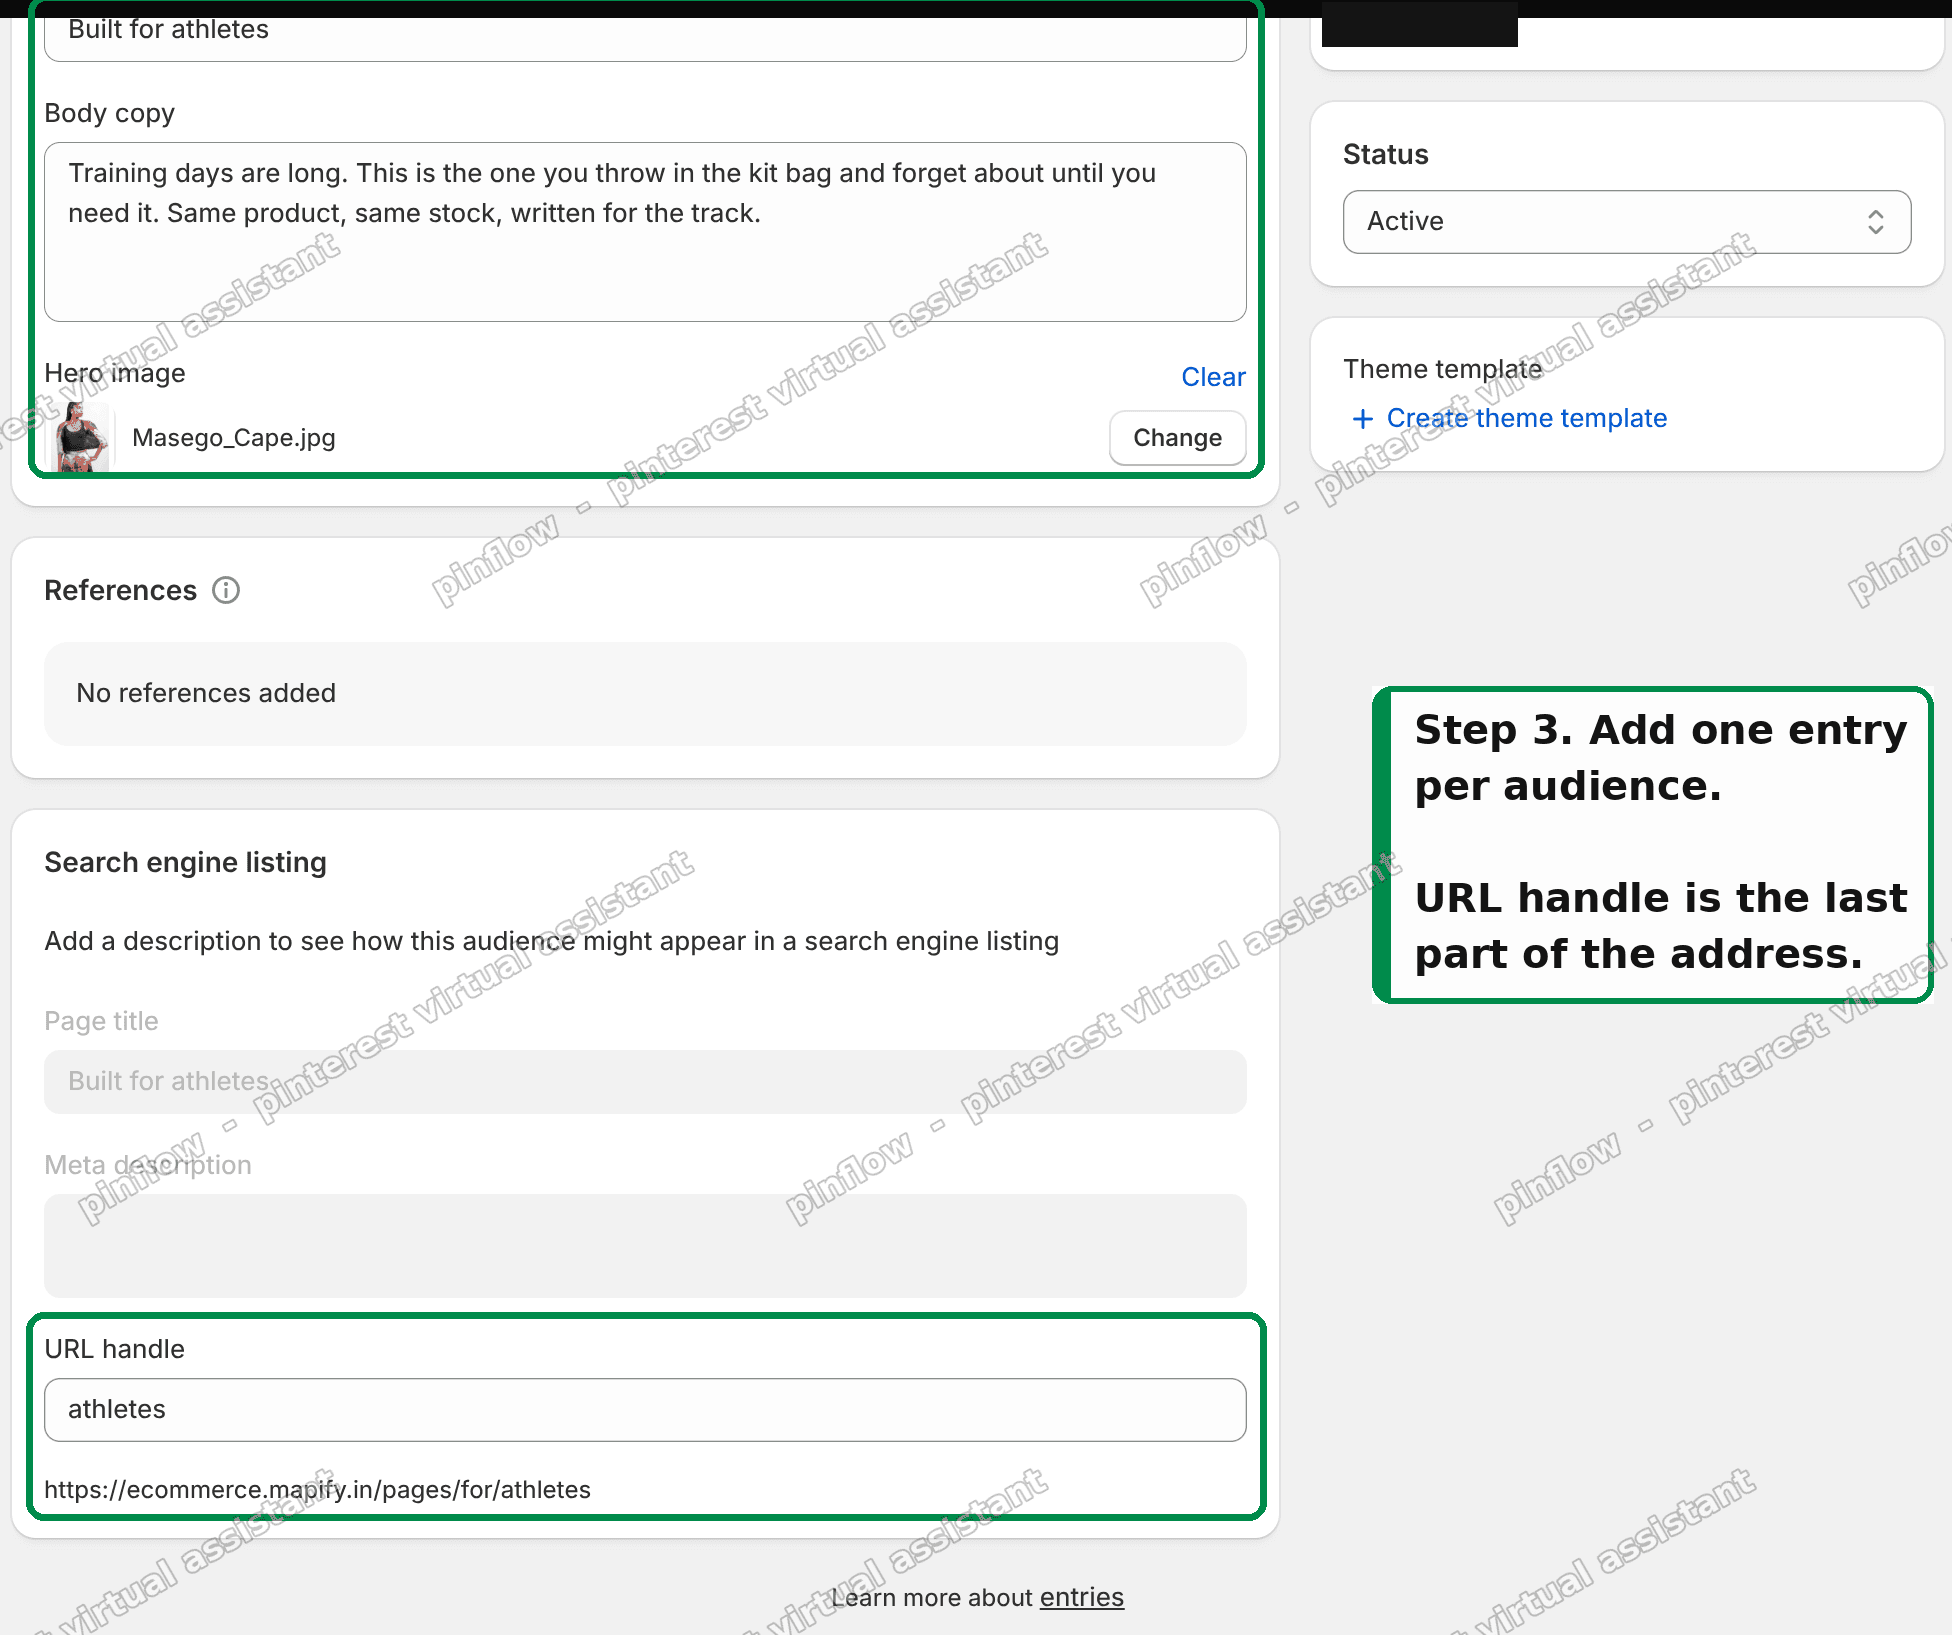 One entry per audience, with its own URL handle
Repeat for each audience. That is the only step you will ever repeat.
Step 4: Build the template once
Online Store, Themes, Customize. At the top of the editor there is a page dropdown. Open it and pick your metaobject template, listed under the definition's name.
Now build the page as you would build any other:
- Add an Image banner. Click the dynamic source button next to the image setting and bind it to your Hero image field. Do the same for the heading and your Headline field.
- Add a Rich text section for the body copy, bound to your Body copy field.
- Add a Featured product section and pick your product.
The Featured product section is the part that matters commercially. It renders Shopify's own product form, so the Add to cart button posts the real variant to the real cart. No custom code, nothing to reconcile at checkout.
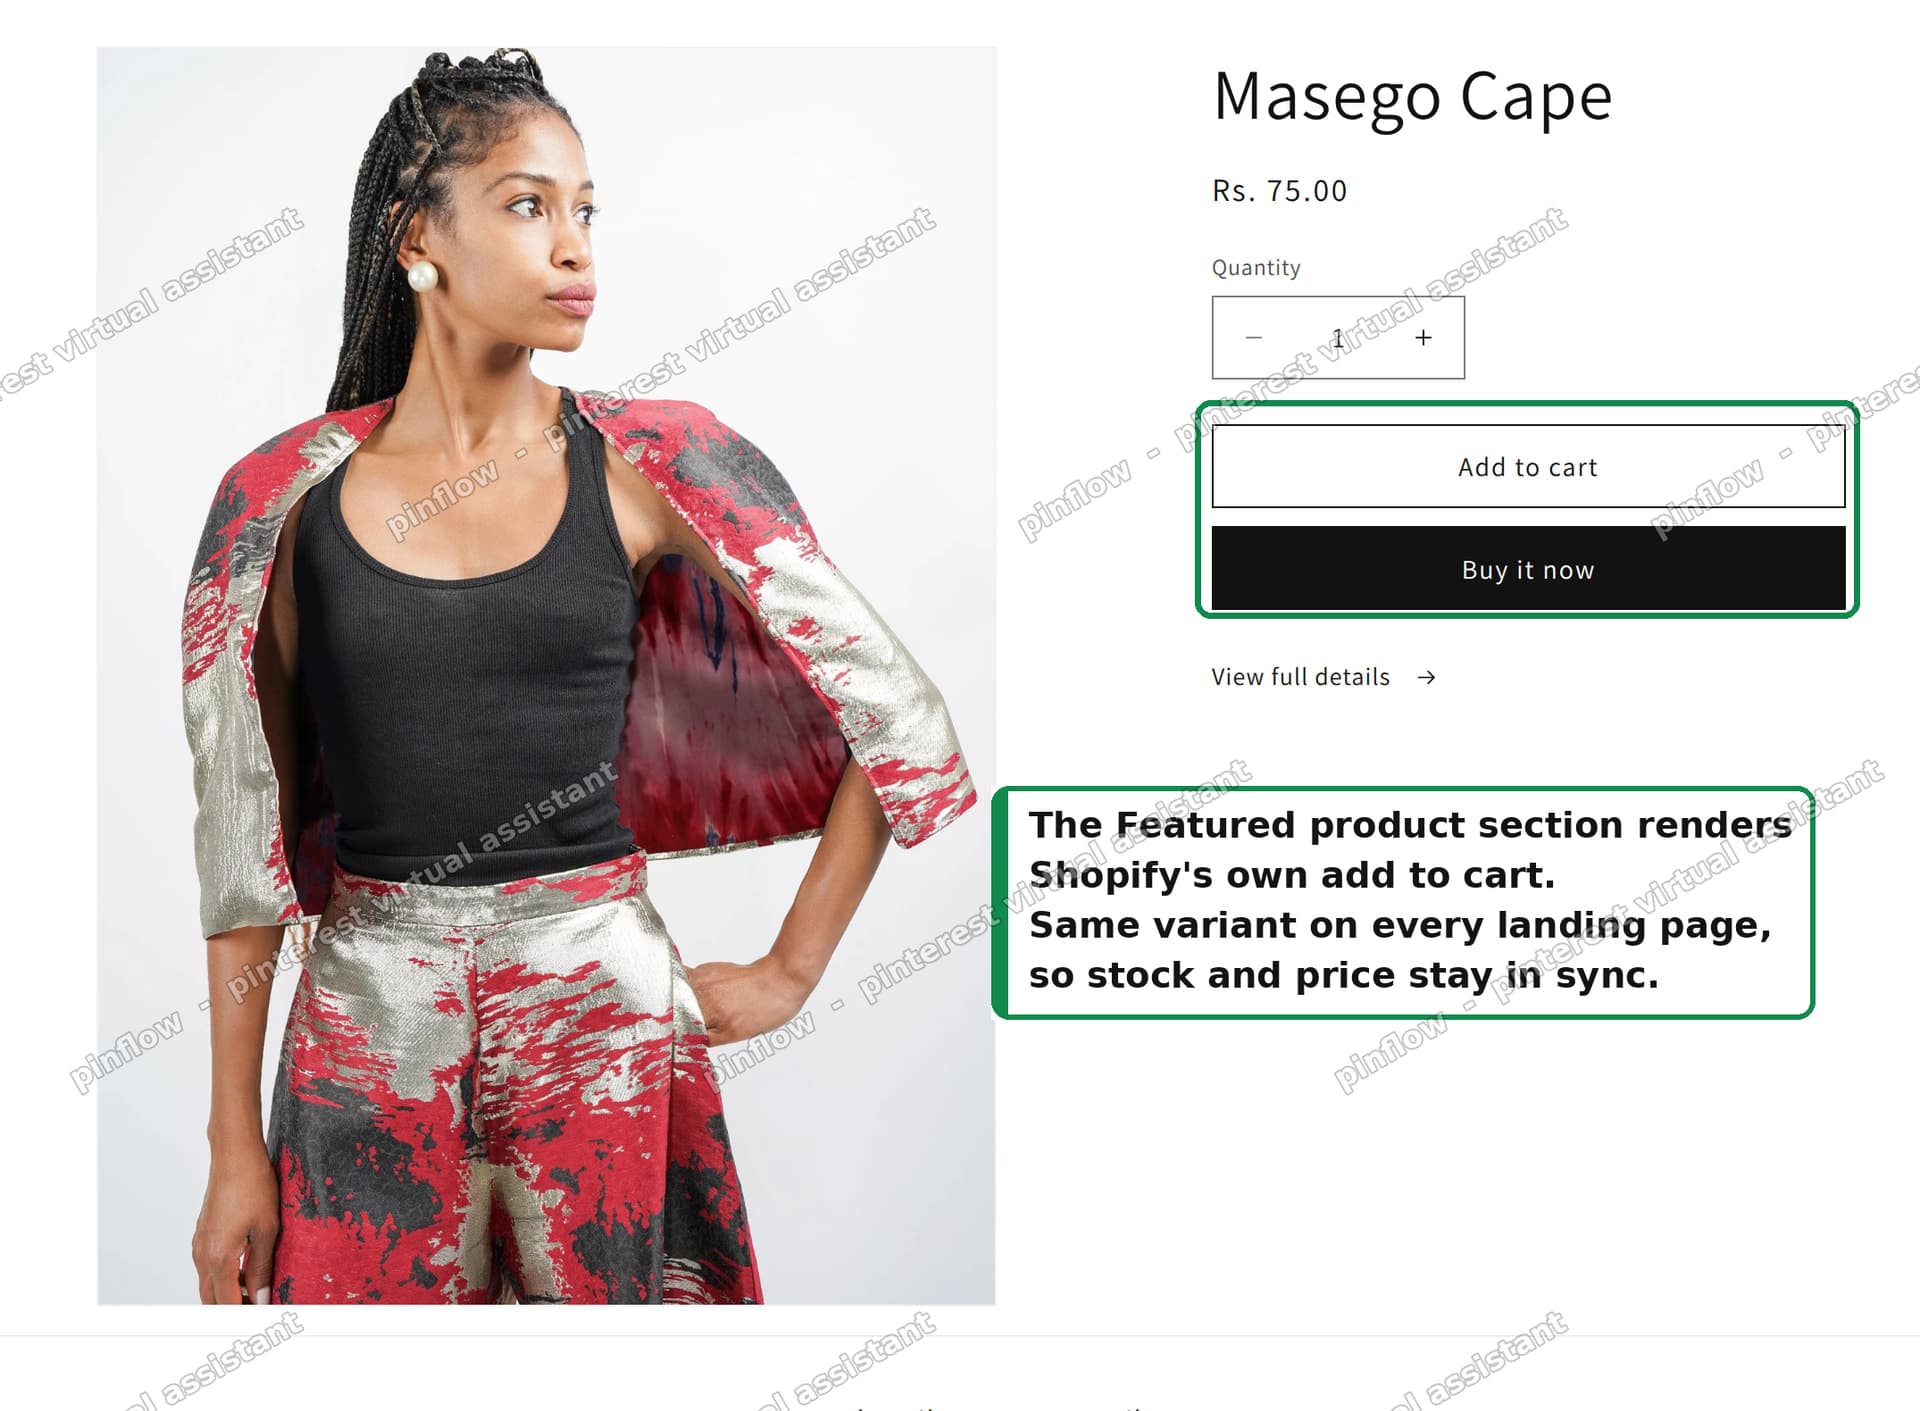 The Featured product section renders the real add to cart
Save. That is the last time you open the theme editor for this.
What you end up with
I tested this on a Dawn 15 store with two entries against one shared template, and created no Pages at all.
| athletes page | doctors page | |
|---|---|---|
| URL | /pages/for/athletes | /pages/for/doctors |
| Title | Built for athletes | Made for long shifts |
| Hero image | one photo | a different photo |
| Canonical | itself | itself |
| Variant added to cart | 47758844887217 | 47758844887217 |
Different URLs, different titles, different images. The same variant ID posted to the cart from both.
That last row is the one people worry about. Inventory does not need syncing because there is nothing to sync. There is still exactly one product and one variant, and both pages point at it. Stock, price and order history stay in one place automatically.
How to use metaobjects in Shopify for anything else
The same pattern works well beyond landing pages, once the shape clicks:
- Locations or stockists. One entry per store, each with its own page.
- Team members or authors. One entry per person.
- Recipes, tutorials, use cases. Anything you have many of, that shares a layout.
- FAQ entries reused across several product pages.
The question to ask is always the same. Do I have many of these, do they share a layout, and do they each deserve a URL? If yes, it is a metaobject.
Two things that will trip you up
Both of these cost me time on the test build, and neither is documented anywhere obvious.
A Multi-line text field will not bind to the Image banner's text block. That block expects a different text type, so your Body copy field simply will not appear in the dynamic source list. It looks like the binding is broken. It is not. Put your body copy in a Rich text section instead, whose text setting accepts multi-line text.
If you edit the template JSON by hand, every dynamic source needs .value. Using the theme editor's dynamic source button writes this correctly for you. Hand-editing does not, and the push is rejected:
{{ metaobject.headline.value }}Leave off .value and Shopify returns "must end with '.value' when not using a metafield filter". A richtext setting additionally needs the binding wrapped in a paragraph tag.
How to create a hidden landing page on Shopify
A related question worth answering, because the naive approach does not work.
Removing a page from your navigation menu does not hide it. The URL still resolves, and Shopify still lists it in sitemap.xml, so it can be found and indexed regardless.
With metaobject entries you have a cleaner lever. Each entry has a Status of Active or Draft. Set it to Draft and the page stops resolving on the storefront entirely, while the content stays in the admin ready to publish. That is a genuine unpublish, not a hidden menu item.
For campaign pages you want live but unlisted, keep the entry Active, keep it out of every menu, and add a noindex tag through your theme or an SEO app.
If your landing page does not appear
Work through these in order.
Check the entry is Active. A Draft entry returns a 404 on the storefront. This catches most people once.
Check the template exists in the theme you are viewing. The metaobject template lives in a specific theme. If you built it in a draft theme and are testing the live one, you get nothing. This is the single most common cause.
Check you enabled it in the Online Store. The Publish entries as web pages toggle has an "Enable in Online Store" checkbox nested underneath. Both are needed.
Check the URL handle, not the display name. The address uses the handle from Search engine listing, not the headline you typed at the top.
Clear the cache. Shopify's CDN holds pages. Test in a private window before concluding anything.
Page, template and entry, named properly
Most of the confusion here is vocabulary, so here they are side by side.
A Page is a content record you create under Online Store, Pages. It has a title, a body, and a URL at /pages/its-handle. One page, one record.
A template is the layout in your theme that decides which sections render and in what order. Many pages can share one template.
A metaobject entry is a record of a content type you invented. With web pages enabled it behaves like a Page, except that you never create a Page for it, and every entry automatically renders through the one shared template.
Get those three straight and the choice stops being difficult. A handful of one-off pages, use Pages. Many pages that share a shape and differ only in content, use metaobject entries and build the layout once.
The merchant who asked this had four audiences and was planning more. For that, the entry route is not just tidier. It is the difference between editing the theme every time marketing invents a persona, and never editing it again.
One audience per landing page. One more on Pinterest.
You built a page for every audience you sell to. PinFlow turns the same catalog into Pinterest pins and posts them on a schedule, which is where people search for the thing before they know your store exists.
Get PinFlow on the Shopify App StoreMore Shopify fixes
More community-sourced Shopify guides, tested on a live store.
SEO & Marketing
Shopify Link in Bio: Show Your Domain, Land People on Products
You want your Instagram bio to read abc.com but send people straight to your products. A redirect will not do it, and /shop is a reserved path on Shopify. Here is the approach that works, and why the usual advice fails.
SEO & Marketing
How to Create a Pop Up Discount on Shopify, Free
Shopify's own free Forms app builds a discount popup in about five minutes. Here is every step, including the theme setting that decides whether it appears at all. Tested live.
SEO & Marketing
Shopify MCP: What Your Store Tells AI Agents
Every Shopify store now publishes a second copy of your catalog for AI agents, and your robots.txt tells them to use it instead of your pages. Here is how to find it and check what it says.