
Make a Shopify Numbered List Start From Any Number
A Shopify numbered list always restarts at 1 because the toolbar button cannot set a starting number. The fix is one HTML edit on the page: change <ol> to <ol start="4">. Covers normal pages, theme sections via Custom Liquid, and jumping a single line with value.
By AjayCodeWiz · September 18, 2026 · 7 min read
Why a Shopify numbered list always starts at 1
You add a numbered list to a page. It runs 1, 2, 3. Lower down you add a second list, and you want it to carry on at 4, 5, 6. It starts again at 1.
A merchant hit exactly this on the Shopify Community. They wanted their second list to begin at 4, tried adding some code to fix it, and got a JSON error instead.
The numbered-list button in the text editor cannot set a starting number. It only makes a plain list, and every new list it makes begins at 1. There is no field for "start at 4".
The starting number lives in one small piece of the page's HTML. HTML is the code a web page is built from. A numbered list in HTML looks like this:
<ol>
  <li>First item</li>
  <li>Second item</li>
</ol>
<ol> means ordered list, which is the numbered kind. Each <li> is one list item, one line. To make the list start at 4, you add start="4" to the opening <ol> tag:
<ol start="4">
  <li>Fourth item</li>
  <li>Fifth item</li>
</ol>
start="4" is called an attribute. It is a setting attached to the tag. The text editor's list button never writes it, so you add it yourself.
The merchant's JSON error came from putting this in the wrong place. They edited the theme's code files, and those files are JSON, so raw HTML breaks them. You do not touch the theme code for this. You edit the page's own HTML.
Change the numbered list on a normal page
Most pages you write, like an About or a guide, live under Online Store, then Pages. That editor has an HTML view built in.
Below, the second list restarts at 1. That is the thing to fix.
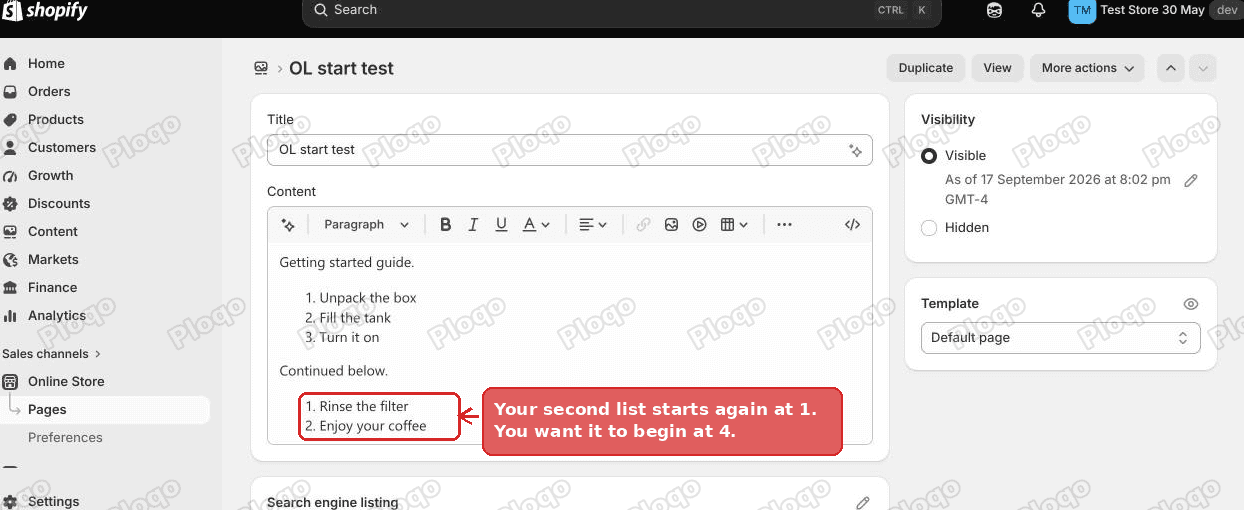 A Shopify page where the second numbered list restarts at 1 instead of continuing at 4
Open the page in the admin. Go to Online Store, then Pages, and click the page you want.
In the Content box there is a toolbar. At the far right of it is a < > button. That is the HTML view. Click it.
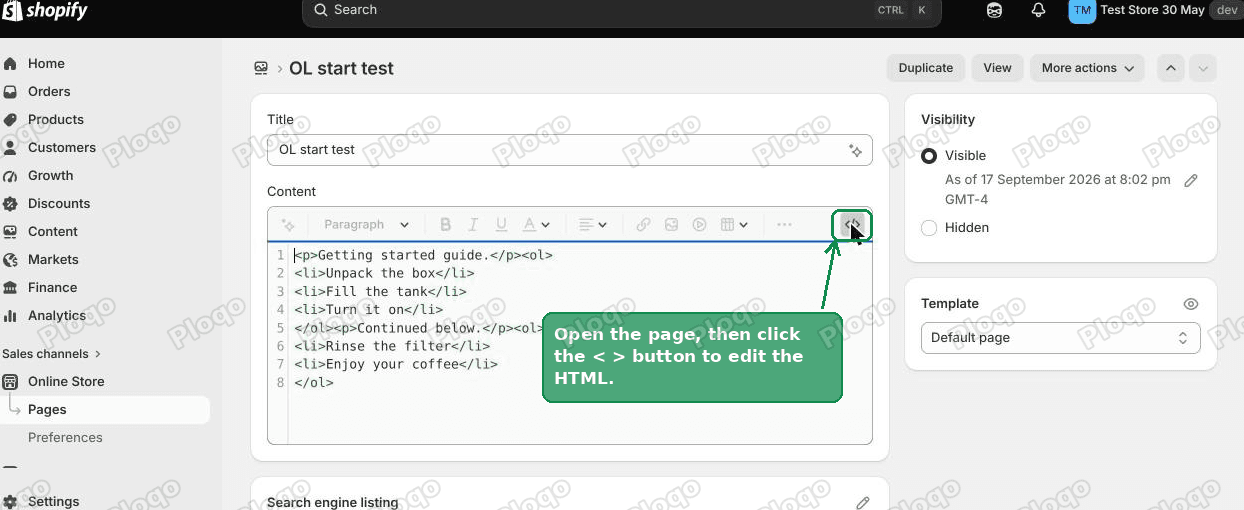 The Content box toolbar on a Shopify page, with the code button highlighted
The box now shows your page as HTML. Find your second list. It begins with <ol>. Change that one tag to <ol start="4">. Leave everything else as it is.
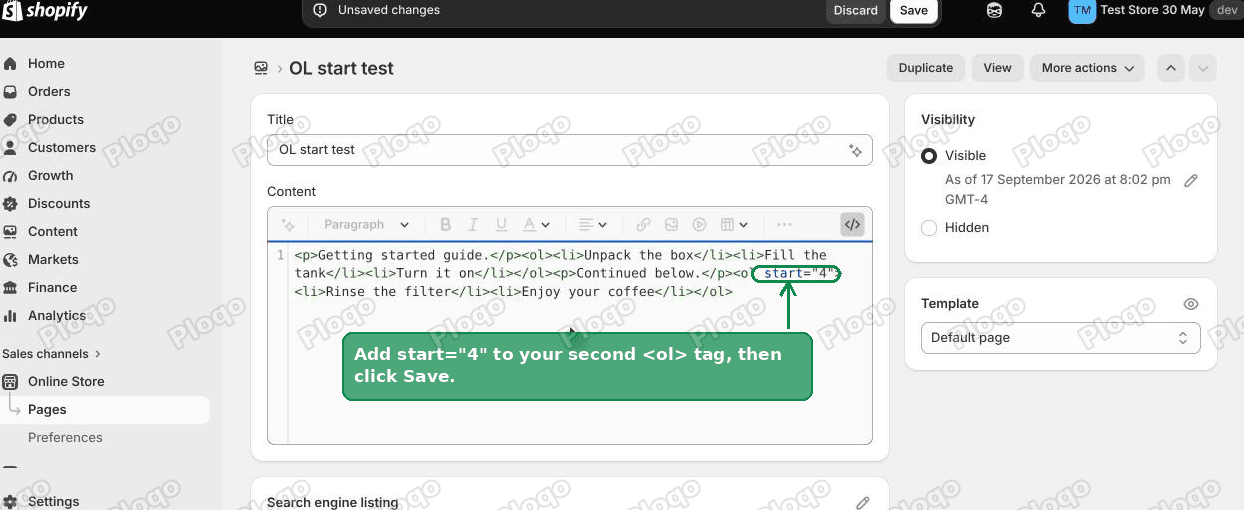 The page HTML with start equals 4 added to the second ordered list tag
Click Save.
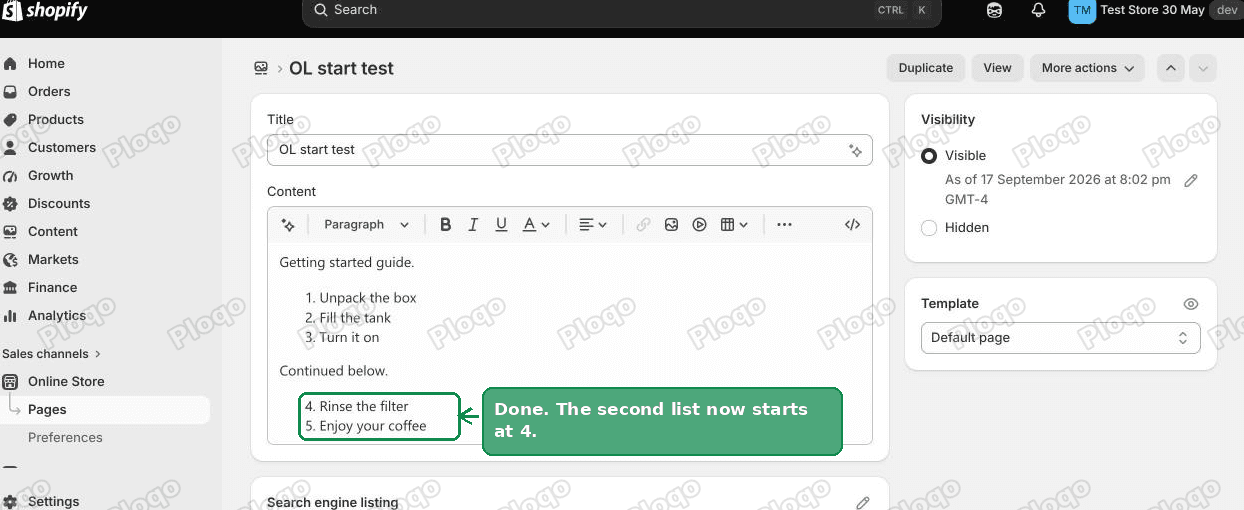 The Shopify page editor showing the second numbered list now starting at 4
I reproduced this on a test store. Before the edit the second list read 1, 2. After it read 4, 5, and the live page matched.
While you are still in the editor, the visual preview may keep showing the list starting at 1. That preview does not read the start value. Save the page and open it on your storefront, and the real page shows 4. I edited the list again afterwards and saved a second time, and the 4 held, so the setting sticks.
When the list is inside a theme section
Some pages are built in the theme editor instead. You reach it from Online Store, then Themes, then Customize. There you stack sections down the page, and a section might have a text box where you typed your list.
That kind of text box strips the starting number out. It only keeps plain formatting, so start="4" is removed the moment you save. The < > trick above does not apply, because there is no page HTML view to open.
For that setup, use a Custom Liquid section. Liquid is the code Shopify themes are built from, and a Custom Liquid section is a box in the theme editor where you paste raw code. It keeps your HTML exactly as written.
In the theme editor, add a new section and pick Custom Liquid from the list. Paste your list into its box, with the start number on the <ol> tag, and save. Paste code like this:
<ol start="4">
  <li>Fourth item</li>
  <li>Fifth item</li>
</ol>
The Custom Liquid section renders that list starting at 4. A community reply suggested this route, and it works. The page-HTML method above is quicker when your list sits on a normal page, so try that one first.
Continue one long list across several blocks
The reason people want a start number is usually a single list broken into parts. Steps 1 to 3 sit above an image or a note, and steps 4 to 6 sit below it.
There is no automatic way to make a second list "know" where the first one ended. You set the number yourself with start. If the first list has three items, the second one gets start="4". If you later add an item to the first list, update the second list's start to match.
For a short, fixed set of steps this is fine. If your list changes often and you dread re-counting, keep all the steps in one <ol> and put your image or note between two <li> items instead of splitting into two lists. One list never loses count.
Set a single item to a specific number
Sometimes you do not want the whole list renumbered, just one line jumped to a value. A list that should read 1, 2, then 7, 8 for example.
Each <li> can carry its own value. Put it on the item where the jump happens:
<ol>
  <li>One</li>
  <li>Two</li>
  <li value="7">Seven</li>
  <li>Eight</li>
</ol>
The list counts 1, 2, then picks up at 7 and continues 8. start on the <ol> sets where the whole list begins. value on an <li> overrides a single line from that point on. Use whichever fits.
The same fix on blog posts and product descriptions
Pages are not the only place this comes up. A blog post and a product description use the same text editor, with the same < > button in the corner of the toolbar.
So the method carries across. To start a numbered list at 4 in a blog post, go to Online Store, then Blog posts, open the post, click < >, and change your <ol> to <ol start="4">. For a product, open the product in the admin, click < > above the Description box, and do the same.
The behaviour is identical in all three. The editor preview may still show 1 while you type, and the saved, live version shows 4. If you ever move a description into a theme section or a block added by an app, the plain-text stripping returns, and the Custom Liquid route is the fallback again.
One place it does not reach is a list Shopify builds for you from data, like the steps an app prints or a table pulled from your products. Those are generated, not typed, so there is no HTML box for you to edit. Changing their numbering means a setting in that app, not this edit.
If the number still shows as 1
A few things to check when the fix does not seem to take.
You are looking at the editor preview, not the live page. The Pages editor preview ignores start. Open the page on your actual storefront to see the real number.
The start went on the wrong list. Every <ol> counts on its own. Make sure start="4" is on the second list's opening tag, not the first.
Your list is inside a theme section after all. If the text box you typed into is in Online Store, Themes, Customize, it will strip the number. Move that list to a Custom Liquid section as described above.
The quote marks got changed. Copying code from a document can turn straight quotes into curly ones, and start=“4” with curly quotes is ignored. Retype the quotes in the editor so they read start="4".
Ordered list, unordered list, and the start number
Two quick distinctions that come up when people search for this.
An ordered list is <ol>, the numbered kind. An unordered list is <ul>, the bulleted kind. Only <ol> counts, so start and value only do anything on an ordered list. A bulleted list has no numbers to change.
The list button in the toolbar has both. One makes numbers, one makes bullets. If your list shows bullets and you wanted numbers, switch it to the numbered one first, then add start in the HTML view.
The start attribute is plain HTML that every browser has supported for years. It is not a Shopify feature you enable, and it is not something an app is needed for. It is one small edit in the code your page already has.
Recap
A Shopify numbered list restarts at 1 because the toolbar button cannot set a starting number. The number lives in the page HTML.
On a normal page, click the < > button in the Content toolbar and change <ol> to <ol start="4">. Inside a theme section, paste the same into a Custom Liquid section. To jump a single line, use <li value="7">.
I tested all of this on a Dawn store, and the second list rendered from 4 on the live page.
Spending too long on manual Shopify busywork?
PinFlow turns your Shopify catalog into Pinterest pins and posts them on a schedule, automatically. Same idea as the rule above, let the system handle the repetitive part.
Get PinFlow on the Shopify App StoreMore Shopify fixes
More community-sourced Shopify guides, tested on a live store.
Themes & Storefront
Shopify Search and Discovery App: Fix Unrelated Search Results
Synonyms are gone from the Shopify Search and Discovery app and store search now pads results with unrelated products. Here is a paste-in fix for Dawn that makes search strict again, and how to rebuild synonyms with tags.
Themes & Storefront
Shopify Coming Soon Page: Add a Get Early Access Button
Turn the Shopify coming soon page into an early access sign-up with a real Get early access button, then email the list your store password before launch. Tested on the Flow theme, with a no-code option.
Themes & Storefront
Remove the Variant ID From Your Shopify Product URL
Your product link keeps turning into /products/name?variant=43176780890281, before the customer has touched anything. One theme setting stops it, a second switch covers Dawn, and a short snippet cleans the links that already carry the ID.