
How to Build a Shopify Portfolio Gallery (No App)
Show a filterable gallery of non-product images on your Shopify portfolio site. Keep every photo in one place, tag it by category, and let each page show its own group. Free, native, tested, with the full code and screenshots.
By AjayCodeWiz · August 26, 2026 · 8 min read
The problem
Shopify is built to sell products, so it has no built-in home for a portfolio: a set of images that are not products, that you want to group by category and show across several pages.
A designer moving from Squarespace asked exactly this on the Shopify Community. They had about 50 portfolio images, wanted to tag them into three categories, and show them as a filtered carousel on four pages: one page per category, plus an all page.
The usual answers are an app, or a hack like turning every image into a blog post. Neither is great. You can do it natively, for free, and keep one clean list of images that feeds every page.
The idea in one line
Store the photos as metaobjects (Shopify's built-in custom content), then add one small theme section that reads that list and shows only the category you pick per page.
Two things make this work:
- Metaobjects give you a single source of truth. You upload and tag each photo once.
- A custom section can loop through every metaobject entry in Liquid and filter it, so the same section on four pages produces four different galleries.
If metaobjects are new to you, they are just structured records you define yourself. This guide keeps it to the two fields you actually need.
Step 1: create the data holder
Go to Settings, then Custom data, then Metaobjects, and Add definition. Name it Portfolio image. Give it these fields:
- Image, type File (image).
- Category, type Single line text, set to a list so one photo can sit in more than one category.
- Caption, optional, a single line of text.
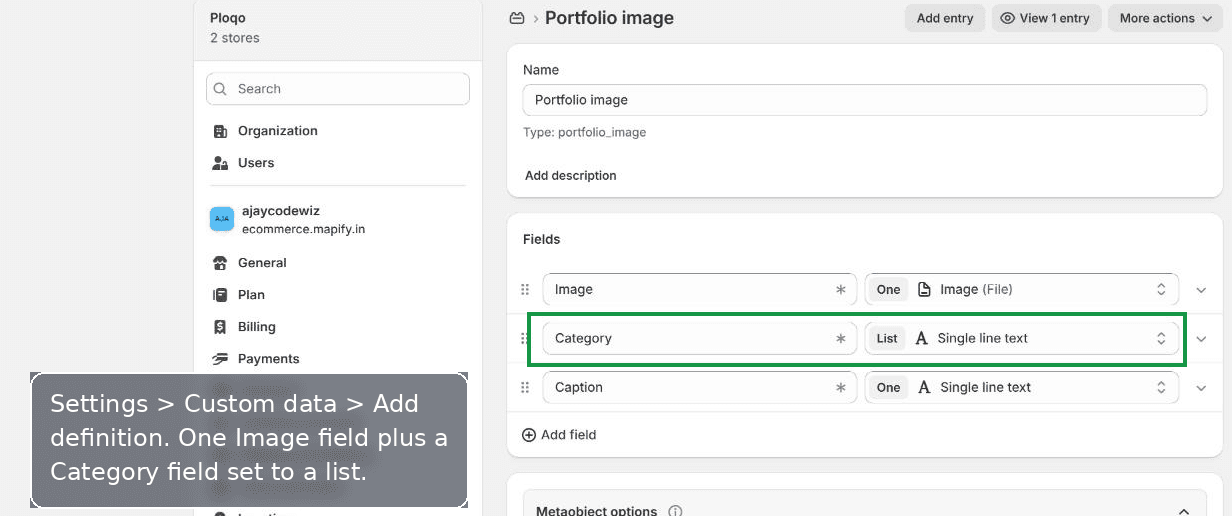 Create a Portfolio image metaobject with an Image field and a Category list
One setting matters for later: open the definition options and make sure storefront access is on, so your theme can read the entries.
Step 2: add your photos
Open Portfolio image and Add entry. Upload the image, type its Category, for example Weddings, and Save. Repeat for every photo. Fifty entries sounds like a lot, but it is the only place you ever add an image, and it replaces re-uploading the same photo onto four different pages.
Because Category is a list, a single photo can carry two tags, for example Portraits and Events, and it will show up on both pages.
 Add each photo as an entry and tag its Category, so one list feeds every page
This entry list is your single source of truth. Change a photo here and every page that uses it updates at once.
Step 3: add the gallery section
This is the only code step, and you do it once.
Go to Online Store, Themes, then the three dots menu and Edit code. Under Sections, choose Add a new section, name it portfolio-gallery, delete the sample content, paste the code below, and Save.
{%- comment -%}
Filterable portfolio carousel, sourced from "Portfolio image" metaobjects.
One source of truth (Settings > Custom data > Portfolio image); each page
sets its own Category to show only that group. Leave Category blank for All.
{%- endcomment -%}
{%- assign filter_category = section.settings.category | strip -%}
{%- assign cw = section.settings.card_width -%}
{%- assign ch = section.settings.card_height -%}
<style>
#pf-{{ section.id }}{padding:{{ section.settings.padding_top }}px 0 {{ section.settings.padding_bottom }}px;}
#pf-{{ section.id }} .pf-head{max-width:var(--page-width,1200px);margin:0 auto 18px;padding:0 20px;}
#pf-{{ section.id }} .pf-head h2{margin:0;}
#pf-{{ section.id }} .pf-wrap{position:relative;max-width:var(--page-width,1200px);margin:0 auto;padding:0 20px;}
#pf-{{ section.id }} .pf-track{display:flex;gap:16px;overflow-x:auto;scroll-snap-type:x mandatory;scroll-behavior:smooth;-webkit-overflow-scrolling:touch;padding:4px 2px 14px;scrollbar-width:thin;}
#pf-{{ section.id }} .pf-item{flex:0 0 auto;width:{{ cw }}px;max-width:78vw;scroll-snap-align:start;margin:0;}
#pf-{{ section.id }} .pf-item img{width:100%;height:{{ ch }}px;object-fit:cover;border-radius:{{ section.settings.radius }}px;display:block;background:#eee;}
#pf-{{ section.id }} .pf-cap{margin-top:8px;font-size:.9rem;opacity:.8;}
#pf-{{ section.id }} .pf-arrow{position:absolute;top:calc(({{ ch }}px / 2) - 4px);transform:translateY(-50%);z-index:2;width:44px;height:44px;border-radius:50%;border:0;cursor:pointer;background:rgba(0,0,0,.6);color:#fff;font-size:24px;line-height:1;display:flex;align-items:center;justify-content:center;}
#pf-{{ section.id }} .pf-prev{left:8px;}
#pf-{{ section.id }} .pf-next{right:8px;}
#pf-{{ section.id }} .pf-empty{padding:40px 20px;opacity:.7;}
</style>
<div id="pf-{{ section.id }}">
{%- if section.settings.heading != blank -%}
<div class="pf-head"><h2>{{ section.settings.heading }}</h2></div>
{%- endif -%}
<div class="pf-wrap">
<button class="pf-arrow pf-prev" aria-label="Previous" data-pf-prev>‹</button>
<div class="pf-track" data-pf-track>
{%- assign shown = 0 -%}
{%- for item in shop.metaobjects.portfolio_image.values -%}
{%- assign cats = item.category.value -%}
{%- if filter_category == blank or cats contains filter_category -%}
{%- assign media = item.image.value -%}
<figure class="pf-item">
{%- if media != blank -%}
<img src="{{ media | image_url: width: 900 }}" alt="{{ item.caption | escape }}" loading="lazy" width="{{ cw }}" height="{{ ch }}">
{%- endif -%}
{%- if item.caption != blank -%}<figcaption class="pf-cap">{{ item.caption }}</figcaption>{%- endif -%}
</figure>
{%- assign shown = shown | plus: 1 -%}
{%- endif -%}
{%- endfor -%}
{%- if shown == 0 -%}<p class="pf-empty">No portfolio images in this category yet. Add them in Settings > Custom data > Portfolio image.</p>{%- endif -%}
</div>
<button class="pf-arrow pf-next" aria-label="Next" data-pf-next>›</button>
</div>
</div>
<script>
(function(){
var root=document.getElementById('pf-{{ section.id }}');
if(!root)return;
var track=root.querySelector('[data-pf-track]');
function step(){var c=track.querySelector('.pf-item');return c?c.getBoundingClientRect().width+16:300;}
root.querySelector('[data-pf-next]').addEventListener('click',function(){track.scrollBy({left:step(),behavior:'smooth'});});
root.querySelector('[data-pf-prev]').addEventListener('click',function(){track.scrollBy({left:-step(),behavior:'smooth'});});
})();
</script>
{% schema %}
{
"name": "Portfolio gallery",
"settings": [
{ "type": "text", "id": "heading", "label": "Heading", "default": "Portfolio" },
{ "type": "text", "id": "category", "label": "Category to show", "info": "Type one category exactly as tagged (e.g. Weddings). Leave blank to show all." },
{ "type": "range", "id": "card_width", "min": 180, "max": 480, "step": 20, "unit": "px", "label": "Card width", "default": 320 },
{ "type": "range", "id": "card_height", "min": 180, "max": 520, "step": 20, "unit": "px", "label": "Card height", "default": 380 },
{ "type": "range", "id": "radius", "min": 0, "max": 32, "step": 2, "unit": "px", "label": "Corner radius", "default": 12 },
{ "type": "range", "id": "padding_top", "min": 0, "max": 100, "step": 4, "unit": "px", "label": "Top padding", "default": 40 },
{ "type": "range", "id": "padding_bottom", "min": 0, "max": 100, "step": 4, "unit": "px", "label": "Bottom padding", "default": 40 }
],
"presets": [ { "name": "Portfolio gallery" } ]
}
{% endschema %}A few notes on what the code does, so you can adjust it:
- It loops
shop.metaobjects.portfolio_image.values, which is every entry you created. - It shows an entry only when its Category matches the section setting, or when that setting is left blank.
- It lays the images out as a horizontal carousel using CSS scroll snap, with arrow buttons and native swipe on mobile.
- Card width, height, corner radius and spacing are all section settings, so you never touch the code again to restyle it.
Step 4: put it on your pages
Create your pages first: Weddings, Portraits, Events, and an All page. Then customize each page, Add section, pick Portfolio gallery, and set Category to show. Type the category exactly as you tagged it. Leave it blank on the All page so it shows everything.
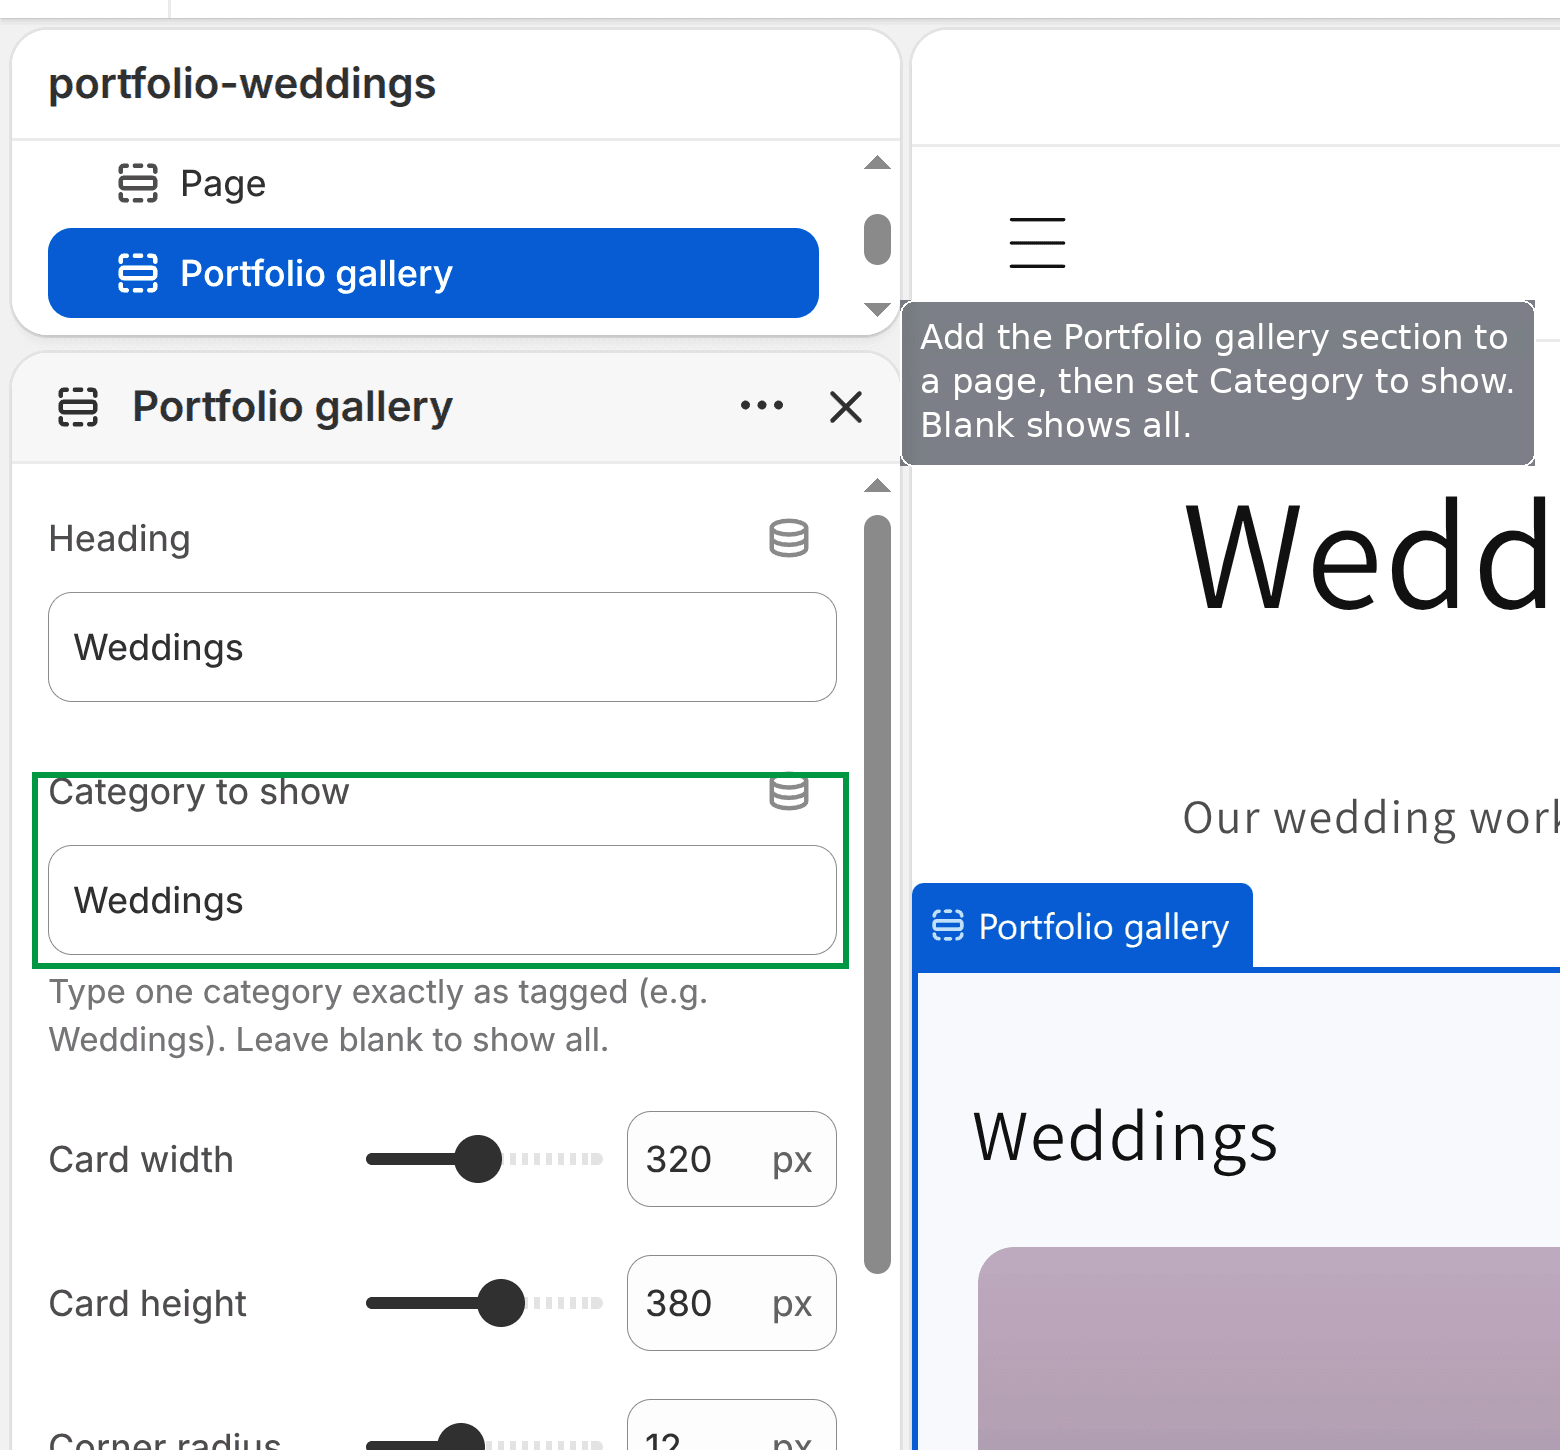 In the theme editor, add the Portfolio gallery section and set Category to show
That is the whole build. The same section, with one setting different, becomes a different gallery on each page.
The result
Each page reads the same photo list and shows only its category. Here is the Weddings page, which shows only the photos tagged Weddings:
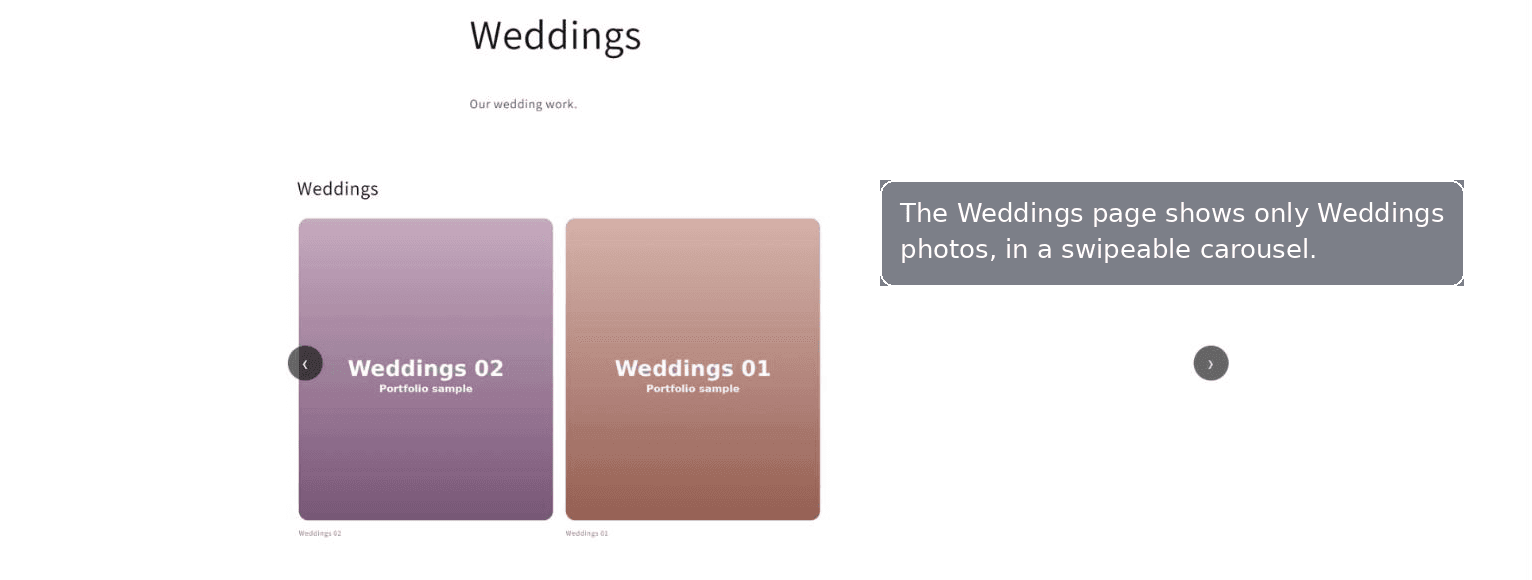 The Weddings page shows only Weddings photos, in a carousel
And the All page, where Category is left blank, shows every photo:
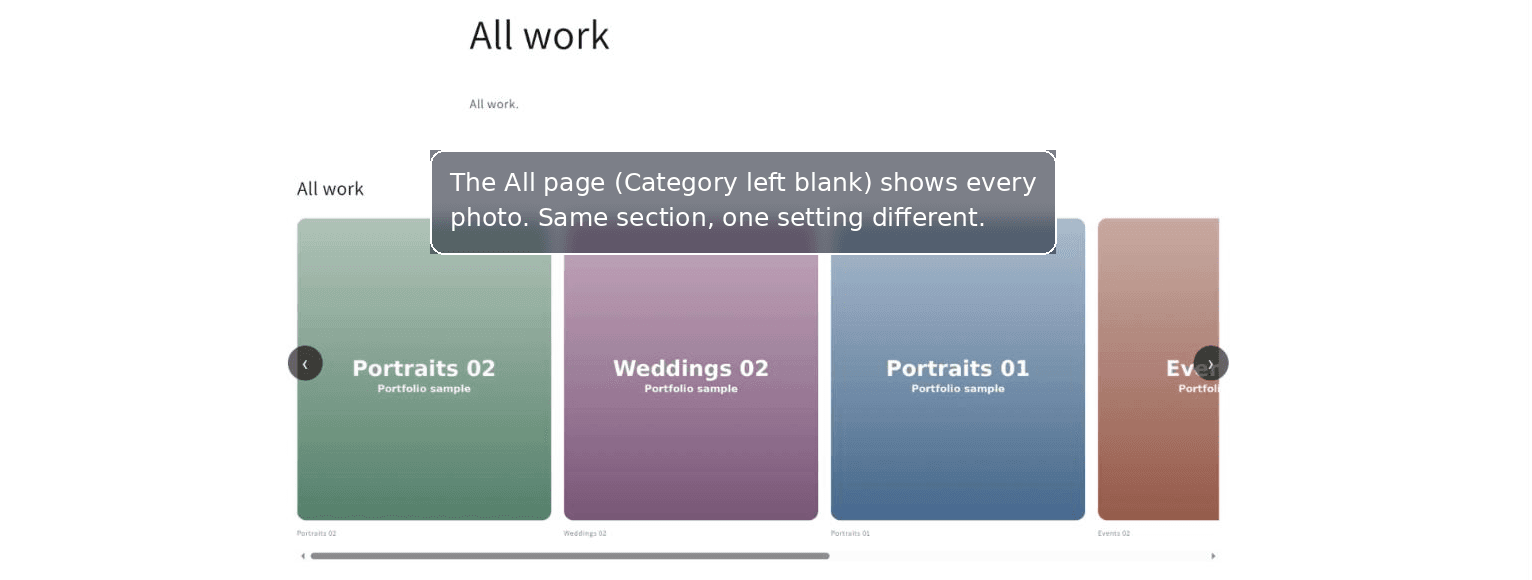 The All page leaves Category blank and shows every photo
Why this beats the common workarounds
- No separate app to pay for, learn, or keep updated.
- No turning images into blog posts, which clutters your blog and mixes portfolio work with articles.
- One list of images, not four copies. Add a photo once and it appears wherever its category is shown.
- It is theme-native, so it inherits your fonts and colors and survives most theme updates because it is a self-contained section.
Adjusting it
- To add a fourth or fifth category, you do nothing to the code. Tag photos with the new category and set a page to show it.
- To change the look, use the section settings for card size and corners, or edit the small CSS block at the top of the section.
- To show captions, fill the Caption field on each entry. Leave it empty to hide it.
The no-code alternative
If you would rather not paste code at all, a gallery app that supports categories will do the job: Foto Gallery, POWR Image Gallery, or Common Ninja are common picks. You trade a monthly fee and an extra app for skipping the one code step. For a portfolio site that mostly shows off work, the native route above is usually the better long-term choice.
The short version
- Shopify has no built-in portfolio, but metaobjects plus one section give you a filterable gallery for free.
- Create a Portfolio image metaobject with an Image field and a Category list, then add your photos once.
- Add the portfolio-gallery section, put it on each page, and set the Category to show. Blank shows all.
- One list of images feeds every page, so nothing is duplicated.
Tested on a Dawn store: six photos across Weddings, Portraits and Events, shown on four pages that each filter to their own category.
Spending too long on manual Shopify busywork?
PinFlow turns your Shopify catalog into Pinterest pins and posts them on a schedule, automatically. Same idea as the fix above, let the system handle the repetitive part.
Get PinFlow on the Shopify App StoreMore Shopify fixes
More community-sourced Shopify guides, tested on a live store.
Themes & Storefront
Shopify Payment Icons: Fix a Footer That Shows None
The payment icons in a Shopify footer come from your payment provider, not from the theme. When the provider sends none, the row stays empty. Here is how to add the icons yourself on Refresh, Dawn and similar themes.
Themes & Storefront
Shopify Order Notes: Turn On the Cart Note Box
Let customers leave order notes and special instructions on your Shopify cart page. Turn on the built-in cart note in Theme settings, rename its label, and find each note on the order. Tested on Dawn, no code.
Themes & Storefront
Shopify WhatsApp Integration: Add a Free Chat Button
How to add WhatsApp to Shopify with a floating chat button: shoppers tap it and WhatsApp opens a chat with you, the message already typed and naming the product.