
Hide the First Image in Your Shopify Product Image Gallery
Hide the first photo in a Shopify product image gallery without deleting it, so the gallery opens on image 2. Tested Custom CSS for the Roam theme, desktop and mobile.
By AjayCodeWiz · October 7, 2026 · 9 min read
The problem
A store owner running the Roam theme wanted the first photo gone from the product page gallery. Not deleted from the product, just not shown in the gallery, so shoppers land on the second photo.
That first photo still had a job. In Shopify, the first image on a product is its featured image, the one that shows on collection pages, in the cart and in social media previews. Deleting it or moving it would change all of those. They only wanted it out of the product page gallery.
I reproduced it on a test store with the Roam theme installed. Here is the gallery before any change. Image 1 is the big photo, and it is the first thumbnail in the strip beside it.
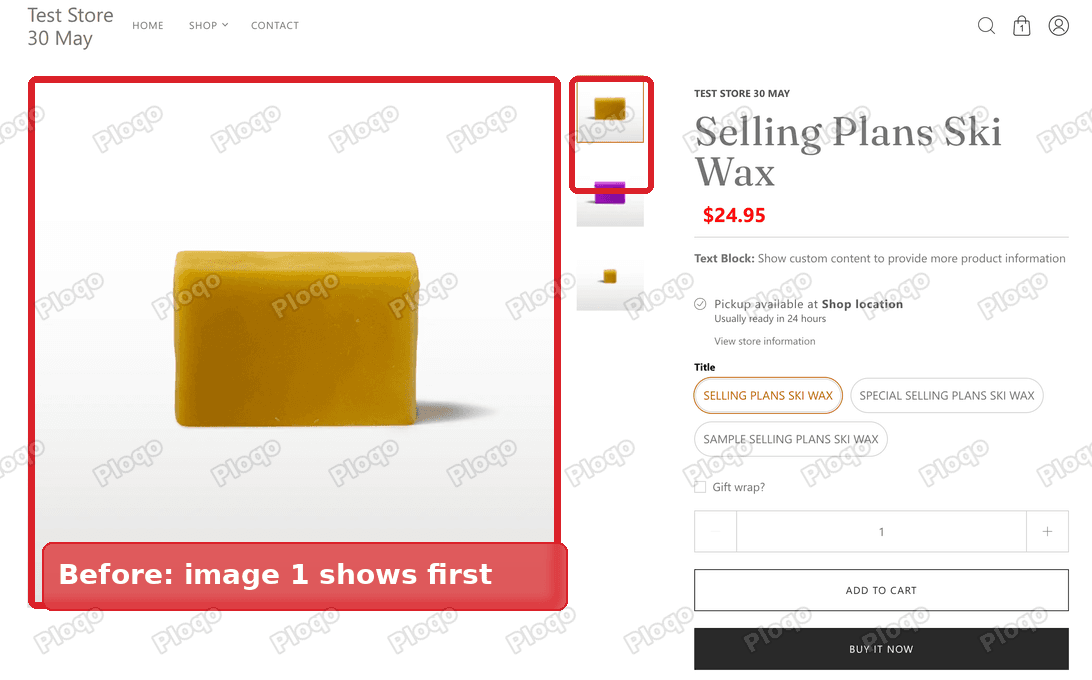 Roam product page with the first image showing in the gallery and as the first thumbnail
The fix is a few lines of Custom CSS, which is the box in the theme editor where you paste styling code. It needs no app and no edits to theme files. But the obvious version of that code breaks the Roam gallery, and I found that out the hard way. Both versions are below, with the reason one fails.
Do you need to hide it, or just move it?
Check this first, because the no-code route is better when it fits.
- You do not need the photo anywhere. Open the product in your admin, tick the photo in the Media section and remove it. It is gone from the gallery, the collection card and everywhere else.
- You just want a different photo to come first. Drag another photo into the first spot in Media. That photo becomes the featured image, so the collection card and cart change too.
- You want the photo on collection pages but not in the product gallery. That is the case this article covers. Shopify has no setting for it, so it takes the code below.
The code works only on the storefront display. The photo is still attached to the product and still loads with the page. It is hidden from view, not removed.
Why hiding the first image can empty the whole gallery
Most themes would let you hide the first photo with one rule that says "do not display this". On Roam that rule leaves the main image area blank.
Roam's product gallery is a slideshow. When the page loads, the theme's script measures the photo that is currently selected and sets the height of the whole gallery to match. On a fresh page load the selected photo is image 1.
If image 1 is set to "do not display", it has no height. The script measures zero and sets the gallery to zero pixels tall. The thumbnails still show beside it, because they sit in a separate strip, but the big photo area collapses.
This is what that looks like on my test store with the "do not display" rule in place.
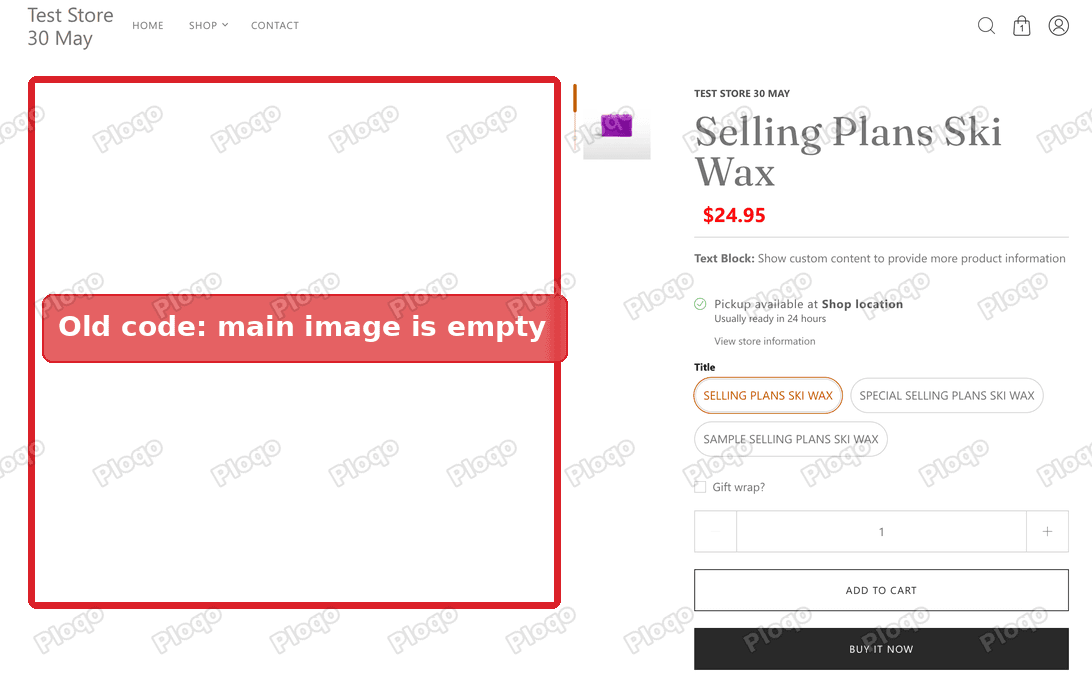 Roam gallery with the first-image rule from display none: thumbnails show, but the main image area is empty
So the working fix keeps image 1 in the page, at its full size, so the script measures a real height. It just makes image 1 invisible and moves it so it does not push the other photos down.
How to hide the first image in the Roam product gallery
These steps are for Roam. The code points at names that Roam uses for its gallery, so it will not do anything on other themes.
- Go to Online Store.
- Click Edit theme on your current theme.
 Shopify admin Online Store page with the Edit theme button highlighted
- Click Theme settings, the gear icon on the left of the theme editor.
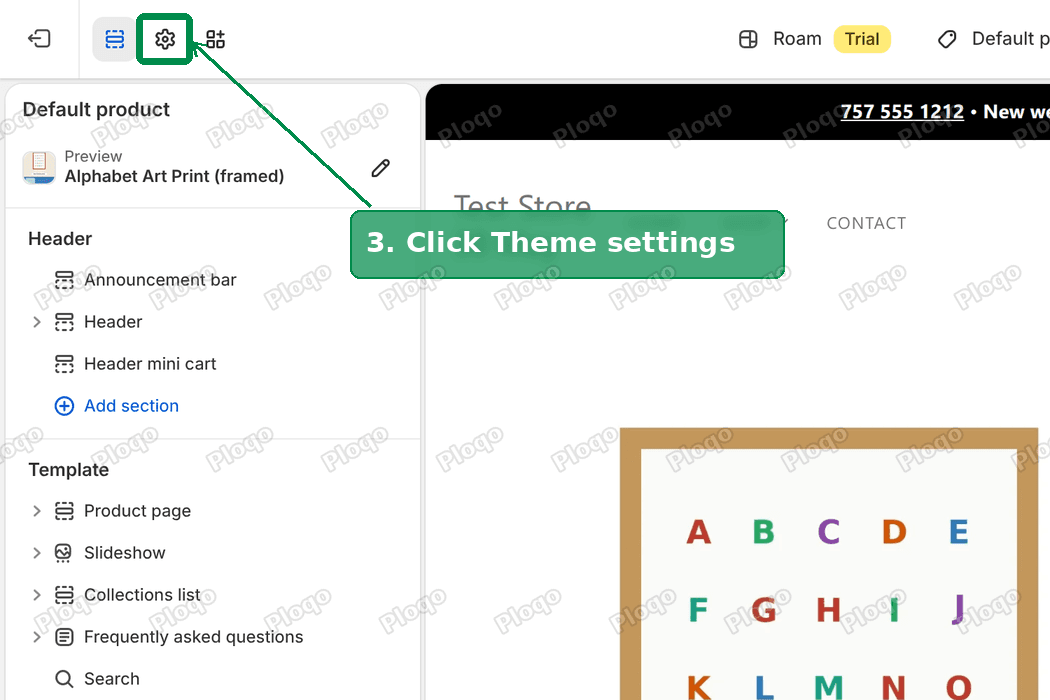 Roam theme editor with the Theme settings gear icon highlighted
- Click Custom CSS to open it.
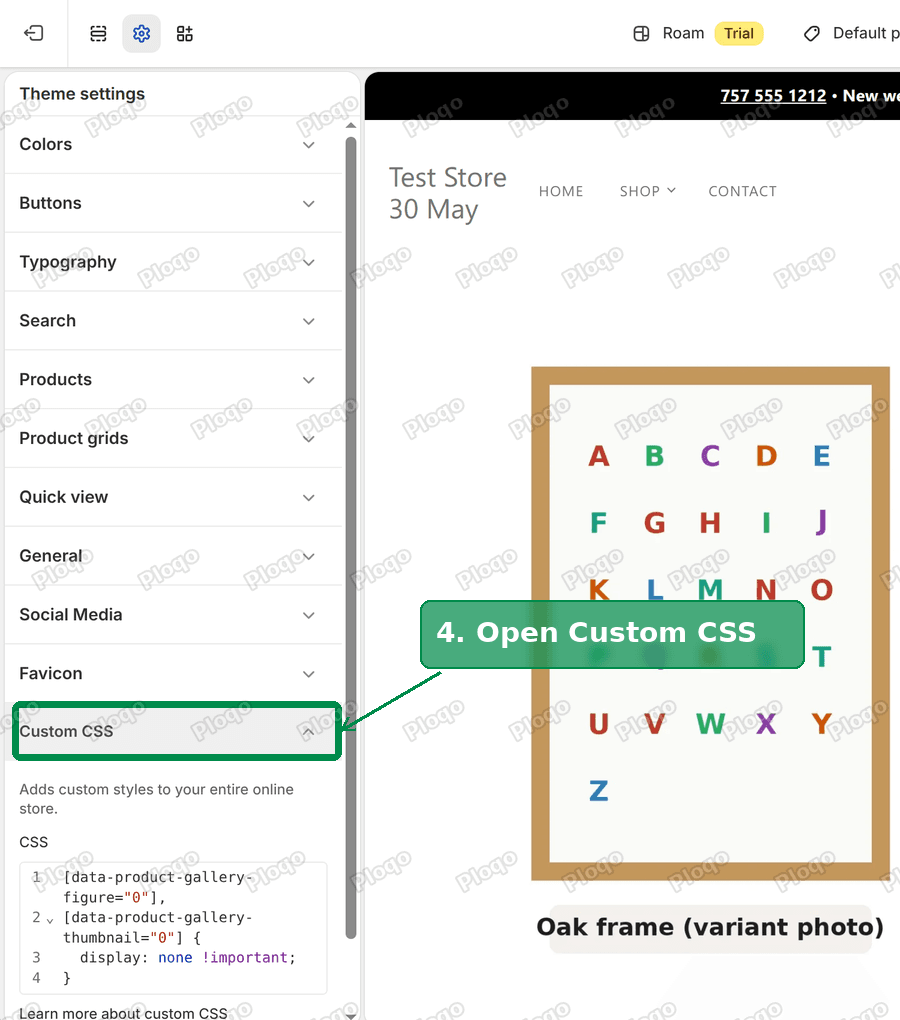 Roam Theme settings list with Custom CSS highlighted
- Paste this code in the box. If you already added code that hides the first image, delete that old code first so only this version is left.
[data-product-gallery-navigation-layout="featured"] {
position: relative !important;
}
[data-product-gallery-figure="0"] {
display: block !important;
position: absolute !important;
top: 0;
left: 0;
width: 100% !important;
opacity: 0 !important;
pointer-events: none !important;
}
[data-product-gallery-thumbnail="0"] {
display: none !important;
}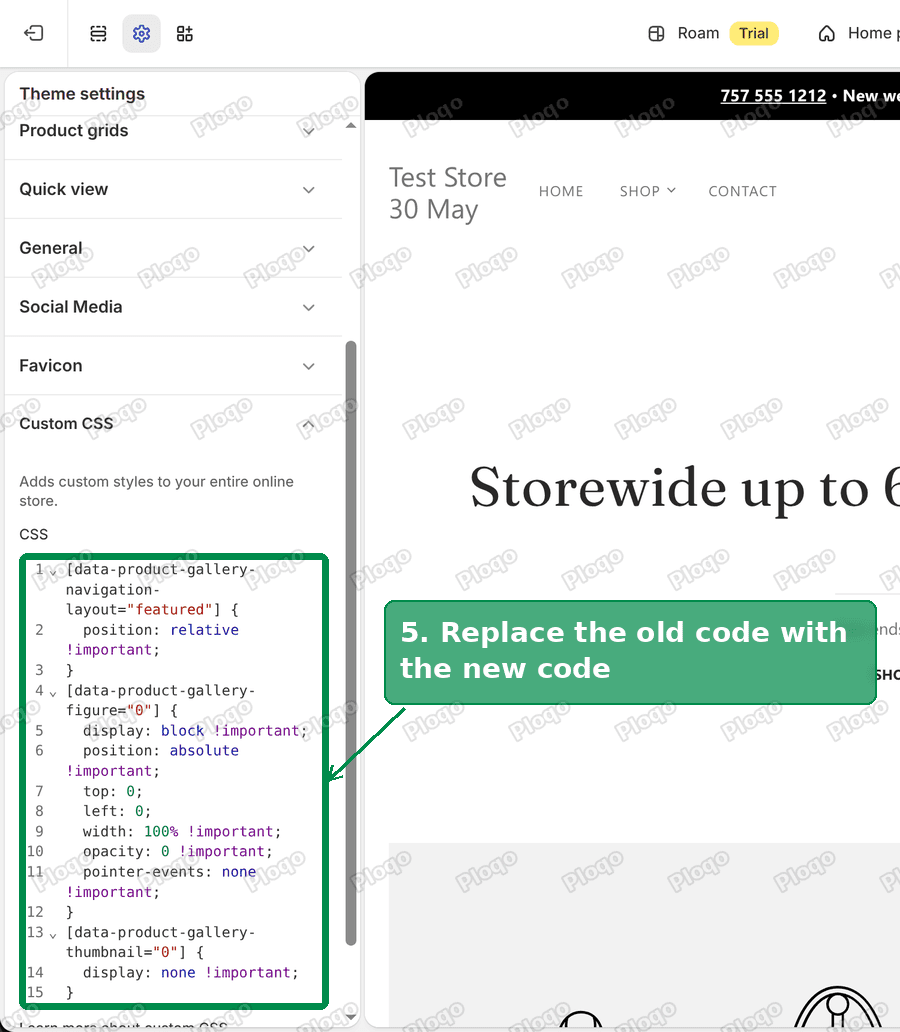 Roam Custom CSS box with the new code pasted in
- Click Save in the top right corner.
 Theme editor top bar with the Save button highlighted
Open a product page in a new tab. The gallery now opens on image 2, and the thumbnail strip starts at image 2.
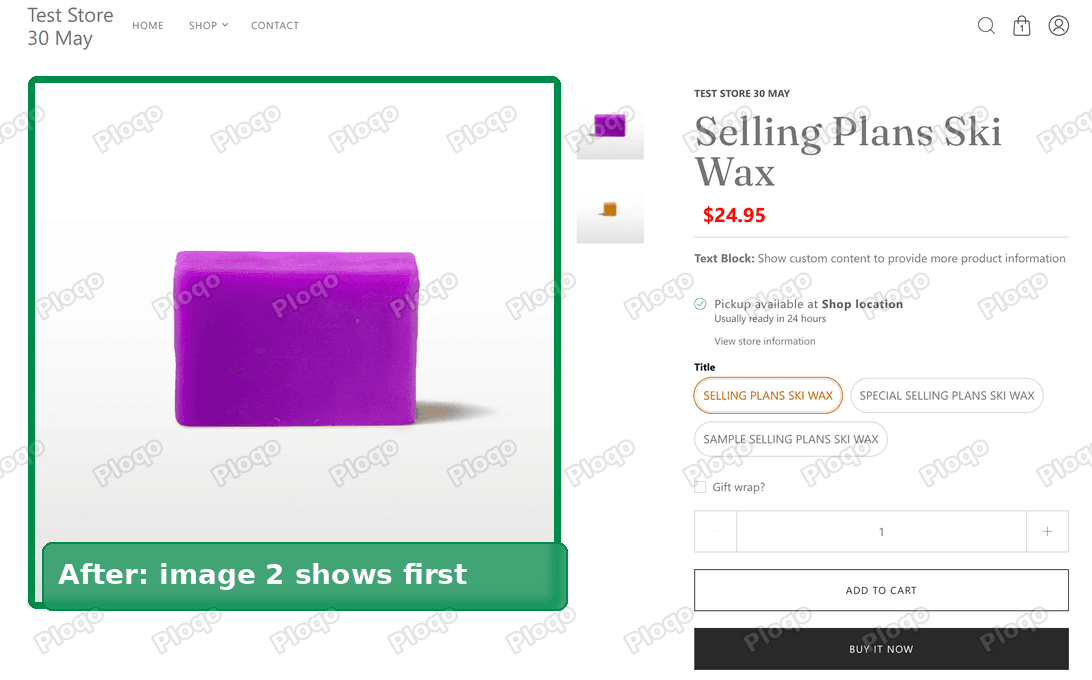 Roam product page after the fix: the gallery opens on image 2 and the first thumbnail is gone
What each part of the code does
You do not need to understand the code to use it, but knowing what each block does makes it easier to check.
- The first block tells the main image area to act as the frame for anything placed inside it. Without it, the hidden photo would be positioned against the wrong part of the page.
- The second block is the hidden photo. It keeps image 1 at full size so Roam's script reads a real height. It lifts image 1 out of the line of photos and lays it over the top, so it takes up no space. Then it makes it fully see-through and stops it from catching clicks, so a shopper clicking the gallery reaches the photo they can see.
- The third block removes image 1's thumbnail from the strip. Thumbnails do not affect the gallery height, so a plain "do not display" is safe there.
Each block uses a selector, which is the part before the curly bracket that points at one element on the page. Roam numbers its gallery photos from 0, so "0" means the first photo.
Why my first fix left the main image empty
I answered this thread twice, and the first answer was wrong.
My first reply used the short "do not display" rule on both the first photo and its thumbnail. Before posting it, I tested it by adding the code to the store owner's live preview in my own browser. The gallery looked right. The store owner pasted it into Theme settings, opened their product The Extra Care Duo, and the main image area was empty.
Two things hid the problem from my test.
- I added the code after the page had already loaded. By then Roam's script had already measured image 1 and set the gallery height. Hiding image 1 afterwards changed nothing about that height, so the gallery kept working. A merchant who saves the code in Custom CSS gets it from the very start of the page load, before the script measures anything. That is the case that breaks.
- My test product on the dev store did not open on image 1. Its selected variant had image 2 attached, so the gallery started on image 2 and never measured the hidden photo.
To catch it, I re-tested by loading the code before the theme's scripts ran, the same way saved Custom CSS loads. The old rule left a blank area on every product in the store owner's preview. The new code showed image 2 on all six of their products, on desktop and on a phone-sized screen.
Why the code uses opacity and not visibility
The usual way to make something invisible but still sized is visibility: hidden. My first draft of the new code used it.
The theme editor would not take it. I pasted the code into Custom CSS and the Save button turned dark, but the preview kept the old code. After saving, the old code was still the one on the storefront. There was no error message. Shopify's Custom CSS box dropped the whole edit because of that one line.
I narrowed it down by trying each line on its own. Every other line saved. The line with visibility: hidden did not. Swapping it for opacity: 0, which makes an element fully see-through, saved on the first try and does the same job here.
If you write your own Custom CSS and a change refuses to save, check for that line first.
Does it work on mobile?
Yes. On a phone the Roam gallery becomes a swipe slider with the thumbnails underneath. With the code saved, it opens on image 2. Swiping and tapping thumbnails move between the remaining photos normally.
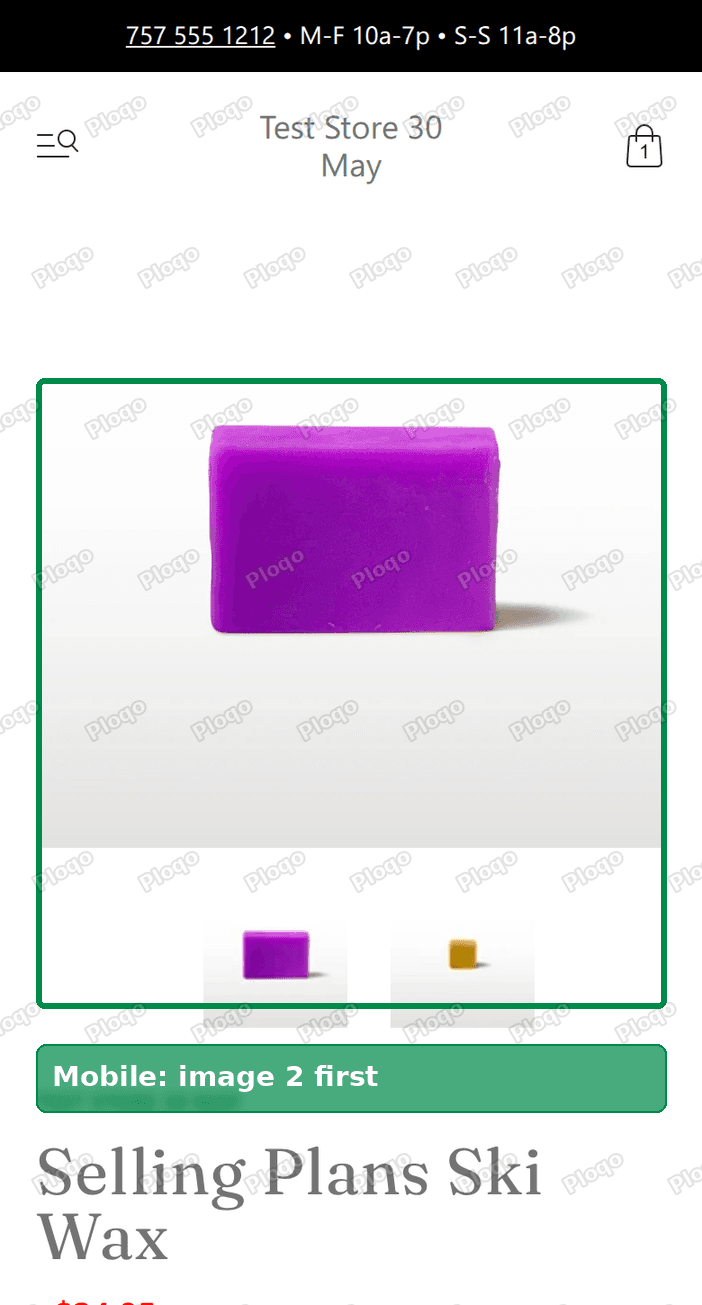 Roam product page on a phone after the fix, opening on image 2
Featured image vs product image gallery
These two get mixed up, and the difference decides which fix you want.
- The featured image is the first photo in the product's Media list in your admin. Shopify uses it on collection pages, search results, the cart, order emails and when the product link is shared on social media.
- The product image gallery is the set of photos on the product page itself. On Roam it is the large photo with a column of thumbnails beside it.
The CSS in this article changes only the product image gallery. Your featured image stays the same everywhere else. If you change the order in Media instead, the featured image changes everywhere.
Can you hide it on some products only?
This code applies to every product page that uses Roam's product gallery. On products where the first photo is one you want shoppers to see, it will be hidden too.
If only some products need it, the no-code route is cleaner: reorder or remove the photo on just those products in the admin.
Does the hidden image still load?
Yes. The code hides the photo on screen. The image is still part of the page, so the browser still downloads it. For one photo per product page that is a small cost.
It is also still the product's featured image, so it still shows on collection pages and in the cart.
Using a different theme?
The selectors in this code are Roam's own names for its gallery parts. Dawn, Horizon, Prestige and other themes use different names, so pasting this code into them changes nothing.
The idea carries over, though. If your theme's gallery sets its height from the selected photo, a plain "do not display" rule can collapse it the same way, and the hide-but-keep-the-size approach is what fixes it.
It did not work. What to check
- The main image area is still empty. The old "do not display" code is probably still in the box. Open Custom CSS, delete everything that targets the first gallery photo, paste only the new code and save.
- Nothing changed at all. Check you pasted into Theme settings > Custom CSS, not into a section's own Custom CSS. Then check the theme is Roam: in the theme editor, the theme name shows at the top of the screen.
- Save stayed greyed out. Click outside the code box, then click Save again. The editor sometimes does not register a paste until the box loses focus.
- The edit will not save, or the old code comes back. Look for
visibilityin your code. Replace it withopacity: 0. - A colour or size uses the first photo as its variant image. Choosing that variant asks the gallery for image 1, and because image 1 is see-through, the gallery stays on image 2. If that variant needs its own photo to show, attach a different photo to it in the product's variant settings.
Spending too long on manual Shopify busywork?
PinFlow turns your Shopify catalog into Pinterest pins and posts them on a schedule, automatically. Same idea as the rule above, let the system handle the repetitive part.
Get PinFlow on the Shopify App StoreMore Shopify fixes
More community-sourced Shopify guides, tested on a live store.
Themes & Storefront
Shopify Autoplay Video on Product Page: Skip the Play Button
Your product video shows a play button instead of playing. How to make a Shopify product page video autoplay on desktop and mobile, with the exact code and steps.
Themes & Storefront
Show a Brand Logo on Shopify Product Pages by Vendor
Show the right brand logo next to the vendor name on every Shopify product page. One logo per brand, no code edits when you add a brand. Tested on the Enterprise theme.
Themes & Storefront
How to Edit the Shopify Cart Page and Add a Message
Shopify checkout hides the shipping option when a cart holds only pickup-only products, and never says why. You cannot edit that screen without Plus, but you can edit the cart page. Here is how, tested on Dawn.