
Show a Brand Logo on Shopify Product Pages by Vendor
Show the right brand logo next to the vendor name on every Shopify product page. One logo per brand, no code edits when you add a brand. Tested on the Enterprise theme.
By AjayCodeWiz · October 7, 2026 · 9 min read
The problem
A store owner selling car parts from many brands wanted a small brand logo above the part number on each product page. The logo had to change with the brand. A product from one brand shows that brand's logo, and a product from another brand shows its own.
The store runs the Enterprise theme. The owner had already looked for an app and found nothing that did this, so they assumed it needed code. That is mostly right. Shopify has no setting that says "show a logo for this vendor". It takes a short piece of code and a one-time setup.
I reproduced it on a test store with the Enterprise theme installed. Here is a product page before the change. The vendor name is plain text above the product title.
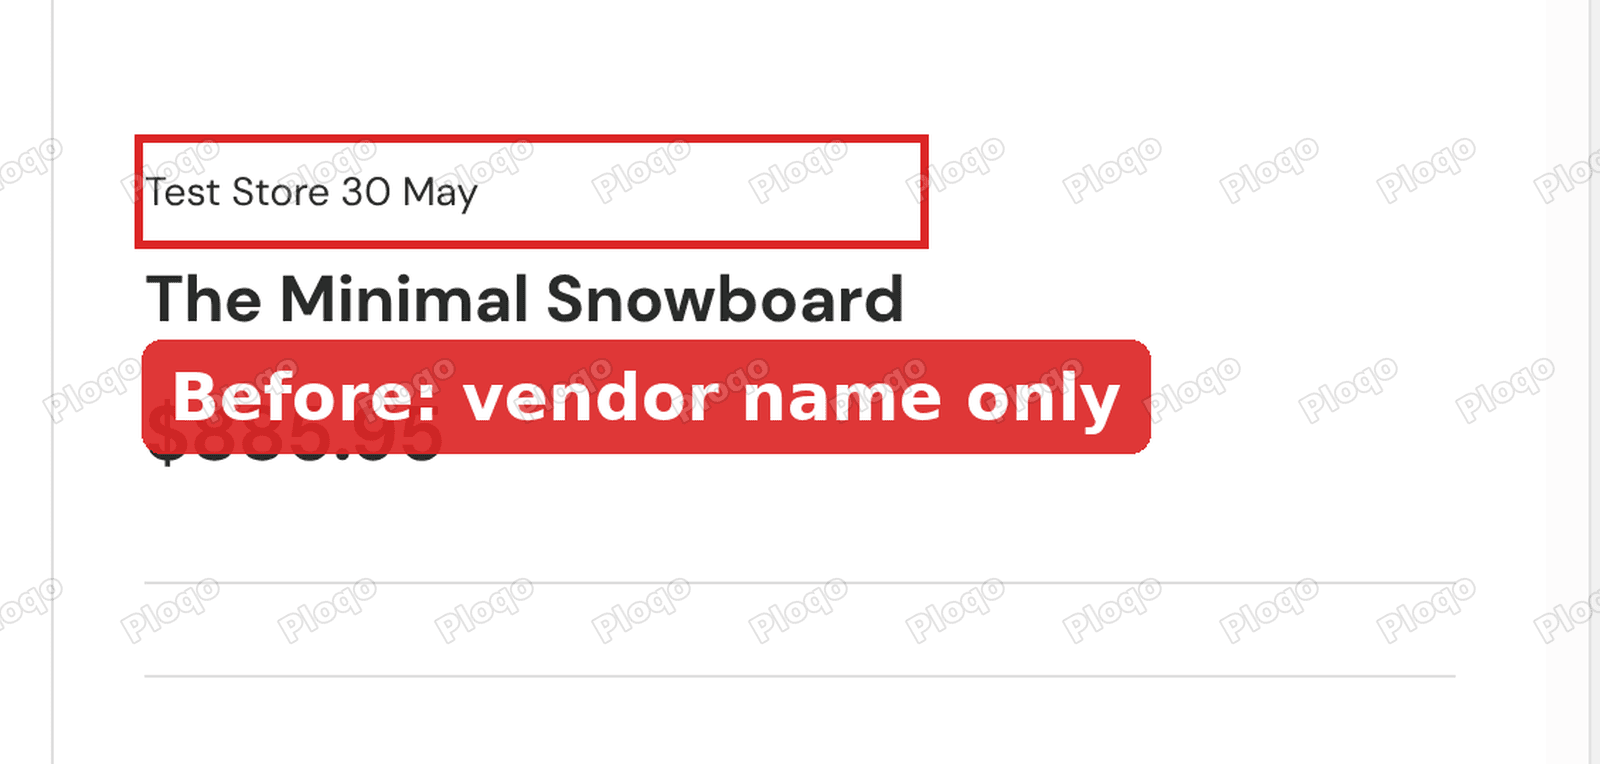 Enterprise product page showing only the vendor name in text above the title
And here it is after. The brand logo sits above the vendor name, and it changes for every brand.
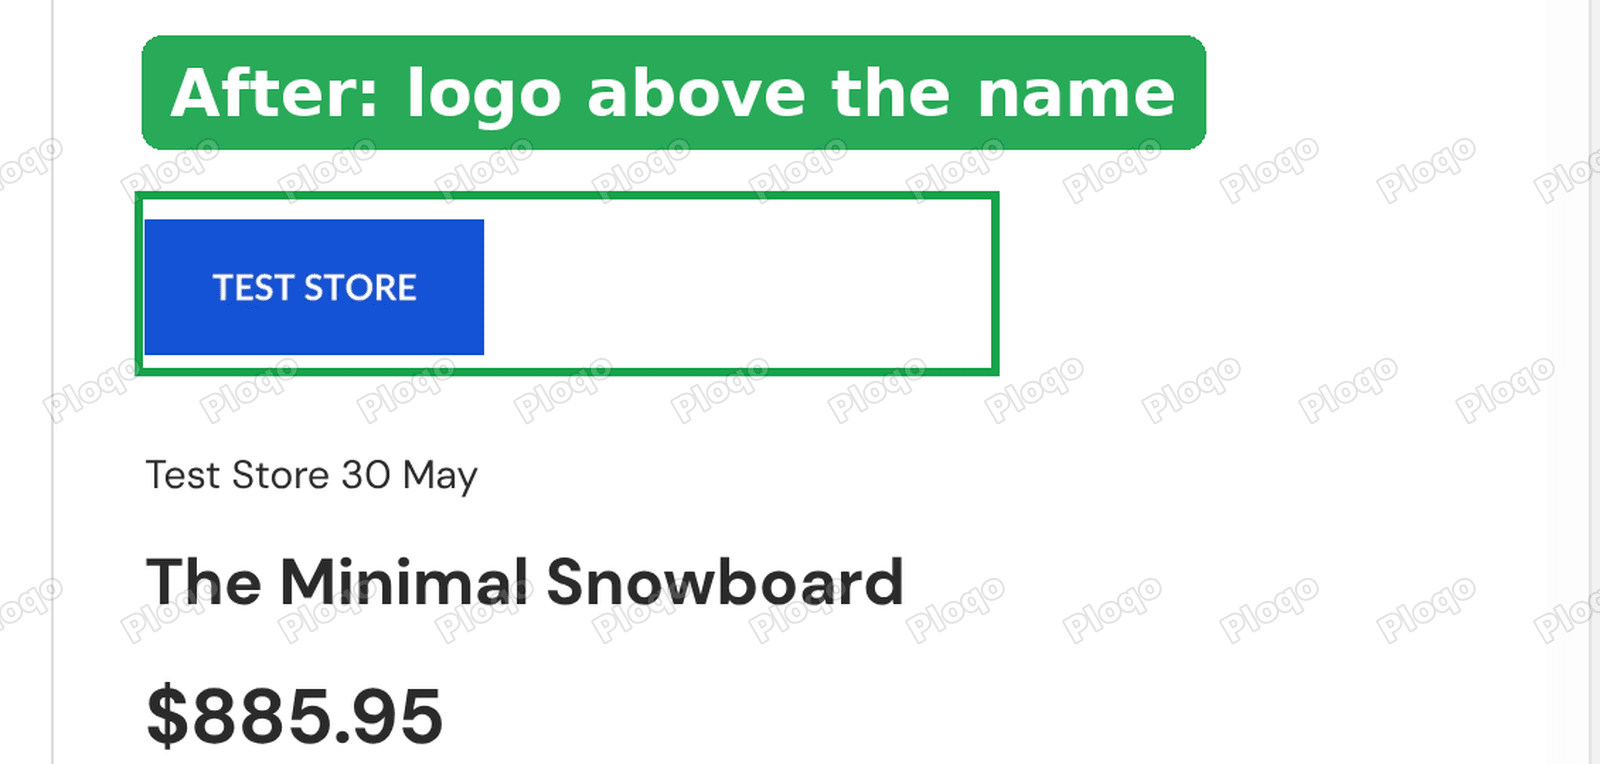 Enterprise product page showing the brand logo above the vendor name
The setup below takes about ten minutes. Adding a new brand later takes one minute and no code.
Why the vendor field cannot hold a logo
Every Shopify product has a Vendor field. It is a single line of text, usually the brand or supplier name. Themes print that text on the product page, in collection filters and in search results.
Because it is only text, you cannot attach a picture to it. There is no logo upload next to the field.
So the job has two parts:
- Store each logo somewhere, once, next to the brand name it belongs to.
- Tell the theme: "look at this product's vendor, find that brand's logo and show it".
Shopify has a tool for part one called a metaobject. A metaobject is a reusable record you fill in once. Here the record is a brand, and it has two fields: a name and a logo. Part two is a small box of code in the theme editor.
Two ways to do it
There are two common answers to this question.
The case and when list. You write one line of code per brand in the theme. Each line says "if the vendor is this, show this image file". It works, and it is quick for three or four brands. Every new brand means opening the theme code, adding a line and uploading the image. A store with 40 brands ends up with a long block of code that is easy to break.
One record per brand. You create a Brand record for each brand in your admin, with the logo attached. The code in your theme stays the same forever. It finds the right record by matching the brand name to the vendor name. A new brand is a new record and nothing else.
I recommend the second one, and the rest of this article uses it. It is also the better choice for a parts store, where the brand list keeps growing.
Before you start
Check three things.
- Your vendor names are spelled the same on every product. "BMW" on one product and "B.M.W." on another count as two different brands. Open Products, add the Vendor column and scan it. The setup below matches names exactly, apart from capital letters and spaces.
- You have the logos ready. Square or wide images both work. A PNG with a clear background looks best on any color. About 300 pixels wide is plenty, because the logo shows at 120 pixels.
- Your theme has a Custom Liquid block on the product page. A Custom Liquid block is a box in the theme editor where you paste code. Enterprise has it. Most current Shopify themes do too.
Step 1: Create the Brand record type
Go to Content > Metaobjects. This is where Shopify keeps your custom record types. Click Add definition.
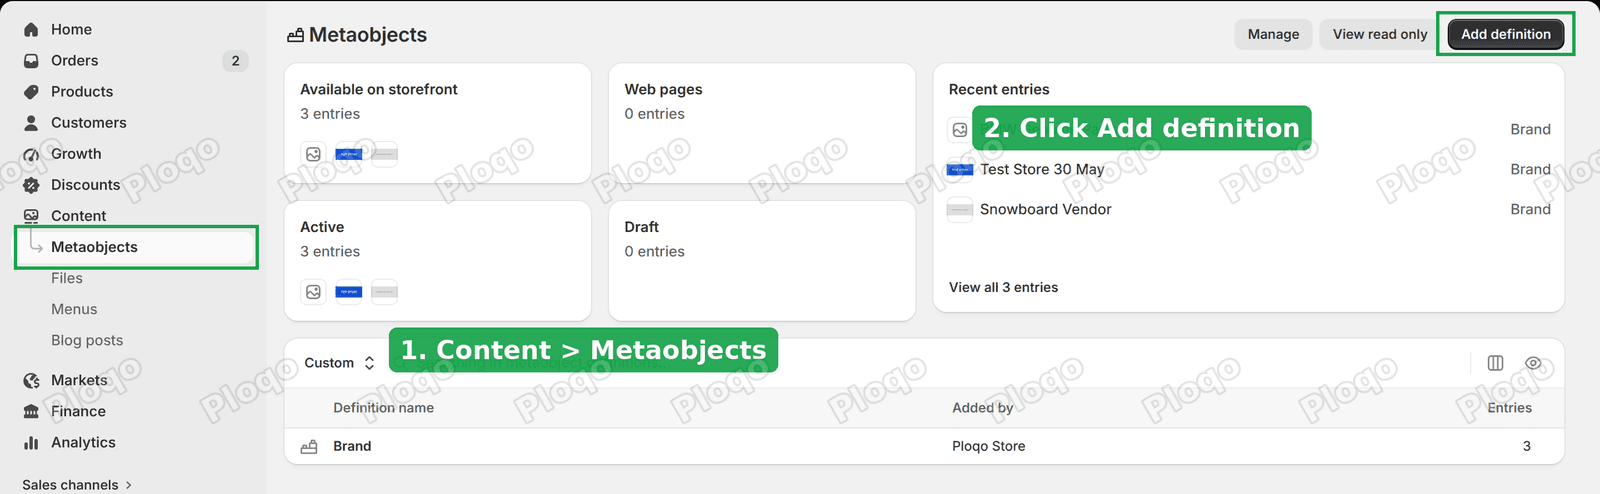 Shopify Metaobjects page with the Add definition button highlighted
On the next screen, name the definition Brand. Then add two fields.
- Name, with the type set to a single line of text.
- Logo, with the type set to a file. Limit it to images.
Leave the other options as they are. In particular, leave Storefronts API access switched on. The theme needs that to read the record. Click Save.
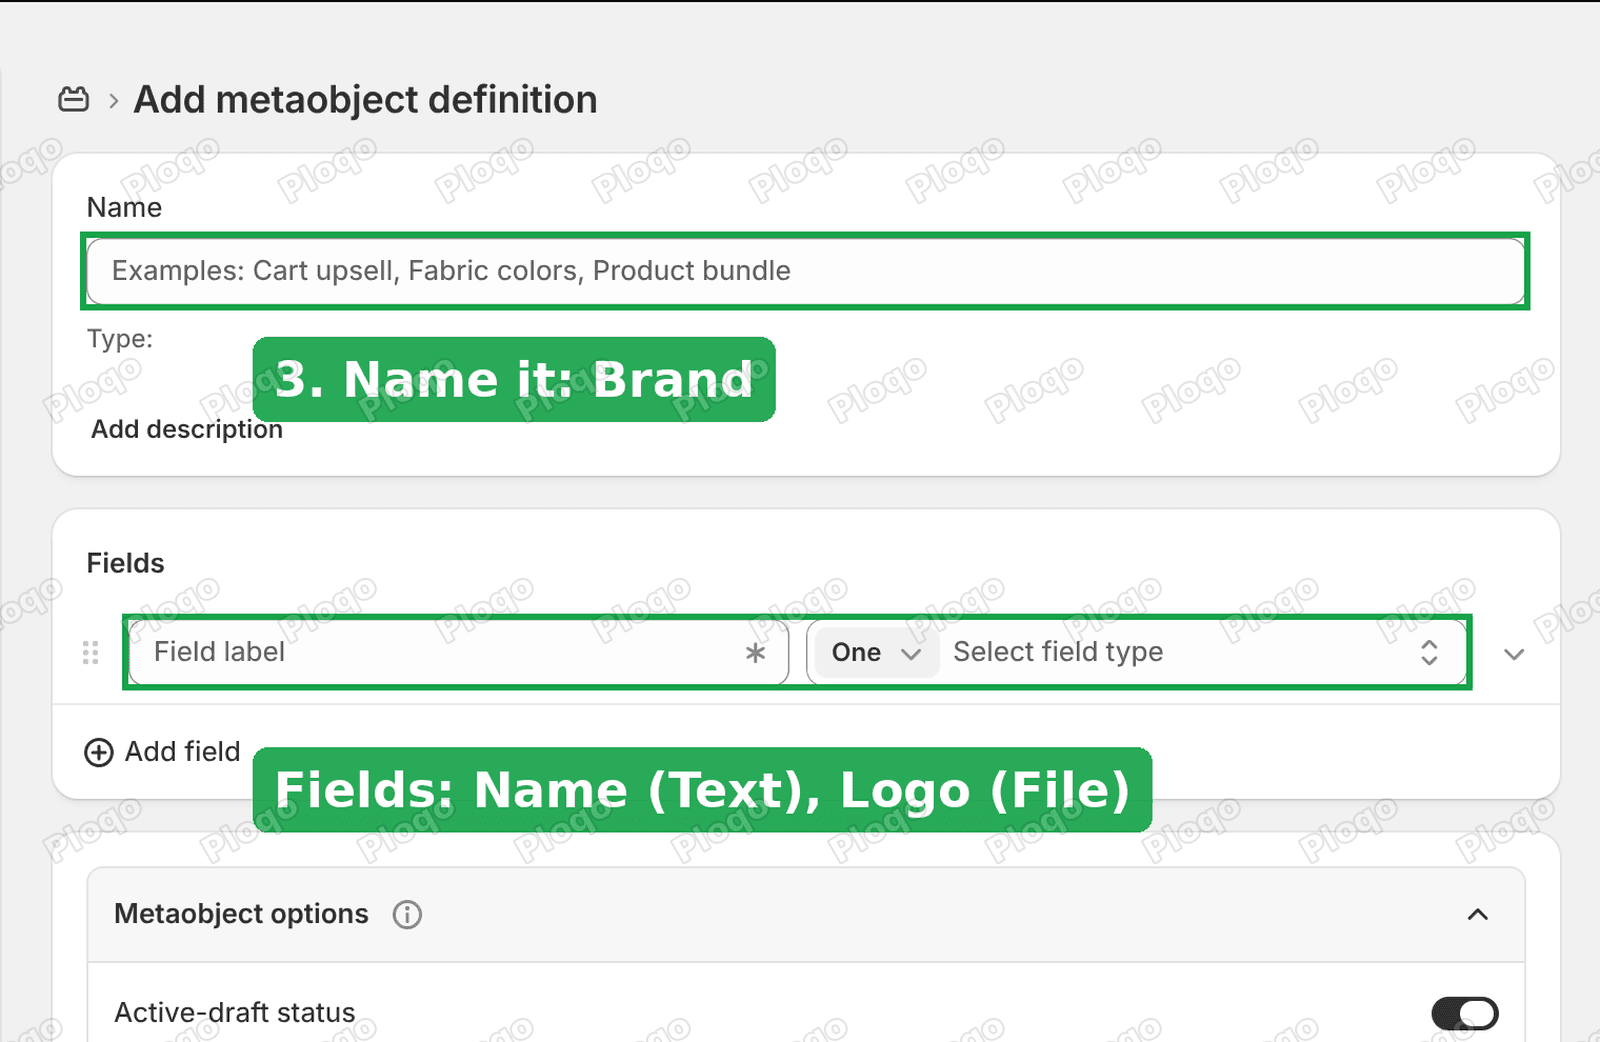 The Add metaobject definition screen with the name and fields to fill in
Step 2: Add one entry per brand
Back on the Metaobjects page, open Brand and click Add entry. Do this once for each brand you sell.
Type the brand name exactly as it appears in the product's Vendor field. Then click Add under Logo and pick the logo file. Click Save.
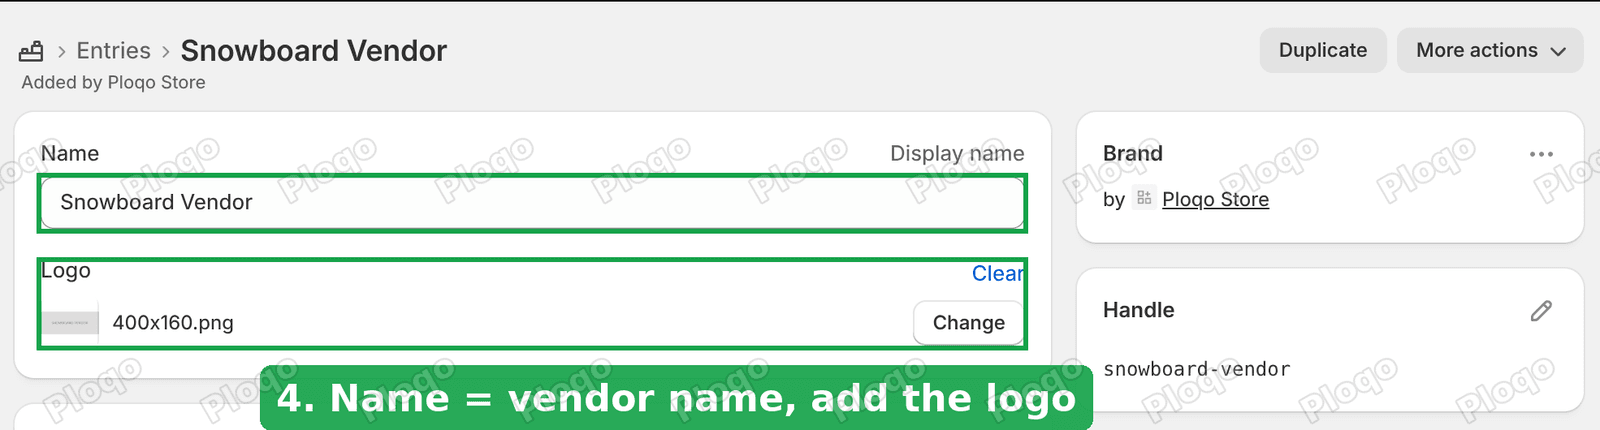 A Brand entry with the name field and the logo attached
Shopify creates a short web-address name for the entry from the brand name. It is lowercase, with dashes instead of spaces. "Snowboard Vendor" becomes snowboard-vendor. The code matches on this name, and that is why the spelling has to line up with the vendor.
You do not need to link any products to the entry. The theme finds the entry from the vendor name on its own. That means you can set up all your brands without opening a single product.
Step 3: Add the code to the product page
Go to Online Store > Themes and click Customize on your theme. Open a product page from the page picker at the top.
In the left menu, click Product. This is the main product section. Click Add block, then choose Custom Liquid.
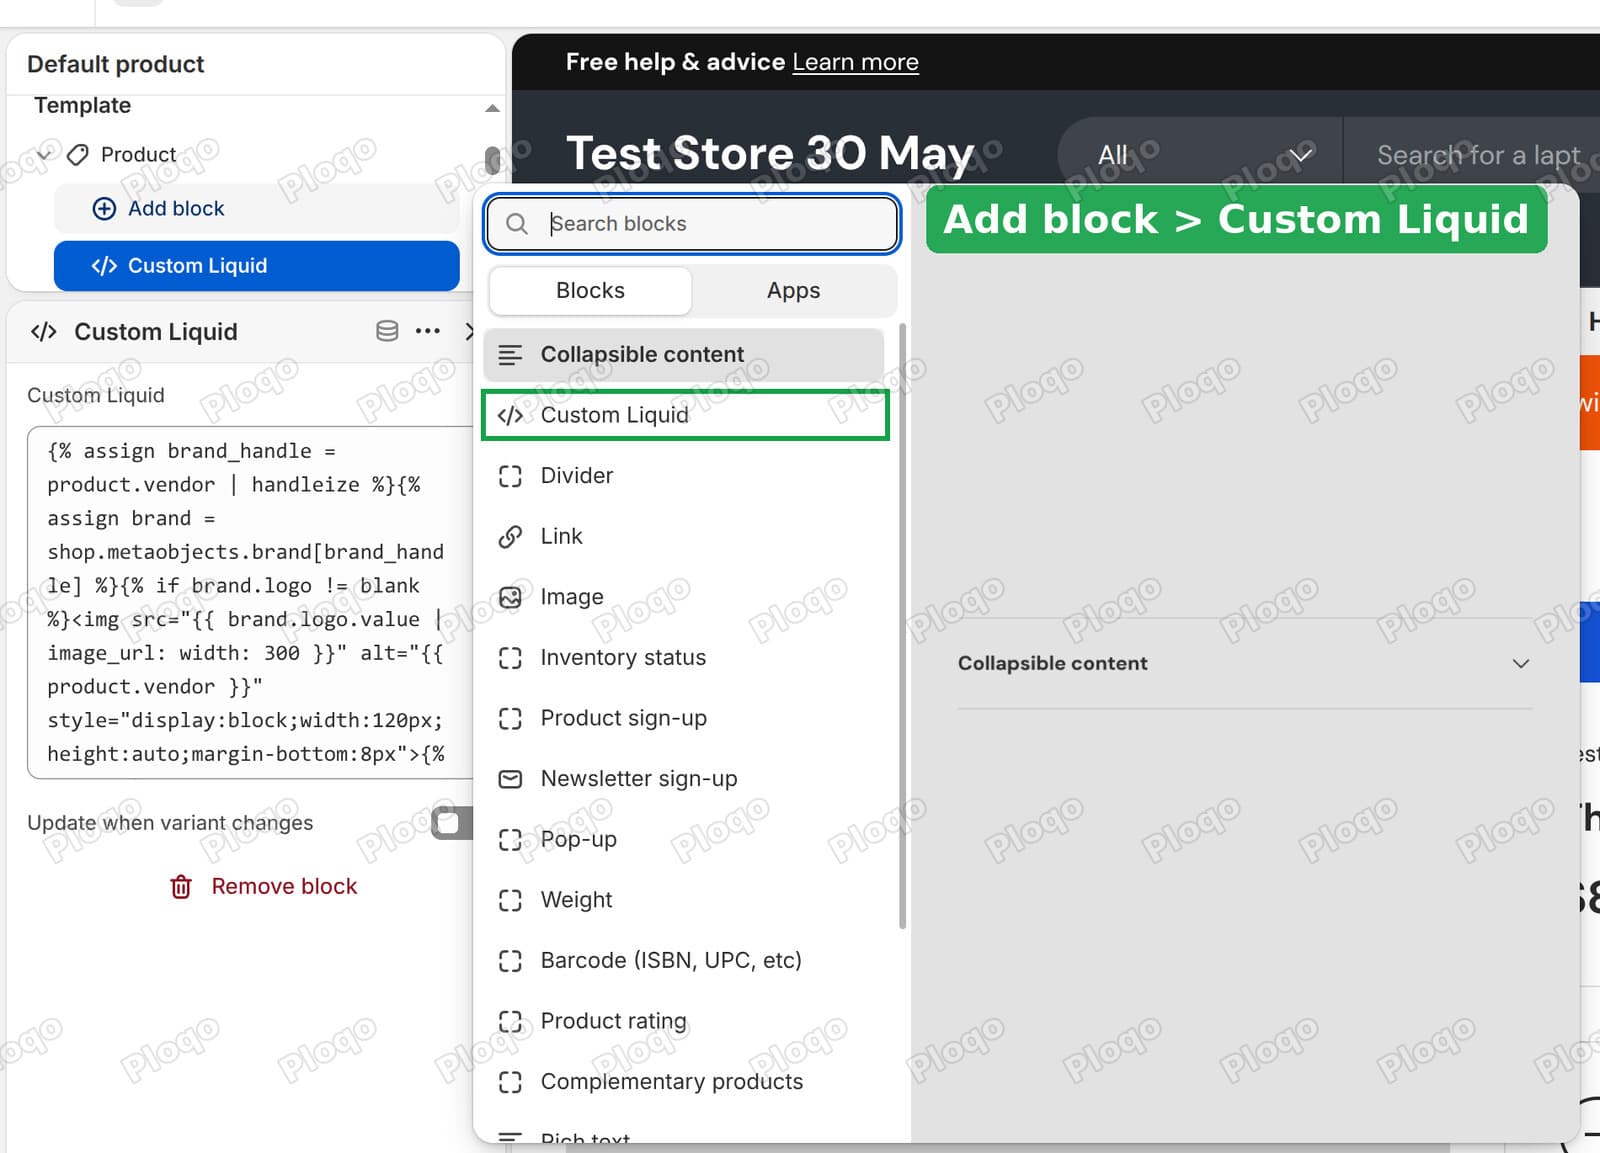 The Add block list in the Enterprise theme editor with Custom Liquid highlighted
On the Enterprise theme the new block lands at the top of the list, which puts the logo above the vendor name. If your theme adds it at the bottom, drag the block up the list to where you want it.
Paste this code into the box.
{% assign brand_handle = product.vendor | handleize %}
{% assign brand = shop.metaobjects.brand[brand_handle] %}
{% if brand.logo != blank %}
<img src="{{ brand.logo.value | image_url: width: 300 }}" alt="{{ product.vendor }}" style="display:block;width:120px;height:auto;margin-bottom:8px">
{% endif %}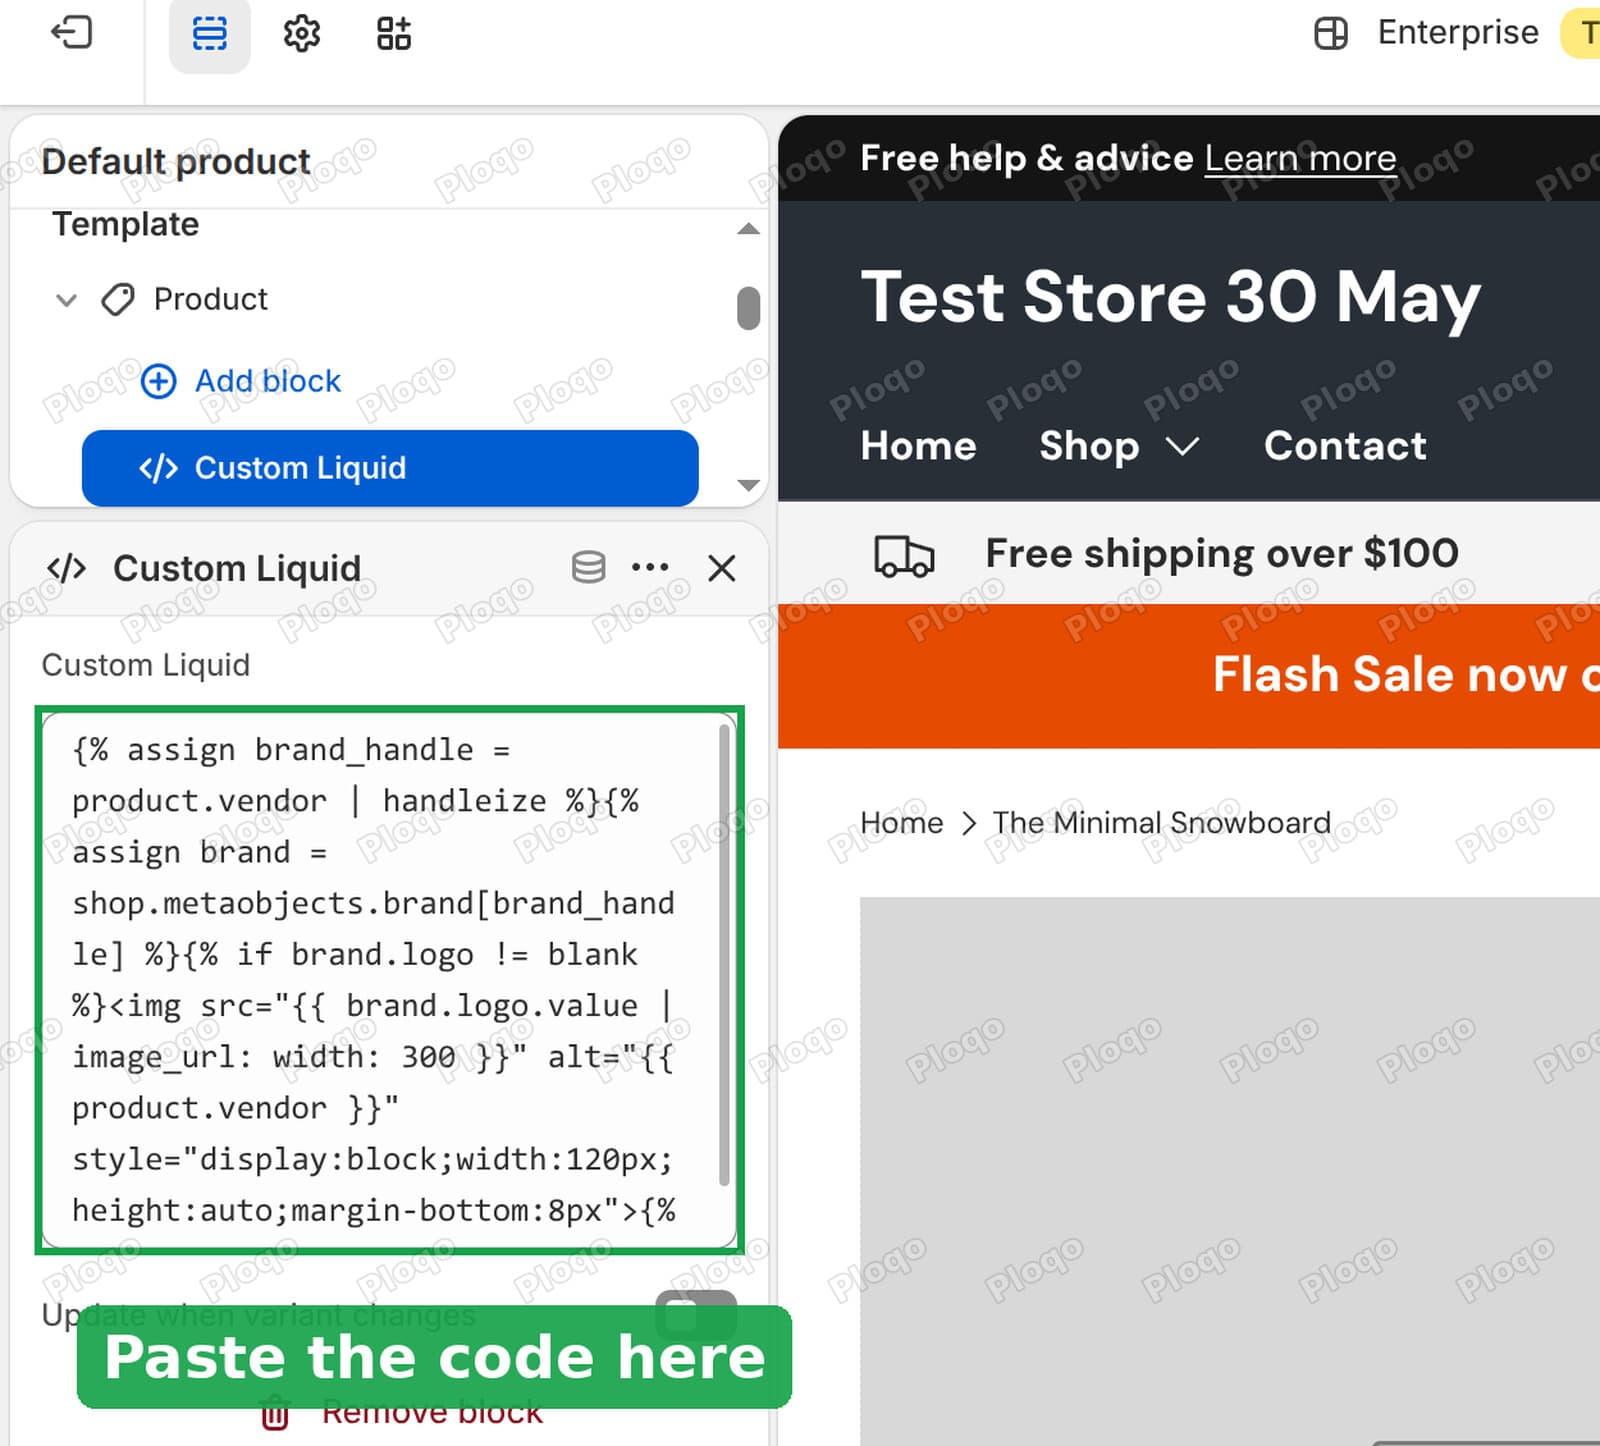 The Custom Liquid box in the theme editor with the code pasted in
Here is what each line does, in plain words.
- The first line takes the product's vendor name and turns it into the short web-address form, with lowercase letters and dashes.
- The second line looks up the Brand entry with that name.
- The third line checks that the entry has a logo. If it does not, nothing shows and the page looks the same as before.
- The fourth line shows the logo at 120 pixels wide. Change
120pxto make it bigger or smaller.
Click Save in the top right.
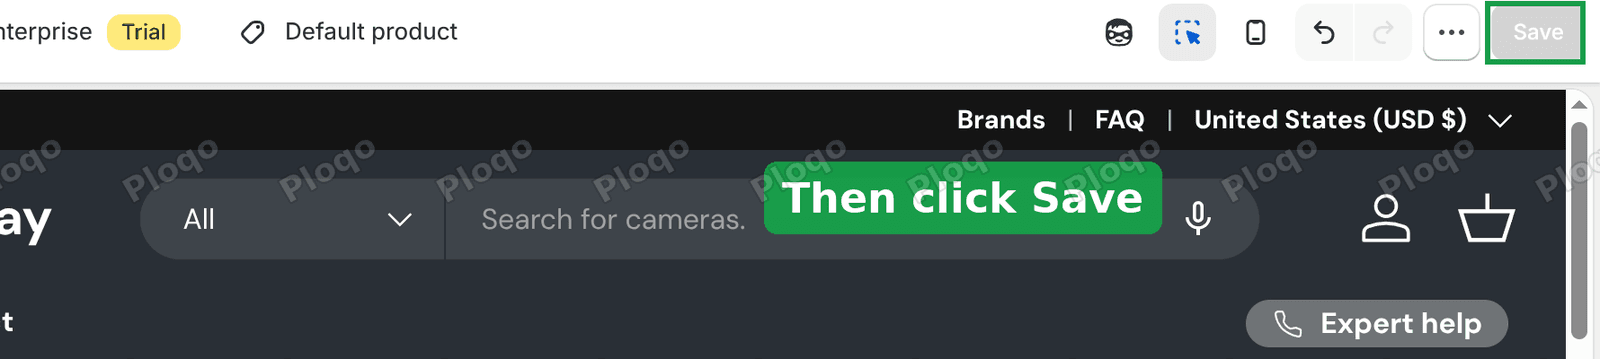 The Save button in the top right of the theme editor
What I saw on the live page
The theme editor preview is not the same as the real page, so I also loaded a product on the storefront itself. The page contained the image tag with the right brand logo, and the image address pointed at the logo I had uploaded. A product whose vendor had no Brand entry showed no logo and no empty space.
Make the logo link to the brand's products
A logo shoppers can click is more useful. Shopify has a built-in page that lists every product from one vendor. Its address looks like this:
/collections/vendors?q=Snowboard%20Vendor
You can wrap the logo in a link to that page. Replace the code in the Custom Liquid box with this version.
{% assign brand_handle = product.vendor | handleize %}
{% assign brand = shop.metaobjects.brand[brand_handle] %}
{% if brand.logo != blank %}
  <a href="{{ product.vendor | url_for_vendor }}">
    <img src="{{ brand.logo.value | image_url: width: 300 }}" alt="{{ product.vendor }}" style="display:block;width:120px;height:auto;margin-bottom:8px">
  </a>
{% endif %}
On my test store the link came out as /collections/vendors?q=Snowboard%20Vendor, and that page listed the products from that vendor.
This page is the vendor page that some stores call a brand page. It is generated by Shopify, so it takes no setup. If you want a designed page for each brand, with a banner and a description, create a collection for each brand instead and link the logo to that collection.
Show a logo only for some brands
You do not have to add every brand. A brand with no entry shows no logo. That is useful if only your biggest brands have usable logo files. Add those first and the rest follow whenever you get the files.
Add a new brand later
- Open the Brand entries list from step 2 and add a new entry.
- Type the brand name exactly as it appears in the vendor field.
- Attach the logo and click Save.
The logo shows on every product with that vendor right away. You do not touch the theme.
If the logo does not show
Work down this list.
- Is the name spelled the same? Compare the Brand entry name with the product's Vendor field, letter by letter. Capital letters and spaces do not matter. Punctuation does. "BMW" and "B.M.W." are different.
- Is Storefronts API access switched on for the Brand definition? Open the Brand definition, click Manage definition and check the toggle.
- Does the entry have a logo attached? An entry with only a name shows nothing.
- Is the block on the right template? Product pages can use more than one template. If some products use an alternate template, add the block there too. In the theme editor, the template name shows at the top of the page.
- Did you save in the theme editor? The preview shows the logo before you save, but the live page does not change until you do.
- Is the page cached? Reload the product page with a hard refresh.
What if your theme has no Custom Liquid block
If your theme only offers Custom Liquid as a whole section, the code is the same. Add a Custom Liquid section on the product page and paste the code there. The section sits below the main product block, so the logo will not be next to the vendor name. If the position matters, a theme with block support is the easier route. For a related example of placing code on a product page, see how to show metafields on a Shopify product page.
The same record for other uses
Once the Brand records exist, you can reuse them. A brand logo strip on the homepage, a brand filter in your menu or a brand story section on a collection page can all read the same records. If you want to understand custom fields better first, see how to add metafields in Shopify.
The case and when version, if you prefer it
If you only sell three or four brands, a short list also works. It keeps everything in one box of code and needs no Brand records.
{% case product.vendor %}
  {% when 'Brand One' %}
    <img src="LOGO-ONE-URL" alt="{{ product.vendor }}" style="width:120px;height:auto">
  {% when 'Brand Two' %}
    <img src="LOGO-TWO-URL" alt="{{ product.vendor }}" style="width:120px;height:auto">
{% endcase %}
Replace the two placeholders with the web address of each uploaded logo. You can copy that address from Content > Files. The catch is the one I mentioned earlier. Each new brand needs a new block of lines in the theme. With a long brand list the Brand records are the cleaner choice.
Apps for this
I could not find an app that does only this one job. Brand-page and brand-directory apps cover related ground, such as an A-Z list of brands. For a logo next to the vendor name, the setup above is shorter than configuring one of them.
Summary
- The Vendor field is text, so the logo lives in a Brand record.
- Create the Brand record type once, then one entry per brand with the logo attached.
- Add one Custom Liquid block to the product page with the code above.
- A brand without a logo shows nothing. A new brand is one new entry and no code.
Spending too long on manual Shopify busywork?
PinFlow turns your Shopify catalog into Pinterest pins and posts them on a schedule, automatically. Same idea as the rule above, let the system handle the repetitive part.
Get PinFlow on the Shopify App StoreMore Shopify fixes
More community-sourced Shopify guides, tested on a live store.
Themes & Storefront
Shopify Autoplay Video on Product Page: Skip the Play Button
Your product video shows a play button instead of playing. How to make a Shopify product page video autoplay on desktop and mobile, with the exact code and steps.
Themes & Storefront
Hide the First Image in Your Shopify Product Image Gallery
Hide the first photo in a Shopify product image gallery without deleting it, so the gallery opens on image 2. Tested Custom CSS for the Roam theme, desktop and mobile.
Themes & Storefront
How to Edit the Shopify Cart Page and Add a Message
Shopify checkout hides the shipping option when a cart holds only pickup-only products, and never says why. You cannot edit that screen without Plus, but you can edit the cart page. Here is how, tested on Dawn.