
Shopify Product Page Buy Box: Bullets, Offer, Trust Badges
A Smile theme merchant wanted feature pills, a Save % and coupon price, a low-stock line, trust badges and payment icons under the price. Three Custom Liquid blocks do it on any Dawn-based theme, no app, with code and screenshots.
By AjayCodeWiz · September 30, 2026 · 13 min read
What a "buy box" is, and why these pieces sit where they do
The buy box is the part of the product page next to the photos: the title, price, options and Add to cart button. It is where a shopper decides, so the extra information goes there rather than further down the page.
The merchant's example had three groups, and each belongs in a different spot:
- Feature bullets above the price. Short tags like "10,000+ microcapsules" or "For sensitive skin". They tell the shopper what the product is before they see what it costs.
- The offer under the price. The discount percentage, the price after a coupon code, a line of size and tax details, and a stock warning.
- Trust information under Add to cart. Secure checkout, free shipping, returns, cash on delivery, the payment icons and a few checkmarks. This answers the doubts a shopper has at the moment they are about to click.
Keeping them as three separate pieces also means you can move, hide or reorder each one in the theme editor without touching the others.
What Smile is built on
Smile is not in the Shopify Theme Store. Its code reports version 15.2.7, and the page structure matches Shopify's free Dawn theme, version 15.2. The product page has the same "Product information" section with the same blocks: Title, Price, Variant picker, Quantity selector, Buy buttons and so on.
That matters because Dawn has a Custom liquid block. A Custom Liquid block is a box in the theme editor where you paste code, and it shows up exactly where you place it in the block list. Liquid is the code Shopify themes are written in. So every Dawn-based theme can take this fix, including Smile, Crave, Studio and most themes sold as "Dawn with extras".
I tested everything below on Dawn 15.2.0, the version Smile is built on.
Step by step: add the three blocks
Before you start, duplicate your theme (Online Store > Themes > the three dots > Duplicate). It takes ten seconds and gives you a copy to go back to.
1. Open the theme editor. Go to Online Store, then click Edit theme on your current theme.
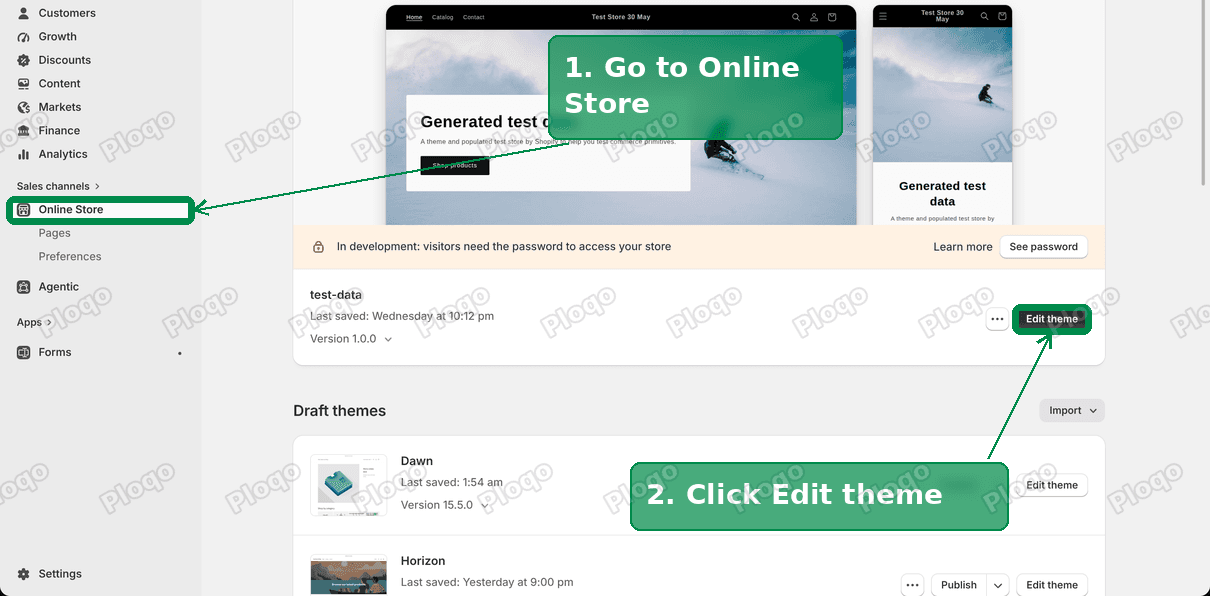 Shopify admin Online Store Themes page with the Edit theme button marked
2. Switch to the product page. At the top of the editor, open the page picker and choose Products > Default product. The preview on the right now shows a product.
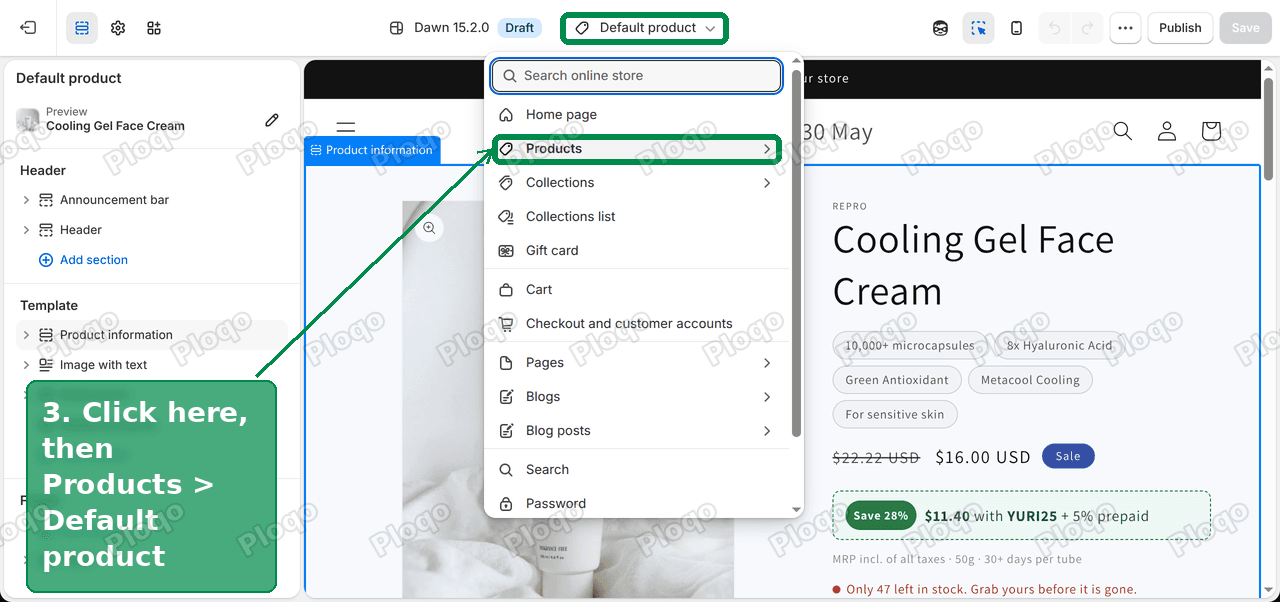 The theme editor page picker open with Products marked
3. Add a Custom liquid block. In the left sidebar, find Product information. Click Add block under it and pick Custom liquid.
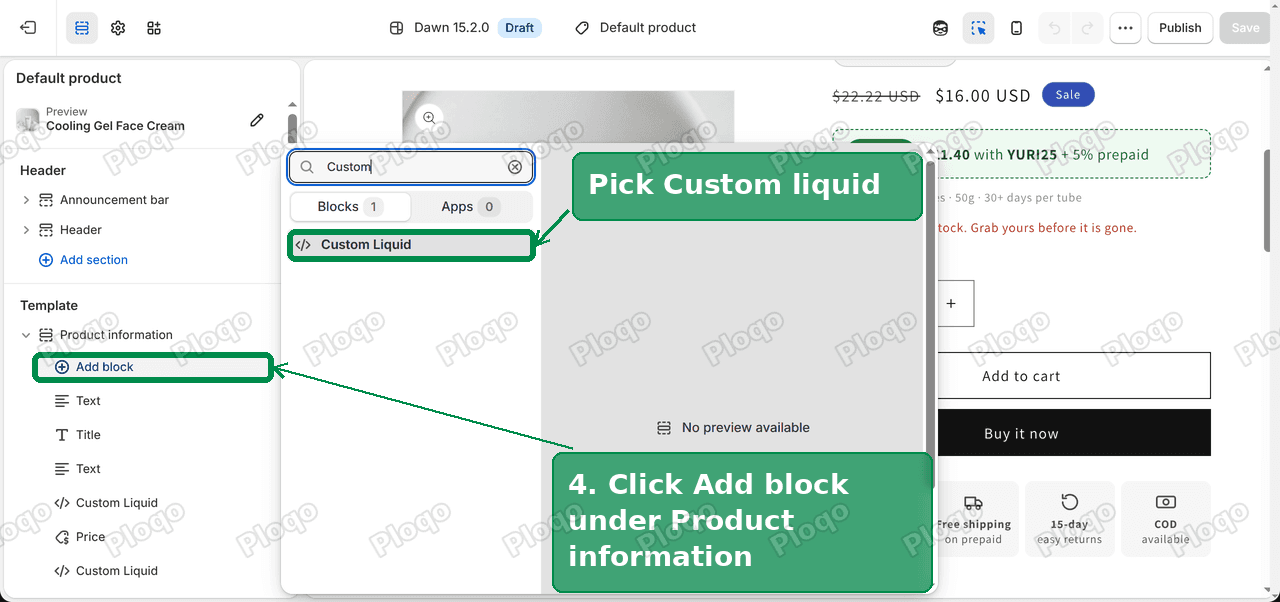 The Add block picker in the theme editor filtered to Custom Liquid
4. Paste the feature bullets code. The block opens with an empty box. Paste this:
{%- assign points = '10,000+ microcapsules|8x Hyaluronic Acid|Green Antioxidant|Metacool Cooling|For sensitive skin' | split: '|' -%}
<div class="ao-pills">
{%- for point in points -%}
<span class="ao-pill">{{ point }}</span>
{%- endfor -%}
</div>
<style>
.ao-pills { display: flex; flex-wrap: wrap; gap: 0.6rem; }
.ao-pill { font-size: 1.25rem; line-height: 1; padding: 0.7rem 1.2rem; border-radius: 99px; background: rgba(var(--color-foreground), 0.05); border: 1px solid rgba(var(--color-foreground), 0.15); }
</style>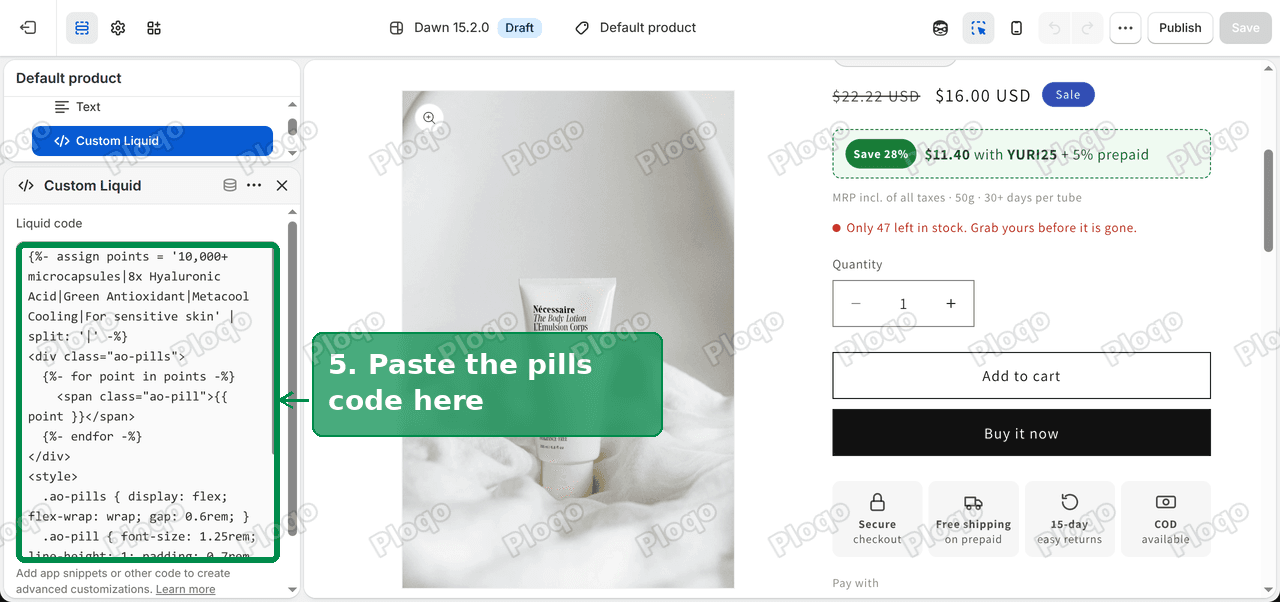 A Custom Liquid block in the theme editor with the feature pills code pasted
5. Move it above the price. Drag the new block by its handle so it sits just above Price in the list.
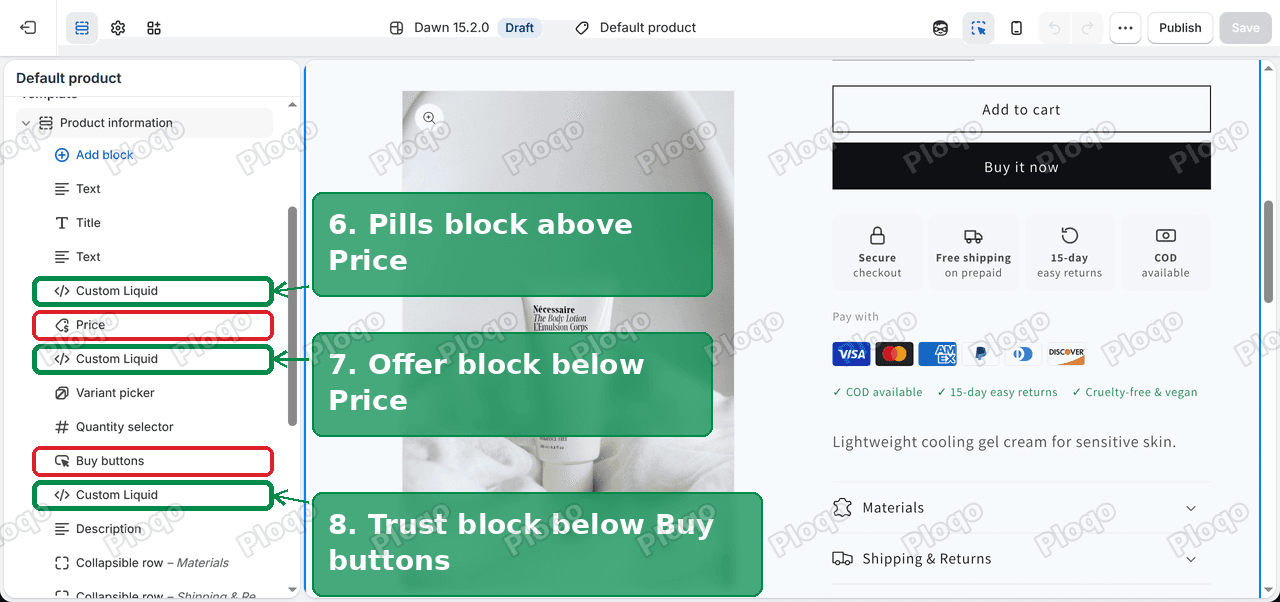 The Product information block list with the three Custom Liquid blocks placed around Price and Buy buttons
6. Add the offer block. Add a second Custom liquid block, paste the code below, and drag it just below Price.
{%- assign coupon_code = 'YURI25' -%}
{%- assign coupon_percent = 25 -%}
{%- assign prepaid_percent = 5 -%}
{%- assign details_line = 'MRP incl. of all taxes · 50g · 30+ days per tube' -%}
{%- assign low_stock_under = 50 -%}
{%- assign v = product.selected_or_first_available_variant -%}
{%- assign keep1 = 100 | minus: coupon_percent -%}
{%- assign keep2 = 100 | minus: prepaid_percent -%}
{%- assign offer_price = v.price | times: keep1 | divided_by: 100 | times: keep2 | divided_by: 100 -%}
<div class="ao-offer">
<p class="ao-offer__row">
{%- if v.compare_at_price > v.price -%}
{%- assign save = v.compare_at_price | minus: v.price | times: 100.0 | divided_by: v.compare_at_price | round -%}
<span class="ao-save">Save {{ save }}%</span>
{%- endif -%}
<span><strong>{{ offer_price | money }}</strong> with <strong>{{ coupon_code }}</strong> + {{ prepaid_percent }}% prepaid</span>
</p>
<p class="ao-offer__details">{{ details_line }}</p>
{%- if v.inventory_management == 'shopify' and v.inventory_quantity > 0 and v.inventory_quantity < low_stock_under -%}
<p class="ao-stock"><span class="ao-stock__dot"></span>Only {{ v.inventory_quantity }} left in stock. Grab yours before it is gone.</p>
{%- endif -%}
</div>
<style>
.ao-offer p { margin: 0; }
.ao-offer__row { display: flex; flex-wrap: wrap; align-items: center; gap: 0.8rem; font-size: 1.5rem; padding: 0.9rem 1.2rem; border: 1px dashed #1a7f37; border-radius: 0.8rem; background: #eefaf1; color: #14532d; }
.ao-save { background: #1a7f37; color: #fff; font-size: 1.2rem; font-weight: 700; padding: 0.4rem 0.8rem; border-radius: 99px; }
.ao-offer__details { font-size: 1.2rem; opacity: 0.7; margin-top: 0.8rem !important; }
.ao-stock { display: flex; align-items: center; gap: 0.6rem; font-size: 1.3rem; color: #b42318; margin-top: 0.8rem !important; }
.ao-stock__dot { width: 0.8rem; height: 0.8rem; border-radius: 50%; background: #d92d20; flex: none; }
</style>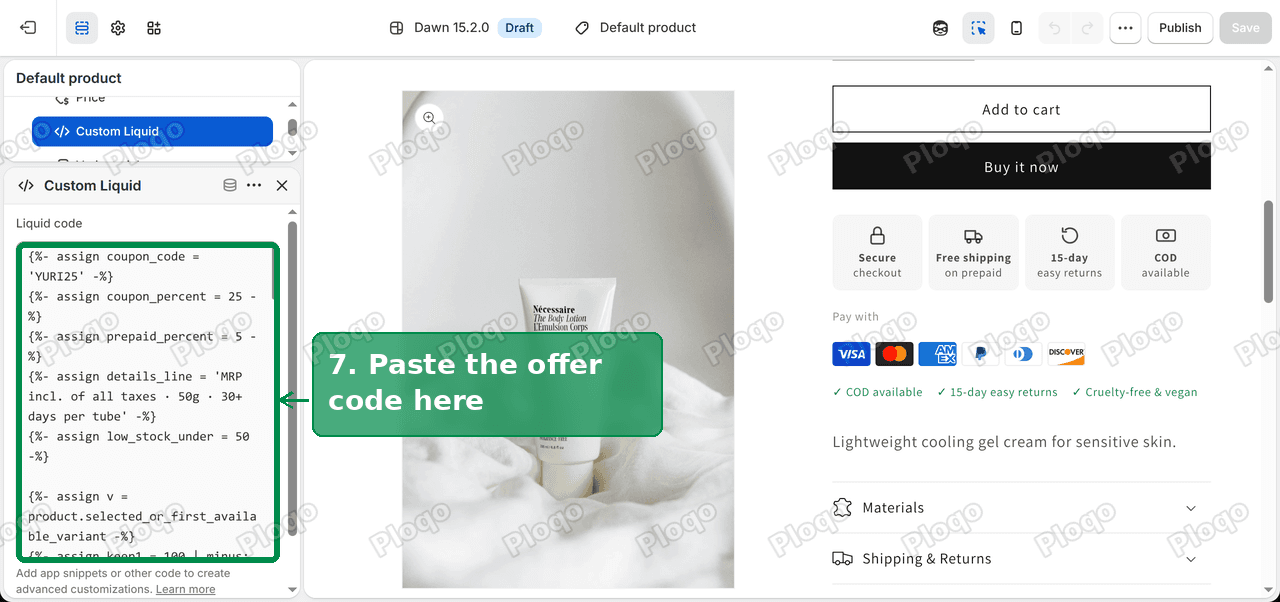 The second Custom Liquid block with the offer line code pasted
7. Add the trust block. Add a third Custom liquid block, paste this code, and drag it just below Buy buttons.
{%- assign trust = 'Secure;checkout|Free shipping;on prepaid|15-day;easy returns|COD;available' | split: '|' -%}
{%- assign badges = 'COD available|15-day easy returns|Cruelty-free & vegan' | split: '|' -%}
<div class="ao-trust">
{%- for item in trust -%}
{%- assign parts = item | split: ';' -%}
<div class="ao-trust__item">
<svg viewBox="0 0 24 24" width="22" height="22" fill="none" stroke="currentColor" stroke-width="1.8" stroke-linecap="round" stroke-linejoin="round" aria-hidden="true">
{%- case forloop.index -%}
{%- when 1 -%}<rect x="5" y="11" width="14" height="10" rx="2"/><path d="M8 11V7a4 4 0 0 1 8 0v4"/>
{%- when 2 -%}<path d="M3 7h11v9H3zM14 10h4l3 3v3h-7"/><circle cx="7" cy="18" r="2"/><circle cx="17" cy="18" r="2"/>
{%- when 3 -%}<path d="M4 12a8 8 0 1 0 3-6.2"/><path d="M4 4v4h4"/>
{%- else -%}<rect x="2" y="6" width="20" height="12" rx="2"/><circle cx="12" cy="12" r="3"/>
{%- endcase -%}
</svg>
<span><strong>{{ parts[0] }}</strong><br>{{ parts[1] }}</span>
</div>
{%- endfor -%}
</div>
<p class="ao-pay__label">Pay with</p>
<div class="ao-pay">
{%- for type in shop.enabled_payment_types -%}
{{ type | payment_type_svg_tag: class: 'ao-pay__icon' }}
{%- endfor -%}
</div>
<div class="ao-badges">
{%- for badge in badges -%}
<span>✓ {{ badge }}</span>
{%- endfor -%}
</div>
<style>
.ao-trust { display: grid; grid-template-columns: repeat(4, 1fr); gap: 0.6rem; }
.ao-trust__item { display: flex; flex-direction: column; align-items: center; text-align: center; gap: 0.4rem; font-size: 1.15rem; line-height: 1.3; padding: 1rem 0.4rem; border-radius: 0.8rem; background: rgba(var(--color-foreground), 0.04); }
.ao-pay__label { font-size: 1.2rem; opacity: 0.7; margin: 1.2rem 0 0.4rem; }
.ao-pay { display: flex; flex-wrap: wrap; gap: 0.5rem; }
.ao-pay__icon { height: 2.4rem; width: auto; }
.ao-badges { display: flex; flex-wrap: wrap; gap: 0.4rem 1.4rem; font-size: 1.2rem; margin-top: 1.2rem; color: #1a7f37; }
</style>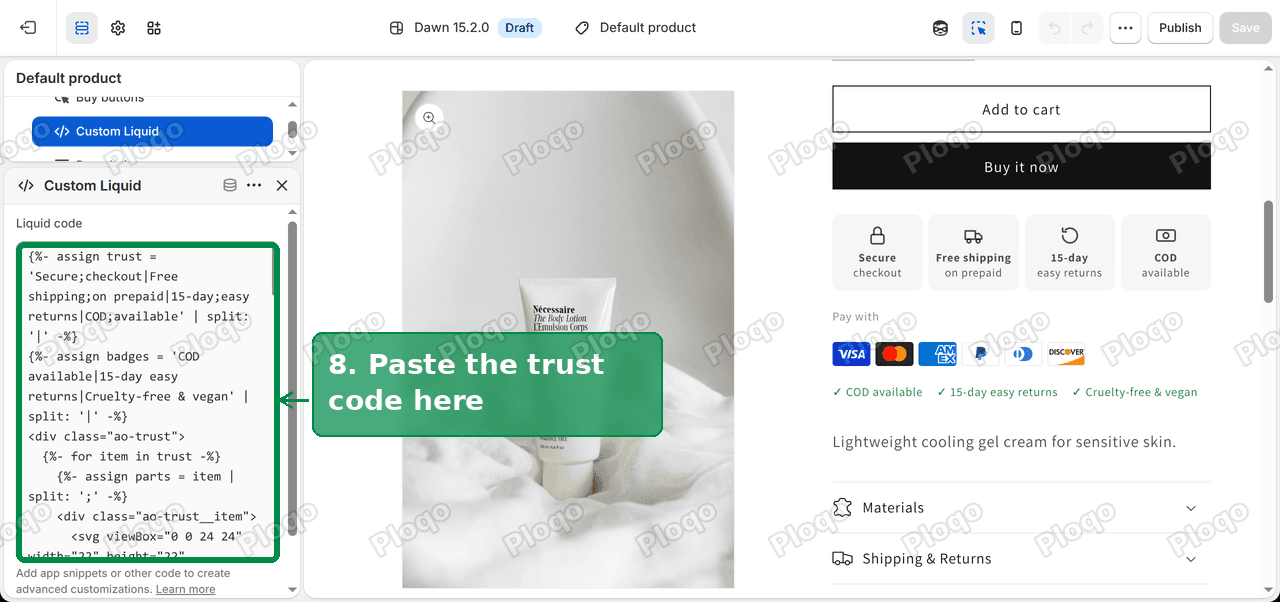 The third Custom Liquid block with the trust badge code pasted
8. Save. Click Save in the top right.
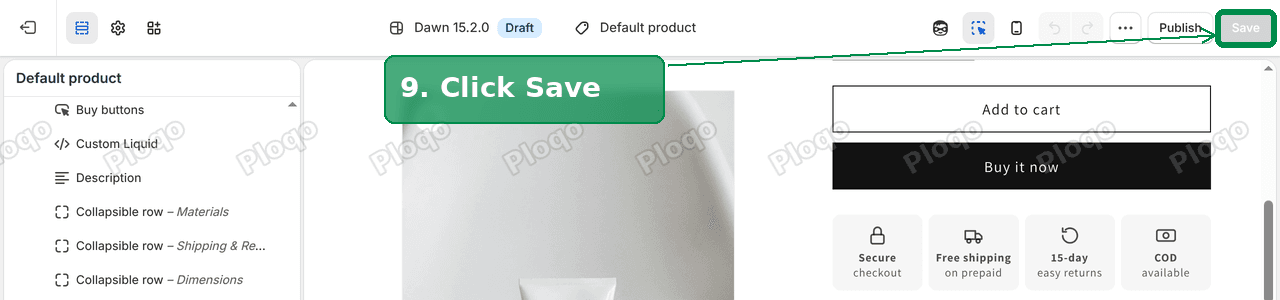 The theme editor top bar with the Save button marked
How to change the words
Each block starts with a few lines that hold the text. You only edit what is inside the quotes.
In the feature bullets block, the bullets are one line separated by a straight bar |. Add a bar and a new phrase to add a bullet, or delete one to remove it. Four or five short bullets fit on one or two rows on a phone. More than that starts pushing the price down the screen.
In the offer block you can change:
coupon_code: the code shoppers type at checkout.coupon_percent: how much the code takes off. The block uses it to work out the price shown.prepaid_percent: the extra discount for paying online instead of cash on delivery. Set it to 0 if you do not offer one.details_line: the small grey line with tax, size and how long the product lasts.low_stock_under: the stock count below which the warning appears.
In the trust block, each badge is a pair of words split by a semicolon: the bold line, then the small line. The checkmark row at the bottom works like the feature bullets.
How to show the percentage discount saved, and the other numbers
The block does not store prices. It reads them from the product each time the page loads.
- "Save 28%" compares the product's price with its Compare-at price. On my test product the price was 22.22, and the tag read "Save 28%". If a product has no compare-at price, the tag is left out.
- The coupon price takes the price, removes the coupon percentage, then removes the prepaid percentage. 12.00, and less another 5% is $11.40, which is what the block showed.
- "Only 47 left in stock" reads the product's inventory. It shows only when Shopify tracks stock for the product and the count is above zero and below your
low_stock_undernumber.
The coupon price is only a message on the page. It does not create a discount. You still need a discount code with the same name and amount under Discounts in the admin, and a way to take the extra prepaid percentage off at checkout. If the code on the page and the code in Discounts do not match, shoppers see a price they cannot get.
Why the low-stock line might not show
On my test store the stock line stayed hidden at first, although the product had 47 units. The stock was stored at a location that did not count toward the online store's available quantity, so the theme saw no number at all. After I moved the units to the main shop location, the line appeared.
If the line does not show for you, check these in order:
- The product has Track quantity turned on (Products > the product > Inventory).
- The stock sits at a location that fulfils online orders.
- The count is below the
low_stock_undernumber in the block. At 50, a product with 120 in stock shows nothing. - The count is above zero. A sold-out product shows the theme's own "Sold out" state instead.
Products with several variants
The three blocks read the variant that is selected when the page first loads. When a shopper switches size or colour, Dawn refreshes the price block, but it does not refresh a Custom Liquid block. So on a product where variants have different prices or stock, the offer line keeps the first variant's numbers until the page reloads.
For a single-size product, like most skincare, this never comes up. For products with variants at different prices, either leave out the coupon price line or use an app that updates on variant change.
The payment icons
The "Pay with" row is not a list of images you upload. It reads the payment methods turned on in Settings > Payments and shows Shopify's own icon for each one. Turn on a new method and its icon appears. Turn one off and it disappears. This matches what Dawn does in its footer.
If an icon you expect is missing, the method is either not turned on or it is one Shopify has no icon for. Some local wallets fall into that group. In that case, the checkmark row underneath is the place to mention it in words.
How it looks on a phone
Most shoppers see the product page on a phone, so I checked it at a 390-pixel wide screen. The feature bullets wrap onto a second row, the offer box stays full width, and the four trust badges sit in one row of narrow tiles. Nothing ran off the side of the screen.
If your trust labels are longer than two or three words, the tiles get tall. Shorter labels such as "Free shipping" and "COD available" keep them even.
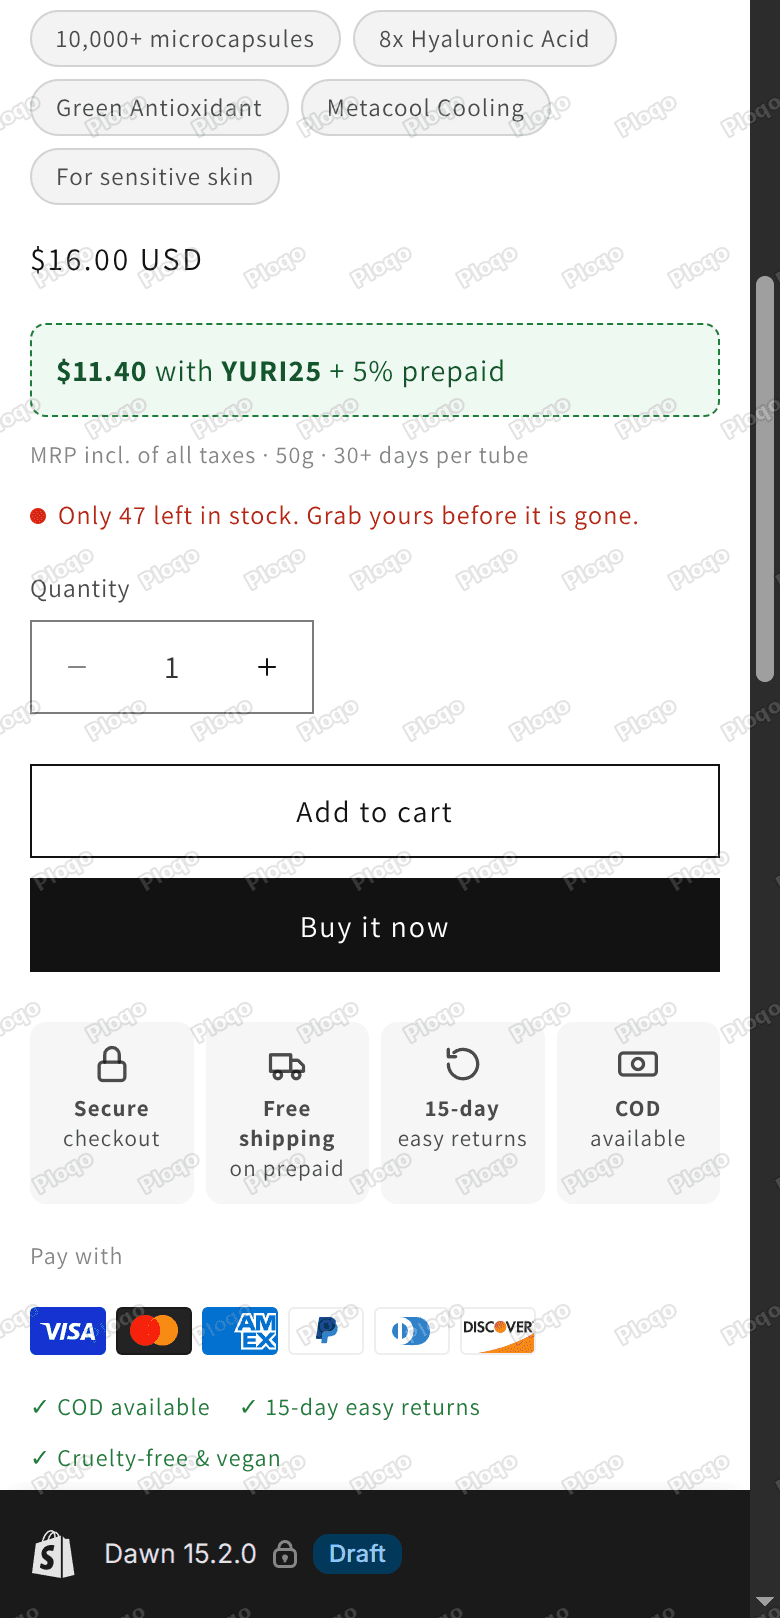 The buy box on a phone-width screen with pills wrapping onto three rows and four trust tiles in one row
Trust badges, payment icons and bullets: which ones help
A buy box can get crowded quickly. If you only need one badge image under the description, the simpler route is in Add Trust Badges Below a Shopify Product Description. For the full buy box, a few rules keep it readable:
- Four feature bullets or fewer. Each should be something a shopper would search for or ask about: an ingredient, a skin type, a size.
- One offer line. The discount and the coupon price belong together. A second promotion underneath competes with the first.
- Only badges that are true for every order. "Free shipping on prepaid" is fine if every prepaid order ships free. If free shipping needs a minimum spend, say so or leave it out.
- Real stock numbers only. A stock warning that never changes is easy for a returning shopper to spot.
Doing it with an app instead
Trust badge and "sales booster" apps can do parts of this without code. They usually add an app block (a piece the app adds to your theme) to the product page, and you place it in the same theme editor. Some add badges only, some add bullets and countdowns too.
The code approach has two advantages. It adds nothing to the page's loading time beyond a few lines of text and styling. And it keeps working if you stop paying for an app. An app is the better choice if you want different bullets on every product without editing code, or if your products have many variants with different prices.
If it did not work
- Nothing shows at all. Check that you saved, and that you are looking at the theme you edited, not a different one in your theme library.
- The blocks show in the wrong place. Open the sidebar list and drag them. The order in the list is the order on the page.
- The prices show in the wrong currency format. The block uses your store's own money format, so it matches the price above it. If it does not, check Settings > General > Store currency.
- The Save tag is missing. The product needs a Compare-at price higher than its price.
- "Liquid error" appears on the page. A quote or a bracket was lost while pasting. Delete the block's content and paste the code again in one go.
Spending too long on manual Shopify busywork?
PinFlow turns your Shopify catalog into Pinterest pins and posts them on a schedule, automatically. Same idea as the rule above, let the system handle the repetitive part.
Get PinFlow on the Shopify App StoreMore Shopify fixes
More community-sourced Shopify guides, tested on a live store.
Themes & Storefront
Shopify AI Section: Fix a Price Badge Hidden Behind the Image
You built a section with Shopify's AI section generator, but the price badge on each card sits behind the photo. Here is the Custom Liquid fix that brings it to the front without regenerating anything. Tested on a Dawn store.
Themes & Storefront
Hide Shipping Calculated at Checkout on One Shopify Product
The line under Add to cart that says shipping is calculated at checkout shows on every product, gift cards included. Here is how to hide it on one product only, with the code, screenshots and the Eclipse theme steps.
Themes & Storefront
Shopify Dropdown Menu Behind Page Content (Z-Index Fix)
Your Shopify dropdown or mega menu opens, but the page title and products sit on top of its links and the menu closes before you can click. The fix is one Custom CSS rule in Theme settings. Tested on a Rebel store.