
How to Add a Size Chart in Shopify Without an App
Build a size chart that applies itself to new products from their product type, translates into any language, and recommends a size. Free, no app, tested on Dawn.
By AjayCodeWiz · July 22, 2026 · 11 min read
The problem
Every clothing store needs a size chart, and every clothing store hits the same three walls.
The first is that you have to attach the chart to each product by hand. Fine for 20 products. Miserable when you import 500 t-shirts and every one of them needs the same chart pointed at it.
The second is language. If you sell in English and French, the chart has to switch with the rest of the store, and most solutions leave it stranded in one language.
The third is that a chart is passive. It shows numbers. It does not tell a shopper which size to buy, which is the actual question they have.
A merchant asked about exactly this on the Shopify Community. They wanted multiple charts, auto-assignment to new arrivals, English and French, and a clean frontend. They had already installed several apps and none of them ticked all four boxes.
The answer is that you do not need an app. Shopify ships the two pieces required, both free and both made by Shopify. What is missing is about 200 lines of theme code to join them together.
I built it and tested it on a Dawn 15.5 store. Here is the whole thing.
Why the apps struggle with this
It is worth understanding why, because it tells you what to build instead.
Auto-assignment and auto-translation are not really features. They are consequences of where your data lives.
A size chart app stores your chart rows in the app's own database. That database is outside Shopify, so Shopify's translation system cannot see it. The app has to build its own translation layer, and its own rules for deciding which product gets which chart.
Some apps do that well. But you are then renting a data model, and it only speaks the languages and rules that vendor decided to support.
If the chart instead lives inside Shopify as native content, translation comes free, because Shopify's own translation app can already read it. Assignment comes free too, because Liquid can look the chart up at render time from something the product already has.
That is the whole trick, and it is why this ends up simpler than the app route rather than harder.
What a Shopify metaobject is
This is the piece most merchants have not met yet, so it is worth two minutes.
You probably know metafields. A metafield adds one extra field to something that already exists. A "care instructions" box on a product, a "founded in" date on the shop.
A metaobject is different. It is a whole custom record type that you define, that exists on its own rather than hanging off a product. You decide what fields it has, then you create as many entries of it as you like.
So "Size chart" becomes a thing your store understands. Each entry is one chart, with a heading, a table, a note. It is not attached to any product. It just exists, and products find it.
The distinction matters here for two reasons.
Because entries stand alone, one chart can serve a thousand products without being copied onto any of them.
And because metaobjects are native Shopify content, Shopify's free Translate and Adapt app can translate their fields, exactly as it translates product titles.
Metaobjects are on every Shopify plan, including Basic. You will find them under Settings, then Custom data.
Step 1: define the chart type
Go to Settings, then Custom data, then Metaobjects, then Add definition. Name it Size chart. Shopify derives the type size_chart from that name, which is what the code will reference.
Add four fields:
- Heading, single line text. The chart's title, which doubles as the link label.
- Table, multi-line text. The chart itself.
- Note, single line text. The "measure your chest, not the garment" line.
- Recommender, multi-line text. Optional, covered further down.
Leave the Translations toggle on. It is on by default, and it is what makes the French step work later.
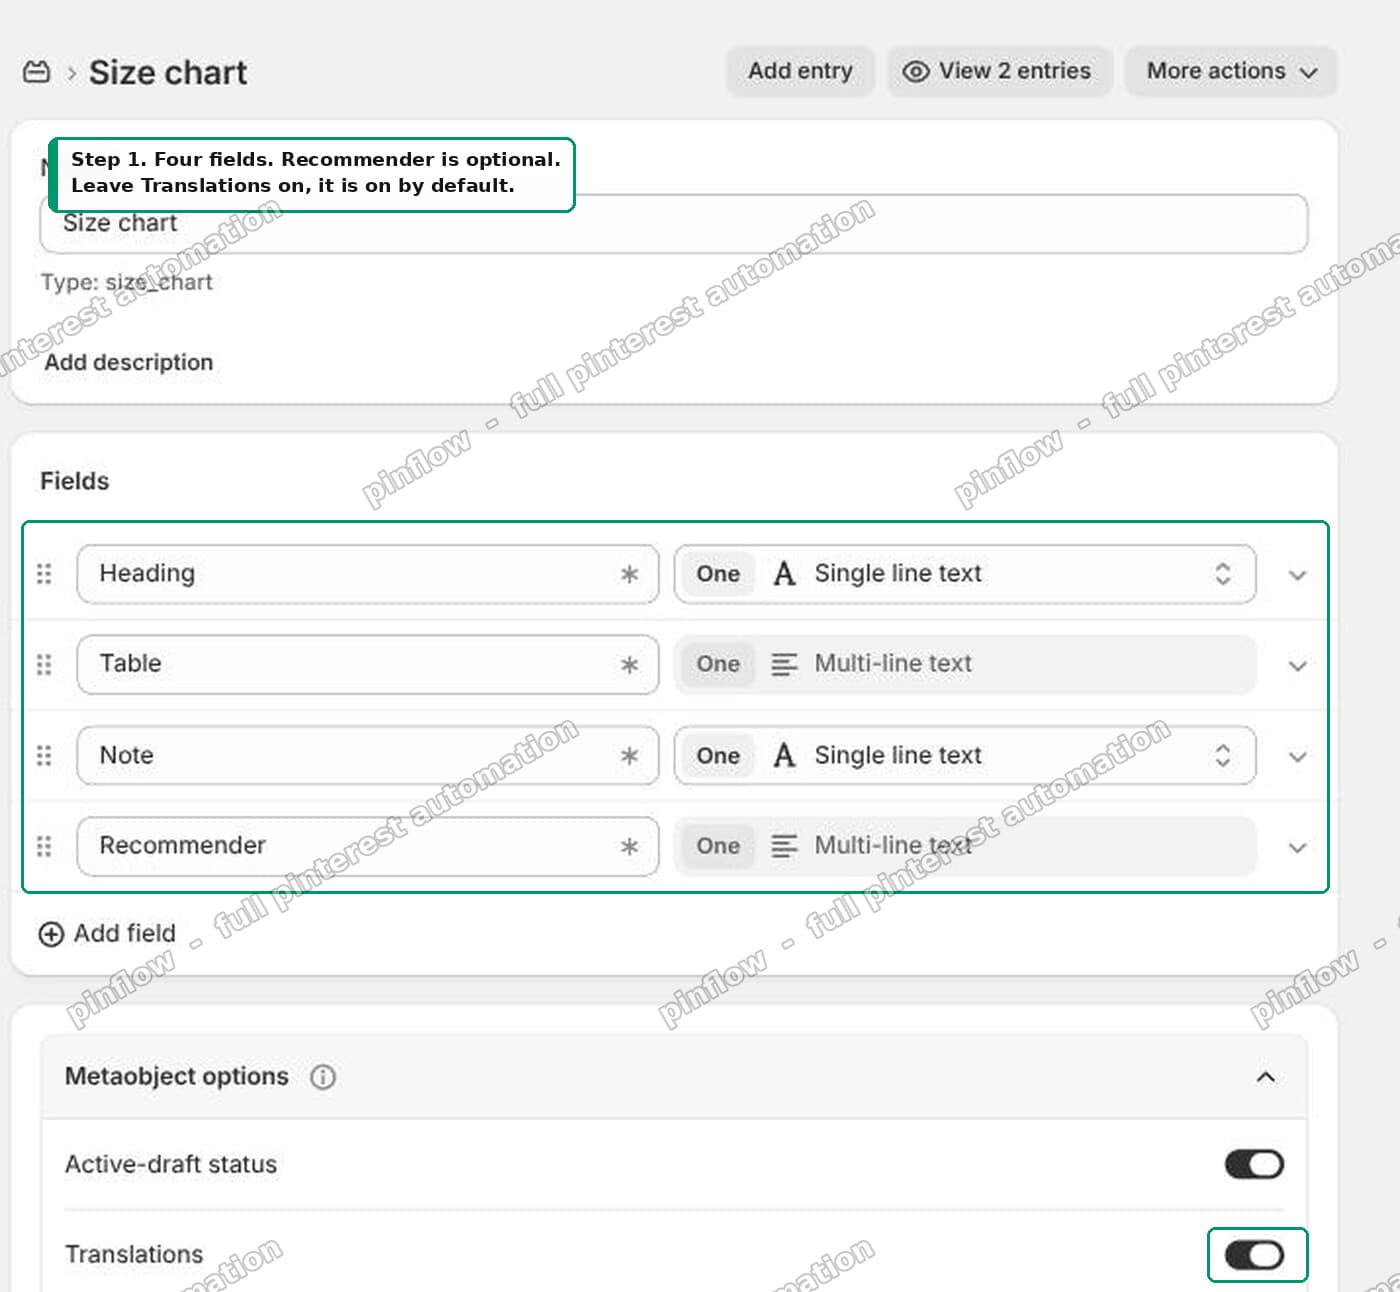 The Size chart metaobject definition with four fields and the Translations toggle enabled
Step 2: add one entry per product type
This is the step that removes the manual work, so it is worth doing deliberately.
You are not creating one chart per product. You are creating one chart per kind of product.
In the Table field, the first line is your column headers and every line after it is a row. Separate the cells with a pipe character:
Size | Chest (cm) | Waist (cm) | Length (cm)
XS | 82-87 | 66-71 | 66
S | 88-93 | 72-77 | 68
M | 94-99 | 78-83 | 70
L | 100-105 | 84-89 | 72
XL | 106-113 | 90-97 | 74
XXL | 114-121 | 98-105 | 76
Then the important part. Set the entry's Handle to the product type, lowercased with dashes.
Product type "T-Shirt" becomes handle t-shirt. Product type "Shirt" becomes handle shirt. Product type "Co-ord Set" becomes handle co-ord-set.
That handle is the entire auto-assignment mechanism. There is no rule builder and no per-product setting. The theme handleizes the product's type and looks for a chart with that handle.
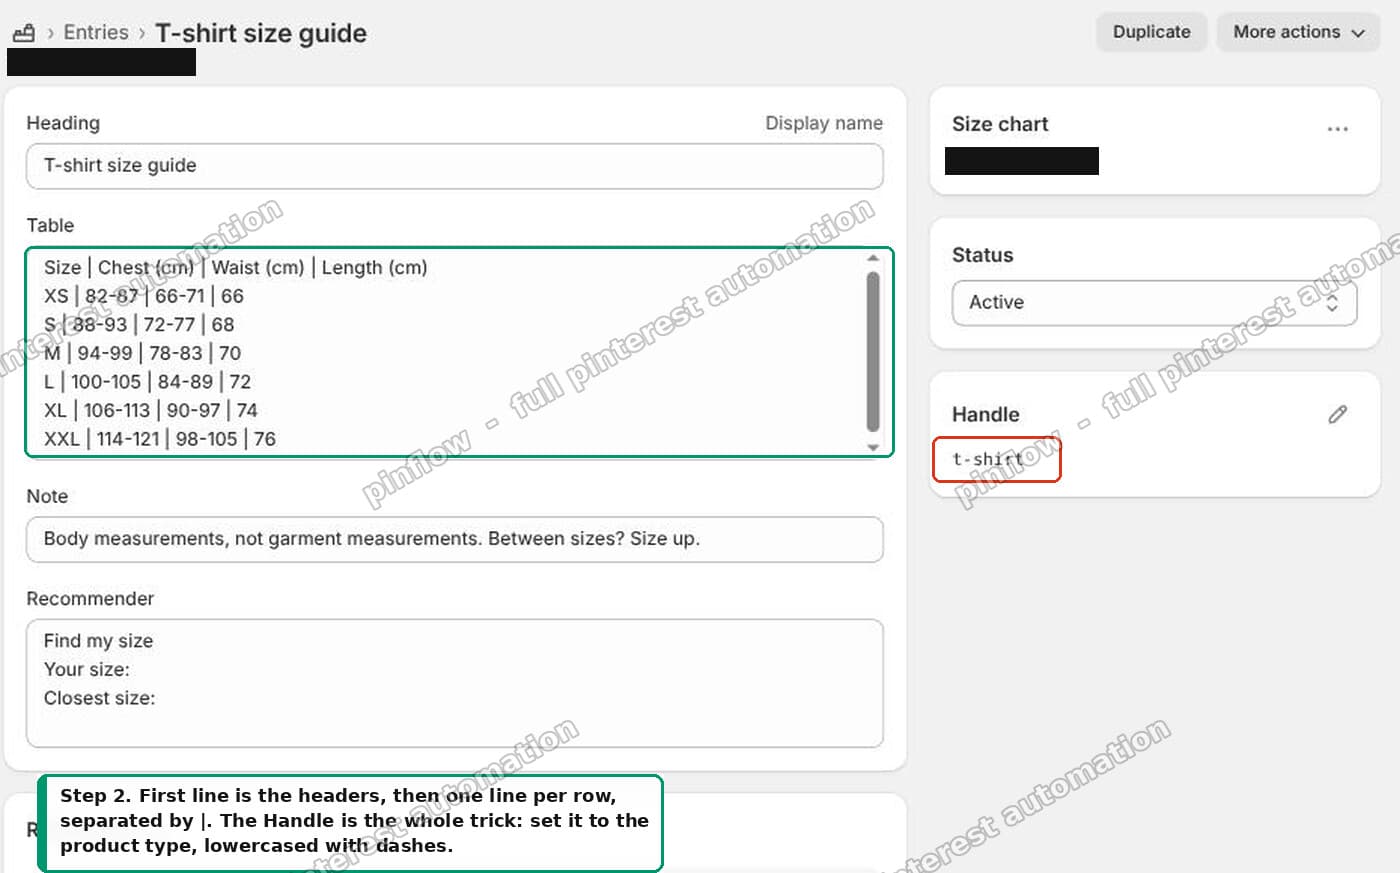 The size chart entry showing the pipe-separated table and the handle set to t-shirt
Step 3: add the snippet
Online Store, then Themes, then the three dots next to your theme, then Edit code. In the snippets folder click Add a new snippet and name it size-chart.
The snippet resolves the chart in this order, first match wins:
- A
custom.size_chartmetafield on the product, if you want to override one product by hand. - A chart whose handle matches the product type.
- A chart whose handle matches any of the product's tags.
- A chart with the handle
default.
If none of those match, nothing renders. No empty button, nothing to clean up.
The full snippet is in the source thread linked at the bottom of this article. The part worth understanding is the lookup:
{%- assign type_handle = product.type | handleize -%}
{%- assign chart = metaobjects.size_chart[type_handle] -%}
That is it. metaobjects.size_chart[handle] fetches an entry by handle at render time, so nothing is stored on the product.
Step 4: put it on the product page
Open the theme editor, open a product template, click Add block, choose Custom Liquid, and paste one line:
{% render 'size-chart' %}Drag it under the variant picker. That is the last thing you have to do per theme, and you never touch it again.
Here is the result. Two products, nothing configured on either one, two different charts:
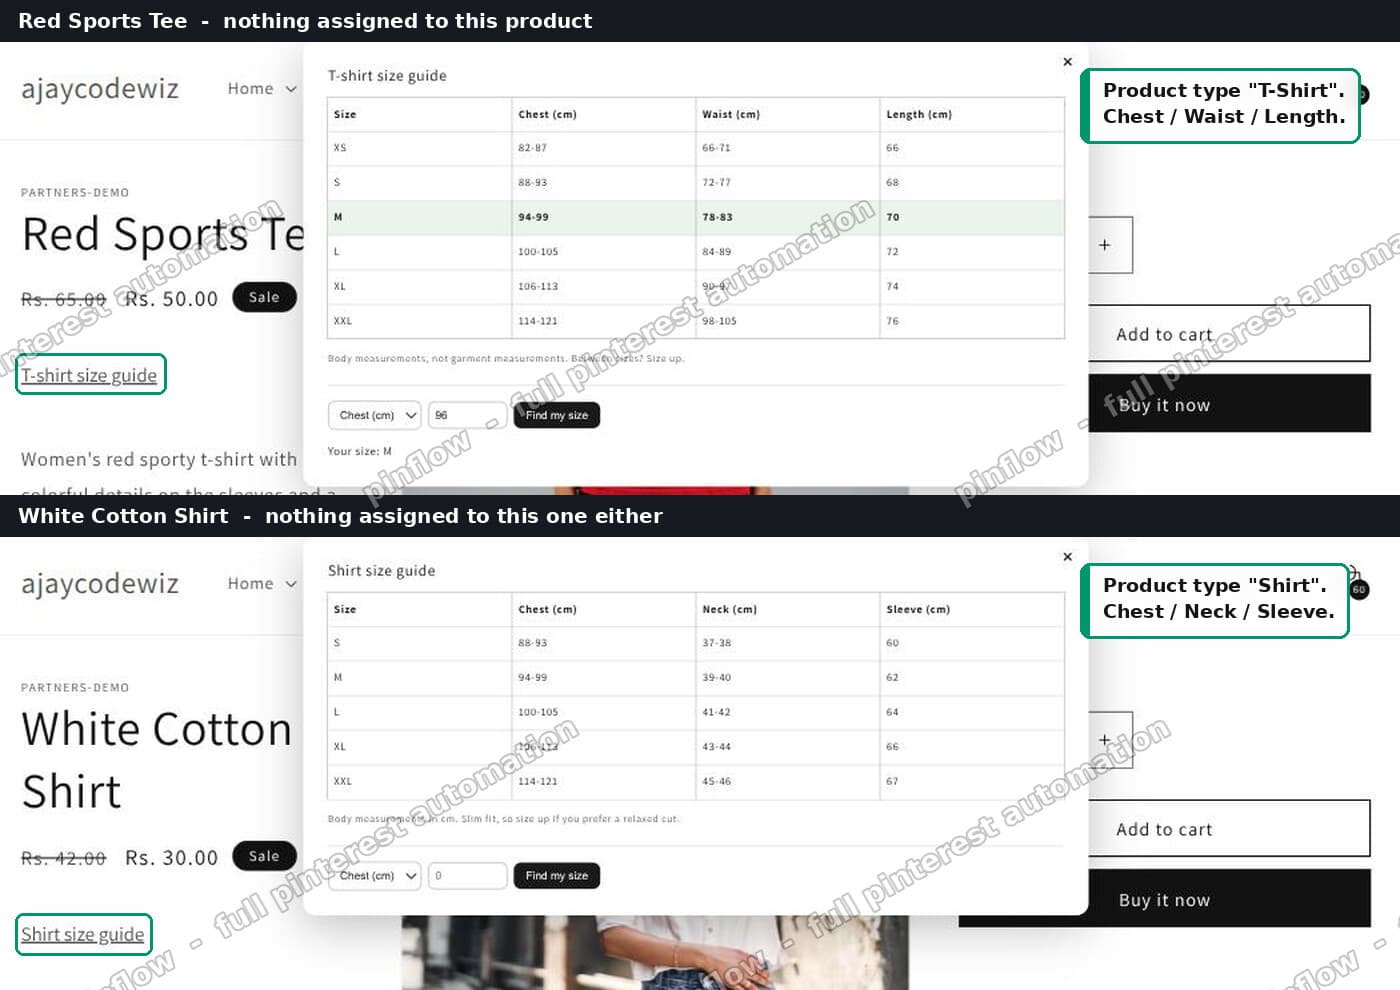 Two products with no chart assigned, each showing a different size chart based on product type
The Red Sports Tee is product type T-Shirt, so it gets the t-shirt chart with Chest, Waist and Length. The White Cotton Shirt is product type Shirt, so it gets the shirt chart with Chest, Neck and Sleeve.
Import 500 more t-shirts tomorrow and every one of them shows the t-shirt chart, because they are all type T-Shirt. That is the auto-apply, and there is nothing to maintain.
The size recommender
A chart shows numbers. A recommender answers the question.
The version I built reads the table that is already on the page, so you never type your measurements twice. Enter a chest measurement, get a size, and the matching row highlights.
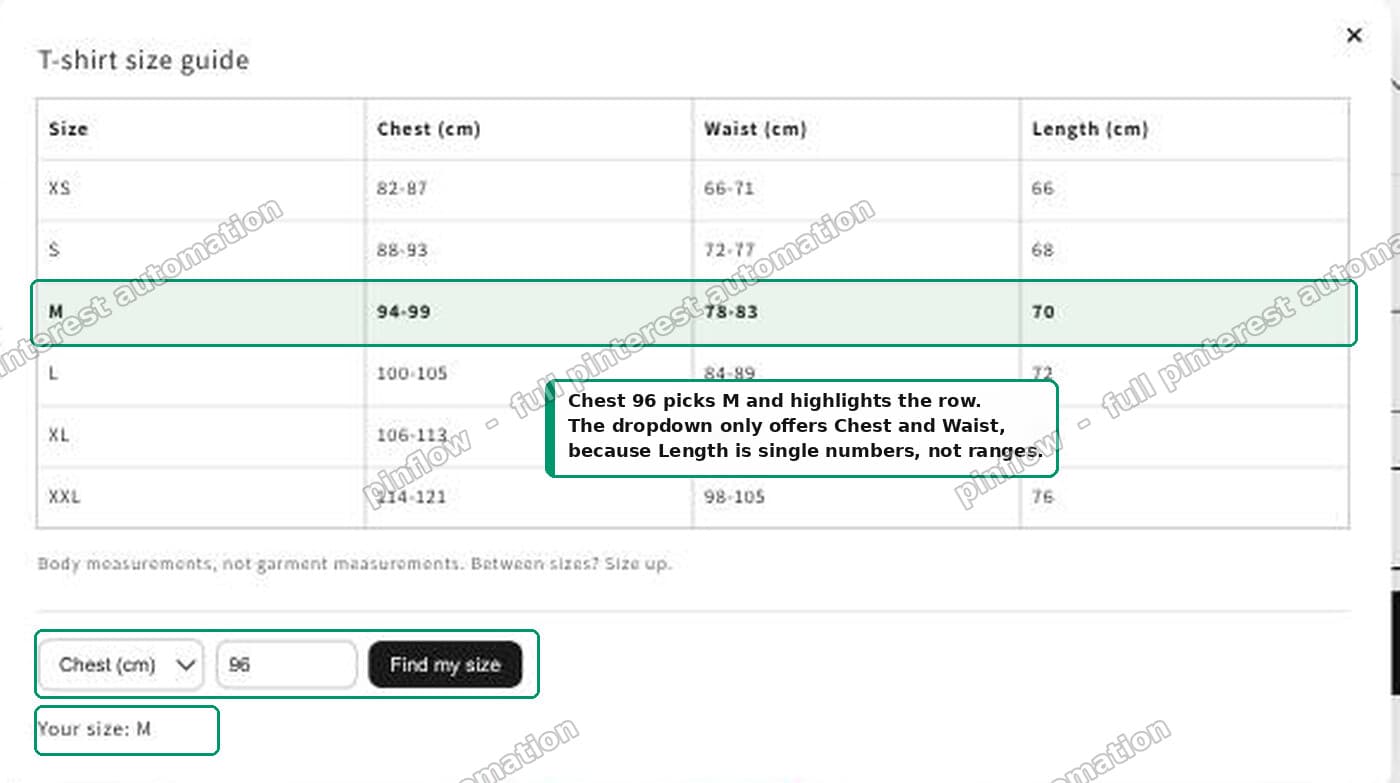 The size recommender returning M for a 96 cm chest with the M row highlighted
It works out which columns are usable on its own. In the test above it offered Chest and Waist but not Length, because Length holds single numbers rather than ranges like 94-99. A column only appears in the dropdown if most of its cells look like a range.
Enter a measurement inside a range and it says "Your size: M". Enter something past the end of the chart and it says "Closest size: XXL" instead of failing with no error.
One honest limit. This does not invent sizing. It cannot know what a Large means at your manufacturer, because nothing can. You type the numbers once per product type and the recommender is a lookup against your own table. That is also what the paid apps are doing.
Step 5: translate it
Install Translate and Adapt, which is free and made by Shopify. Open the chart entry, then More actions, then Localize.
You get your English in one column and an empty column for each language you have added, side by side.
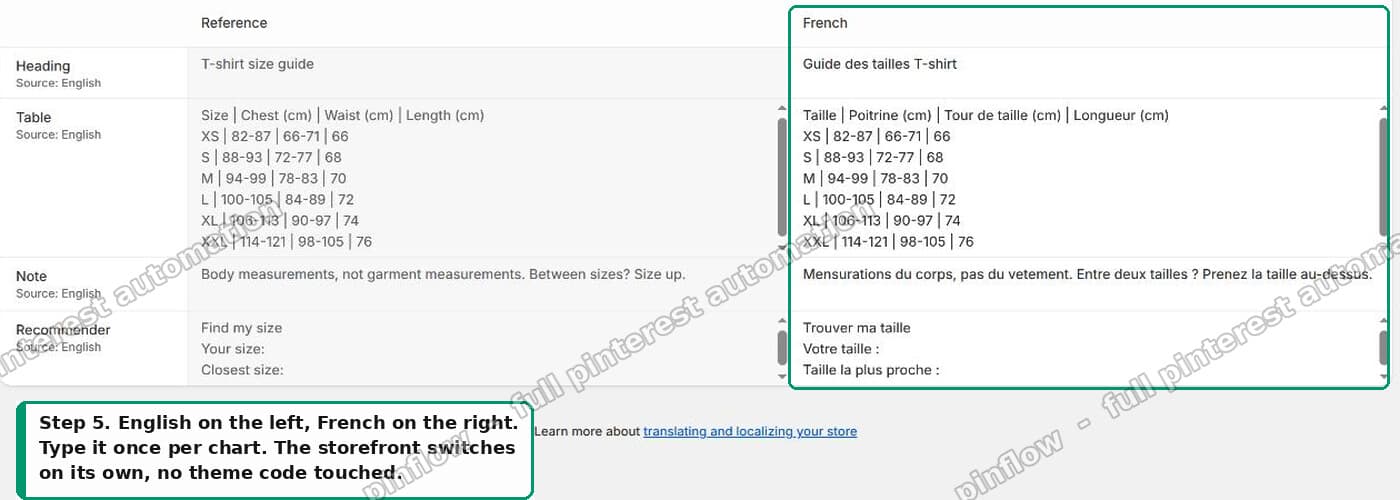 Translate and Adapt showing the English size chart fields beside their French translations
Translate the heading, the column headers, the note, and the recommender labels. The size letters and the numbers stay exactly as they are, so most of the work is four short phrases.
Then it switches on its own. On the French storefront the heading, the table headers, the note, the button and the result line all come back in French. No theme code changes between the two languages.
That is the payoff of keeping the data inside Shopify. You are not configuring a translation feature. You are translating content, and the storefront does the rest.
One detail worth copying. Put the punctuation inside the label rather than in the code. French wants a space before a colon, so the French label reads Votre taille : while the English one reads Your size:. If the colon is hardcoded in your JavaScript, French comes out subtly wrong forever.
Does this work on my theme?
The code uses no theme classes, no theme snippets and no theme variables, and its CSS is scoped to the snippet. It should drop into any Online Store 2.0 theme.
Two things are worth knowing before you paste it into a heavily customised theme.
The dialog moves itself to the end of the page. This is deliberate. Dawn puts a CSS transform on the product information column, and any transformed ancestor becomes the containing block for position: fixed. Before I moved the dialog, it was rendering 309px wide instead of filling the viewport. Reparenting it to <body> fixes that on any theme with the same pattern.
Custom Liquid blocks are a 2.0 feature. If your product template has no Add block button, you are on a vintage theme. Add the {% render %} line to the product section file directly instead.
Common questions
Do I need a size chart app at all? Not for charts, assignment, or translation. An app is worth paying for if you want body-scan sizing, per-variant recommendations from returns data, or a support team to call.
Can one chart cover several product types? Yes. Give the entry the handle of your most common type, then add the other types as tags on those products. The snippet falls back to tags after the product type.
What if a product has no matching chart? Nothing renders. No button appears and the page is unaffected, which is the correct behaviour for accessories and one-size items.
Where do metaobject entries live? Content, then Metaobjects. The definition lives under Settings, then Custom data. Two different screens, which trips people up.
Does this slow the page down? The lookup is one Liquid call at render time, and the markup is a table. There is no external script and no app embed, so it is faster than any app version.
Can I use inches and centimetres? Add both as columns. The recommender offers each numeric column separately, so a shopper picks whichever they measured in.
If it is not working
No button appears. The handle does not match the product type. Check for capitals and spaces. Product type T Shirt handleizes to t-shirt but T-Shirt with a trailing space does not. Compare the entry handle against the type exactly.
The chart shows on the wrong products. You probably have a default entry catching everything. Rename or delete it while you test.
The table renders as one long line. Your rows are separated by something other than real line breaks. Retype them in the Shopify admin rather than pasting from a word processor.
The recommender dropdown is empty. No column contains ranges. It needs cells like 94-99 to work. A column of single numbers is displayed but not offered as a measurement.
French shows English. Either the language is not published under Settings, then Languages, or the entry has not been translated yet. The theme falls back to the default language rather than showing nothing.
The dialog is narrow or clipped. An ancestor has a transform, filter or contain on it. That is the containing-block problem described above, and moving the dialog to <body> is the fix.
I tested all of this on a Dawn 15.5 development store, in English and French, on the live storefront rather than the theme editor preview. The measurements and behaviour above are from that store.
Spending too long on manual Shopify busywork?
PinFlow turns your Shopify catalog into Pinterest pins and posts them on a schedule, automatically. Build it once, then let it run.
Get PinFlow on the Shopify App StoreMore Shopify fixes
More community-sourced Shopify guides, tested on a live store.
Themes & Storefront
Shopify Horizon: Carousel Blank Until You Drag It
A Horizon carousel that shows an empty strip until you drag it, then fills in, is usually the theme skipping the painting of slides it thinks nobody is looking at. Here is how to tell that apart from a genuinely broken carousel, and the one line of CSS that covers it.
Themes & Storefront
Shopify Sold Out Overlay: Grey Out Products and Add a Sold Out Box
Shopify themes mark a sold out product with a small pill in the corner of the card. Here is how to turn that pill into a black Sold Out box across the middle of the photo, and fade the photo behind it, with no theme code and no app.
Themes & Storefront
How to Change the Price Font Size on a Shopify Collection Page
Shopify themes have no setting for the price size on a product card. Here is the one rule that shrinks it on collection pages only, where to paste it so it cannot reach your product pages, and how to keep the crossed out sale price in proportion.