
Add a Star Rating to Shopify Without an App
Add a Shopify star rating with a custom theme section, no app, plus when a free reviews app is the smarter route for real reviews.
By AjayCodeWiz · August 4, 2026 · 10 min read
The problem
A merchant asked about this on the Shopify Community. He wanted a star rating on his product page. Not from an app. He wanted custom code, and he wanted every part of it editable.
He posted a picture of the look he was after. Filled stars, an empty star for the leftover, a rating number, and a line of small print like "4,777 Aggregated Reviews".
This is a very common ask. You see a star rating on a competitor store and want the same badge on yours. But you do not want to install a full reviews app just to show it.
I reproduced this on a test store running Kalles, the same theme the merchant used. Then I built a single theme section that draws the exact badge and exposes every value in the theme editor. No app. No paid plan. It drops straight in.
Here is the result on a live Kalles store.
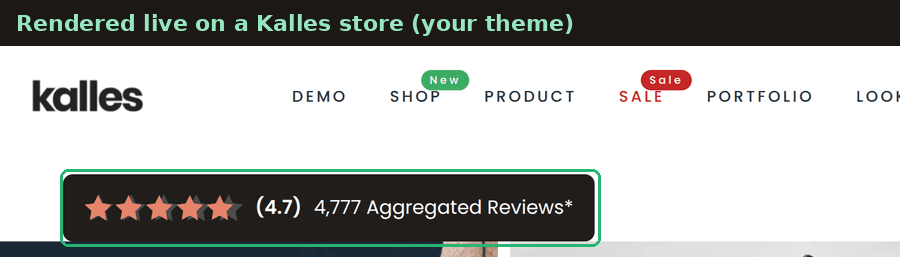 Custom star rating badge rendered on a live Kalles product page
The rest of this post shows how it works, how to add it, and the one big decision to make before you copy any code.
Why a custom star rating is not the same as reviews
This is the part most forum answers skip. It matters, so read it first.
There are two completely different things people mean by "shopify star rating".
A star display. This is a graphic. It shows stars and a number that you type in. It does not collect anything. It does not change on its own. You decide it says 4.7, and it says 4.7 until you edit it. This is what the merchant asked for, and it is what custom code gives you fast.
A reviews system. This collects real ratings from real buyers. Customers leave a rating. The store averages them. The star display updates by itself. This needs a database behind it, which a theme snippet does not have. So this part needs an app.
A star made of custom code is honest only if the number is real. If you type "4.7 from 4,777 reviews" and you have not sold 4,777 units, that is a made-up claim. It can mislead shoppers and it can breach the review-display rules many regions enforce.
So decide up front:
- You want a rating figure you control (a store-wide badge, a trust line, a hero number you can back up). Custom code is perfect. Keep reading the fix below.
- You want real, per-product reviews that customers submit. Skip to the free app section. Custom code cannot do that job.
What you get with the custom code
The section I built draws the star badge with plain SVG stars and a little CSS. Everything is a theme setting, so you never touch code again after pasting it once.
The clever part is the partial star. It is exact, not a rounded half. Two identical rows of stars sit on top of each other. The empty row is grey. The filled row is coloured and clipped to a percentage. Set the rating to 4.7 and the fifth star fills to 94 percent. Set 4.5 for a true half. Set 5 for full. I tested this on the Kalles store, and the badge above is that render, with the fifth star clipped to 94 percent.
You can change all of this from the theme editor:
- The rating number, and how many stars total (3 to 10).
- Filled star colour, empty star colour, star size, and the gap between stars.
- Show or hide the (4.7) number.
- The count text and the label next to it, like "4,777 Aggregated Reviews".
- Text colour and size.
- Background colour, corner radius, padding, and left/center/right alignment.
The fix: add the star rating section
This works on Kalles and on most themes, because it is a self-contained section. Nothing in it depends on Kalles internals.
Step 1: open the code editor.
Go to Online Store > Themes. Find your theme. Click the "..." menu, then Edit code.
Under the Sections folder, click Add a new section. Name it custom-star-rating. Shopify creates a starter file with placeholder content. Delete everything inside it.
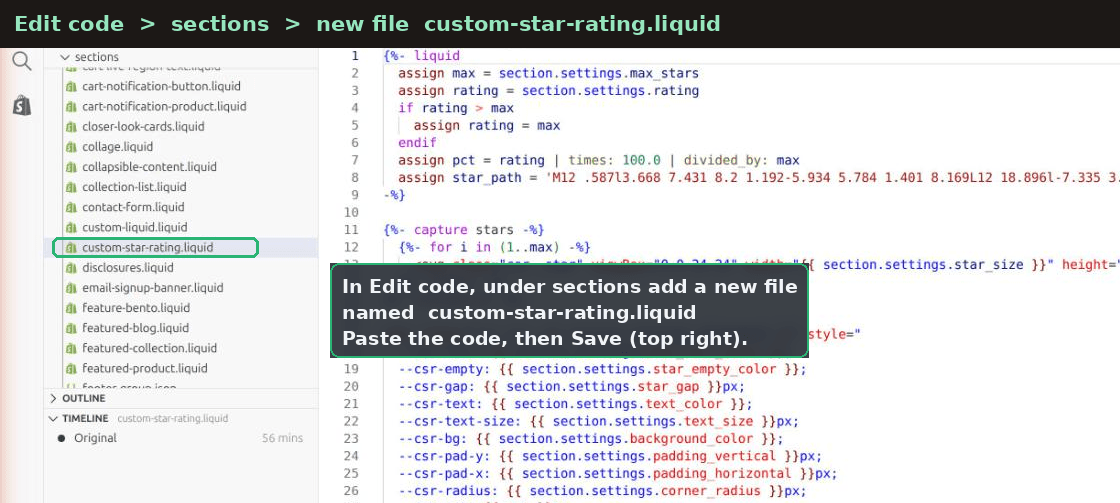 Shopify code editor with a new custom-star-rating section file under Sections
Step 2: paste the code.
Paste the block below into the empty file. Then click Save at the top right.
{%- liquid
  assign max = section.settings.max_stars
  assign rating = section.settings.rating
  if rating > max
    assign rating = max
  endif
  assign pct = rating | times: 100.0 | divided_by: max
  assign star_path = 'M12 .587l3.668 7.431 8.2 1.192-5.934 5.784 1.401 8.169L12 18.896l-7.335 3.857 1.401-8.169L.132 9.21l8.2-1.192z'
-%}

{%- capture stars -%}
  {%- for i in (1..max) -%}
    <svg class="csr__star" viewBox="0 0 24 24" width="{{ section.settings.star_size }}" height="{{ section.settings.star_size }}" aria-hidden="true"><path d="{{ star_path }}"/></svg>
  {%- endfor -%}
{%- endcapture -%}

<div class="csr csr--{{ section.settings.alignment }}" style="
  --csr-fill: {{ section.settings.star_fill_color }};
  --csr-empty: {{ section.settings.star_empty_color }};
  --csr-gap: {{ section.settings.star_gap }}px;
  --csr-text: {{ section.settings.text_color }};
  --csr-text-size: {{ section.settings.text_size }}px;
  --csr-bg: {{ section.settings.background_color }};
  --csr-pad-y: {{ section.settings.padding_vertical }}px;
  --csr-pad-x: {{ section.settings.padding_horizontal }}px;
  --csr-radius: {{ section.settings.corner_radius }}px;
  --csr-pct: {{ pct }}%;
">
  <div class="csr__inner">
    <span class="csr__stars" role="img" aria-label="{{ rating }} out of {{ max }} stars">
      <span class="csr__stars-base">{{ stars }}</span>
      <span class="csr__stars-fill">{{ stars }}</span>
    </span>

    {%- if section.settings.show_number -%}
      <span class="csr__num">({{ rating }})</span>
    {%- endif -%}

    {%- if section.settings.review_count != blank -%}
      <span class="csr__count">{{ section.settings.review_count }} {{ section.settings.count_label }}</span>
    {%- endif -%}
  </div>
</div>

<style>
  #shopify-section-{{ section.id }} .csr__inner {
    display: inline-flex;
    align-items: center;
    gap: 10px;
    max-width: 100%;
    flex-wrap: wrap;
    background: var(--csr-bg);
    padding: var(--csr-pad-y) var(--csr-pad-x);
    border-radius: var(--csr-radius);
  }
  #shopify-section-{{ section.id }} .csr--left   { text-align: left; }
  #shopify-section-{{ section.id }} .csr--center { text-align: center; }
  #shopify-section-{{ section.id }} .csr--right  { text-align: right; }
  #shopify-section-{{ section.id }} .csr--center .csr__inner { justify-content: center; }
  #shopify-section-{{ section.id }} .csr--right  .csr__inner { justify-content: flex-end; }

  #shopify-section-{{ section.id }} .csr__stars {
    position: relative;
    display: inline-block;
    line-height: 0;
    white-space: nowrap;
  }
  #shopify-section-{{ section.id }} .csr__stars-base,
  #shopify-section-{{ section.id }} .csr__stars-fill {
    display: inline-flex;
    gap: var(--csr-gap);
  }
  #shopify-section-{{ section.id }} .csr__stars-fill {
    position: absolute;
    top: 0;
    left: 0;
    width: var(--csr-pct);
    overflow: hidden;
  }
  #shopify-section-{{ section.id }} .csr__stars-base .csr__star { fill: var(--csr-empty); }
  #shopify-section-{{ section.id }} .csr__stars-fill .csr__star { fill: var(--csr-fill); }

  #shopify-section-{{ section.id }} .csr__num,
  #shopify-section-{{ section.id }} .csr__count {
    color: var(--csr-text);
    font-size: var(--csr-text-size);
    line-height: 1.2;
  }
  #shopify-section-{{ section.id }} .csr__num { font-weight: 600; }
</style>

{% schema %}
{
  "name": "Custom star rating",
  "tag": "section",
  "class": "section-custom-star-rating",
  "settings": [
    { "type": "header", "content": "Rating" },
    { "type": "range", "id": "rating", "label": "Rating", "min": 0, "max": 5, "step": 0.1, "default": 4.7 },
    { "type": "range", "id": "max_stars", "label": "Number of stars", "min": 3, "max": 10, "step": 1, "default": 5 },
    { "type": "checkbox", "id": "show_number", "label": "Show rating number", "default": true },

    { "type": "header", "content": "Review count text" },
    { "type": "text", "id": "review_count", "label": "Count", "default": "4,777" },
    { "type": "text", "id": "count_label", "label": "Label", "default": "Aggregated Reviews*" },

    { "type": "header", "content": "Stars" },
    { "type": "color", "id": "star_fill_color", "label": "Filled star color", "default": "#E8836B" },
    { "type": "color", "id": "star_empty_color", "label": "Empty star color", "default": "#4a4a4a" },
    { "type": "range", "id": "star_size", "label": "Star size", "min": 10, "max": 48, "step": 1, "unit": "px", "default": 22 },
    { "type": "range", "id": "star_gap", "label": "Space between stars", "min": 0, "max": 14, "step": 1, "unit": "px", "default": 3 },

    { "type": "header", "content": "Text" },
    { "type": "color", "id": "text_color", "label": "Text color", "default": "#ffffff" },
    { "type": "range", "id": "text_size", "label": "Text size", "min": 10, "max": 30, "step": 1, "unit": "px", "default": 16 },

    { "type": "header", "content": "Layout" },
    { "type": "select", "id": "alignment", "label": "Alignment", "default": "left",
      "options": [
        { "value": "left", "label": "Left" },
        { "value": "center", "label": "Center" },
        { "value": "right", "label": "Right" }
      ]
    },
    { "type": "color", "id": "background_color", "label": "Background", "default": "#211d1a" },
    { "type": "range", "id": "corner_radius", "label": "Corner radius", "min": 0, "max": 40, "step": 1, "unit": "px", "default": 0 },
    { "type": "range", "id": "padding_vertical", "label": "Vertical padding", "min": 0, "max": 80, "step": 2, "unit": "px", "default": 16 },
    { "type": "range", "id": "padding_horizontal", "label": "Horizontal padding", "min": 0, "max": 80, "step": 2, "unit": "px", "default": 16 }
  ],
  "presets": [
    { "name": "Custom star rating" }
  ]
}
{% endschema %}
Step 3: drop the section onto the page.
Go back to Online Store > Themes and click Customize. Open the page where you want the badge. Click Add section. Type "star". Pick Custom star rating.
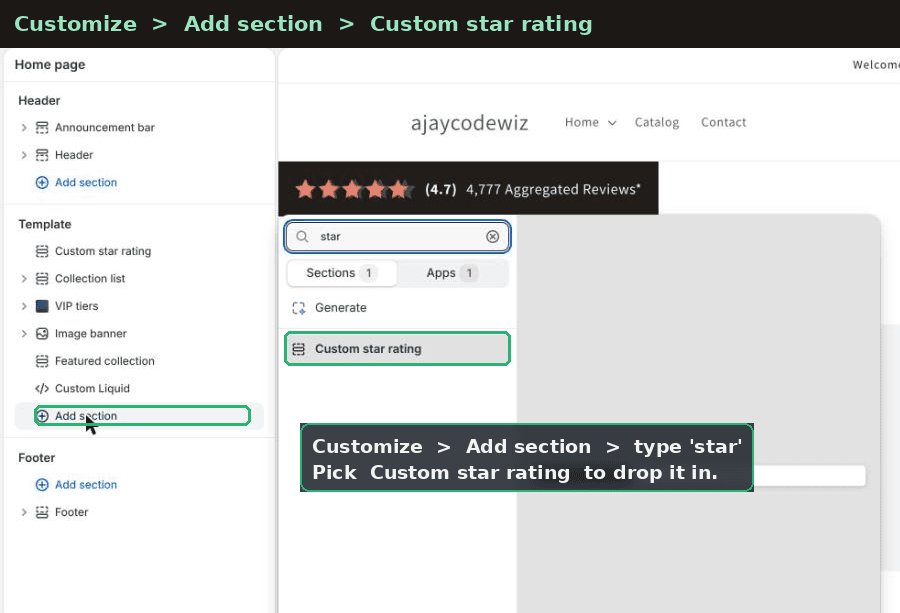 Shopify theme editor Add section picker filtered to Custom star rating
Drag it wherever you want. On a product page, put it right under the title or under the price.
Step 4: set your values.
With the section selected, the settings panel on the left holds every knob. Rating, star count, colours, sizes, the count text, alignment, padding. Change one and the preview updates live.
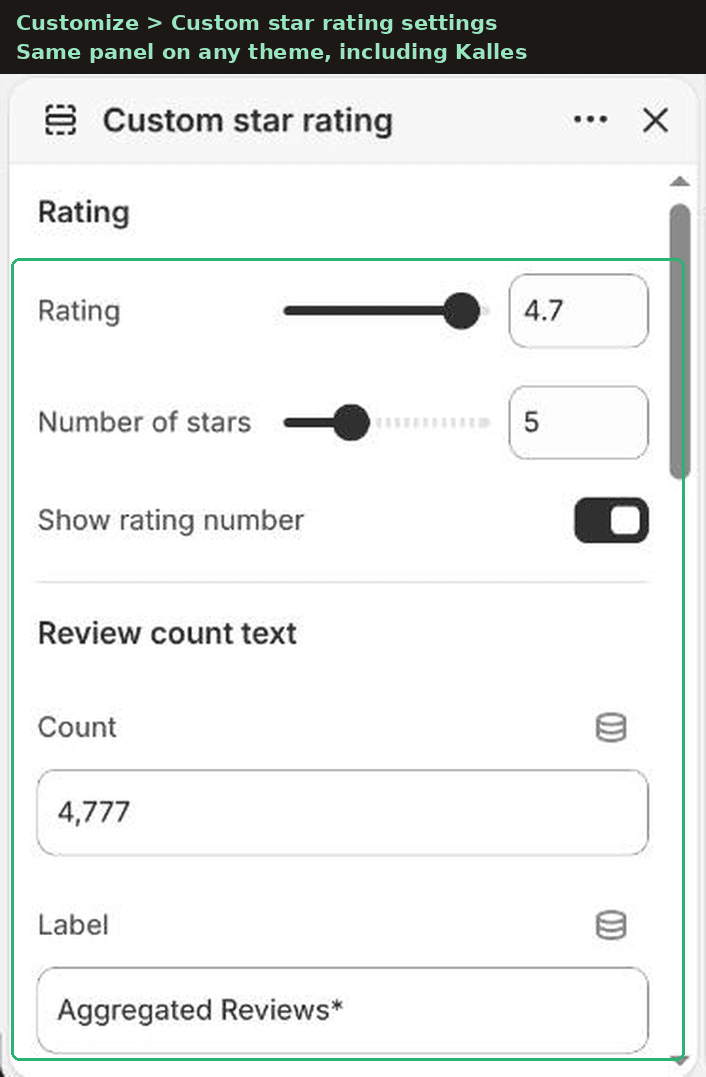 Custom star rating section settings in the Shopify theme editor
That is the whole custom-code route. One file, pasted once, then all clicks after that.
The alternative: a free reviews app for real reviews
If you want ratings that customers actually leave, custom code is the wrong tool. You need a reviews app, and you do not need to pay for one.
Judge.me has a free plan. It is the most common free choice for Shopify product reviews. On the free plan you get:
- Unlimited review requests by email after an order.
- A star widget on the product page that shows the real average.
- A star badge you can place on collection pages and the home page.
- Photo reviews and a reviews carousel.
Setup is short. Install Judge.me from the Shopify App Store. It adds its widgets to your theme through the theme editor as app blocks. You place the star widget where you want it, the same way you added the section above. From then on the stars update themselves as reviews come in.
So the honest split is simple. Use the custom section when you control the number and want a styled badge. Use a free reviews app when you want genuine, self-updating shopify product reviews without app fees.
You can even run both. Collect real reviews with Judge.me on the product page, and use the custom badge for a hero trust line elsewhere, as long as the number matches reality.
How do I add a star rating in Shopify without an app?
Add a theme section that draws the stars with code, then place it through the theme editor. That is exactly the fix above. You create one section file under Sections in Edit code, paste the Liquid and CSS, save, then add it to any page from Customize. No app is installed and no monthly fee applies. The trade-off is that the number is one you type, not one collected from buyers.
How do I show a real average rating from reviews?
For a real average you need a reviews app, because the average has to be stored and recalculated as new reviews arrive. A theme file has no place to keep that running total. Install a free reviews app like Judge.me, let it collect ratings, and drop its star widget on the product page. The widget reads the live average and updates on its own. This is the correct answer whenever the goal is trust from real customers rather than a designed badge.
Can I add a star rating with custom code and keep it editable?
Yes, and that is the point of building it as a section rather than a hard-coded snippet. Every value in the section above is a theme setting. You edit the rating, the star count, the colours, the sizes, and the label from the theme editor, with no code after the first paste. If instead you hard-code the stars directly into a template, you would have to open the code every time you want to change the number. The section approach keeps the shopify reviews custom code out of your way.
Does the star rating work on any theme, not just Kalles?
Yes. I built and tested it on Kalles, but nothing in it relies on Kalles. It is a standalone section with its own SVG stars and its own scoped CSS. The styles are namespaced to the section id, so they will not clash with your theme. It works the same on Dawn, Horizon, and most Theme Store themes. The only thing that differs per theme is where the Add section button sits in the editor, and every theme has one.
If it did not work
A few things trip people up. Here is how to fix each.
The stars do not appear after saving. Check that you pasted into a file under the Sections folder, not Snippets. Only sections show up in the Add section picker. Also confirm you deleted the starter placeholder before pasting.
The section is not in the Add section list. The file must contain the schema block at the bottom, including the presets line. If the schema has a typo, Shopify hides the section. Re-copy the whole block, top to bottom.
The partial star fills the wrong amount. The fill is rating divided by star count. If you set 8 stars and a rating of 4, the bar fills to half of eight stars, not four full stars. Keep the star count at 5 for a normal five-star scale.
The colours look off. The filled and empty colours are separate settings. If both are the same colour you cannot see the partial fill. Set the empty star to a light grey and the filled star to your brand colour.
Two star badges show up. You probably added the section twice. Open Customize, find the extra one in the section list, and remove it.
Definitions people confuse
Star rating. The visual: stars, a fill level, a number. It is a display, not a data source.
Product review. A single customer's rating plus optional text and photos. Many reviews average into the rating.
Reviews app. Software that collects reviews, stores them, and averages them. It supplies the number your stars show. Judge.me is one free option.
Theme section. A block of Liquid and CSS you add and arrange in the theme editor. The custom star rating here is a section. It draws stars but stores no reviews.
App block. A widget an installed app injects into your theme. A reviews app's star widget is an app block. It reads live data from the app.
The one-line takeaway: if you only need to shopify add star rating as a designed badge with a number you stand behind, the custom section is the fastest and cheapest route. If you need real ratings from buyers, install a free reviews app. Pick the tool that matches the job, and the star rating shopify shoppers see will actually mean something.
Spending too long on manual Shopify busywork?
PinFlow turns your Shopify catalog into Pinterest pins and posts them on a schedule, automatically. Same idea as the rule above, let the system handle the repetitive part.
Get PinFlow on the Shopify App StoreMore Shopify fixes
More community-sourced Shopify guides, tested on a live store.
Themes & Storefront
Shopify AI Section: Fix a Price Badge Hidden Behind the Image
You built a section with Shopify's AI section generator, but the price badge on each card sits behind the photo. Here is the Custom Liquid fix that brings it to the front without regenerating anything. Tested on a Dawn store.
Themes & Storefront
Hide Shipping Calculated at Checkout on One Shopify Product
The line under Add to cart that says shipping is calculated at checkout shows on every product, gift cards included. Here is how to hide it on one product only, with the code, screenshots and the Eclipse theme steps.
Themes & Storefront
Shopify Dropdown Menu Behind Page Content (Z-Index Fix)
Your Shopify dropdown or mega menu opens, but the page title and products sit on top of its links and the menu closes before you can click. The fix is one Custom CSS rule in Theme settings. Tested on a Rebel store.