
Shopify Product Page Customization: Add a Terms Checkbox
Add a required terms and conditions checkbox to specific Shopify products without an options app. One tag, one Custom liquid block, native variants untouched. Tested on Athens 6.6.0.
By AjayCodeWiz · July 20, 2026 · 10 min read
The problem: you need a checkbox on some products, not all of them
A merchant on the Shopify Community had about 50 products that needed a "I agree to the terms" checkbox before anyone could add them to the cart.
The rest of their catalog needed nothing.
They already had a product options app. It could produce a checkbox, but it forced them into one option set per product, which broke their product images. Fifty products meant fifty option sets.
That is a lot of work for a tick box, and it is the wrong tool.
This is one of the more common Shopify product page customization requests. The fix is smaller than most people expect: one tag and one block. No app, no monthly fee, and your native variants stay exactly as they are.
Why the options app fights you
A product option is a thing the customer chooses, and the choice changes what they are buying. Size. Color. Length of chain.
A terms checkbox is none of that. Every customer must tick it, there is only one valid answer, and it does not change the product, the price, or the SKU.
Options apps are built around variants. Model a non-choice as an option and you inherit everything that comes with variants. Per-product option sets. Image mapping. In some apps, a rewritten add-to-cart button that no longer matches your theme.
So do not model it as an option. Model it as what it is: a small piece of UI on the product page, plus a line item property that records the agreement on the order.
Step 1: tag the products that need it
The checkbox needs to appear on 50 products out of a few hundred. A tag is the cheapest way to mark that set, and it is one bulk action rather than fifty edits.
In your Shopify admin, go to Products, tick the products you want, then open the More actions menu and choose Add tags.
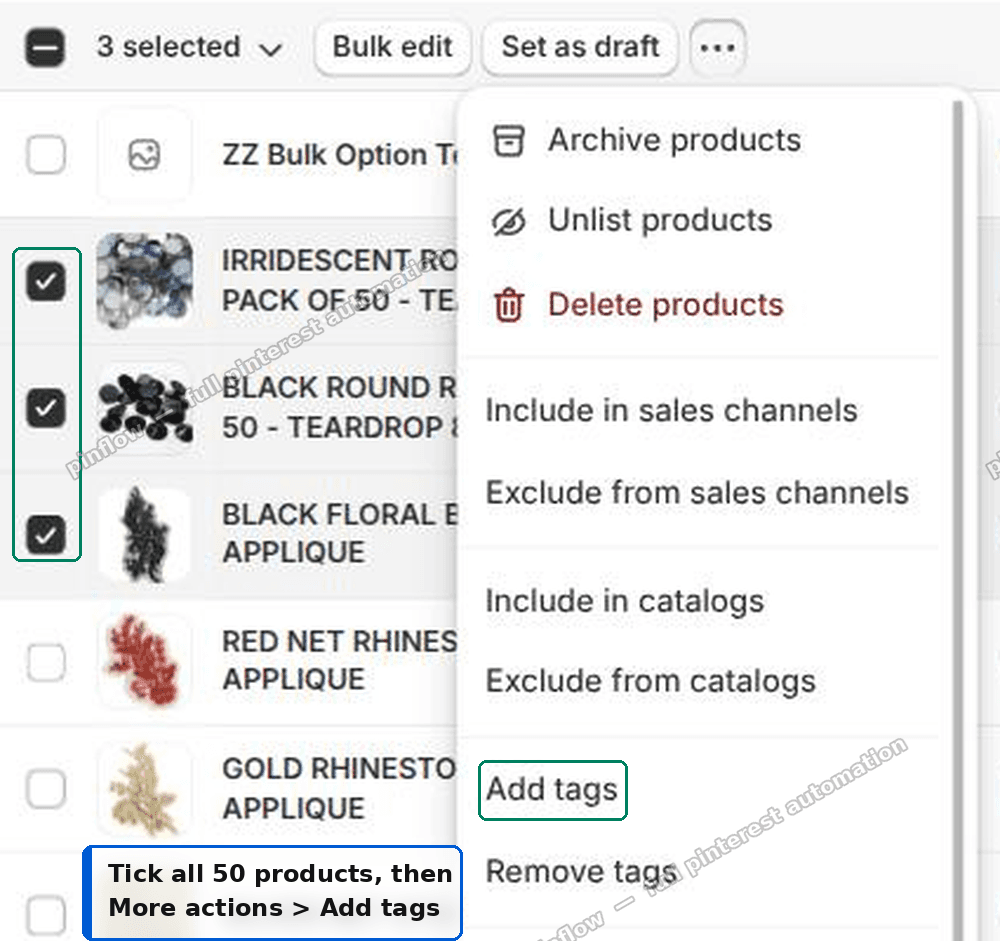 Select the products in the Shopify admin and choose Add tags from the More actions menu
Type terms-required, click the Add "terms-required" line to create the tag, then Save.
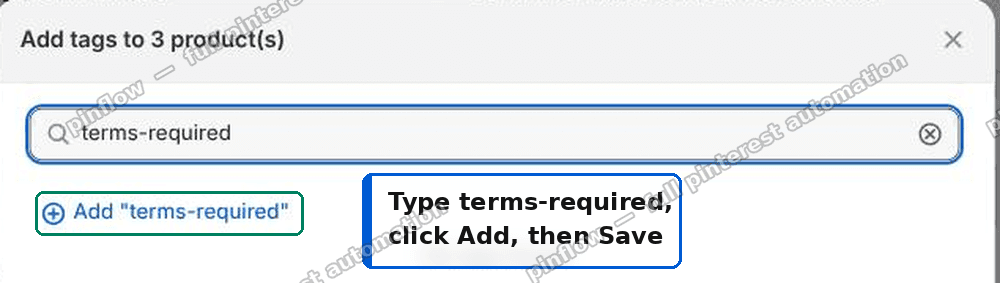 Create the terms-required tag in the Add tags dialog
That is the only per-product work in this whole job. Adding product 51 later is one tag, not a new option set.
You can also select every product on the page with the header checkbox, then use Select all X products if your filtered view already matches the set you want.
Step 2: add one Custom liquid block
Every Online Store 2.0 theme has a block for injecting Liquid into the product page. The name varies. Dawn calls it Custom Liquid. Athens, the theme in this case, also calls it Custom liquid. That is worth knowing. The vendor documentation calls it "Liquid", so you will search the block list for the wrong word.
Go to Online Store > Themes > Customize, switch to your Product template, select the Product information section, and click Add block. Search for "liquid".
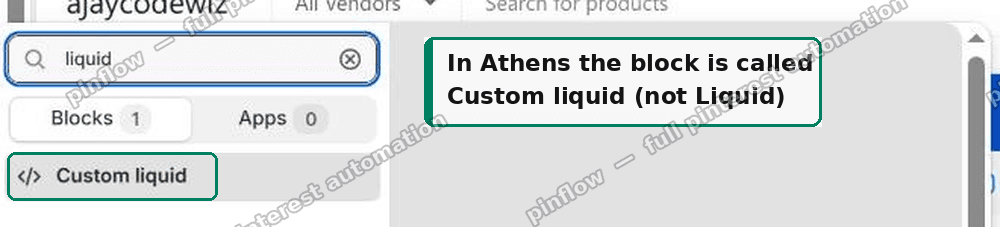 The Athens block picker showing the Custom liquid block
In Athens the block has a Position setting. Set it to Right so the checkbox renders in the same column as the buy buttons rather than in the left accordion column.
Leave Heading and Icon empty. Athens turns the block into an expandable accordion only when Position is Left and a heading or icon is set. On Right with both empty it stays inline, which is what you want for a checkbox.
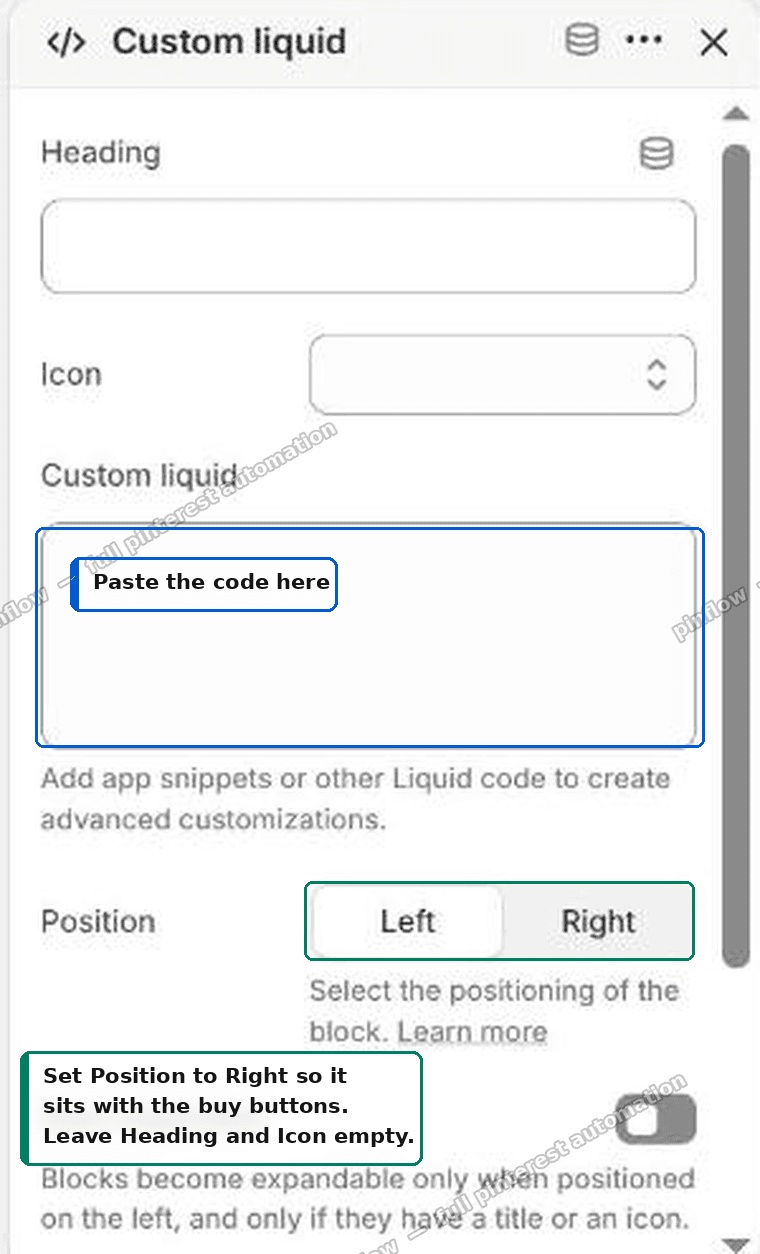 The Custom liquid block settings with Position set to Right
Then drag the block in the block list so it sits just above Buy buttons. Blocks render in list order, and by default a new block lands at the top of the column, above the title.
Paste this in:
{% if product.tags contains 'terms-required' %}
<div class="terms-gate" data-terms-gate>
  <label class="terms-gate__label">
    <input type="checkbox" name="properties[Terms accepted]" value="Yes" data-terms-checkbox>
    <span>I have read and agree to the <a href="/policies/terms-of-service" target="_blank" rel="noopener">Terms and Conditions</a>.</span>
  </label>
  <span class="terms-gate__error" data-terms-error hidden>Please accept the Terms and Conditions to continue.</span>
</div>

<style>
  .terms-gate { margin: 1.2rem 0; }
  .terms-gate__label { display: flex; gap: .6rem; align-items: flex-start; cursor: pointer; line-height: 1.4; }
  .terms-gate__label input { margin-top: .25rem; flex: 0 0 auto; }
  .terms-gate__error { display: block; margin-top: .5rem; color: #d72c0d; font-size: .9em; }
  .terms-gate__error[hidden] { display: none; }
  /* the class lives on <body>, so it keeps applying to buy buttons the theme re-renders */
  body.terms-locked .shopify-payment-button { opacity: .4; pointer-events: none; }
</style>

<script>
(function () {
  function init() {
    var FORM = 'form[action*="/cart/add"]:not(.installment)';

    function box()      { return document.querySelector('[data-terms-checkbox]'); }
    function errorEl()  { return document.querySelector('[data-terms-error]'); }
    function accepted() { var b = box(); return !b || b.checked; }

    function sync() {
      var b = box(), e = errorEl();
      if (!b || !e) return;

      if (b.checked || !b.dataset.touched) e.setAttribute('hidden', '');
      else e.removeAttribute('hidden');

      // re-resolve the form every time: the theme replaces it on each variant change
      var form = document.querySelector(FORM);
      if (form) {
        var id = form.getAttribute('id');
        if (!id) { id = 'terms-gate-form'; form.setAttribute('id', id); }
        if (!form.contains(b)) b.setAttribute('form', id);
      }

      document.body.classList.toggle('terms-locked', !b.checked);
    }

    function deny(e) {
      var b = box();
      e.preventDefault();
      e.stopImmediatePropagation();
      b.dataset.touched = '1';
      sync();
      b.scrollIntoView({ block: 'center', behavior: 'smooth' });
      b.focus();
    }

    document.addEventListener('change', function (e) {
      if (e.target.matches && e.target.matches('[data-terms-checkbox]')) {
        e.target.dataset.touched = '1';
        sync();
      }
    });

    document.addEventListener('click', function (e) {
      var t = e.target.closest && e.target.closest('[name="add"]');
      if (!t || accepted()) return;
      if (t.closest(FORM) || t.getAttribute('form')) deny(e);
    }, true);

    document.addEventListener('submit', function (e) {
      if (e.target.matches && e.target.matches(FORM) && !accepted()) deny(e);
    }, true);

    document.addEventListener('product:variant-change', sync);

    sync();
  }

  if (document.readyState === 'loading') document.addEventListener('DOMContentLoaded', init);
  else init();
})();
</script>
{% endif %}
Save. Untagged products are completely untouched, because the whole block is wrapped in the tag check.
What it does on the storefront
With the box unticked, clicking Add to cart does nothing except show the warning. The item is not added and the cart count does not move. Buy it now is dimmed and unclickable.
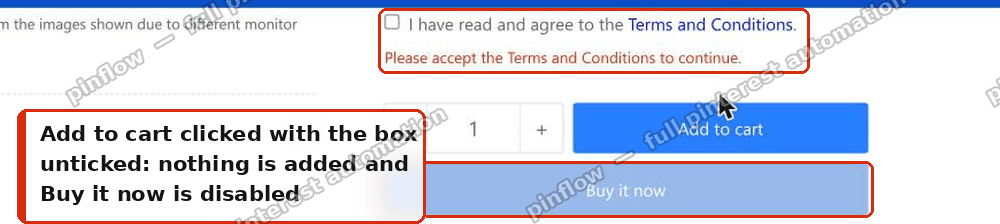 Add to cart blocked while the terms checkbox is unticked
Tick the box and the warning clears, and Buy it now returns to normal.
 The warning clears and Buy it now is enabled once the box is ticked
The acceptance is then recorded against the line item, so it appears on the cart, on the order in your admin, and in the customer's confirmation email.
 Terms accepted: Yes recorded on the cart line item
Make the acceptance read the way you want on the order
The checkbox submits as a line item property. That is the same mechanism most product-options apps use, so the acceptance travels with the line: it shows on the cart, on the order in your Shopify admin, on the packing slip, and in the customer's confirmation email.
I placed a real test order to confirm where it lands. Here it is on the order in admin, sitting in the line item's properties block, next to any other properties on that item:
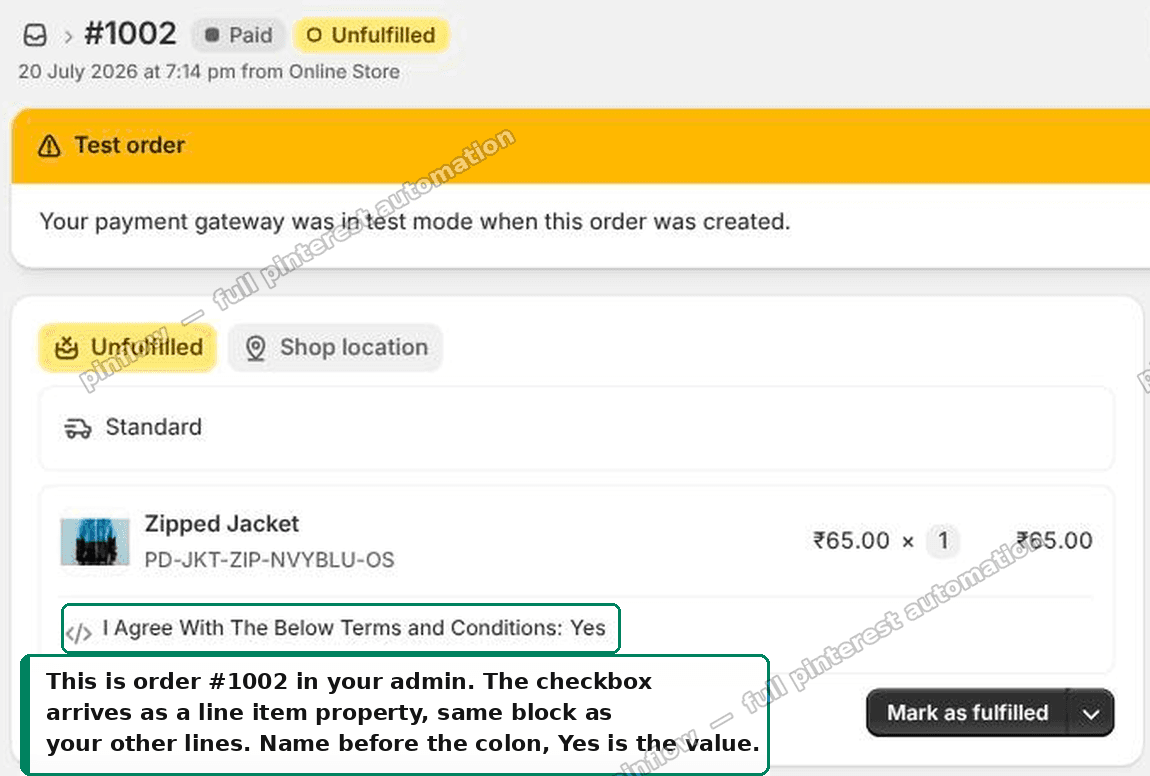 The terms acceptance shown on the order in the Shopify admin
One detail decides whether that line reads well, and it is easy to get wrong.
What prints on the order is the property name, not the label the shopper sees. In the markup, the visible wording lives in the <span> next to the checkbox, while the name Shopify records comes from the name="properties[...]" attribute. They are two different strings. If the input says name="properties[Terms accepted]", the order reads Terms accepted: Yes no matter what the on-page label reads.
So set the name to exactly what you want printed:
<input type="checkbox" name="properties[I Agree With The Below Terms and Conditions]" value="Yes" data-terms-checkbox>The text inside properties[...] is what shows before the colon. The value is what shows after it, so make it whatever you want on record: Yes, Accepted, or a check mark to match your other lines.
Two rules Shopify enforces on line item properties, each of which hides the line if you break it:
- Do not start the name with an underscore. A leading
_marks the property as private, so it is stored but never displayed on the order or the confirmation email. - Keep the value non-empty. A blank value is dropped, and the line disappears with it.
Four things that break naive versions of this
I reproduced this on a test store and hit every one of these. They are the reason the snippet above looks more defensive than you would expect.
A plain required attribute does nothing
The obvious approach is <input type="checkbox" required> and let the browser handle it.
It does not work. Shopify's product form is rendered with novalidate on it. Dawn does this, Athens does this, most themes do this. The reason is that the theme submits the form over AJAX and handles its own errors. novalidate switches off native HTML validation entirely, so a required checkbox is ignored and the item goes straight into the cart.
The submit has to be blocked in JavaScript.
The checkbox is not part of the form
The Custom liquid block renders in the product information column. The <form> element only wraps the quantity selector and the buy buttons - on Athens it is about 4,700 characters and contains nothing else.
So a checkbox in that block sits outside the form, and its value would never be submitted.
The form="..." attribute fixes that. It associates an input with a form by ID even when the input lives elsewhere in the document, and new FormData(form) then includes it.
form.id does not return what you think
This one is genuinely surprising.
The product form contains <input name="id"> for the selected variant. Named form controls are exposed as properties on the form element, so form.id returns that input element, not the form's ID string.
Use form.getAttribute('id') instead. Code that does if (!form.id) form.id = 'something' does nothing, and says nothing, the checkbox never gets wired up, and the property never submits.
Buy it now bypasses the form completely
The dynamic checkout button is a separate web component that posts straight to checkout. Blocking form submission does not touch it.
That is why the snippet disables it too. It does so with a class on <body> rather than an inline style on the button, and that choice matters - see the next section.
What happens when the variant changes
This is the failure that survives casual testing, because it only appears after the shopper interacts with the page.
Many themes re-render the buy area when the customer picks a different variant, so the price, stock state, and button label stay correct. Athens does it like this:
productFormDestination.outerHTML = productFormSource.outerHTMLThat replaces the entire product form element - form, Add to cart button, and Buy it now - with fresh HTML from the server.
Any script that grabbed those elements once and stored them in variables is now holding references to nodes that are no longer in the page. The gate stops, with nothing to flag it working, and the inline style that dimmed Buy it now is gone because the replacement HTML never had it.
I measured this. Counting attempted /cart/add requests with the box unticked:
| before a variant change | after a variant change | |
|---|---|---|
| version holding references | 0 blocked | 1 got through |
| version re-querying each time | 0 blocked | 0 blocked |
The merchant in this case had 50 products on native variants. Anyone switching variant before adding would have walked straight past the checkbox.
Two fixes, both in the snippet above:
- Re-query the form inside every handler, and delegate all listeners off
documentrather than binding them to elements that get destroyed. - Lock Buy it now with a class on
<body>. The body element survives the re-render, so the CSS rule keeps applying to whatever new button appears.
The checkbox itself is safe, because it lives outside the replaced element, and its form="..." attribute re-associates automatically with the new form of the same ID.
How to add a custom text field on a Shopify product page
The same mechanism covers the related request: a text input for engraving, a gift message, or a name.
Swap the checkbox for a text input and keep the properties[...] name:
<label for="engraving">Engraving (optional)</label>
<input type="text" id="engraving" name="properties[Engraving]" maxlength="30"
       form="product-form-{{ section.id }}">
Two notes:
- Line item properties are the general mechanism here. Any input named
properties[Something]gets attached to the line and shows on the order. - A property with an empty value is dropped by Shopify, so optional fields simply do not appear when left blank. If you want the field to be mandatory, gate it with the same JavaScript pattern as the checkbox.
Naming the property with a leading underscore, like properties[_internal], hides it from the customer while keeping it on the order. Useful for values you want for fulfillment but not on the invoice.
Shopify file upload on the product page
File upload works the same way and needs no app:
<input type="file" name="properties[Artwork]" form="product-form-{{ section.id }}">The form already carries enctype="multipart/form-data", which is what makes this work. Shopify stores the file and puts a link on the order line.
The limit is 20 MB per file. There is no way to raise it, and there is no built-in way to restrict file types beyond the accept attribute, which is a hint rather than a rule.
If it did not work, check these
The checkbox does not appear at all. The product is not tagged, or the tag does not match. Tags are case sensitive in contains comparisons, so Terms-Required will not match terms-required.
The checkbox appears but Add to cart still works. Your theme uses a different selector for the button. The snippet looks for [name="add"], which is the Shopify convention, but check your theme's markup and adjust.
The checkbox appears in the wrong place. Drag the block in the theme editor block list. On Athens, also confirm Position is set to Right.
Everything works but nothing shows on the order. The property name is wrong. It must be exactly properties[Your Label], and the input must be inside the form or carry a matching form attribute.
It works on the product page but not from a collection page. Quick-add buttons post to the cart without ever loading the product page, so the block never renders. Turn off quick add for those products, or accept that the gate only covers the product page. Athens has no quick add, so this did not apply here.
Terms checkbox on the product page vs at checkout
Worth being clear about what this does and does not cover.
This puts the checkbox on the product page. It is a per-item agreement, and it records which items the customer accepted terms for.
If you want a single agreement at checkout, that is a different job. On Shopify Plus you can use checkout UI extensions. On other plans, checkout is not editable. Merchants usually put the agreement text near the checkout button in the cart instead.
For most stores asking this question, the product page version is what they actually want, because the agreement is specific to certain products rather than the whole order.
Is a checkbox legally binding?
Not advice, just the practical distinction people ask about.
A tick box where the customer actively agrees is a "clickwrap" agreement. It is generally treated as stronger evidence of consent than a passive "by using this site you agree" notice. Recording the acceptance on the order, which the snippet does, is the part that makes it evidence rather than decoration.
If the agreement matters commercially, have a lawyer look at the wording. The technical side is the easy half.
What this cost
One tag applied in a single bulk action. One block. No app, no monthly fee, no per-product option sets, and the native variants are untouched.
That is usually the right shape for a Shopify product page customization. Reach for a tag and a Custom liquid block before you reach for an app, and only escalate when you genuinely need a customer-facing choice rather than a customer-facing control.
Customizing the page is half the job. Getting people to it is the other half.
PinFlow turns your Shopify catalog into Pinterest pins and posts them on a schedule, so the product page you just tuned gets seen by people who are not on your store yet.
Get PinFlow on the Shopify App StoreMore Shopify fixes
More community-sourced Shopify guides, tested on a live store.
Themes & Storefront
Shopify Payment Icons: Fix a Footer That Shows None
The payment icons in a Shopify footer come from your payment provider, not from the theme. When the provider sends none, the row stays empty. Here is how to add the icons yourself on Refresh, Dawn and similar themes.
Themes & Storefront
Shopify Order Notes: Turn On the Cart Note Box
Let customers leave order notes and special instructions on your Shopify cart page. Turn on the built-in cart note in Theme settings, rename its label, and find each note on the order. Tested on Dawn, no code.
Themes & Storefront
Shopify WhatsApp Integration: Add a Free Chat Button
How to add WhatsApp to Shopify with a floating chat button: shoppers tap it and WhatsApp opens a chat with you, the message already typed and naming the product.