
Shopify Purchase Orders After Stocky: Create and Receive (No App)
Make a purchase order in the Shopify admin, mark it as ordered, create its transfer, then receive a short delivery on that transfer. No app needed.
By AjayCodeWiz · November 19, 2026 · 7 min read
How do you create and receive a purchase order in Shopify now that Stocky is gone?
In your Shopify admin, open Products > Purchase orders, click Create purchase order, pick the supplier, the destination and the products, then save it. Click Mark as ordered when the supplier confirms, then Create transfer. You do not receive the stock on the purchase order. You receive it on the linked transfer, under Products > Transfers, with Receive items.
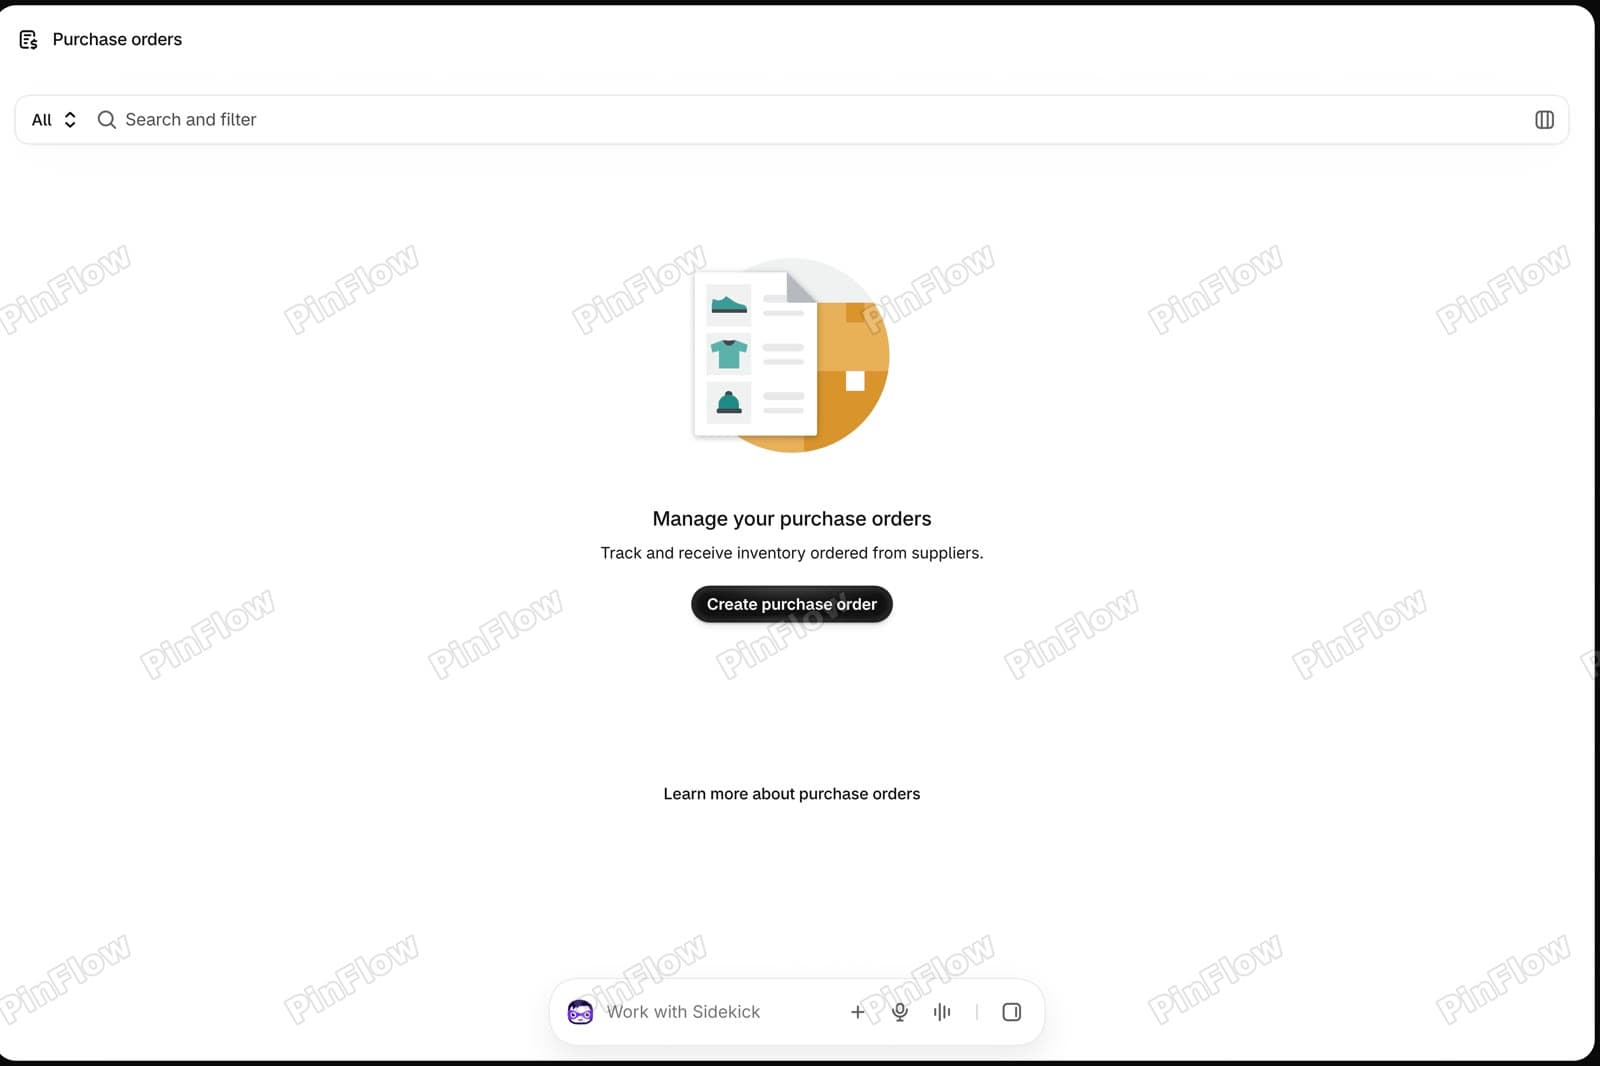 Purchase orders list in the Shopify admin with no orders yet and a Create purchase order button, with Transfers in the Products menu on the left
The steps follow the video, filmed on a development store on 19 November 2026 with no app installed. The video orders three products, then receives a short delivery. Shopify's help pages cover creating purchase orders and receiving on an inventory transfer.
Step 1: Know that Stocky has ended
Stocky was the app many stores used for purchase orders. Shopify's help page, Migrating from Stocky to Shopify inventory management, says it is no longer available as of 31 August 2026. The same page says you now manage inventory in the Shopify admin and Shopify POS.
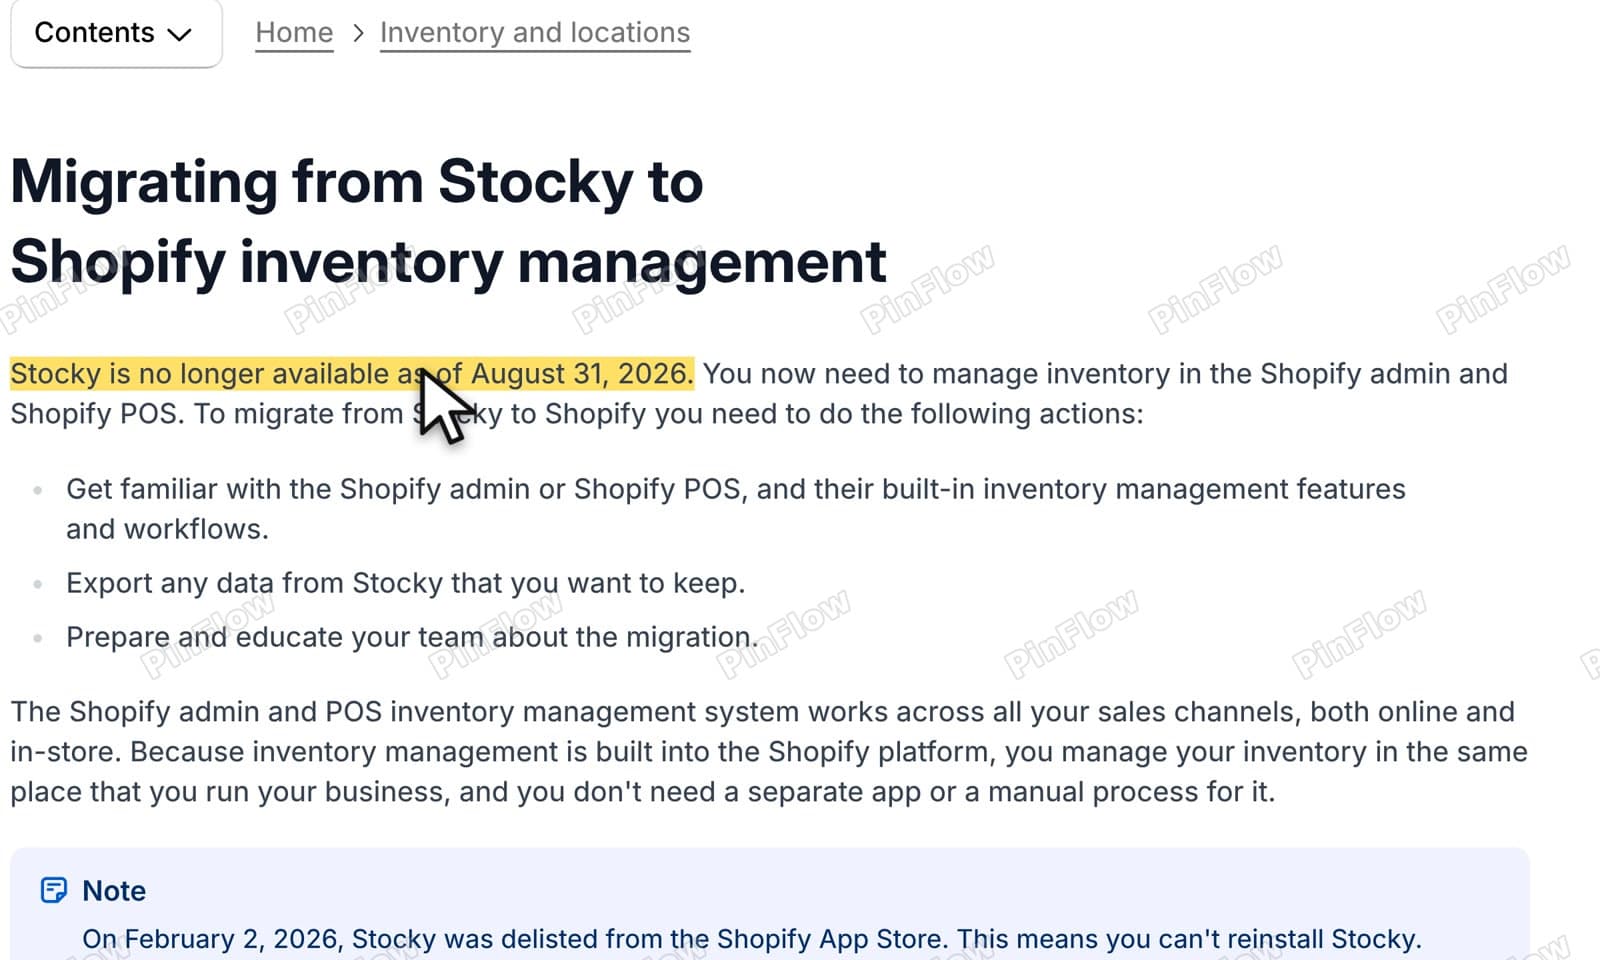 Shopify Help page Migrating from Stocky to Shopify inventory management with the sentence Stocky is no longer available as of August 31, 2026 highlighted
Step 2: Read the two statuses
On the purchase order help page, a purchase order has two statuses, Draft and Ordered. Receiving, partial receipt, completion and closure are tracked on the linked transfer instead. The page also says that marking a purchase order as ordered can't be reversed, so mark it only after your supplier confirms.
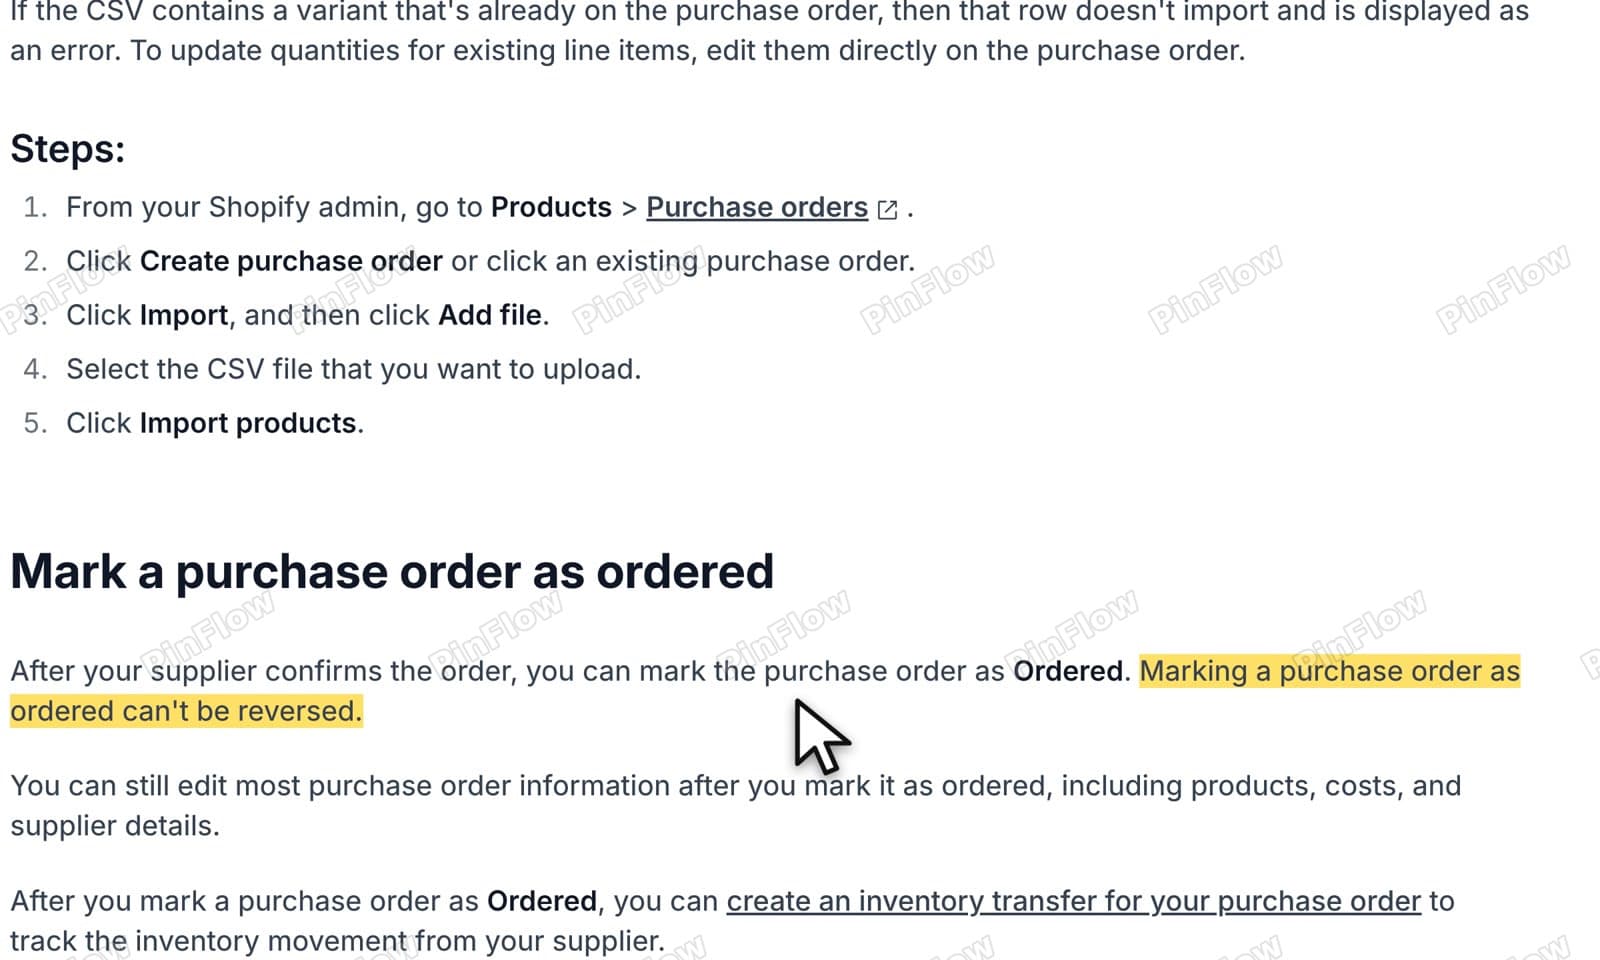 Shopify Help page on purchase orders with the sentence Marking a purchase order as ordered can't be reversed highlighted
Step 3: Open the Create purchase order form
Back in the admin, go to Products > Purchase orders and click Create purchase order. The form has the supplier and destination at the top, a search box for products, a Cost summary on the right and the order details below it.
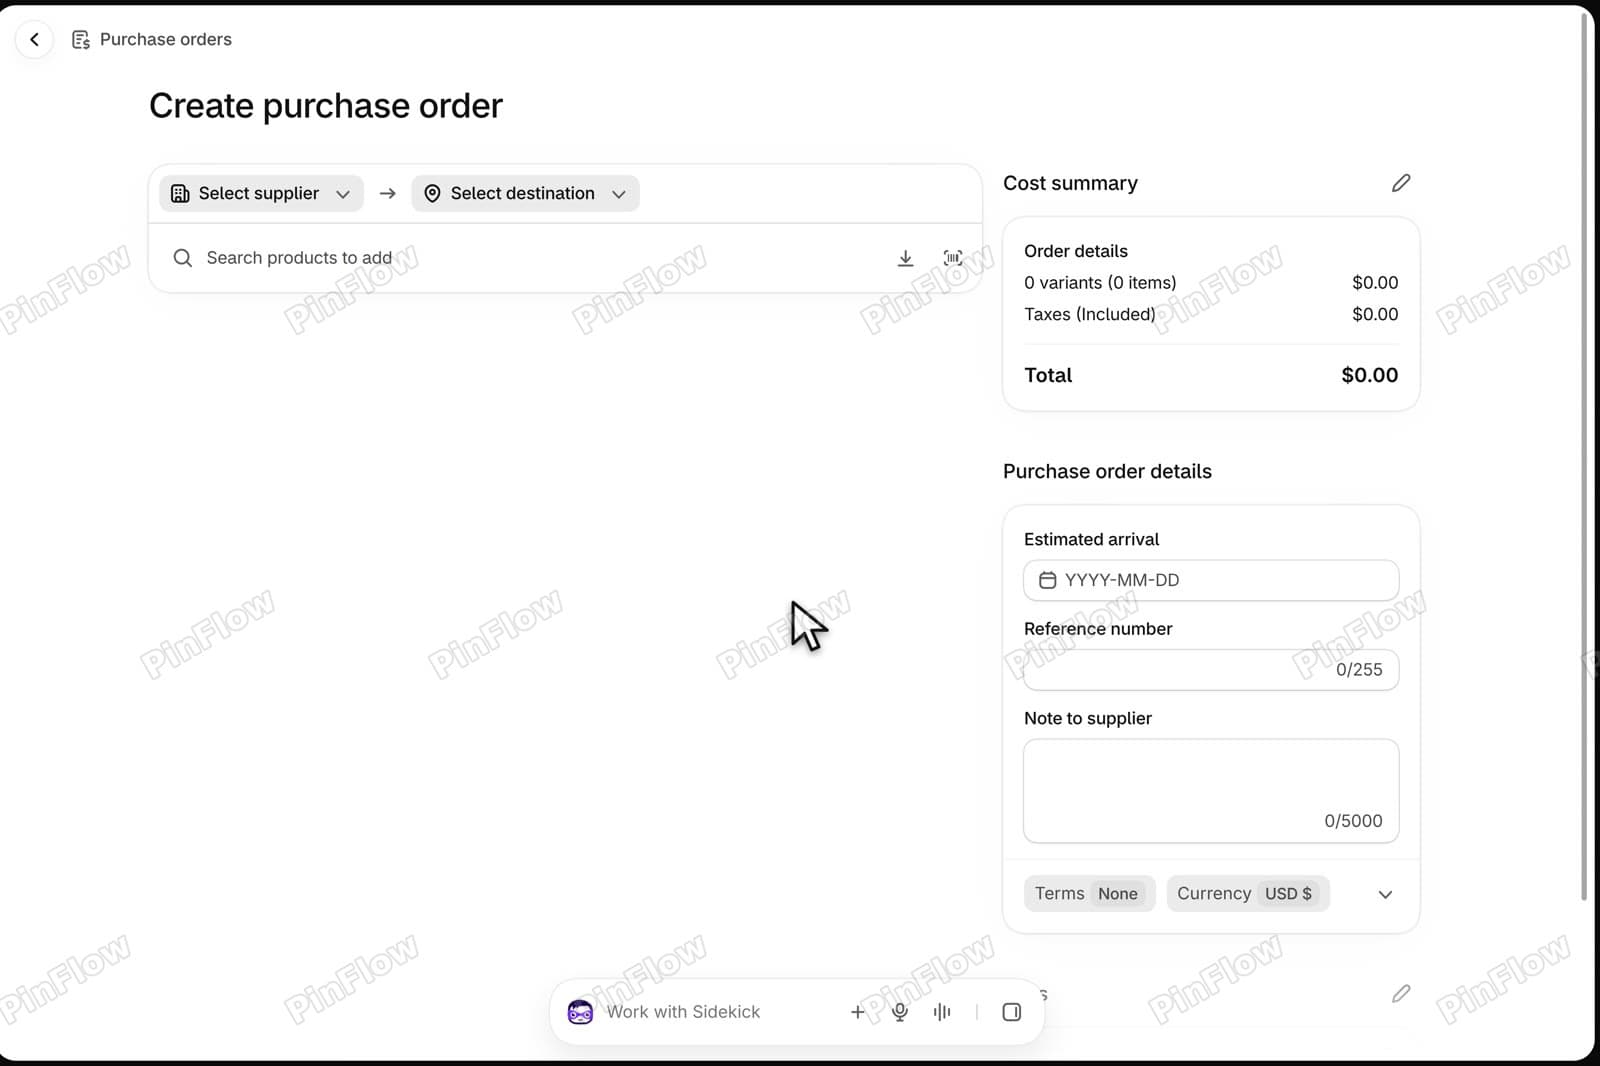 Create purchase order form with the Select supplier and Select destination dropdowns, a product search box, the Cost summary and the Purchase order details
Step 4: Pick the supplier
Click Select supplier. The list shows the suppliers you have, and a Create new supplier link sits under it. The video picks Ploqo Sample Co, the vendor name on the demo products. There is no separate suppliers page, so a new supplier is made from here.
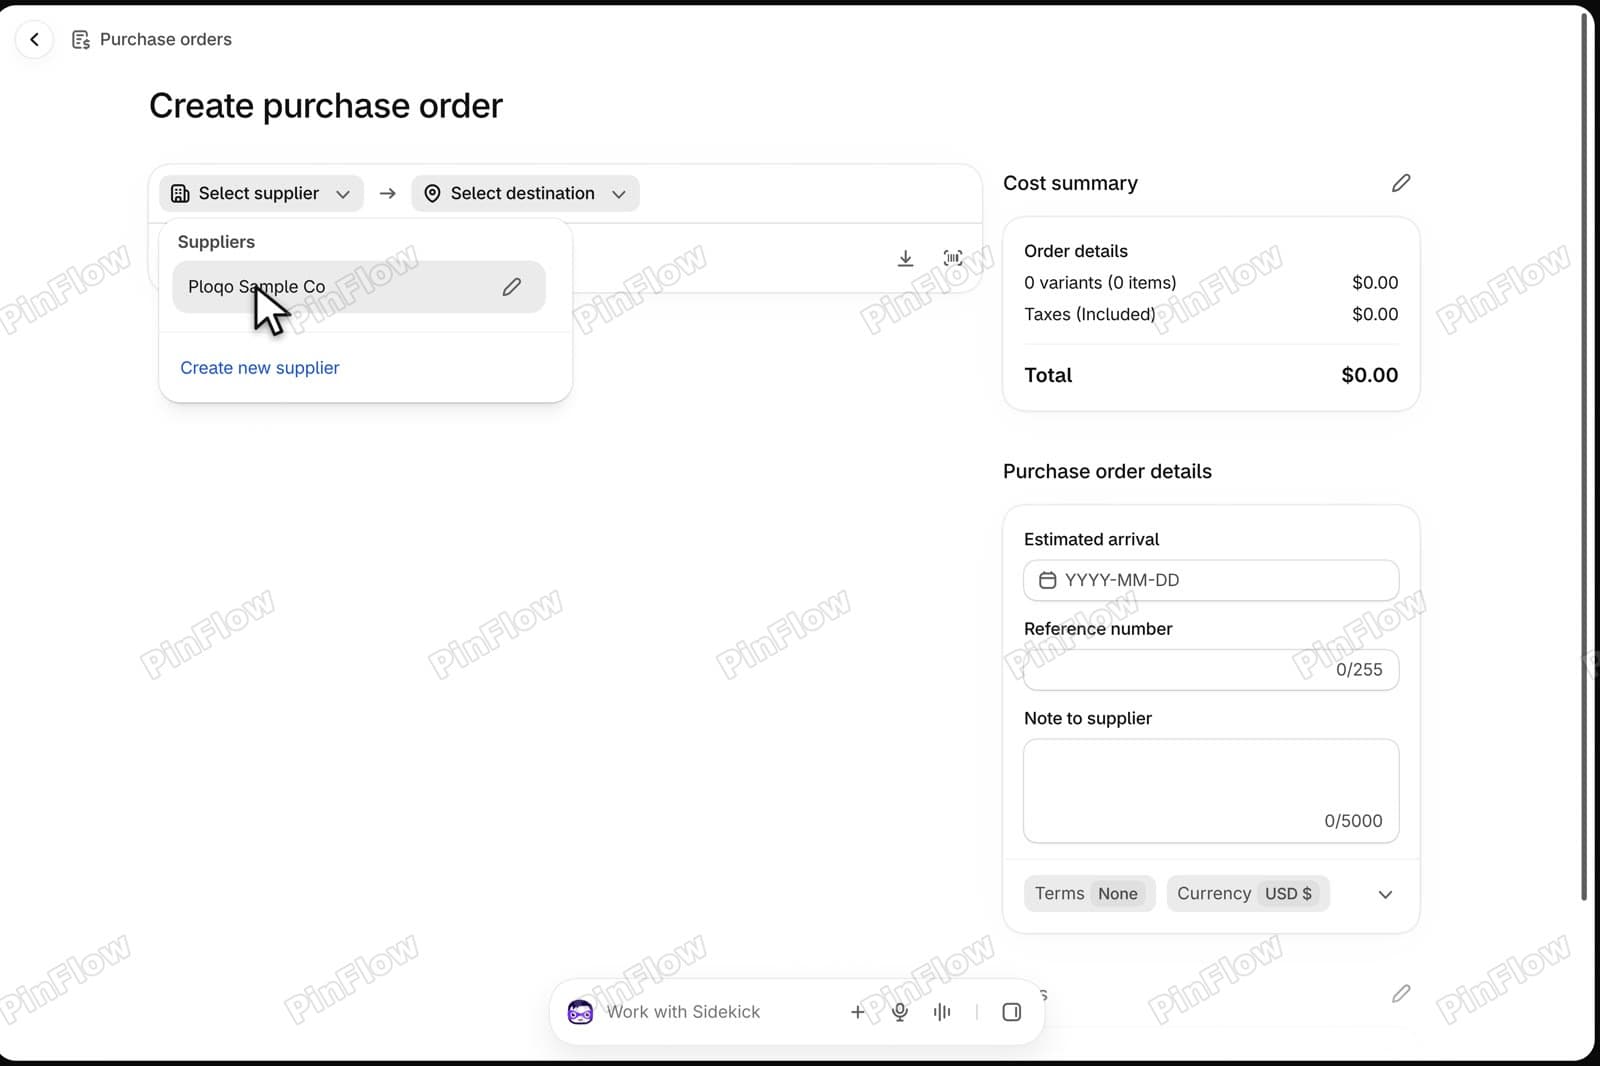 Select supplier dropdown listing the supplier Ploqo Sample Co with a Create new supplier link below it
Step 5: Choose the destination
Click Select destination and pick the location where the stock will land. The demo store has one location, Shop location.
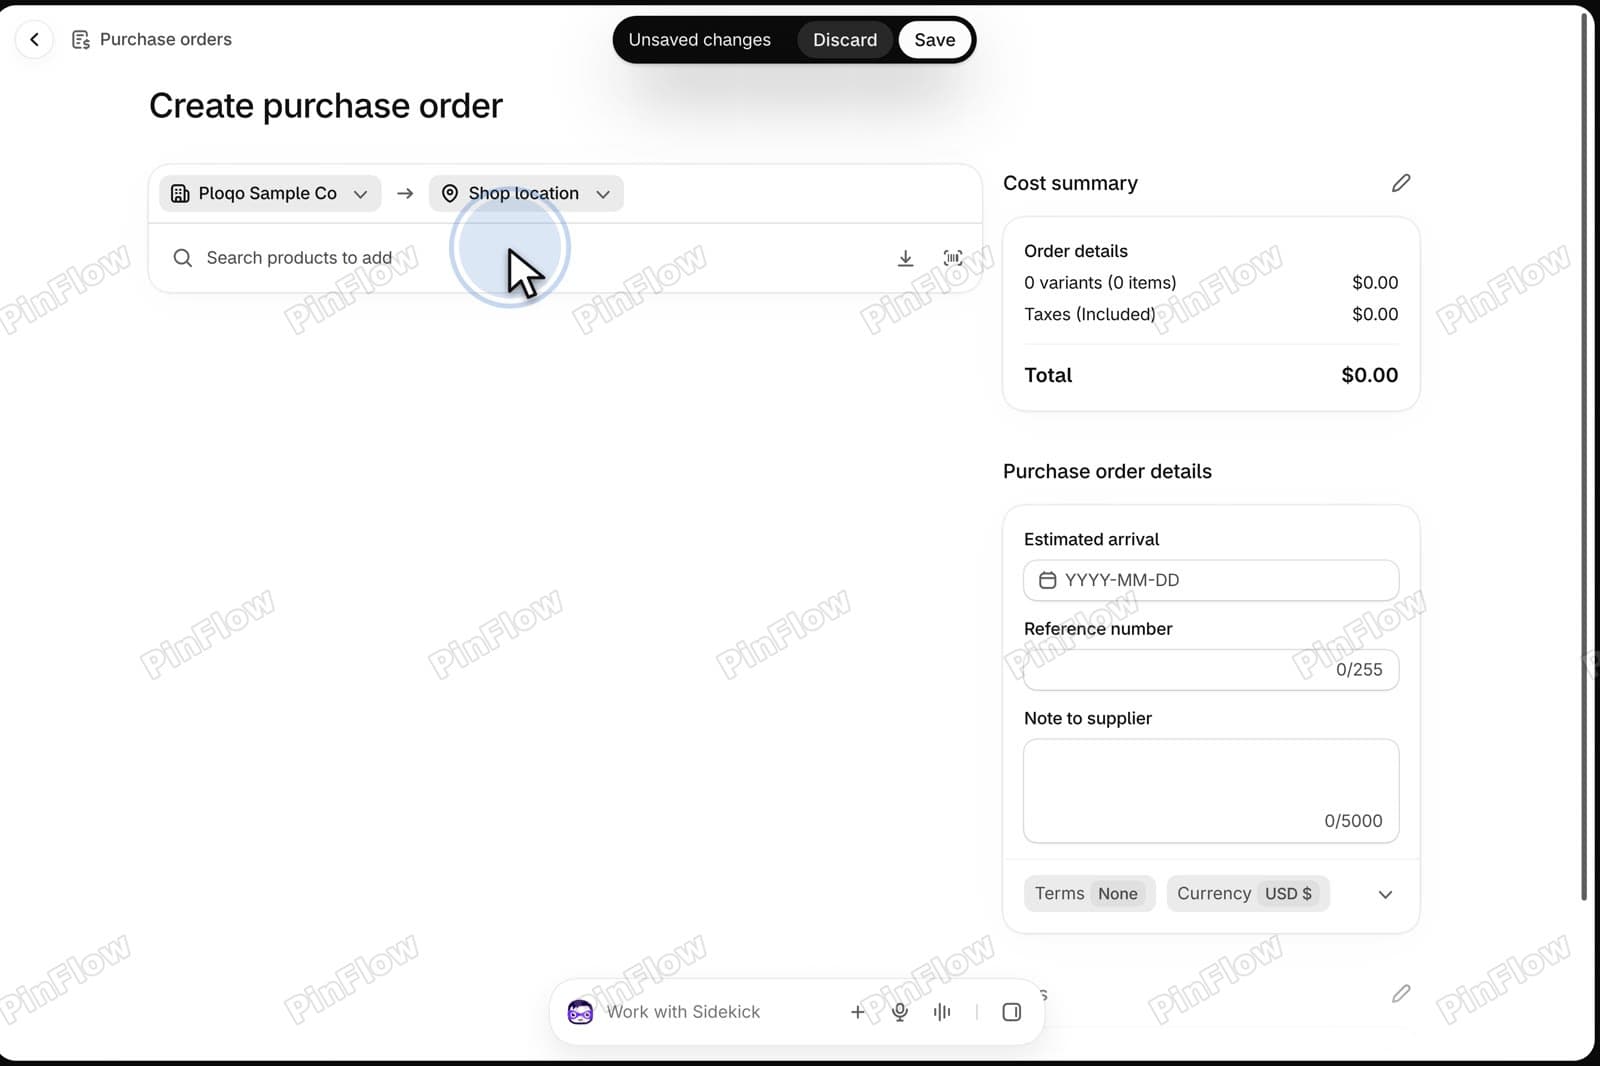 Purchase order with the supplier Ploqo Sample Co and the destination Shop location selected
Step 6: Add the products
Click Search products to add. The picker has an Available at Destination column, so you see current stock while you choose. The video starts with the Wool Beanie, which has 0 available and is sold out, so it is the one to reorder.
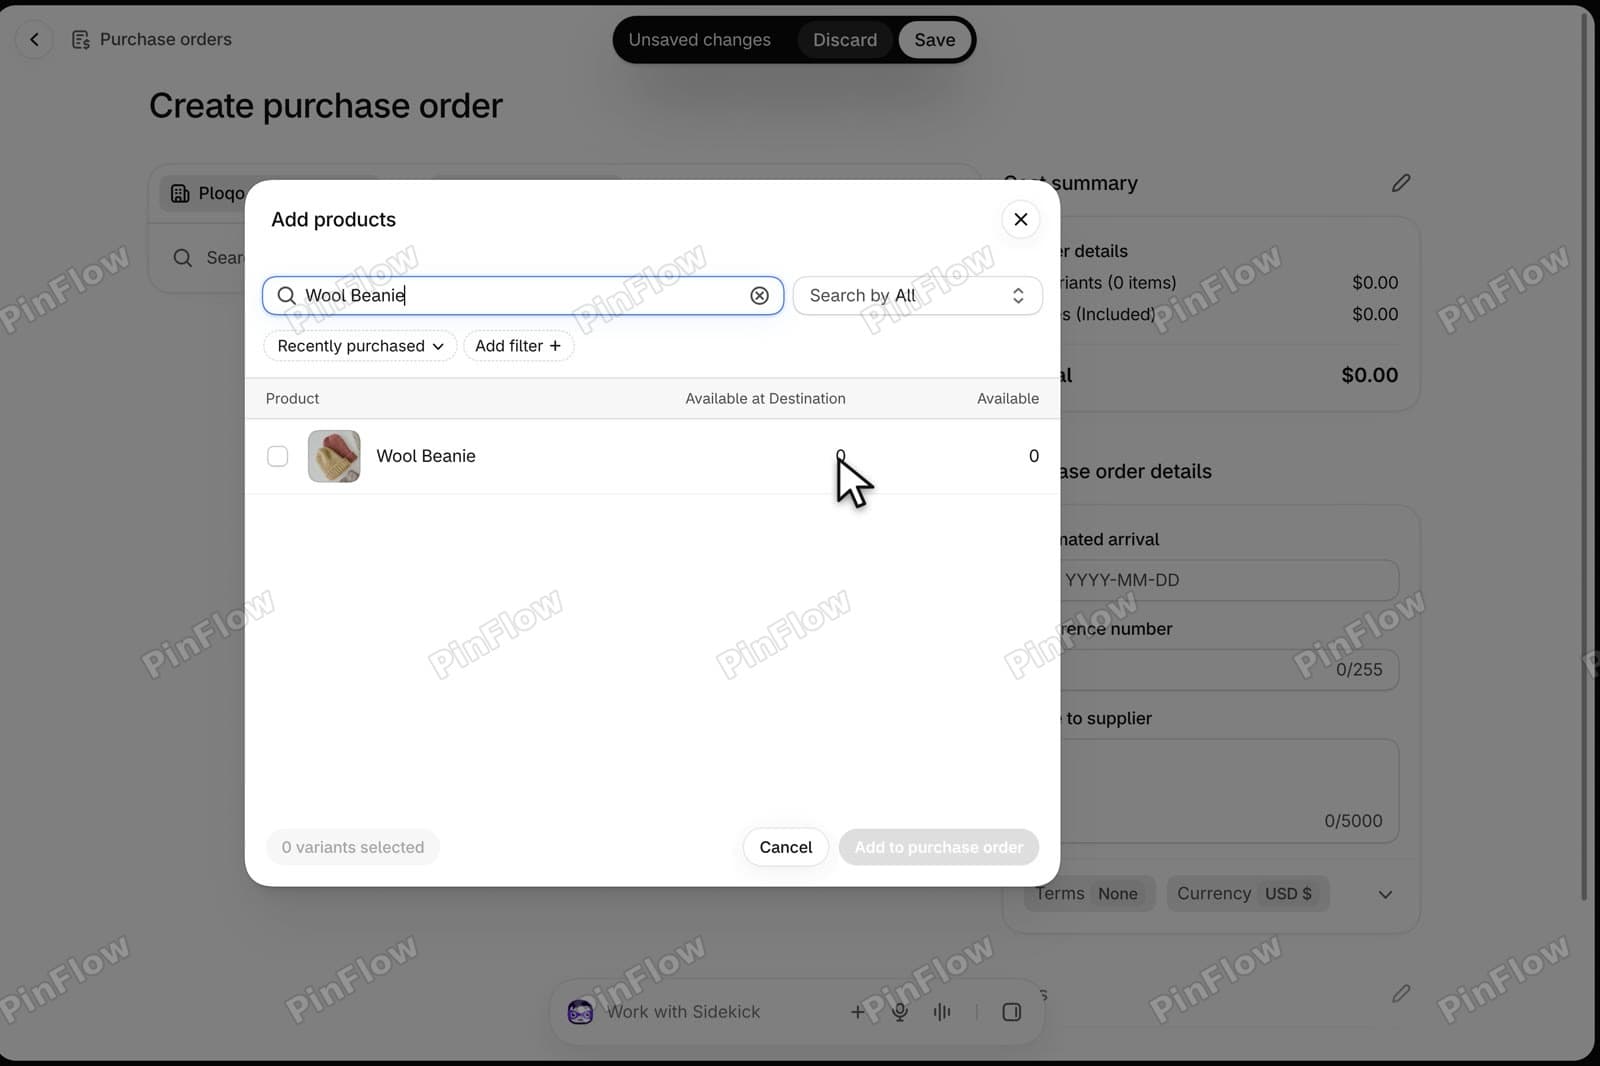 Add products dialog searching Wool Beanie, with the Available at Destination column showing 0
Search again for the A5 Dotted Notebook and the Canvas Tote Bag. The ticks stay on between searches. With 3 variants selected, click Add to purchase order.
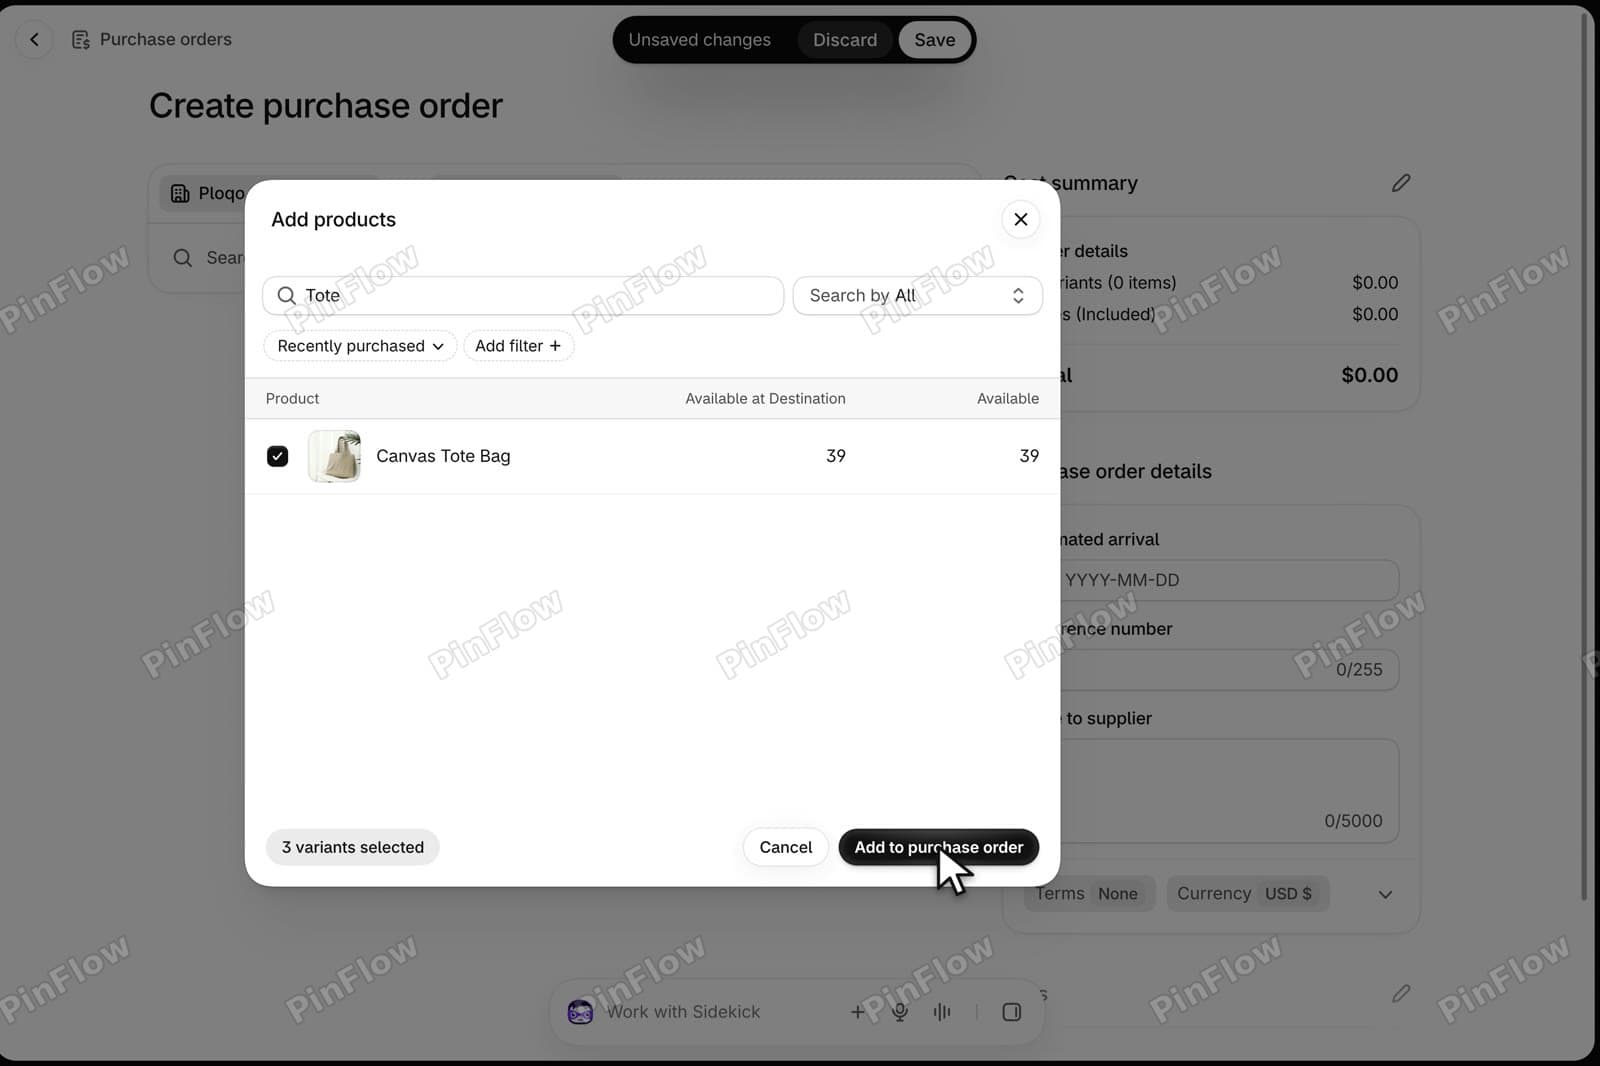 Add products dialog with the Canvas Tote Bag ticked, 3 variants selected and the Add to purchase order button
Step 7: Set the quantities
The cost fills in by itself from each product's cost per item: $4.10 for the beanie, $2.40 for the notebook and $6.00 for the tote. Every line starts at a quantity of 1.
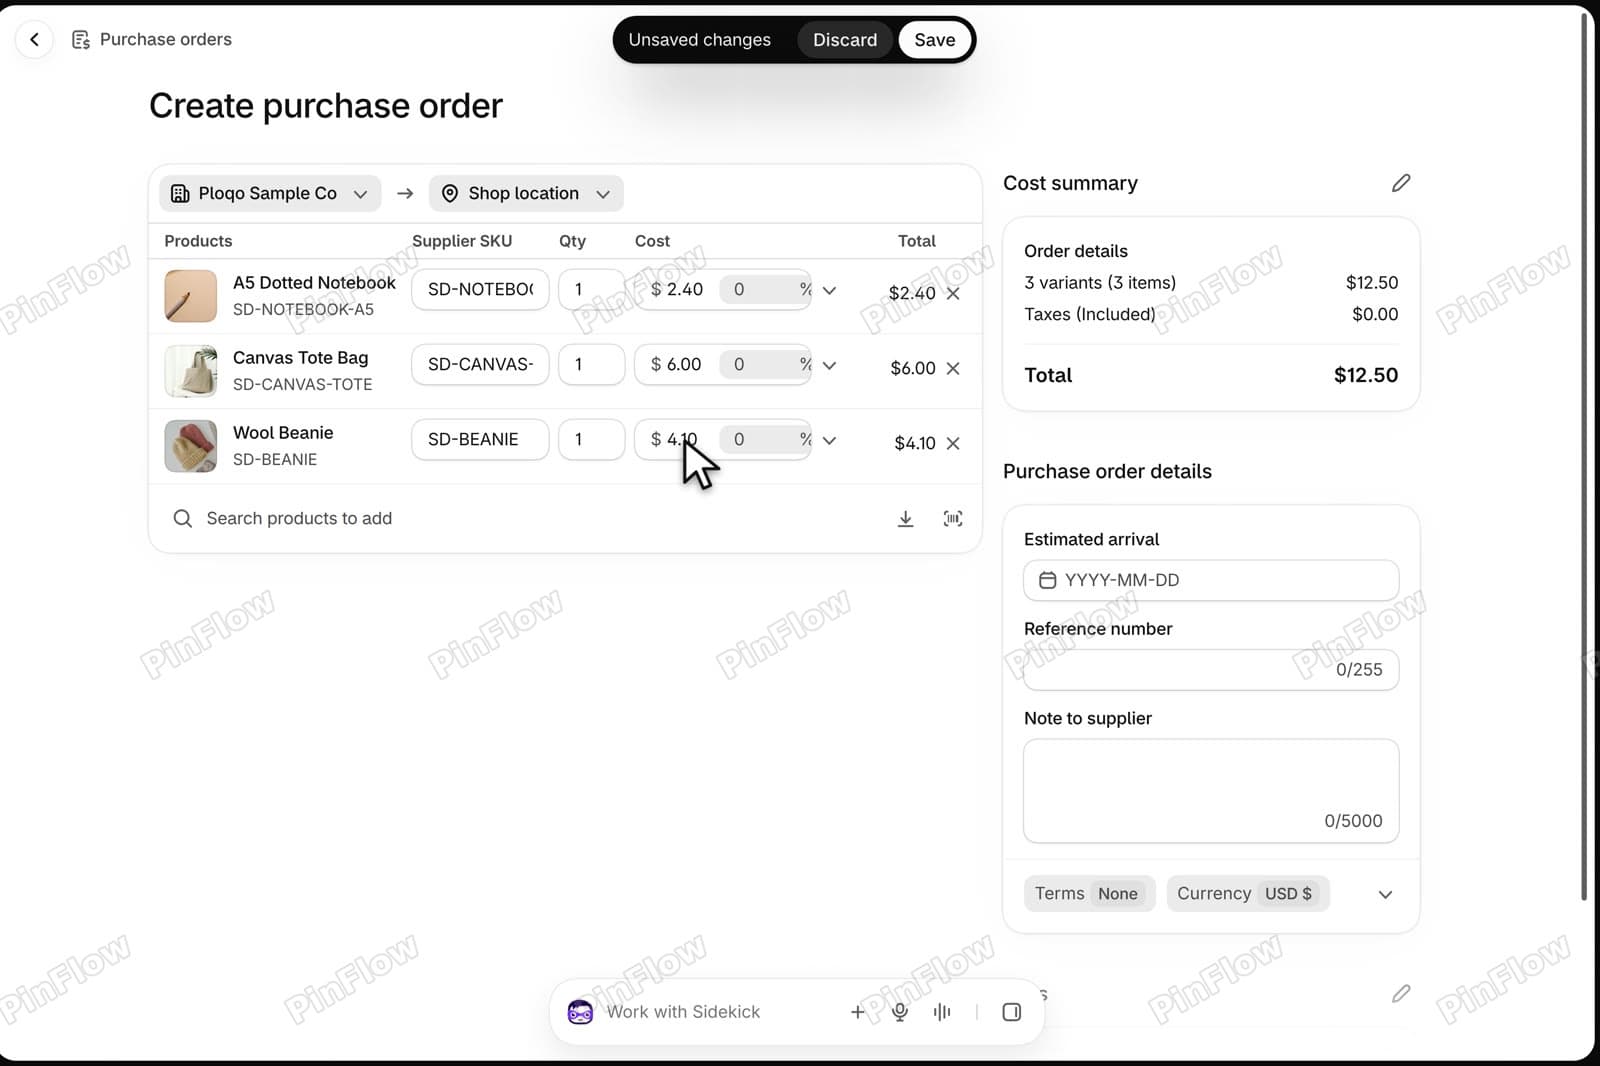 Purchase order lines for the notebook, tote and beanie with the cost already filled in and a quantity of 1 on each line
Type 20 notebooks, 10 totes and 30 beanies. That makes 60 items, and the cost summary shows $231.00.
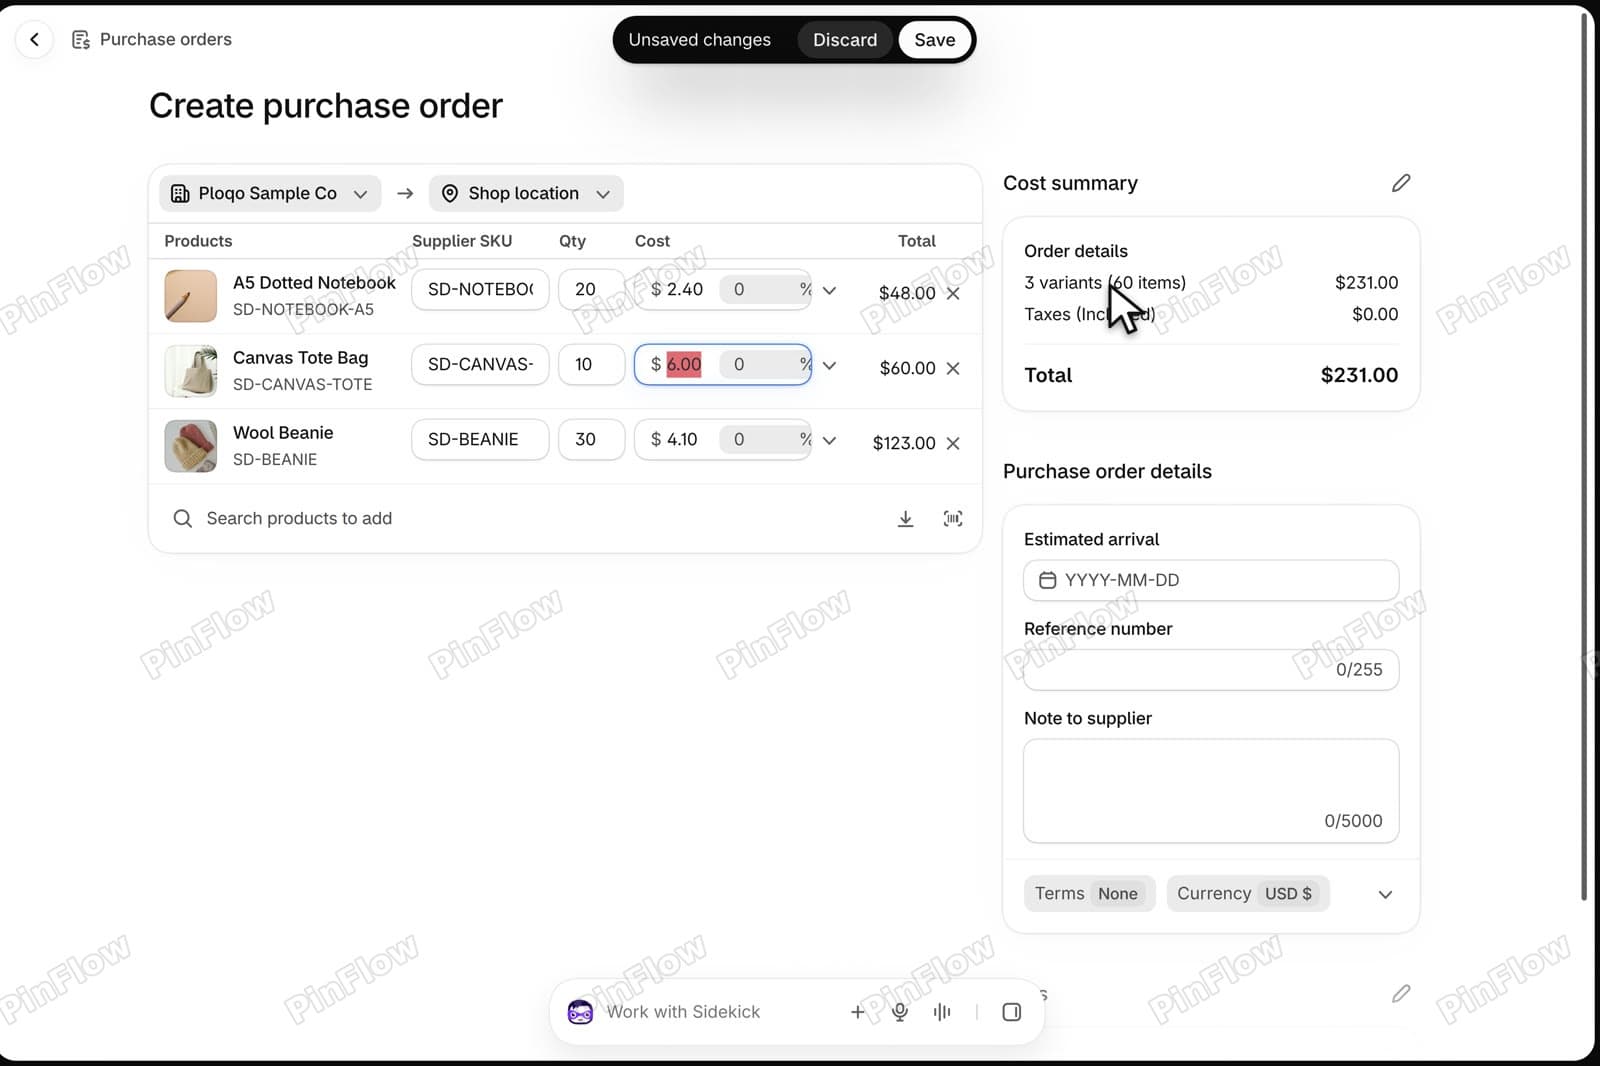 Purchase order lines with quantities 20, 10 and 30 and the Cost summary showing 3 variants, 60 items and $231.00
Step 8: Know the CSV import for long orders
For a long order, the import icon next to the product search opens Import products by CSV. It has a Download CSV sample link. The help page says each variant can be matched by SKU, by barcode or by both. The video cancels this dialog.
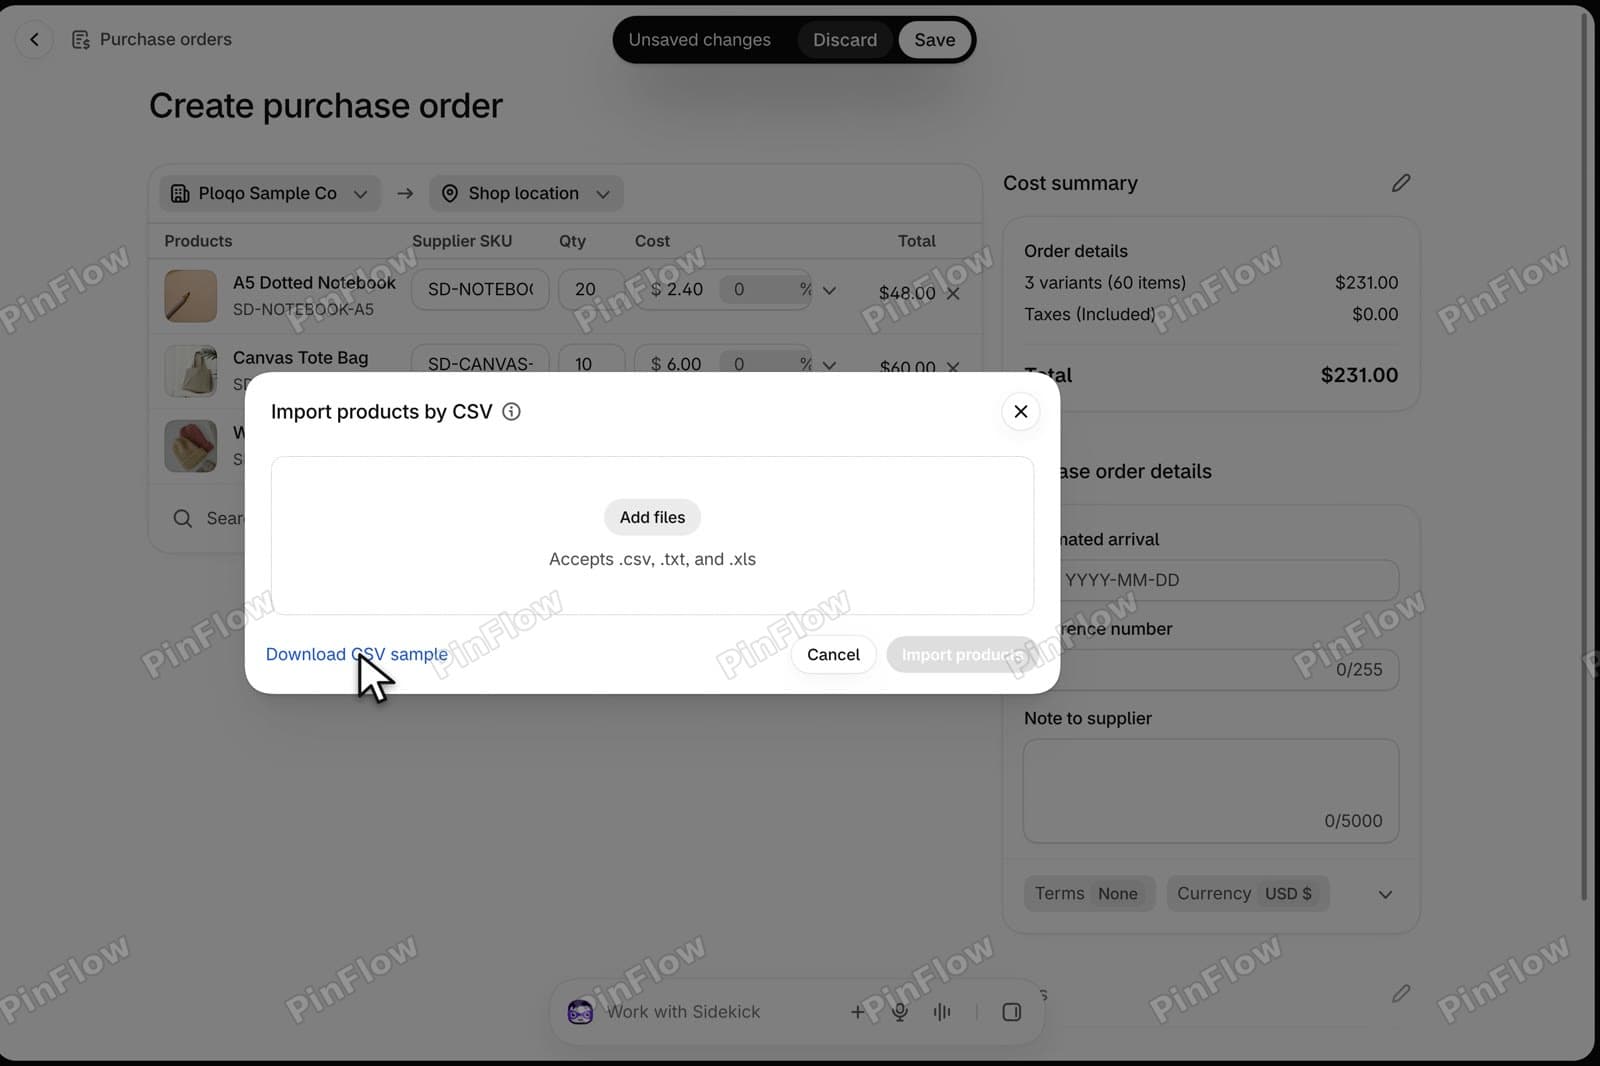 Import products by CSV dialog with an Add files button and a Download CSV sample link
Step 9: Add the shipping cost
Click the pencil next to Cost summary. In Manage cost summary, pick Shipping amount in the adjustment list, type 15 and save.
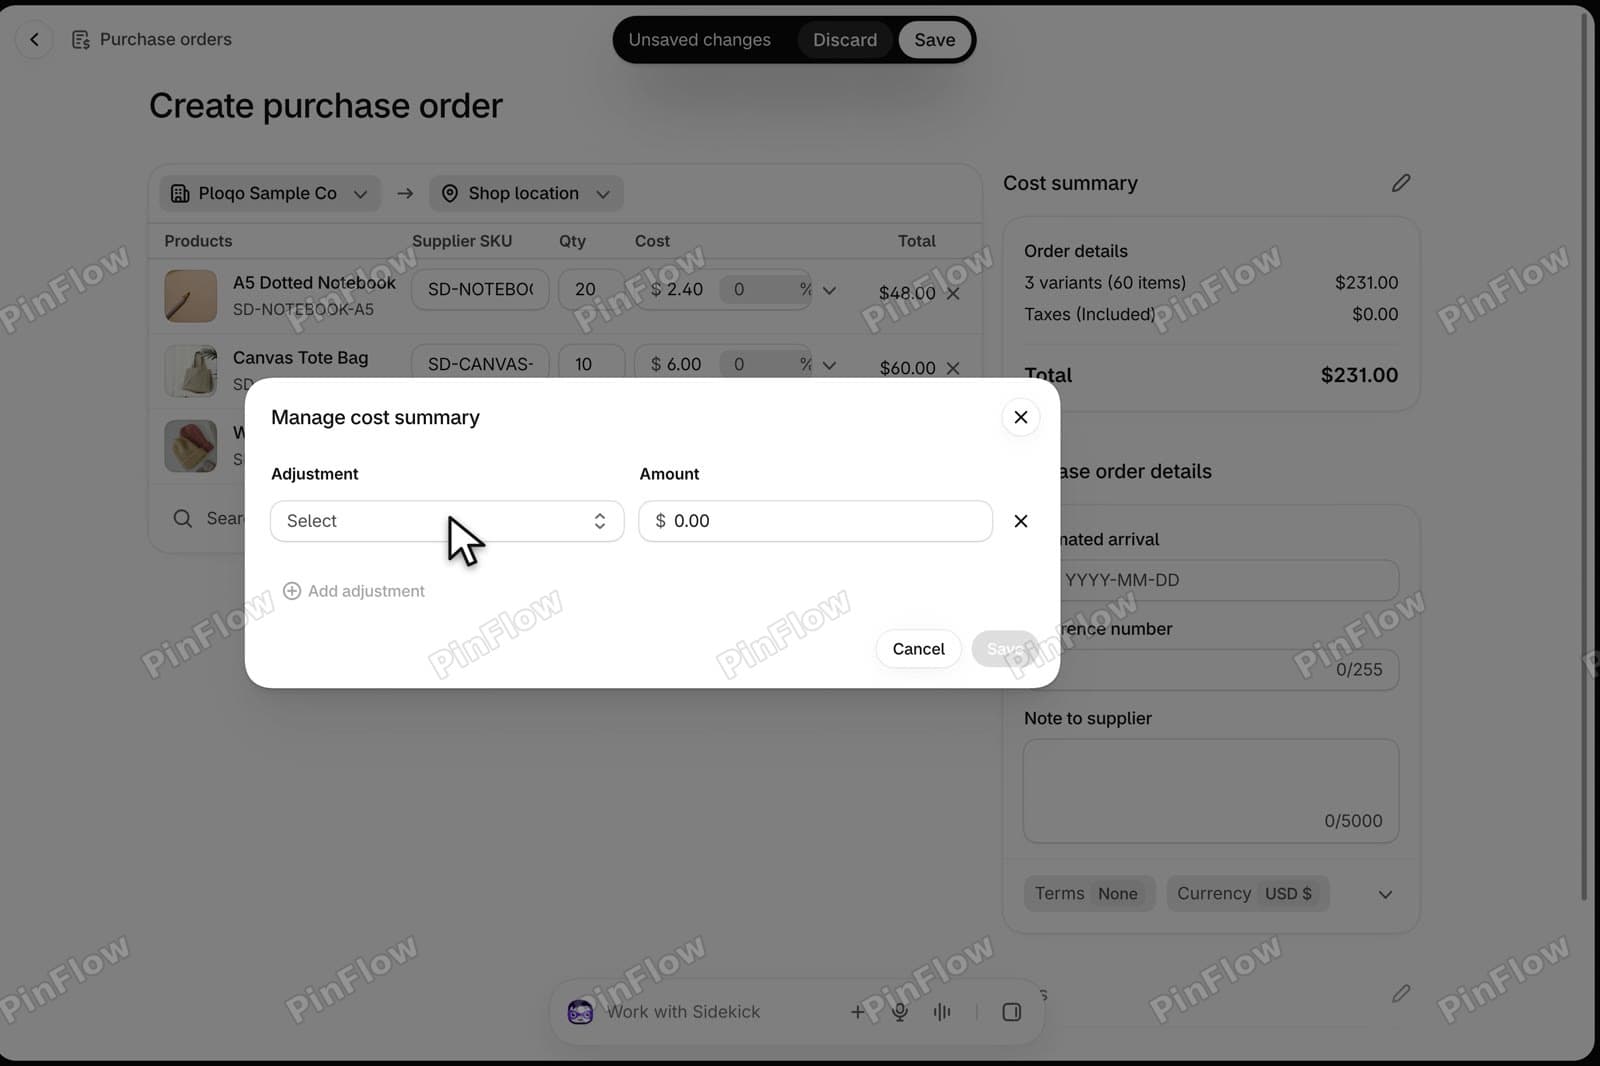 Manage cost summary dialog with an Adjustment dropdown and an Amount field
The cost summary now lists Shipping amount $15.00, and the total is $246.00.
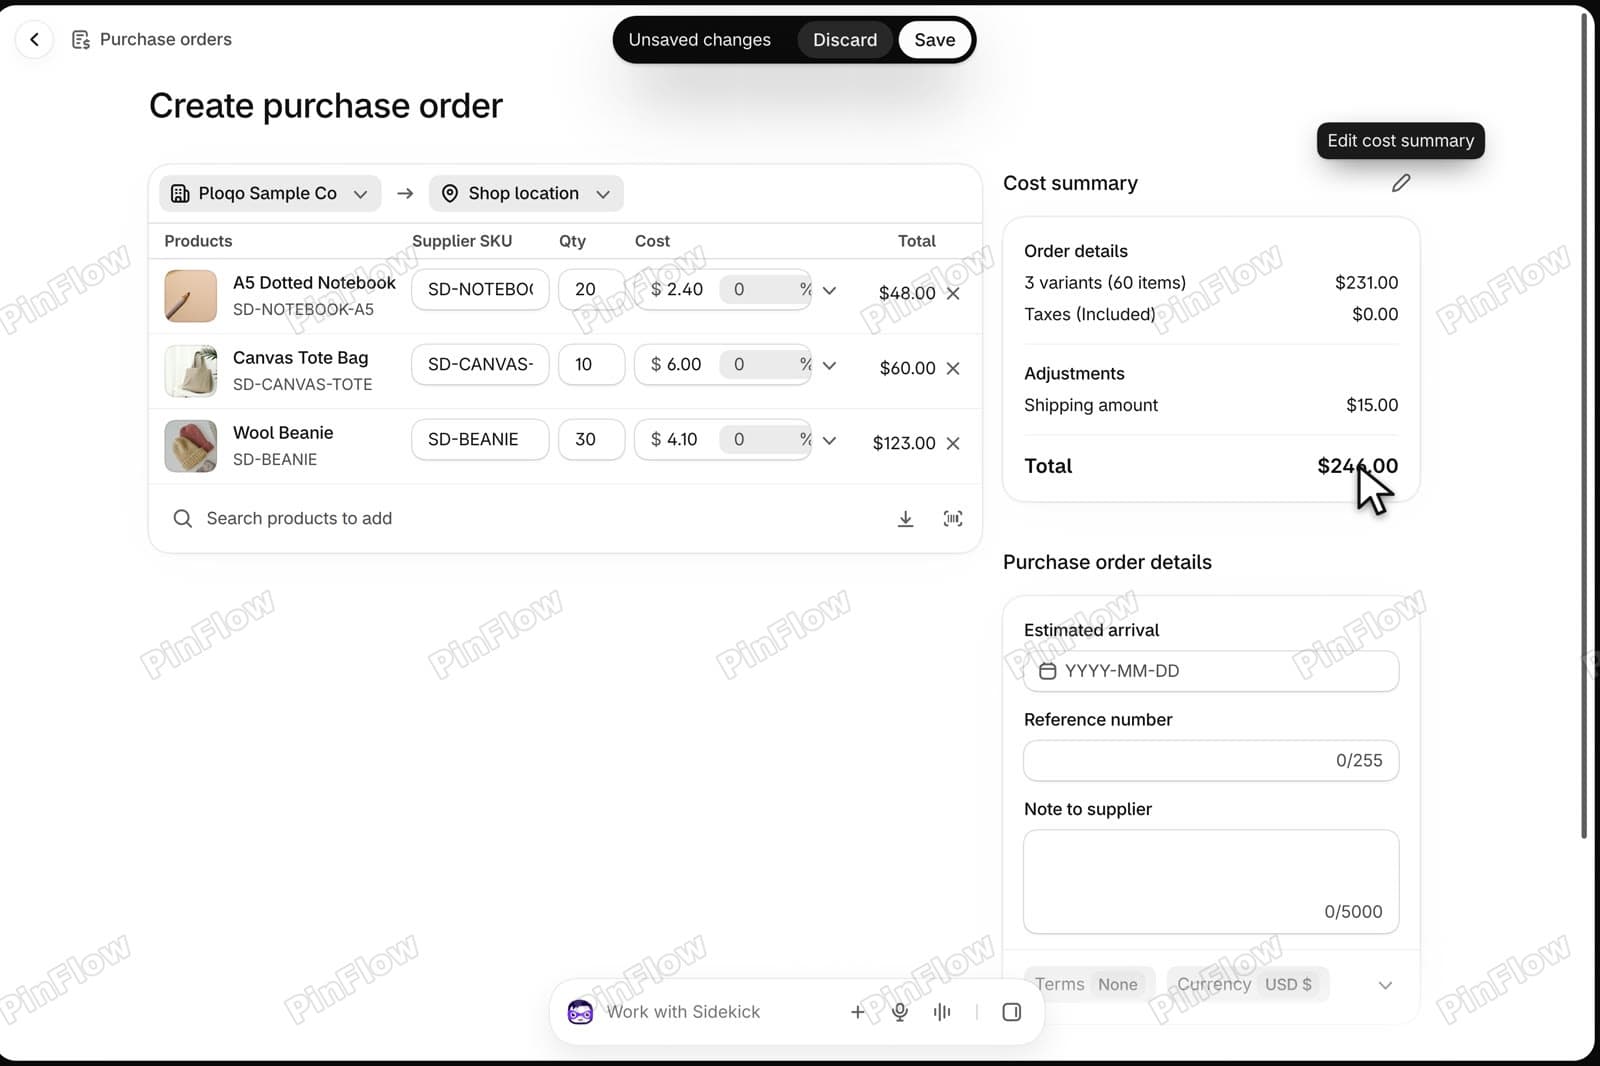 Cost summary with the line Shipping amount $15.00 and a Total of $246.00
Step 10: Set the payment terms and a reference number
Open Terms at the bottom of the order details to see Purchasing information, and set the payment terms to Net 30. Then type your own reference number in the Reference number field. The video uses PO-1001. These terms are saved on this purchase order, not on the supplier.
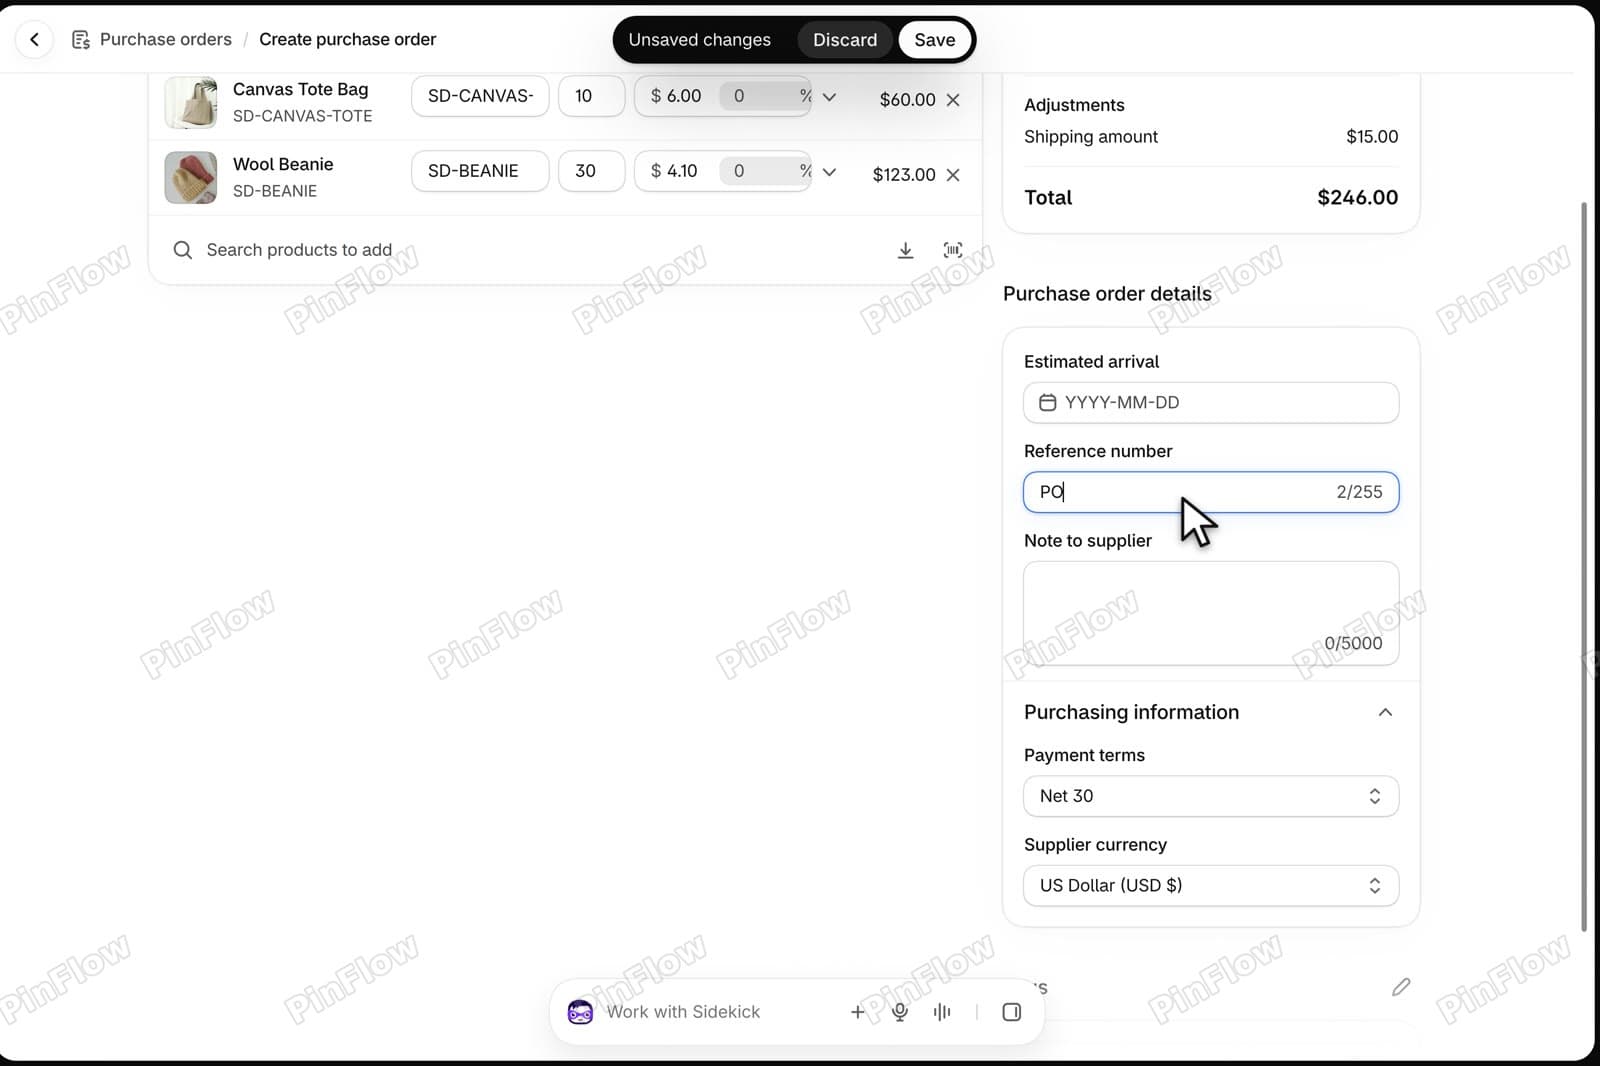 Purchase order details with the Reference number field being typed and Purchasing information showing Payment terms Net 30
Step 11: Save the draft
Click Save. The purchase order gets a number, #PO5 here, and a Draft badge. A draft can still change: you can edit its details and add or remove products.
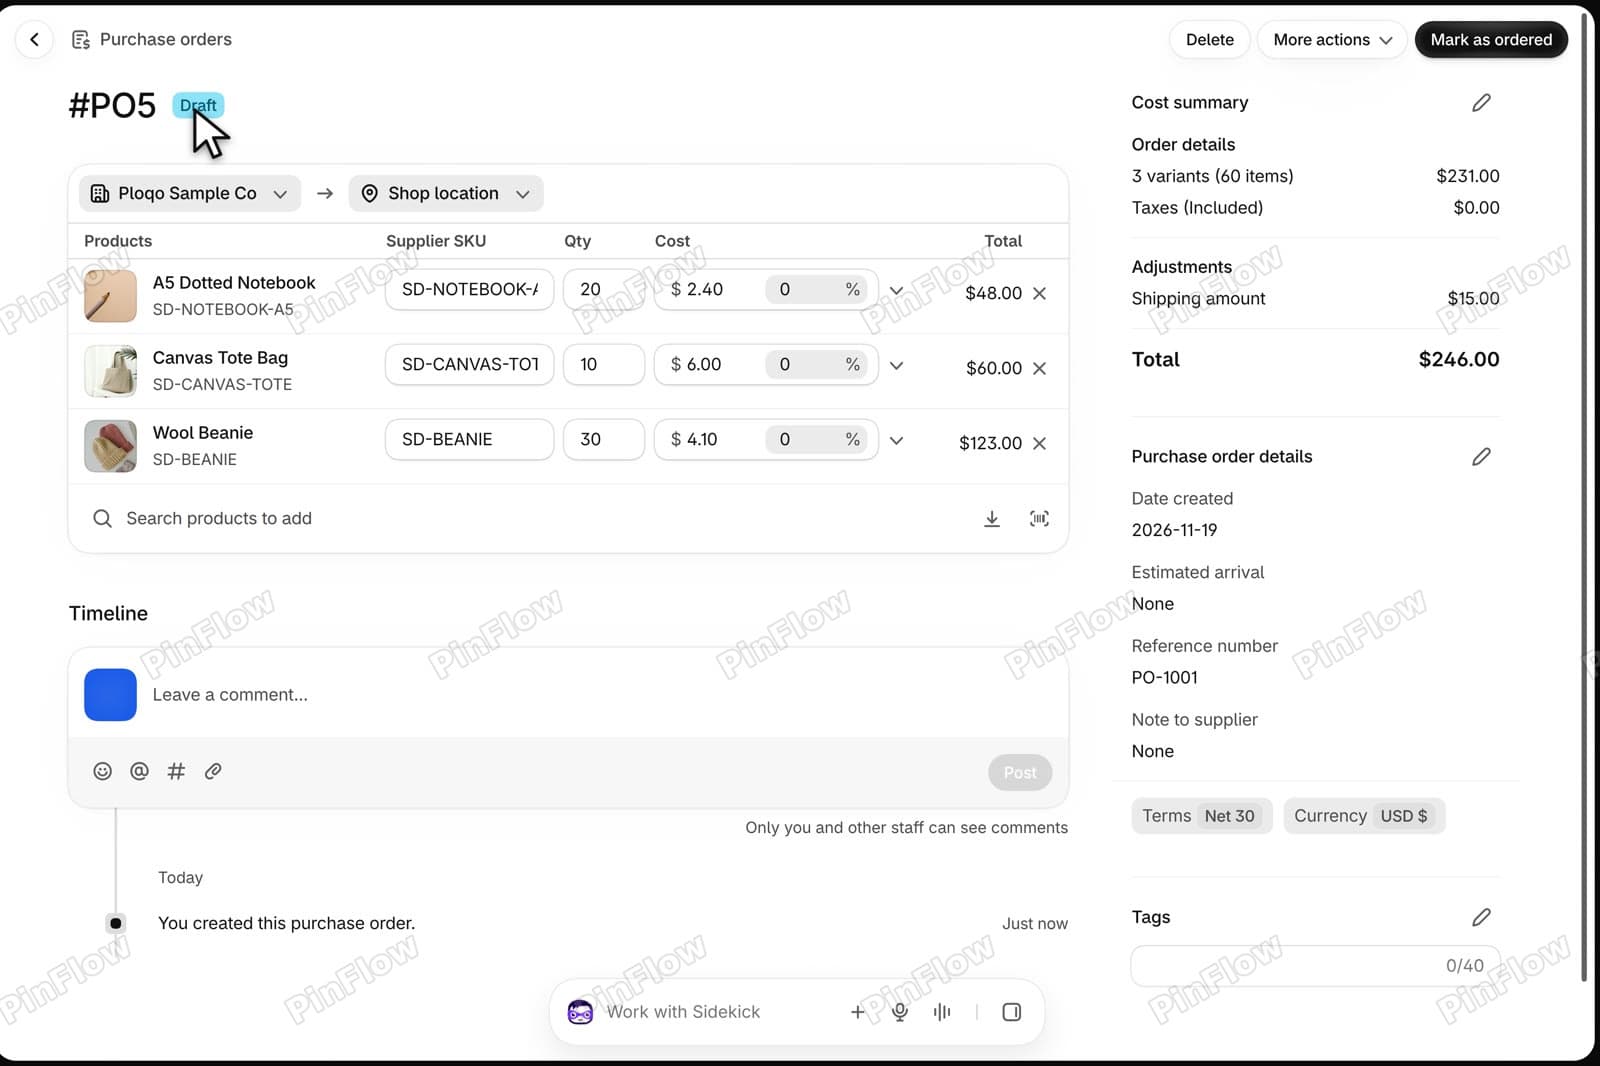 Saved purchase order #PO5 with a Draft badge, the three product lines and the reference number PO-1001
Step 12: Export a PDF for your supplier
Open More actions. It has Export PDF, which makes a PDF you can send to your supplier. On the purchase order page, that is the only export.
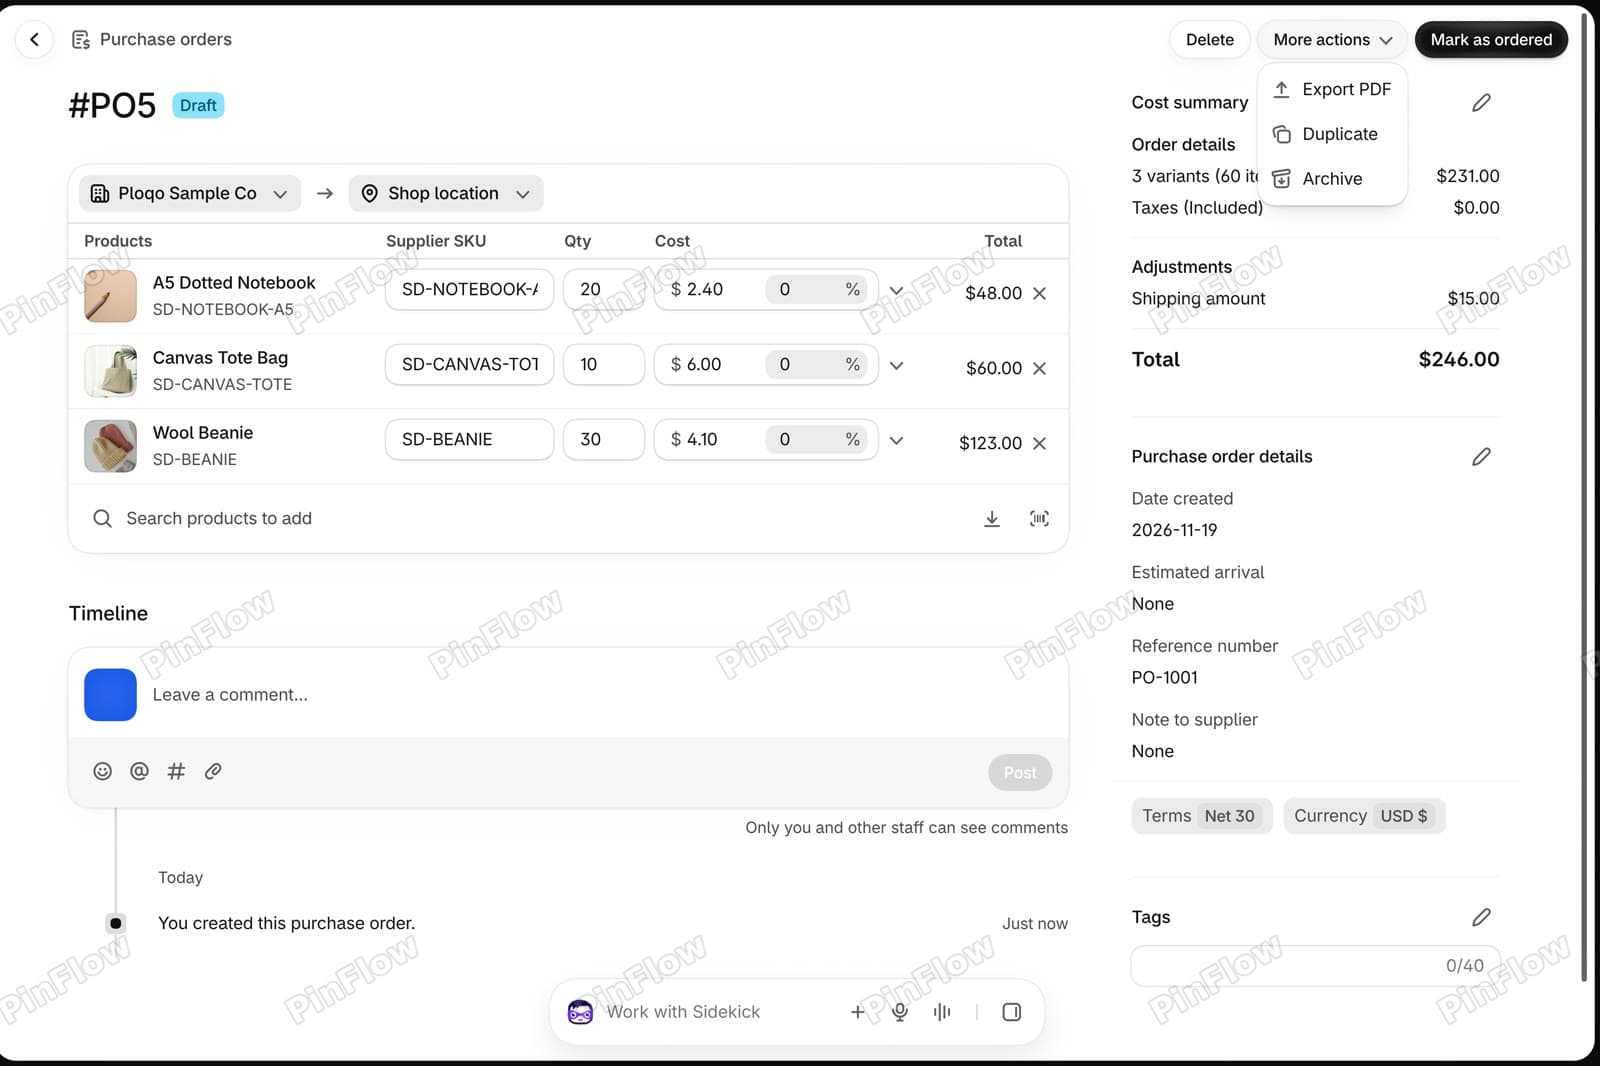 More actions menu on the purchase order page listing Export PDF, Duplicate and Archive
Step 13: Mark it as ordered
When your supplier confirms, click Mark as ordered. The badge changes to Ordered, and a Create transfer button appears at the top right.
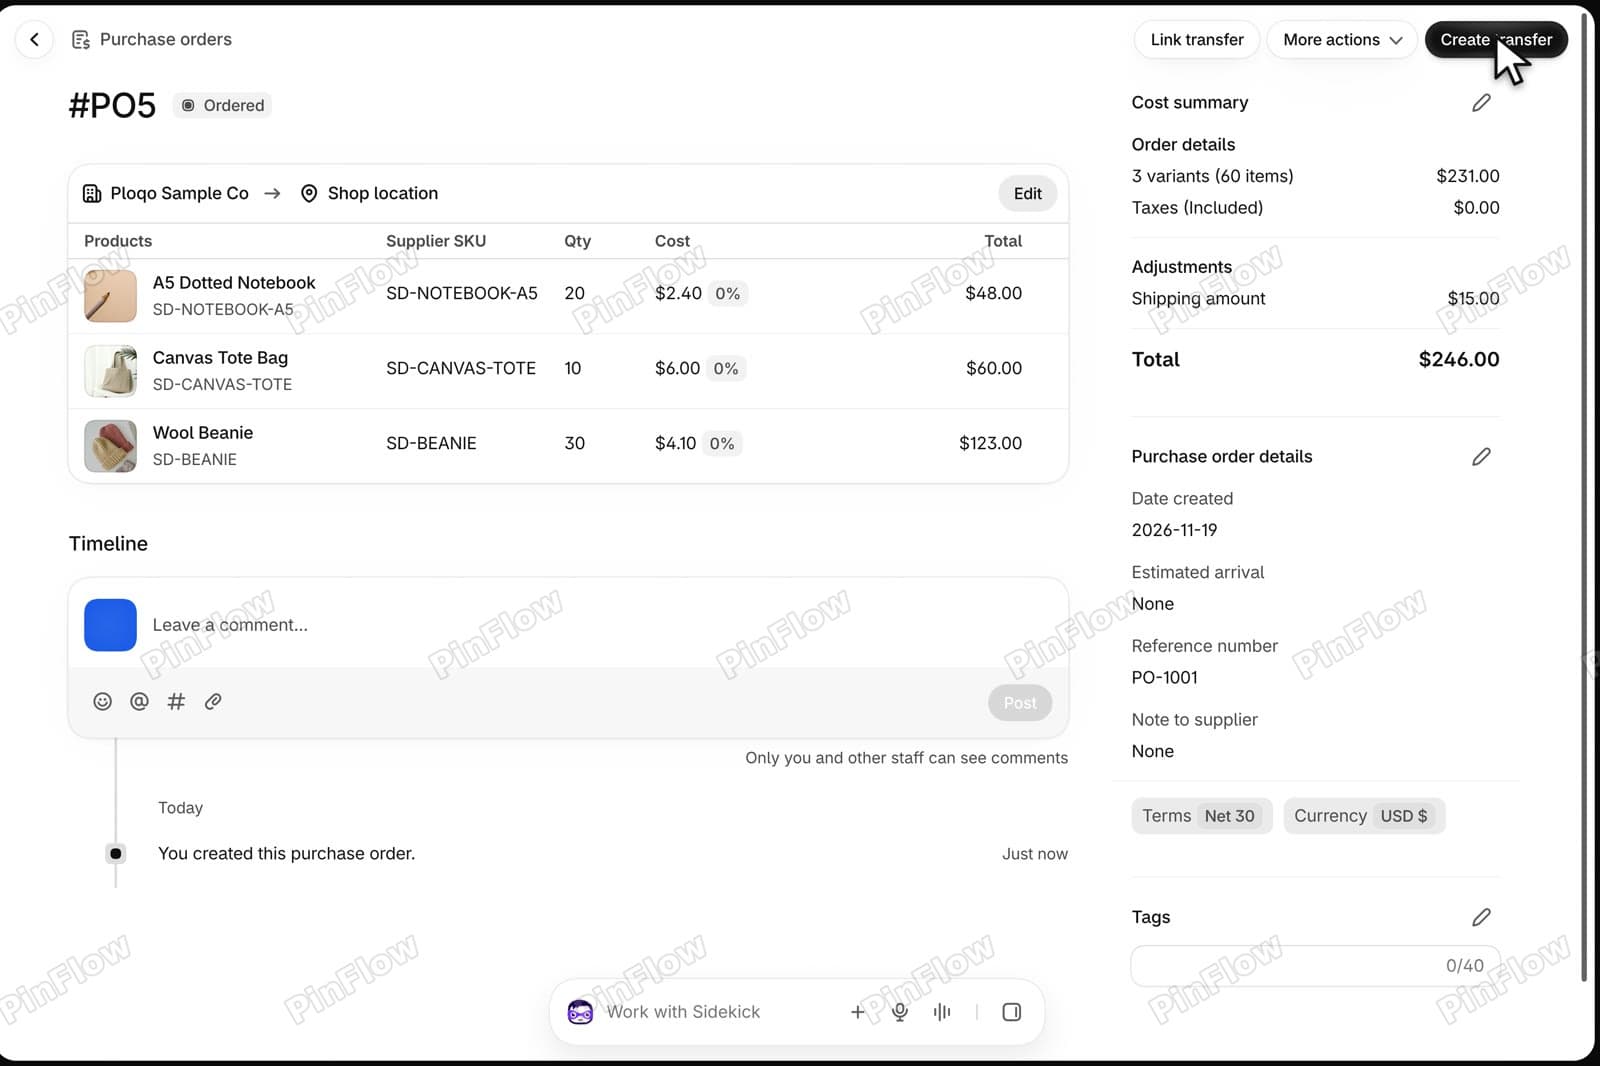 Purchase order #PO5 with an Ordered badge and the Create transfer button at the top right
Step 14: Create the transfer
Click Create transfer. It opens a draft transfer from the supplier, Ploqo Sample Co, to Shop location, with the order's lines already filled in: 20 notebooks, 10 totes and 30 beanies.
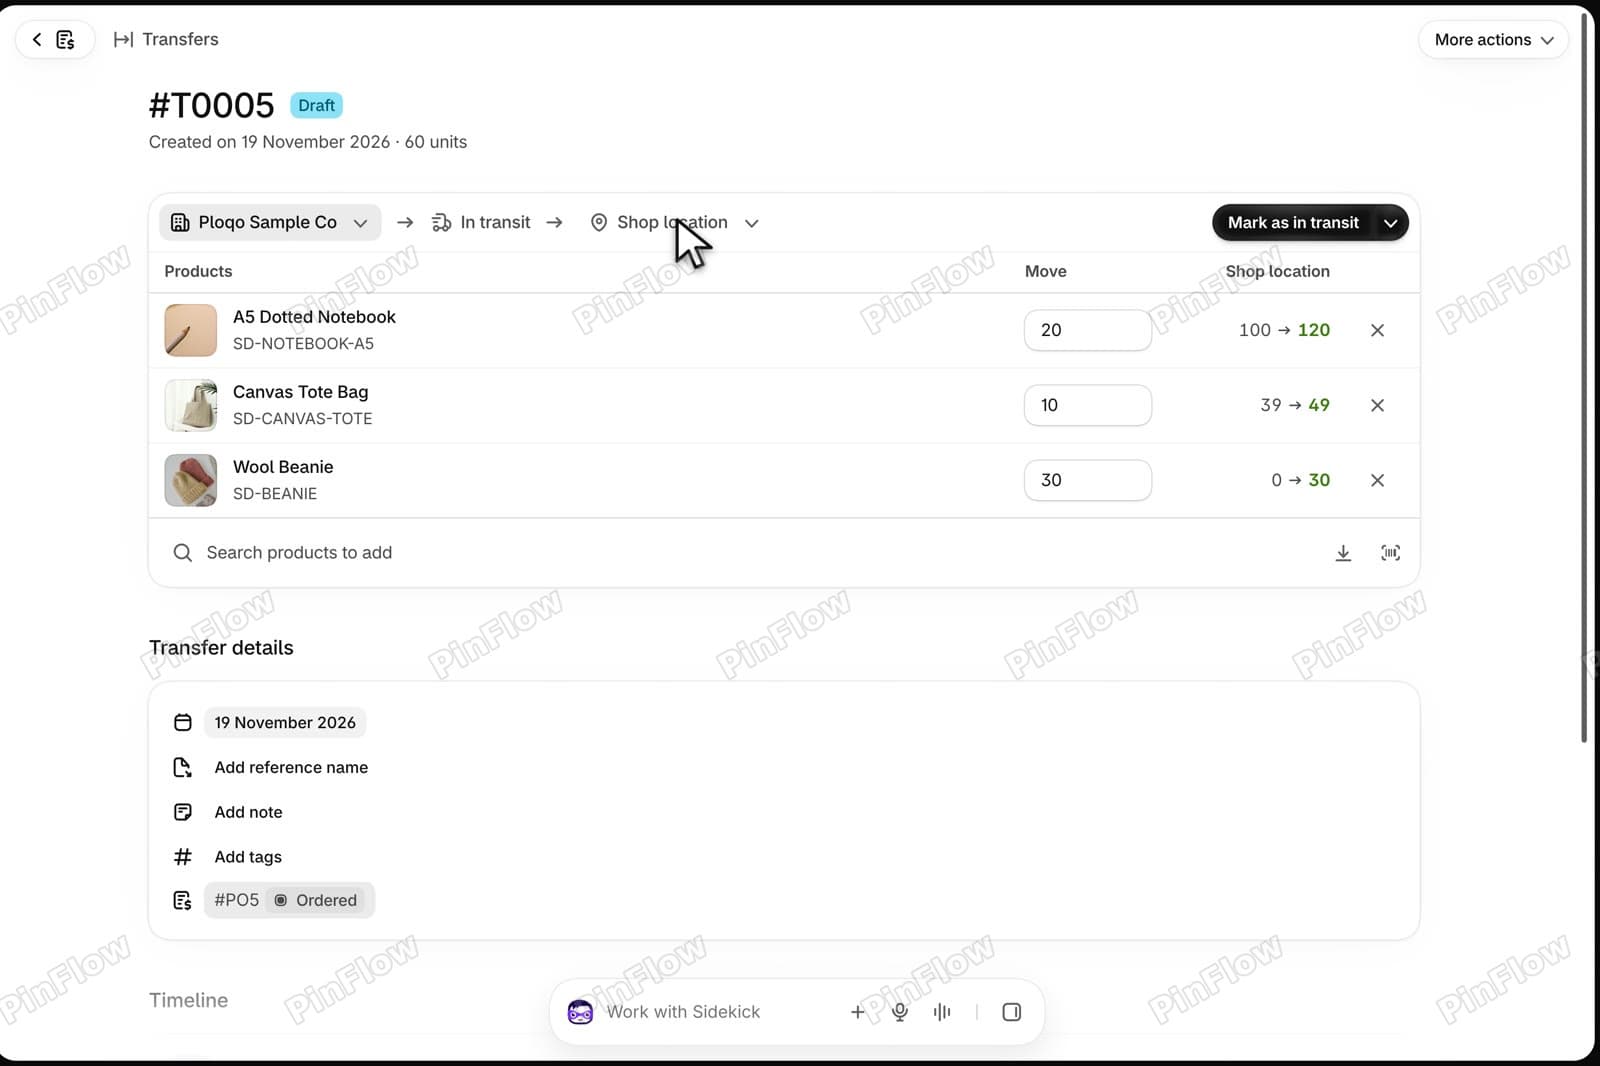 Draft transfer #T0005 from Ploqo Sample Co to Shop location with the notebook 20, tote 10 and beanie 30 filled in
Step 15: Mark it as in transit
When the supplier ships, click Mark as in transit. The transfer is now In progress and its shipment is In transit. This is the moment the stock counts as incoming.
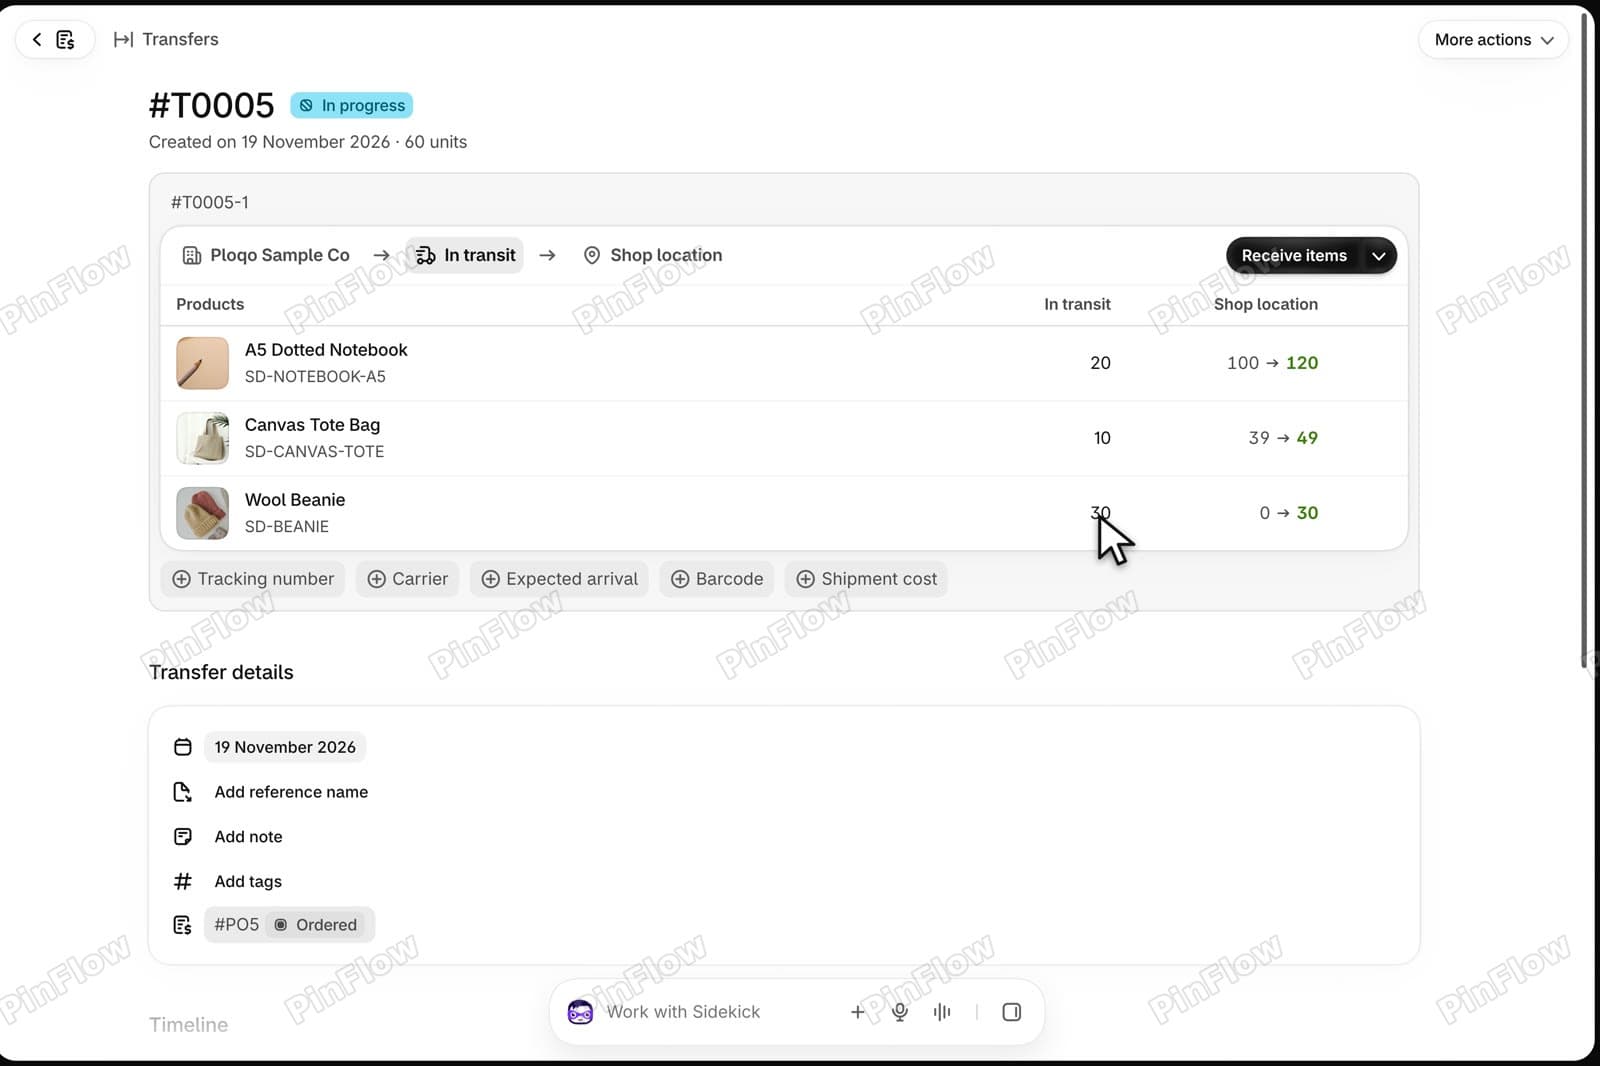 Transfer #T0005 with an In progress badge, the shipment In transit and a Receive items button
Step 16: Check Incoming in Inventory
Go to Products > Inventory. For the beanie, the Incoming column shows 30 and On hand is still 0, because nothing has arrived yet.
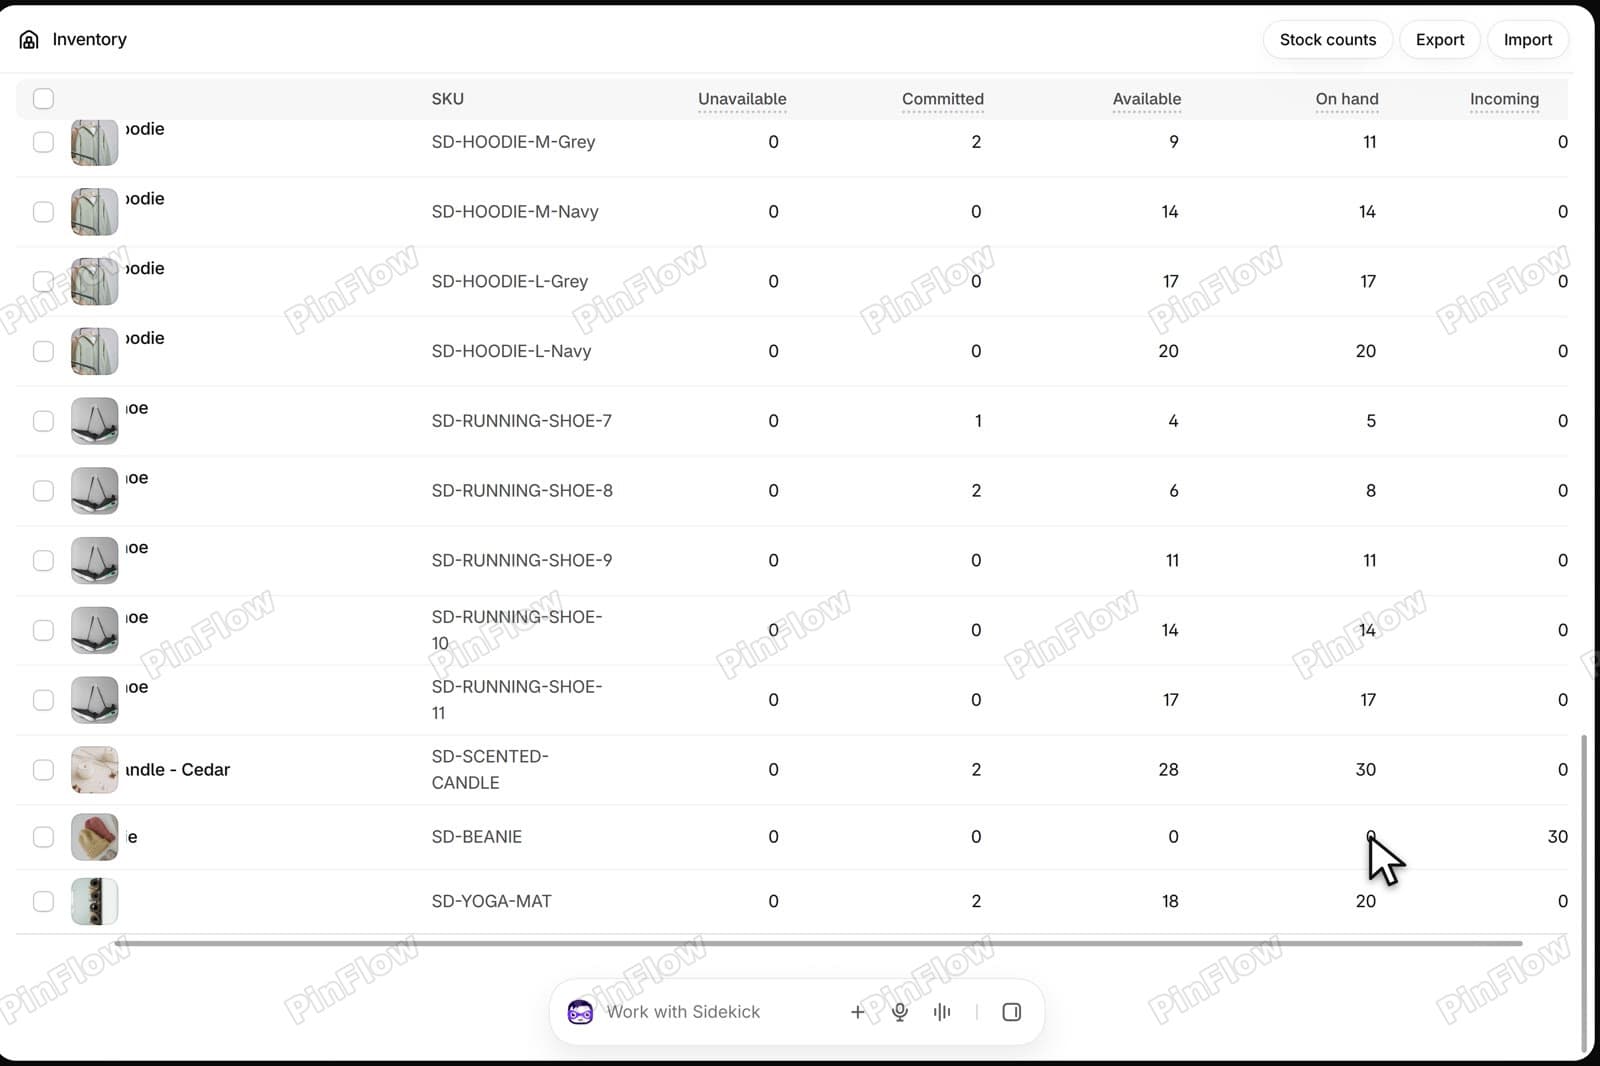 Inventory table with the SD-BEANIE row showing On hand 0 and Incoming 30
Step 17: Open the transfer and click Receive items
The box has arrived, but it is short. Go to Products > Transfers and open the transfer. It is In progress. Click Receive items.
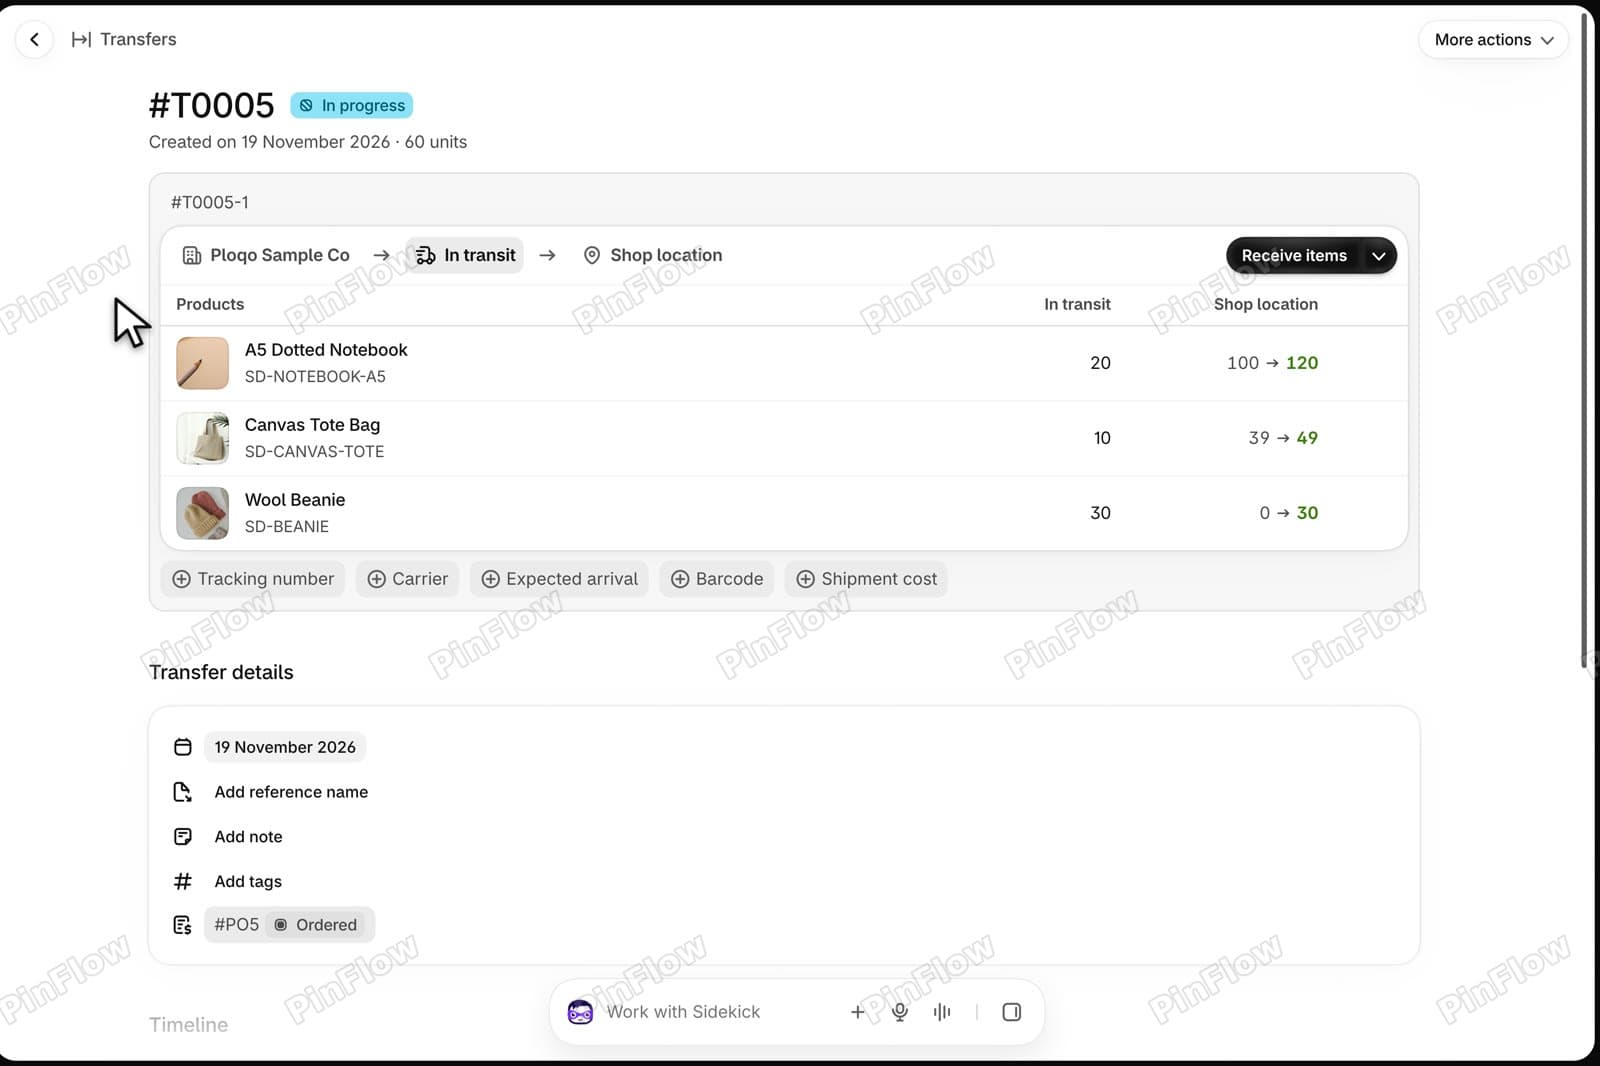 Transfer #T0005 In progress with the shipment from Ploqo Sample Co and the Receive items button
The receive sheet lists each product with a Receive action (Accept, Reject or Cancel), a Quantity box and a Total column. Accept all would take in every unit at once. For a short box, type what came instead.
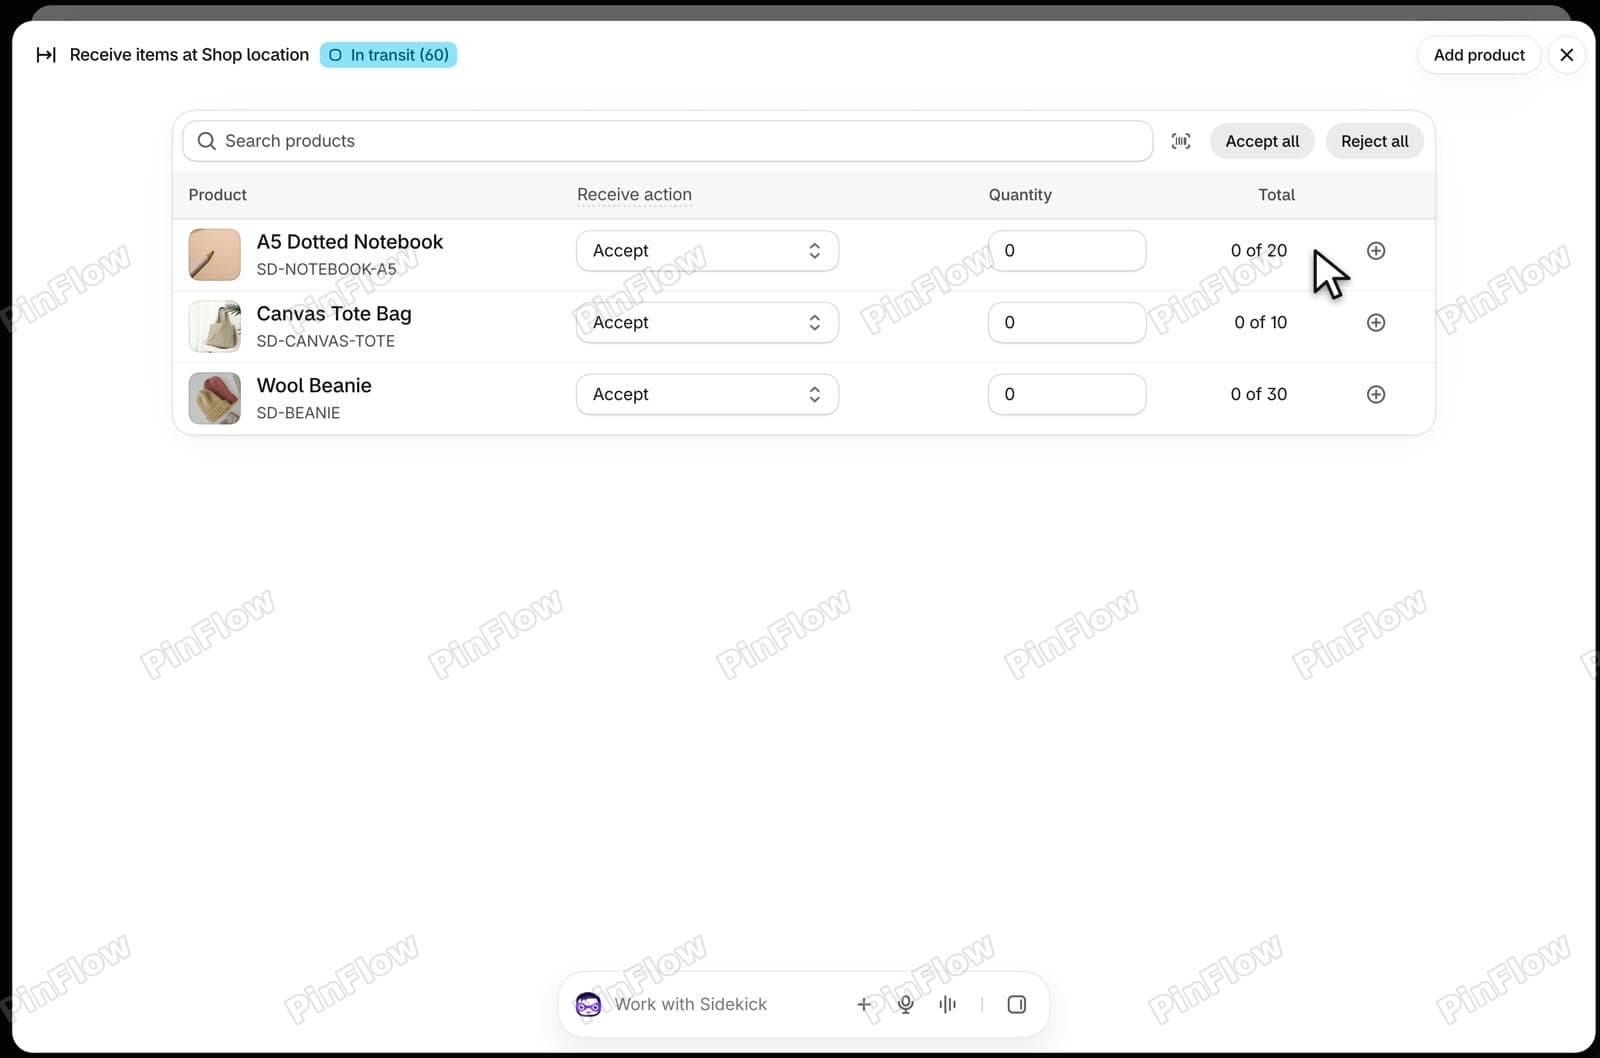 Receive items sheet with the notebook, tote and beanie, each set to Accept with a quantity of 0 and totals 0 of 20, 0 of 10 and 0 of 30
Step 18: Type what arrived
All 20 notebooks and all 10 totes came. Only 22 beanies arrived, and 2 of them are damaged, so accept 20.
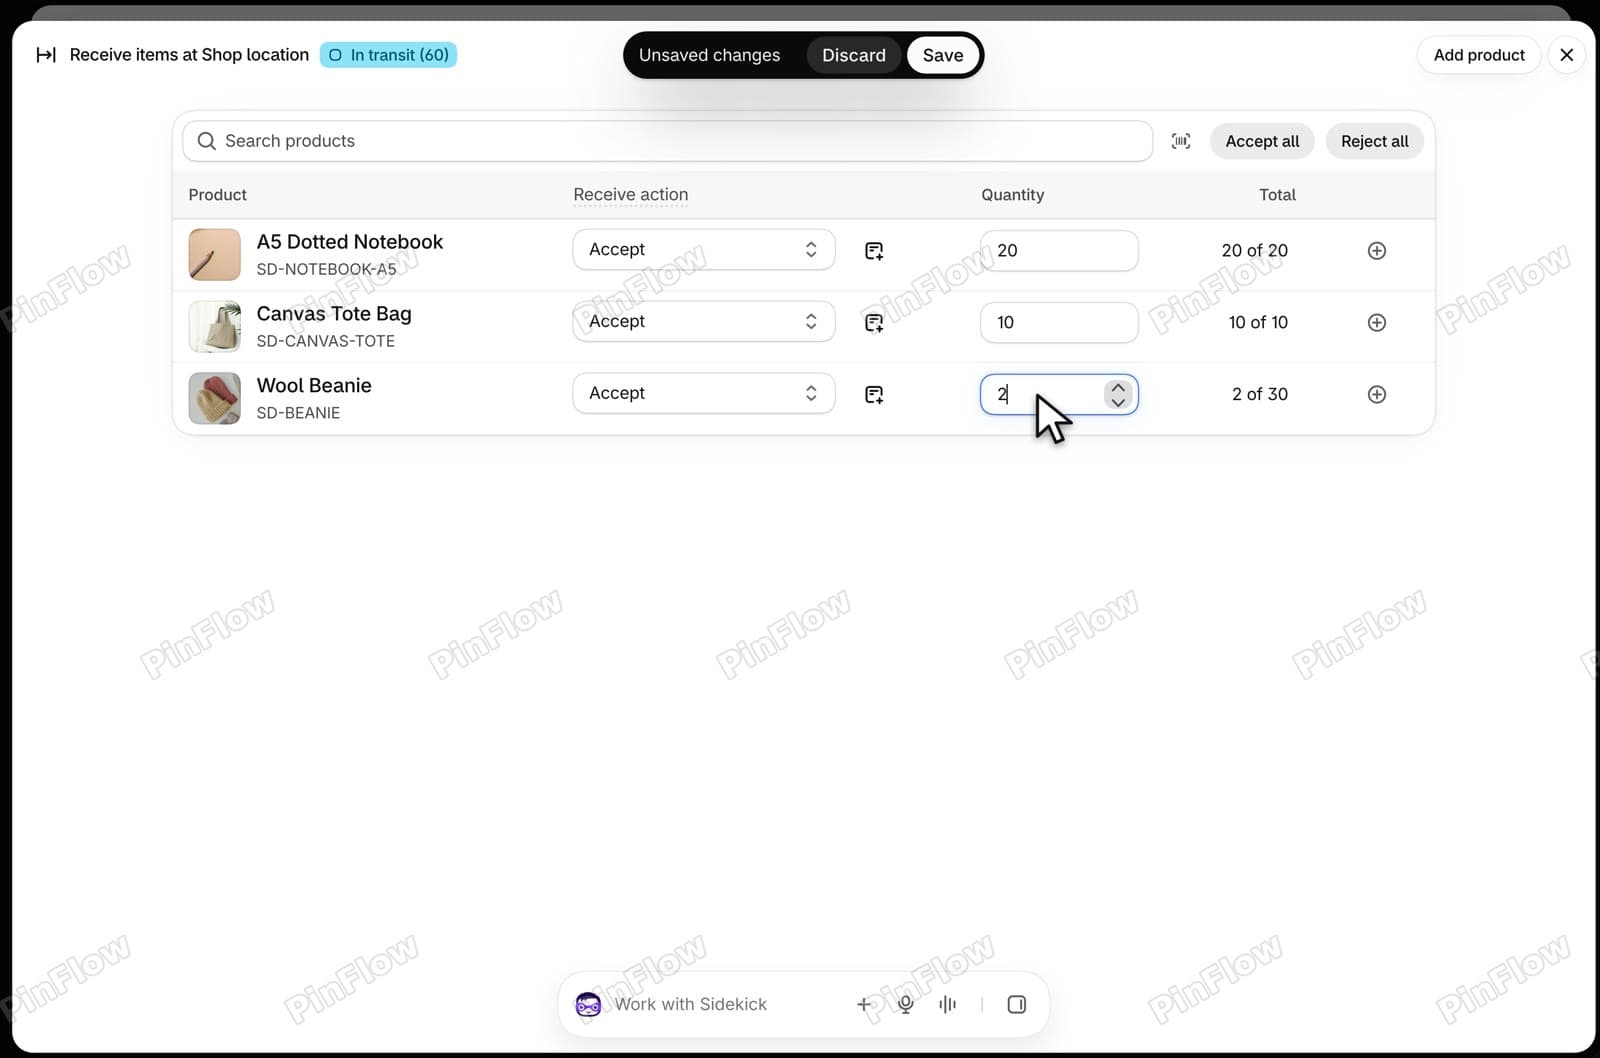 Receive items sheet with quantities 20, 10 and 20 typed and totals 20 of 20, 10 of 10 and 2 of 30 on the beanie row
Step 19: Reject the damaged units
Click the plus on the beanie row to add a second row for the same item. Set its action to Reject, type 2 and add a note, Damaged. The beanie total reads 22 of 30. Click Save, then reload the page, because it can show the old numbers for a few seconds.
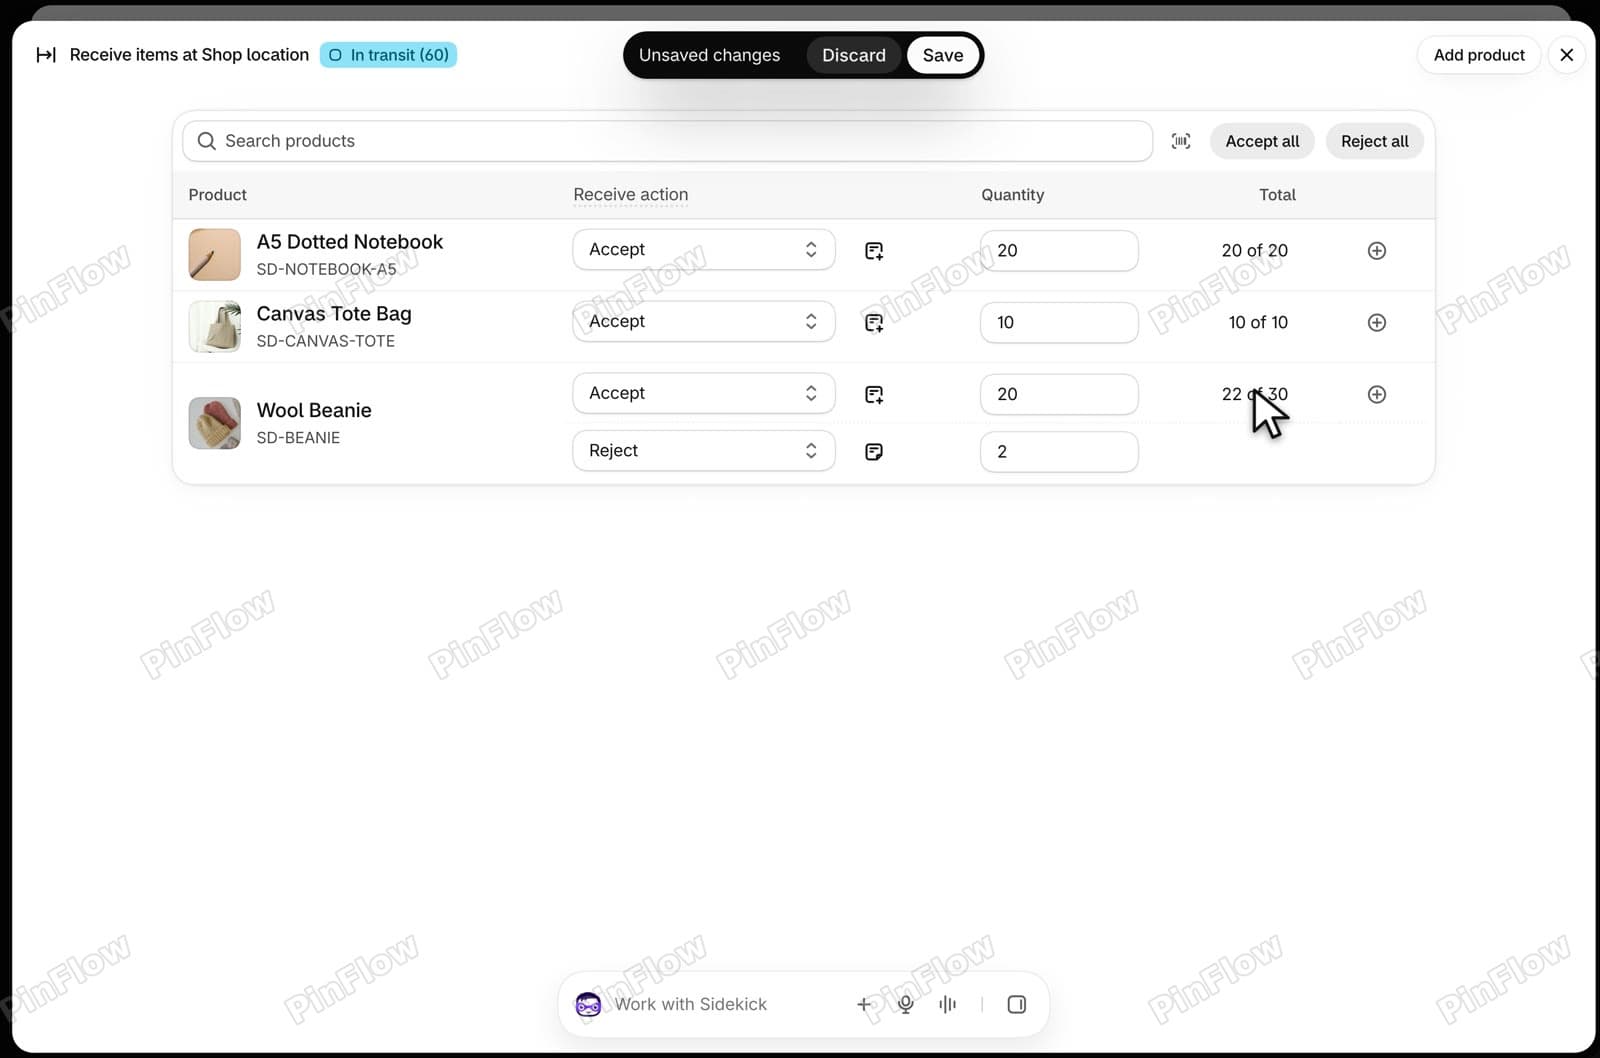 Receive items sheet with a second beanie row set to Reject with a quantity of 2 and the beanie total 22 of 30
Step 20: Read the transfer after the first receipt
The transfer stays In progress. The received shipment shows 20 accepted and 2 rejected for the beanie, and 8 beanies are still in transit.
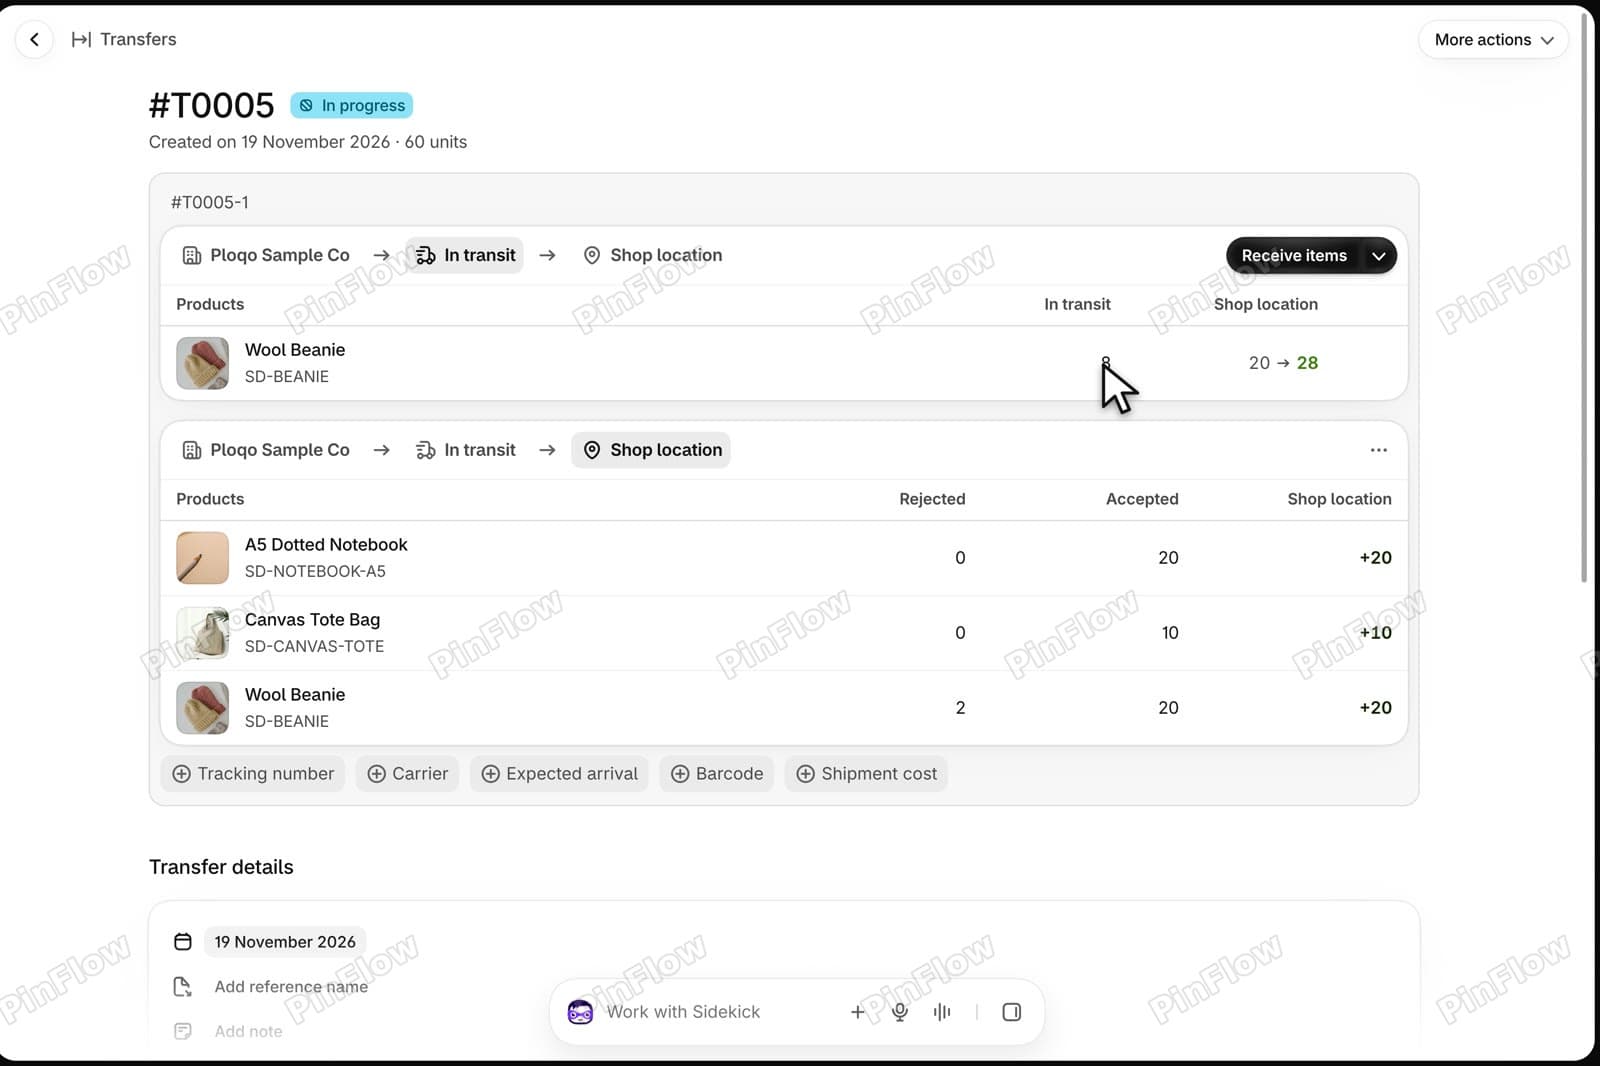 Transfer #T0005 In progress with a received shipment listing notebook accepted 20, tote accepted 10, beanie rejected 2 and accepted 20, and 8 beanies still in transit
Step 21: Check On hand in Inventory
In Inventory, the beanie's On hand is 20, not 22, because the 2 rejected units never reach your stock. The Incoming column still shows 8.
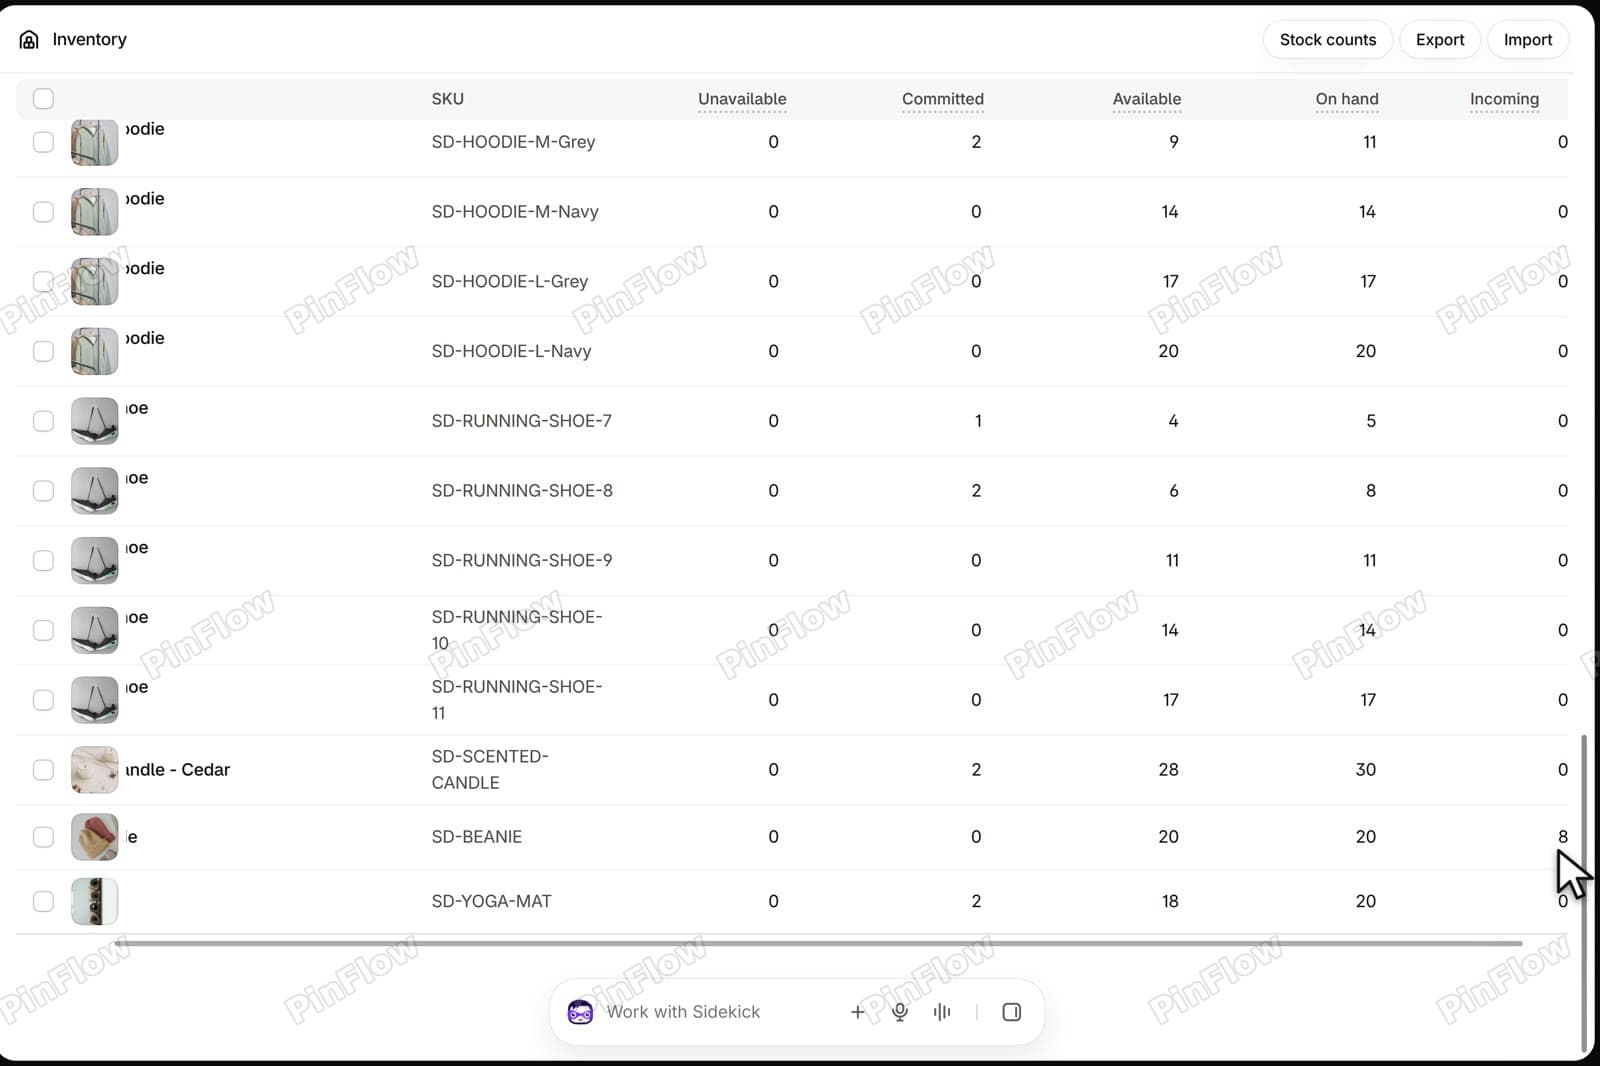 Inventory table with the SD-BEANIE row showing On hand 20 and Incoming 8
Step 22: Receive the rest
When the last 8 arrive, open the transfer and click Receive items again. The beanie shows 22 of 30. Type 8 and save.
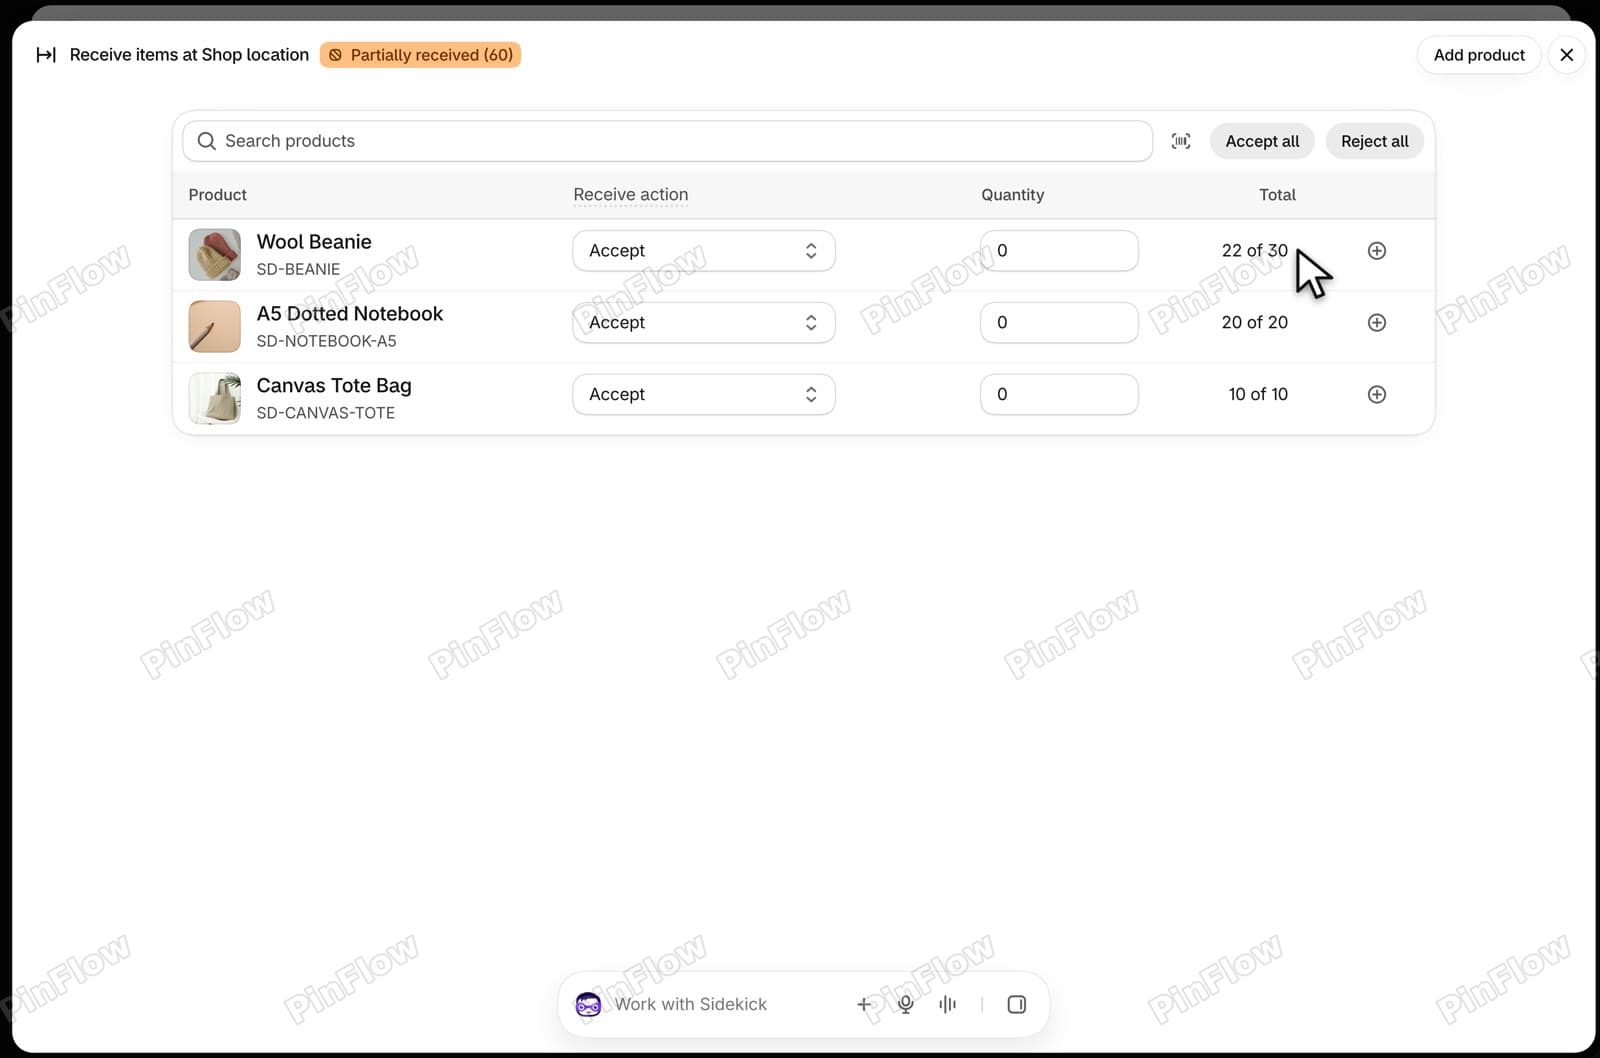 Receive items sheet for the transfer with the status Partially received and the Wool Beanie row showing 22 of 30
Step 23: Check that the transfer is Transferred
After a reload, the transfer says Transferred. The beanie has 28 accepted and 2 rejected. The Shopify help page says a transfer changes to Transferred once every quantity is accounted for.
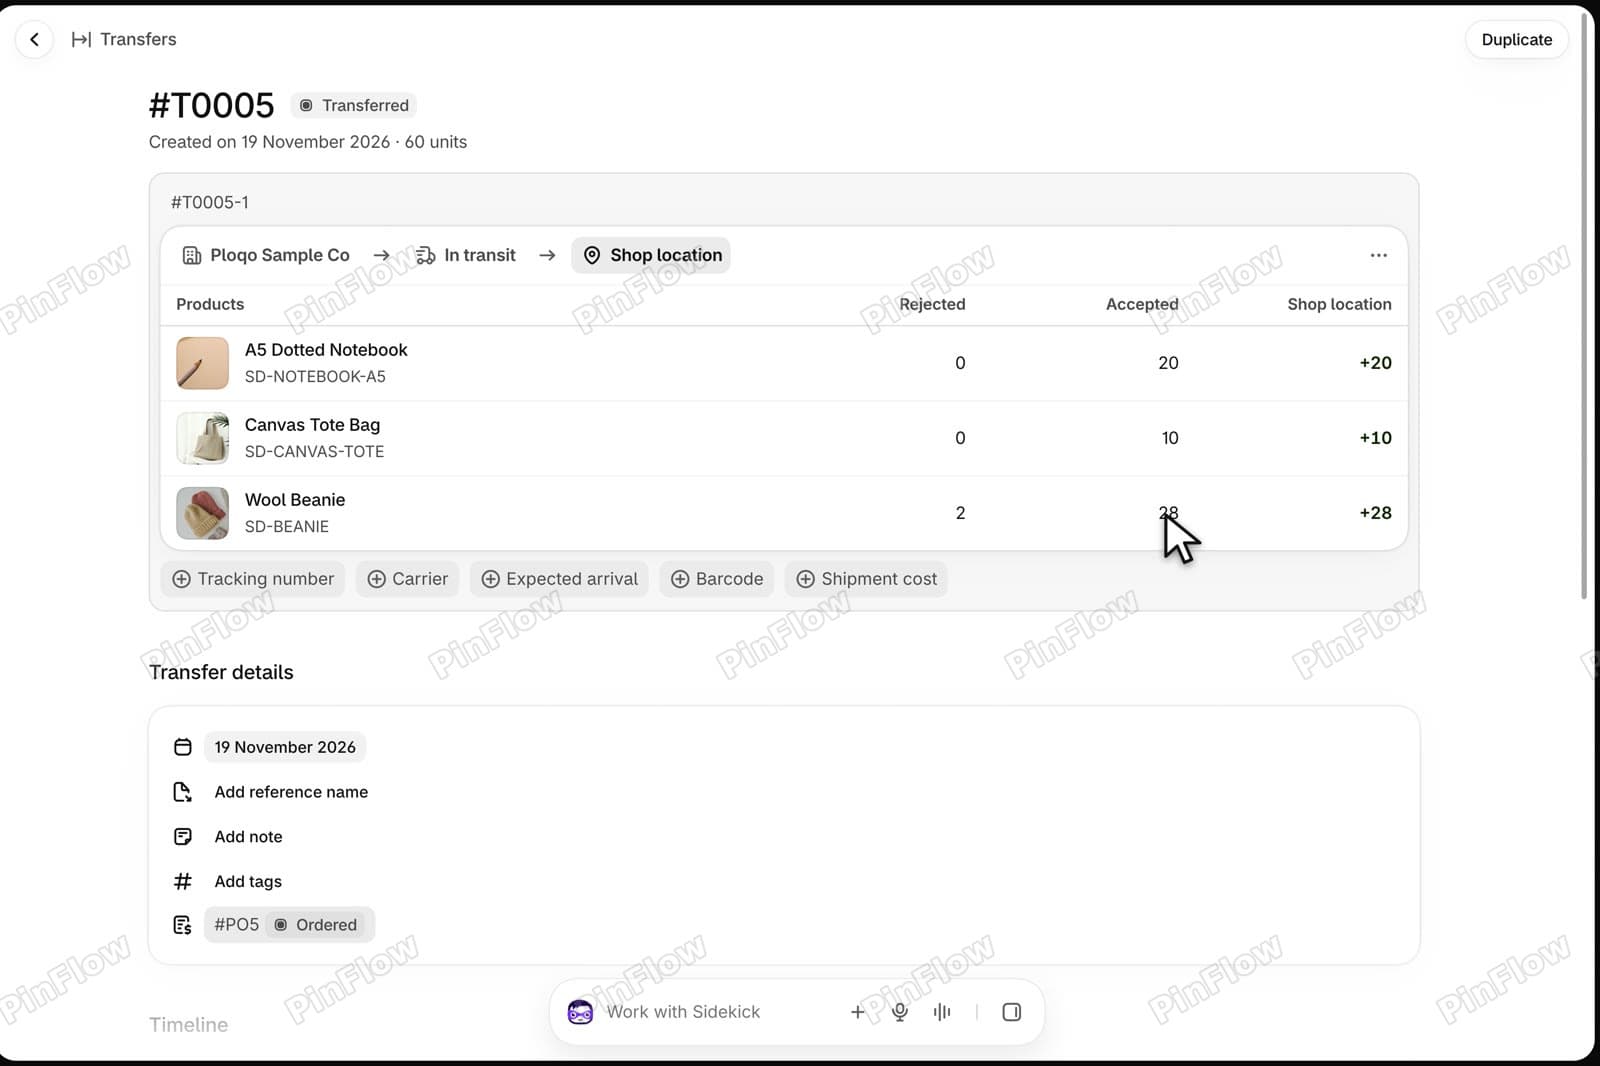 Transfer #T0005 with a Transferred badge and the beanie showing rejected 2 and accepted 28
Step 24: See it on the purchase orders list
Go back to Products > Purchase orders. The row for PO-1001 shows the linked transfer as Transferred, and Received says 60 of 60. The 2 rejected units count there too.
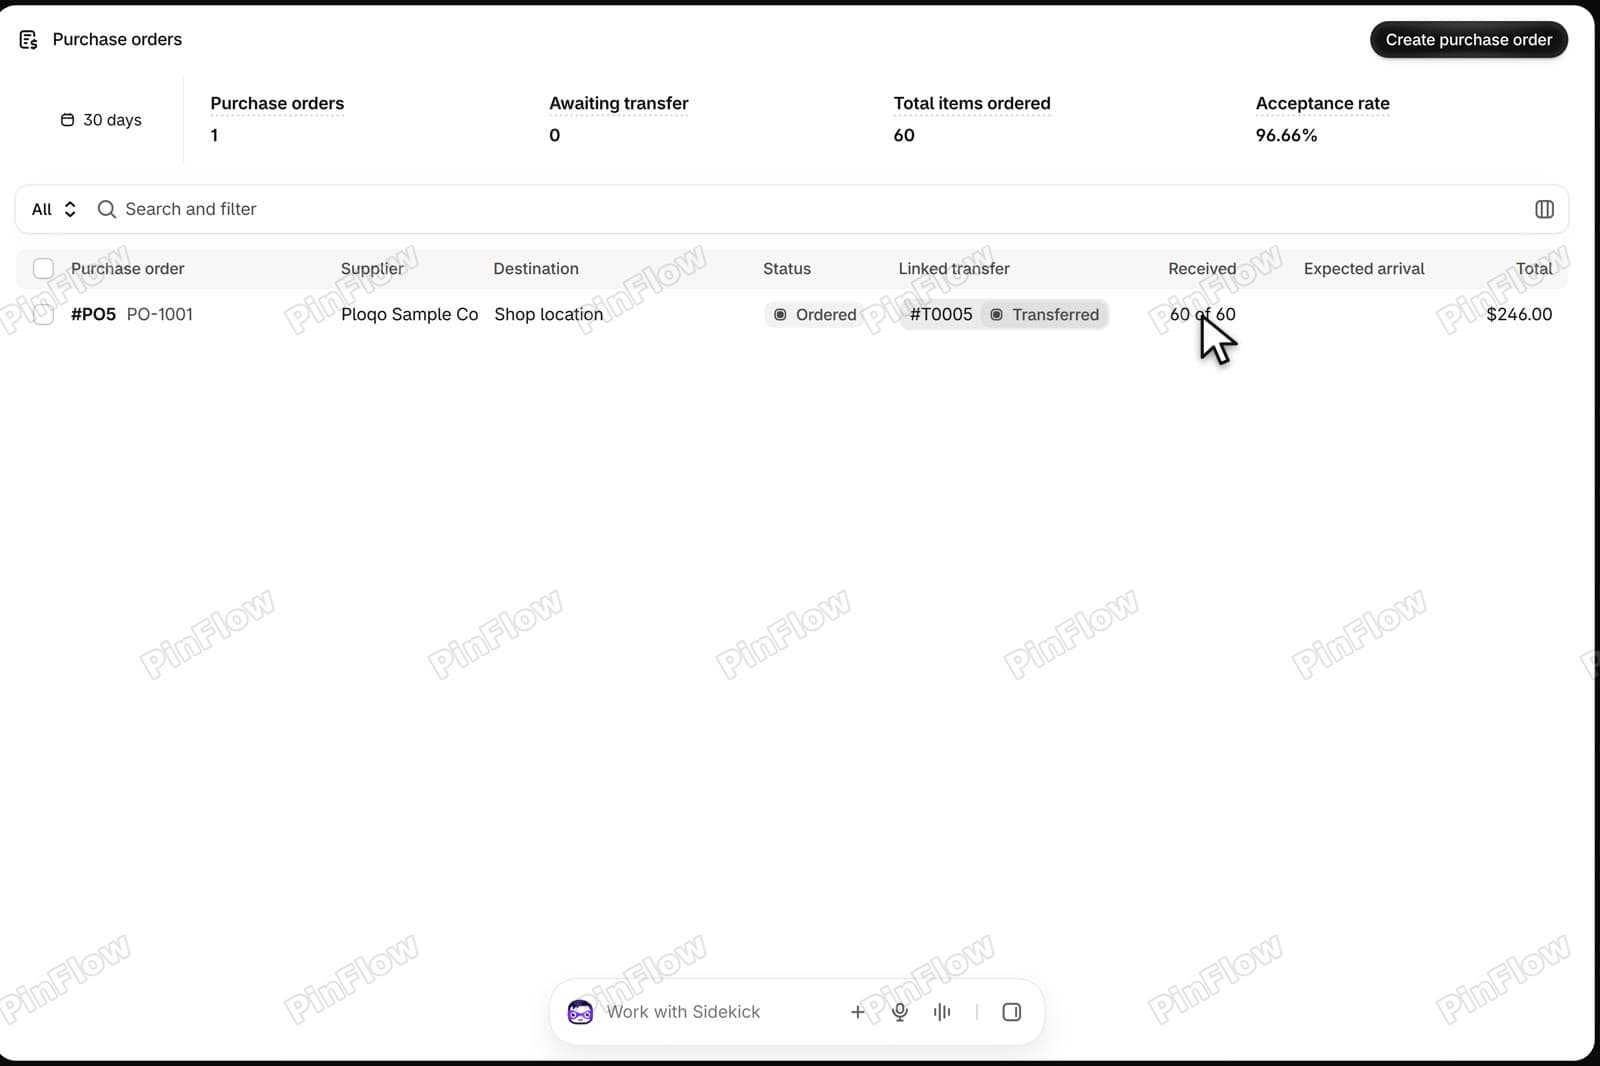 Purchase orders list with the row PO-1001, the linked transfer #T0005 Transferred and the Received column reading 60 of 60
Step 25: Open the purchase order
Open the purchase order. It shows Ordered and Transferred badges, with a Linked transfer card in the right-hand column. So: you order on the purchase order, and you receive on its transfer.
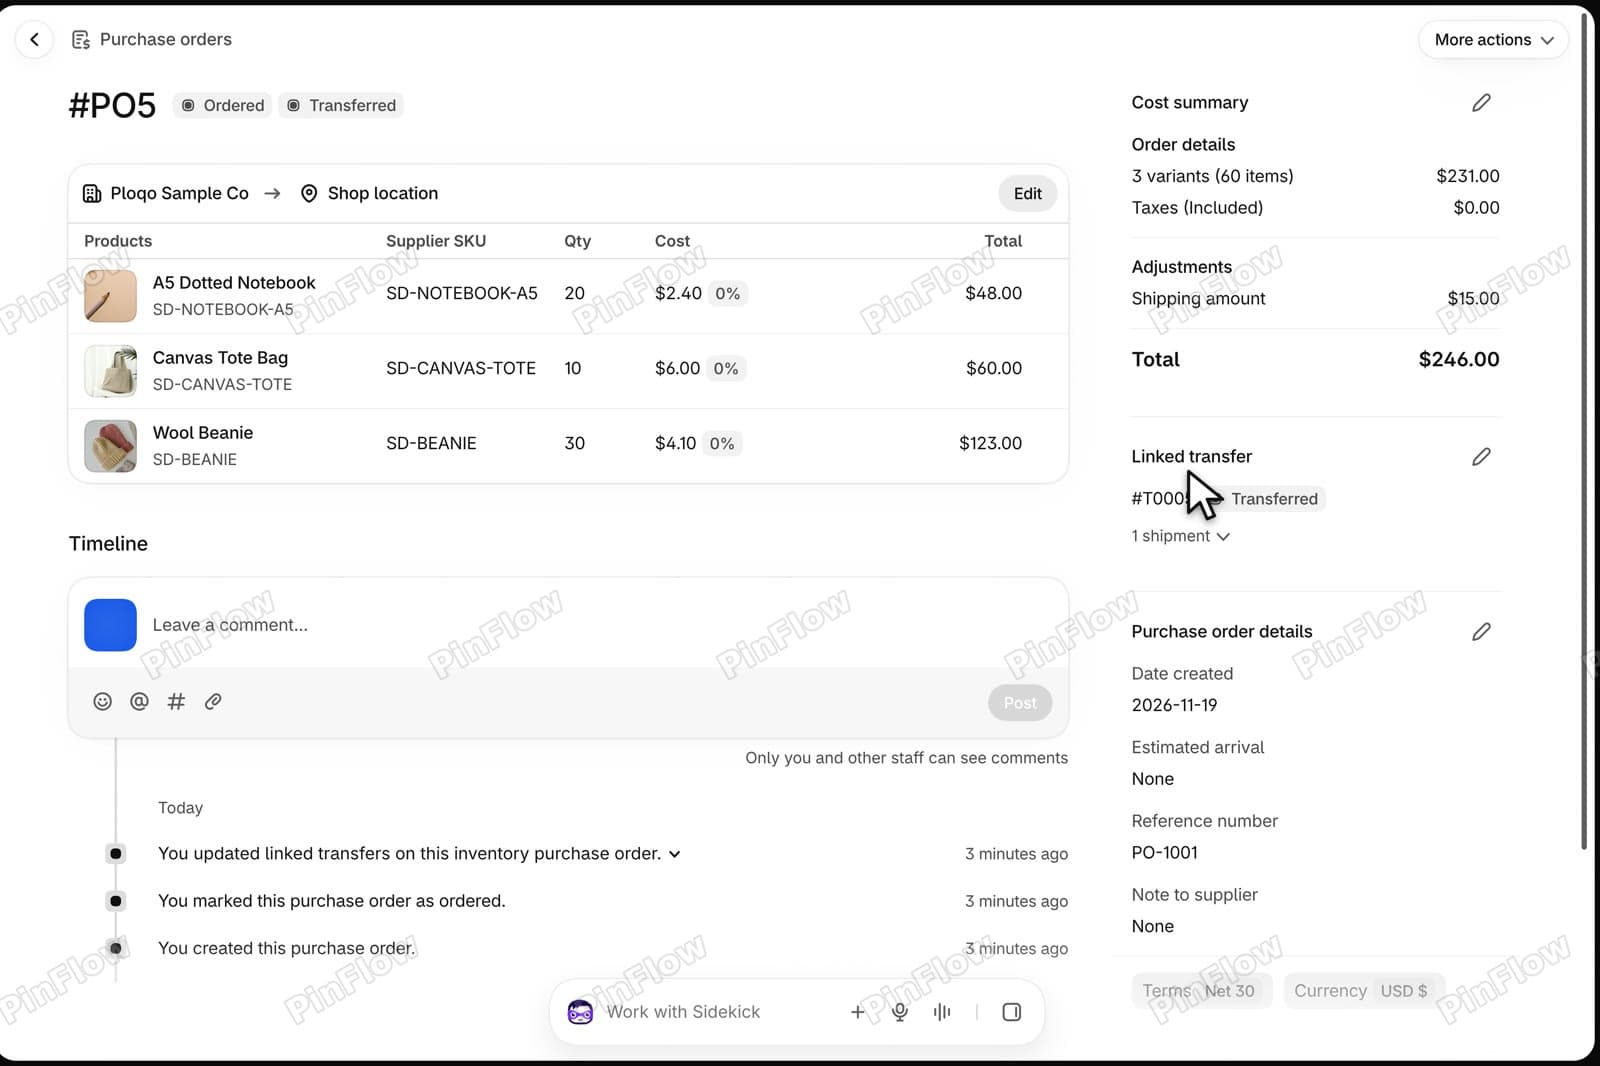 Purchase order #PO5 with Ordered and Transferred badges and a Linked transfer card at the right showing the transfer as Transferred
Before you rely on it
- The purchase orders in the video are Shopify's own, with no app. Shopify's help pages do not say which plans have them. The demo store is on the Basic plan, so check your own admin for Products > Purchase orders.
- Your Stocky history does not move across by itself. Shopify's migration page says to export the records you want to keep using Stocky's own reports, and that you have read-only access to export for at least 90 days after 31 August 2026.
Shopify Help page on purchase orders with the sentence about marking a purchase order as ordered highlighted
- Mark an order as ordered only after the supplier confirms. The help page says it can't be reversed.
- Stock counts as incoming once the transfer is marked as in transit, and it reaches On hand when you accept it on the receive sheet. Rejected units never add to your stock.
Purchase order #PO5 with an Ordered badge and the Create transfer button
Questions
Where do I receive stock on a Shopify purchase order? On the linked transfer, not on the purchase order. Open Products > Transfers, open the transfer and click Receive items.
Receive items sheet with quantities typed for the notebook, tote and beanie
Can I receive part of a delivery? Yes. Type the quantity that arrived for each product and save. The transfer stays In progress until every unit is accounted for, then it changes to Transferred.
Transfer after the first receipt with a received shipment and 8 beanies still in transit
What happens to damaged units? Add a second row for the same product, set it to Reject and type the quantity. Rejected units are recorded on the transfer and do not add to your available stock.
Receive items sheet with a second beanie row set to Reject and a quantity of 2
Can I export a purchase order? The purchase order page has More actions > Export PDF. The help page lists no CSV export there.
More actions menu on the purchase order page listing Export PDF
Can I import many lines at once? Yes. The import icon next to the product search opens Import products by CSV, with a sample file to download.
Import products by CSV dialog with an Add files button and a Download CSV sample link
For the rest of the admin, see how to adjust inventory.
More Shopify fixes
More community-sourced Shopify guides, tested on a live store.
Shopify Admin
How to Create a Black Friday Discount with Shopify Sidekick (2026)
Type your Black Friday discount into Sidekick as one sentence, check the review form, fix the end date and press Publish. It shows as Scheduled until it starts.
Shopify Admin
Shopify New Admin (2026): Where Search, Sidekick and Settings Went
Shopify's new admin moved search, alerts, the store switcher and Settings into the black sidebar, and Sidekick to a bar at the bottom. Where each one is now.
Shopify Admin
How to Use the New Shopify Admin (2026): Every Main Screen
A tour of the new Shopify admin: the black sidebar, search and Ctrl K, Home, Orders, Products, Settings and Sidekick, with where to click on each screen.