
How to Add Variant Images in Shopify So Photos Switch
If clicking a colour does not change the product photo, that colour has no variant image attached. How to add variant images in Shopify, and why a swatch is not the same thing. Tested on Dawn 15.
By AjayCodeWiz · July 27, 2026 · 9 min read
The problem: you click a colour and the photo does not change
You set up a product with four colours. The colour picker looks right. Then you click the second colour and the photo on screen does not move.
Or worse, it changes to a flat rectangle of colour instead of the product.
A swimwear merchant asked about this on the Shopify Community. She sells bikini tops in four prints, she had built proper print swatches, and she wanted the obvious thing: click a print, see that exact swimsuit.
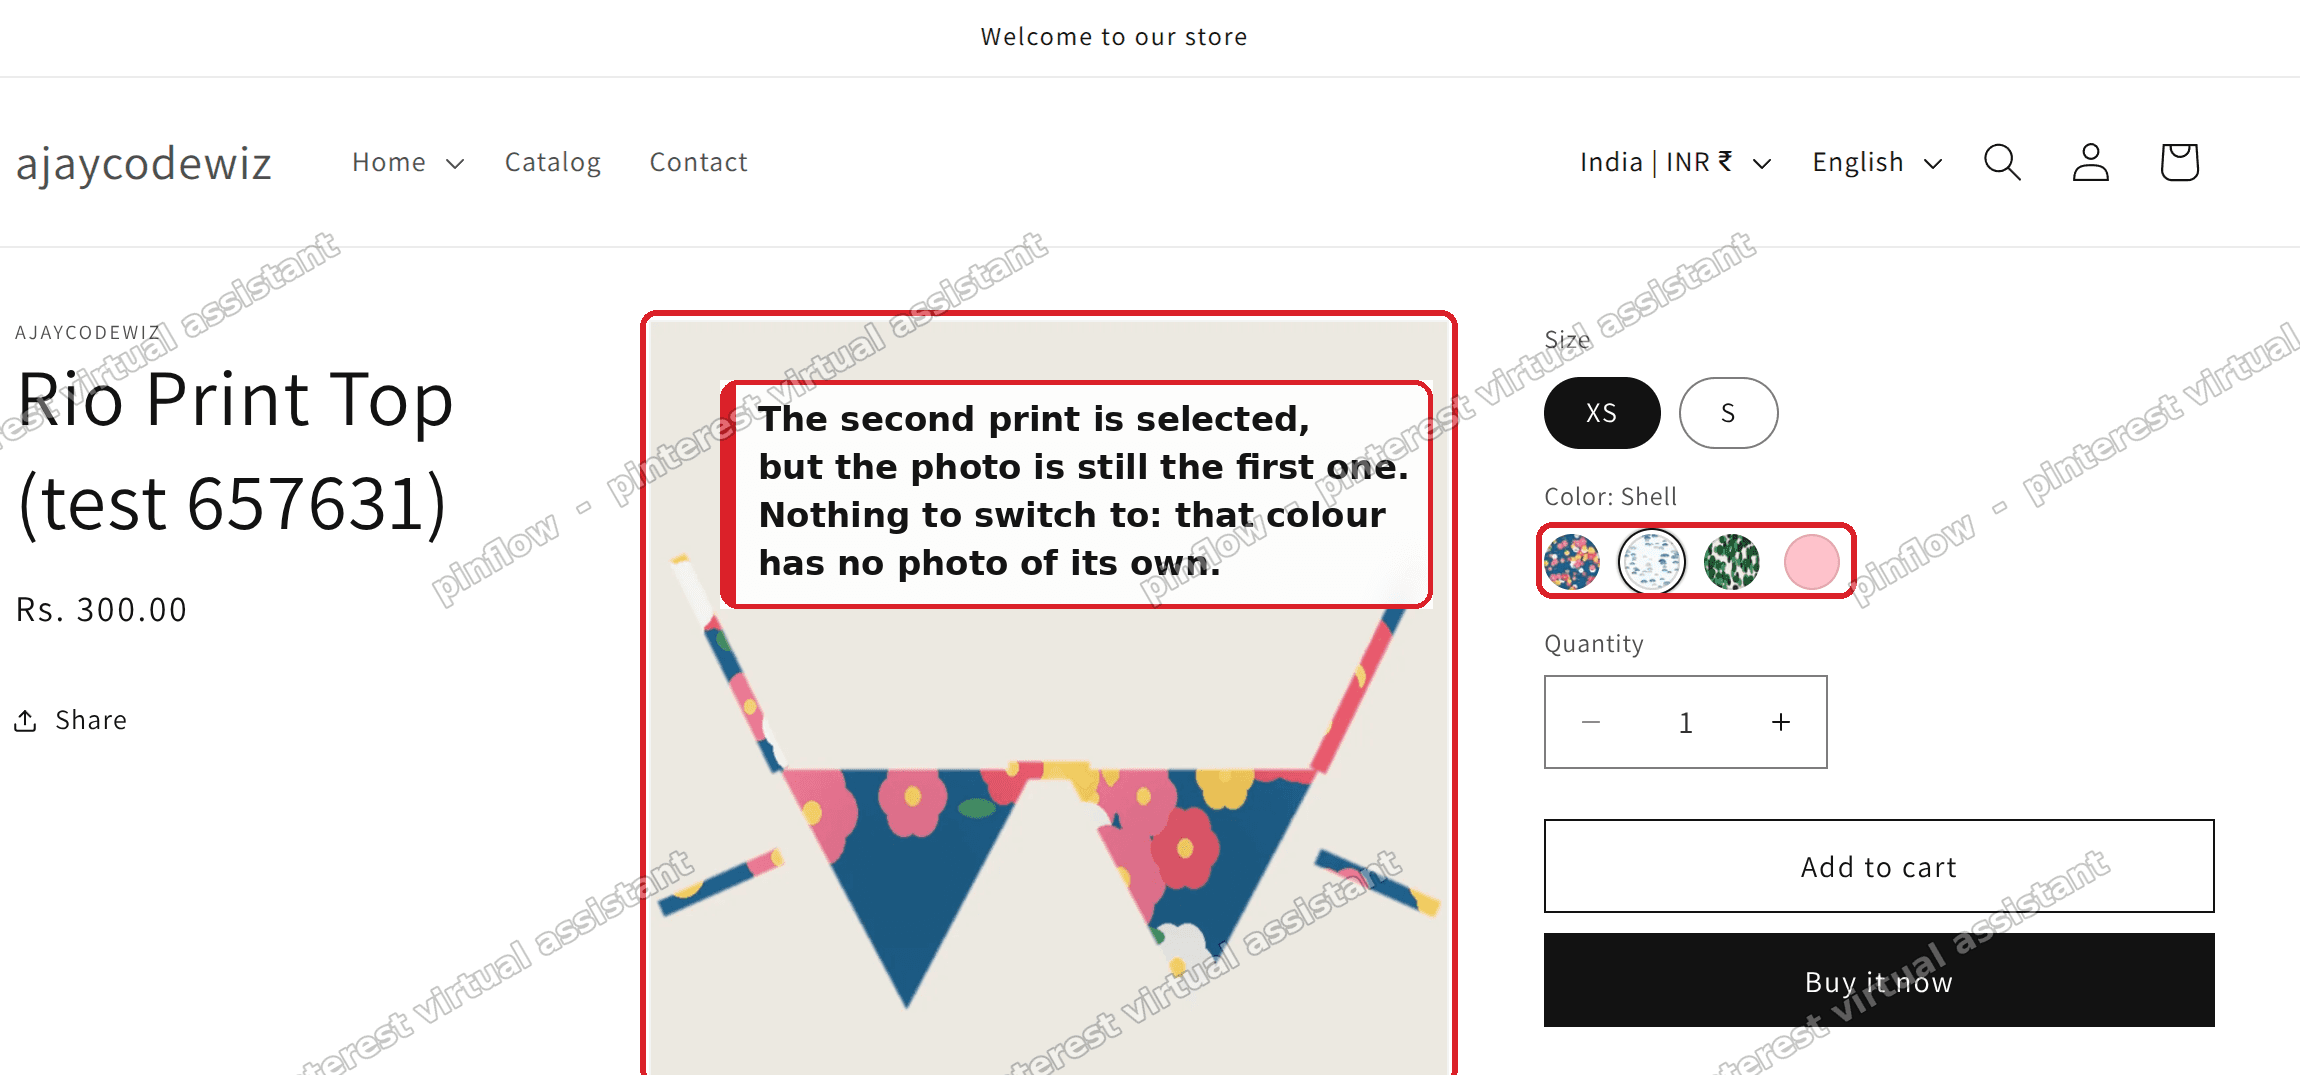 The second print is selected but the photo has not changed
Her swatches were already working. Three of her four prints rendered the real fabric pattern in the circle. That was not the problem.
I pulled the product data from her live store and counted. Across the 14 products with a Colour option there were 35 colours, and 31 of them had no photo attached at all. Only four did.
That is the whole bug. A swatch cannot switch to a photo that does not exist.
Swatch and variant image are two different things
This is the distinction that trips most people, so it is worth being precise.
A swatch is the small circle in the picker. It is a property of the option value, not of the product. It holds either a hex colour or a small image of the fabric.
A variant image is the full product photo Shopify jumps to when that variant is selected. It is a property of the variant, and it points at one of the product's media items.
They are stored in different places, they are edited in different screens, and one does not imply the other.
So you can be in exactly the state that merchant was in: perfect swatches, no image switching. The circles look great and clicking them does nothing.
The reverse also happens. You assign variant images, the photos switch correctly, and the circles are still plain colour dots because you never gave the option values a swatch image.
Why the photo does not switch
When a shopper picks a variant, the theme looks up that variant's image and scrolls the gallery to it.
If the variant has no image, there is nothing to look up. Most themes do the sane thing and leave the gallery where it is. Nothing appears broken. Nothing moves either.
On Dawn I reproduced it on a test store: four colours, only the first with a photo assigned. Selecting colour two, three or four left the first colour's photo on screen every time. The picker updated, the URL updated, the price updated. The photo did not.
A 60 second check: how many of your colours actually have a photo
Do not guess at this. Shopify will tell you.
Open any product page on your storefront and add .js to the URL:
https://your-store.myshopify.com/products/your-product-handle.jsThat returns the product as JSON. Every variant has a featured_image field. If it reads null, that variant has no image, and clicking it will never change the photo.
Do that on two or three products and you will know within a minute whether you have a settings problem or a data problem. In the case above it was a data problem, 31 times over.
How to add variant images in Shopify
This is the fix, and it is per product. There is no global setting.
Step 1. Upload one photo per colour into the product's Media.
Open the product in your admin and add a photo for every colour you sell. The variant image has to be one of the product's own media items, so if the photo is not in Media you cannot assign it.
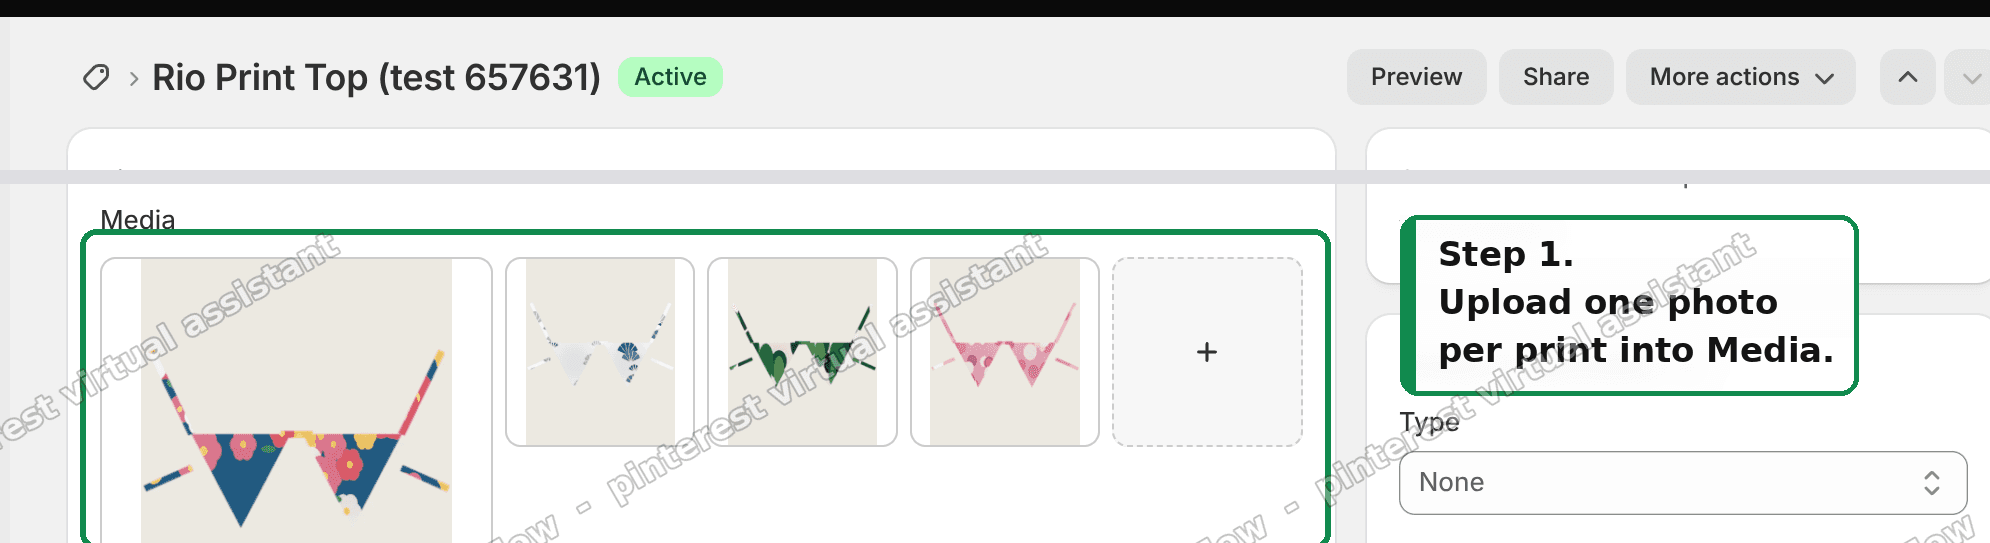 Upload one photo per print into the product's Media section
Step 2. Group the variant list by Colour.
Scroll to the Variants card. There is a Group by dropdown, and by default it groups by whichever option is first, usually Size. Switch it to Colour.
This matters more than it looks. Grouped by colour, you assign one photo per colour group instead of repeating yourself for every size.
Step 3. Click the small square next to each colour and pick that colour's photo.
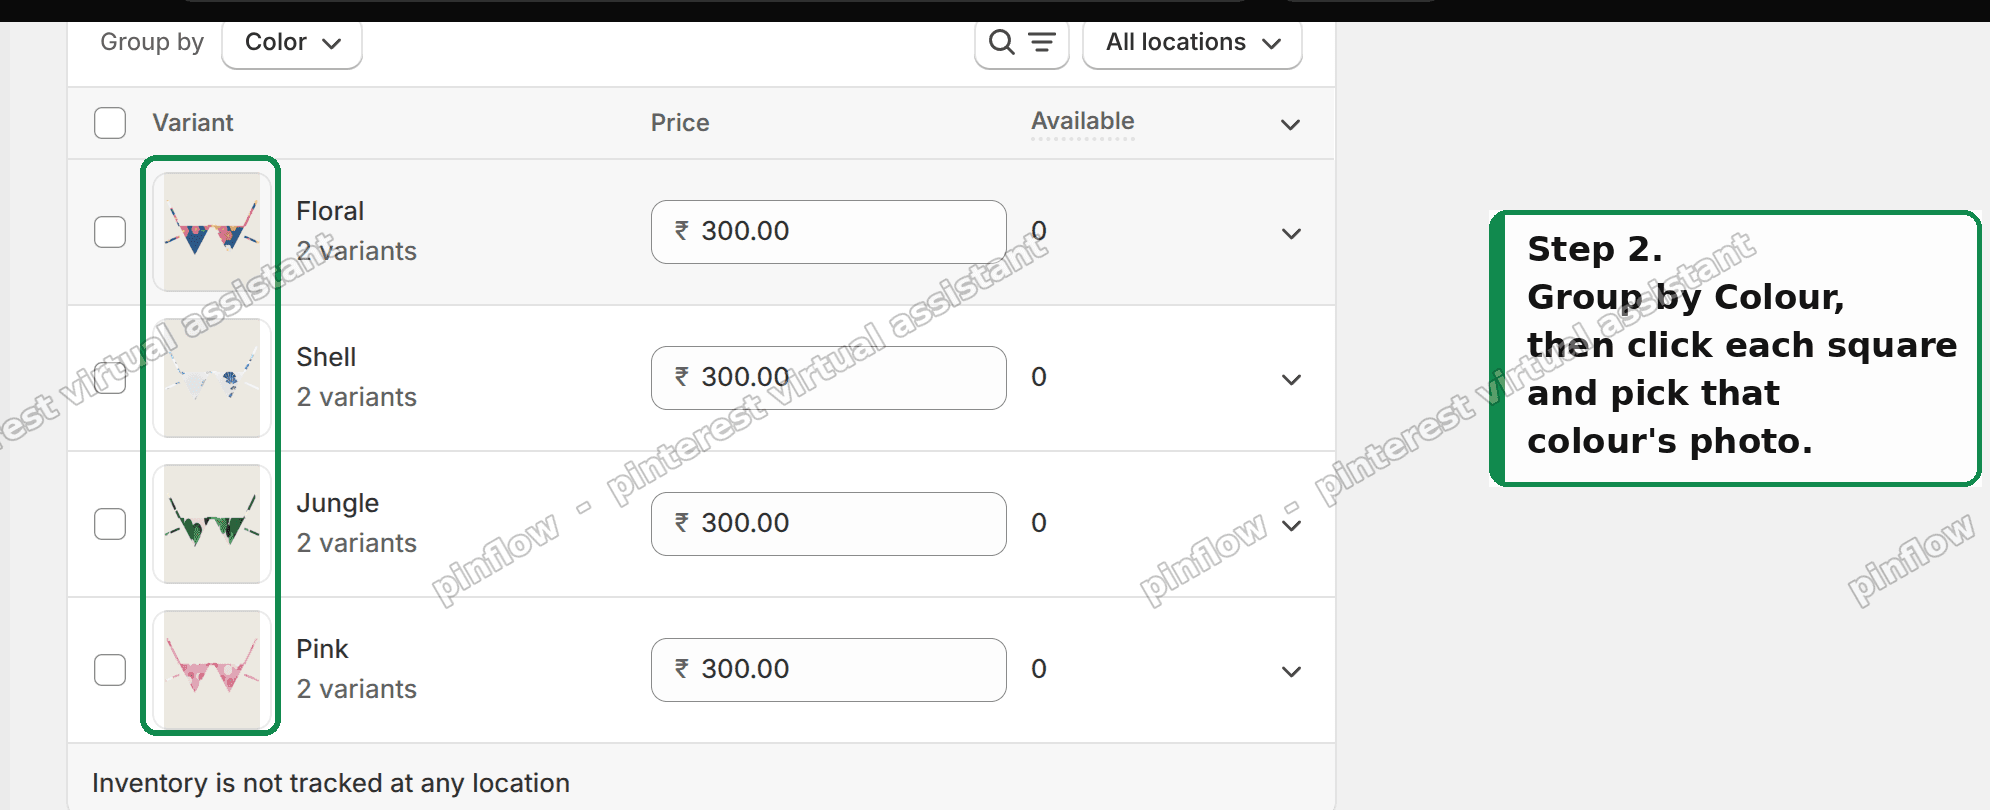 Group by Colour, then click each square and pick that colour's photo
Step 4. Save, then test on the storefront.
Do not test in the admin. Open the real product page and click through every colour.
After doing this on the test store, all four colours swapped to their own photo. Verified by reading the rendered image source after each click, not by eye.
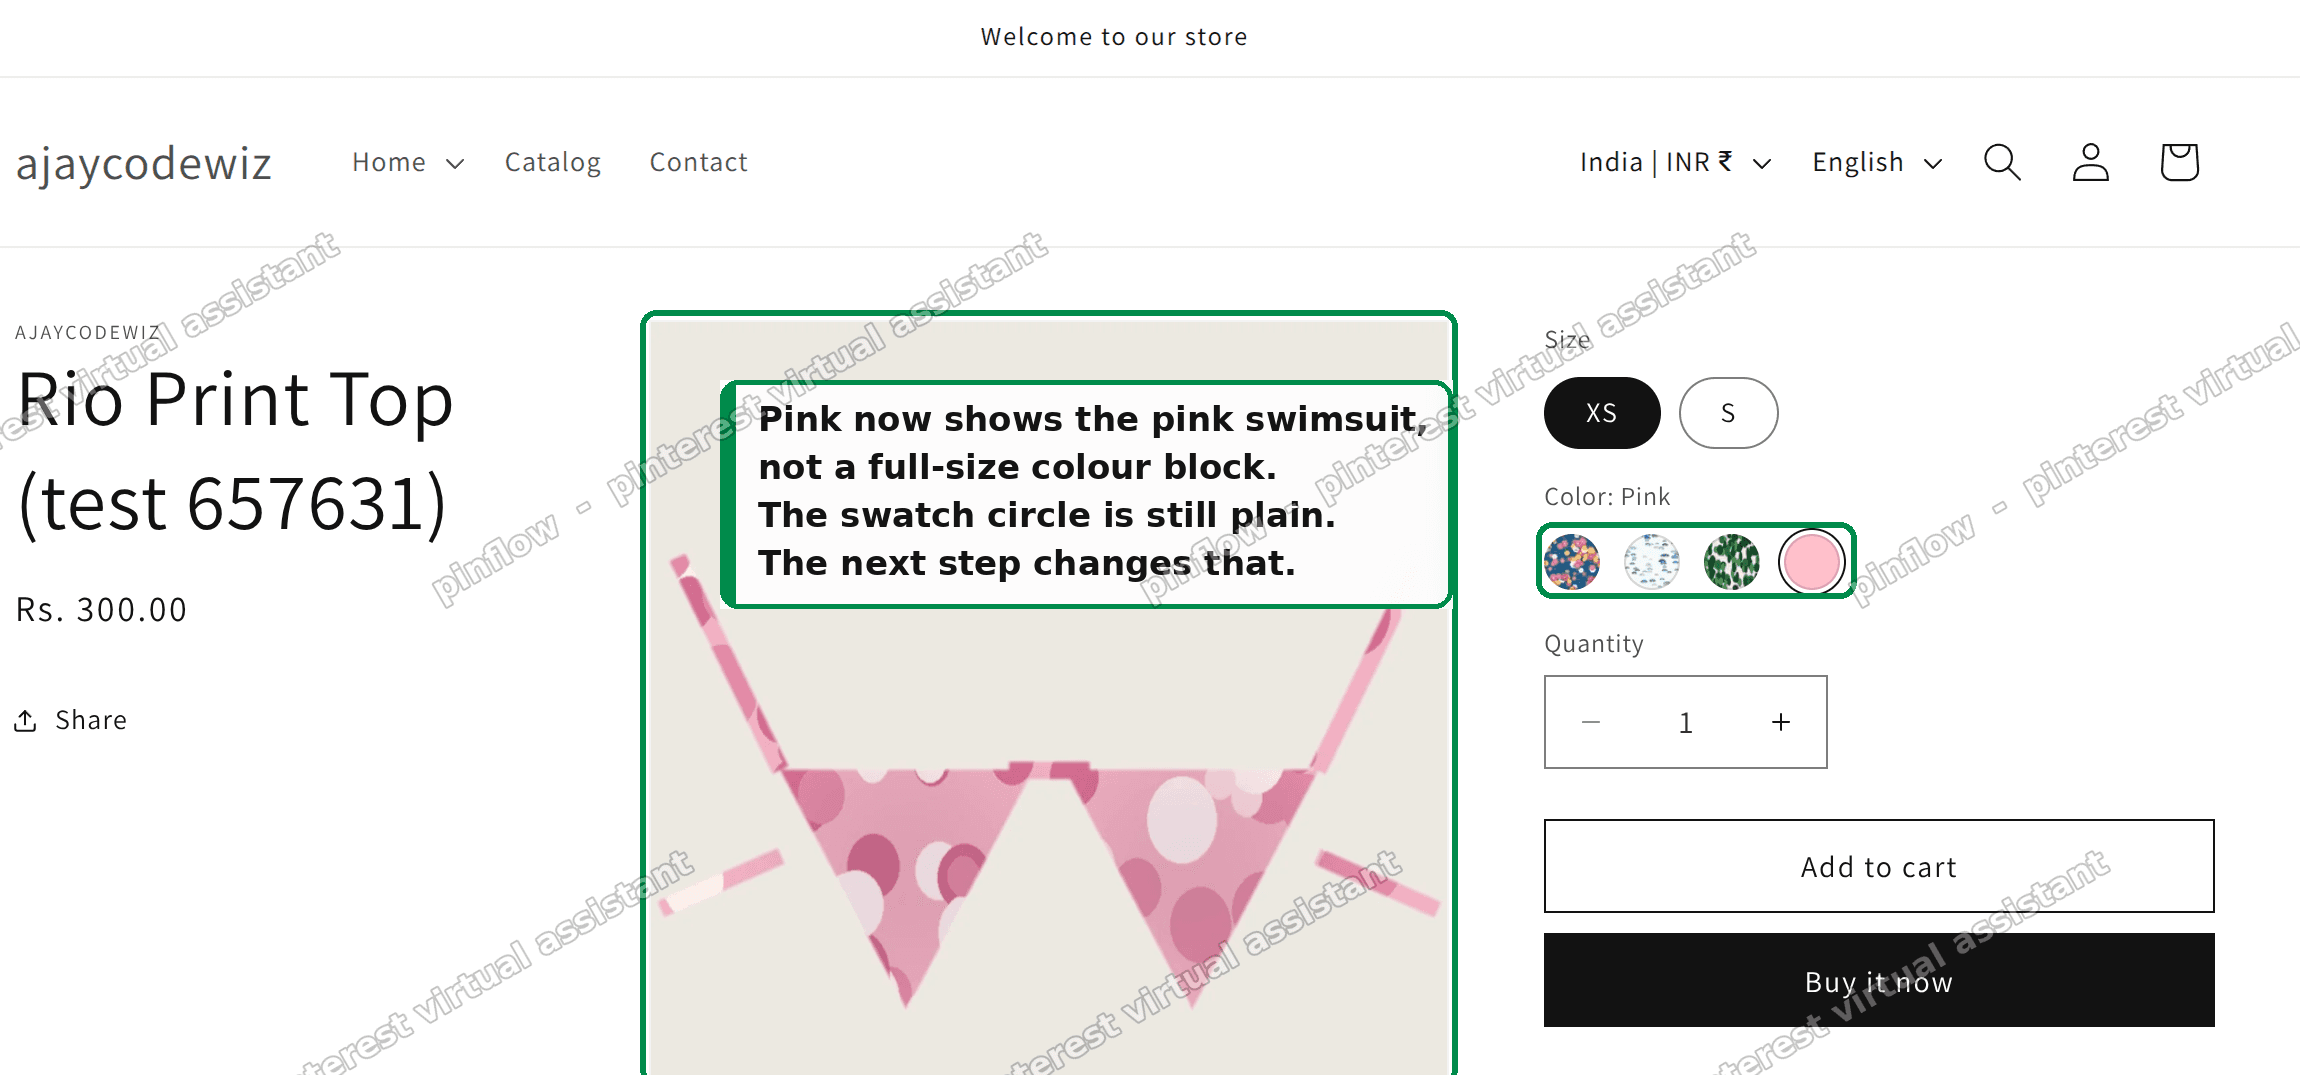 Every colour now shows its own photo
The giant block of flat colour
This is a specific failure worth calling out because it looks like a theme bug and is not.
The merchant had a plain pink JPEG sitting in her product's photos, assigned as the Pink variant image. So selecting Pink filled the entire gallery with a pink rectangle.
The file itself was fine. It was in the wrong place.
A flat colour file belongs in the swatch, where it renders at about 40 pixels across. It does not belong in the product's Media, where it renders at full size.
The fix is two moves:
- In the product's Media, tick the flat colour file and click Remove.
- Upload a real photo of the product in that colour and assign it to the variant.
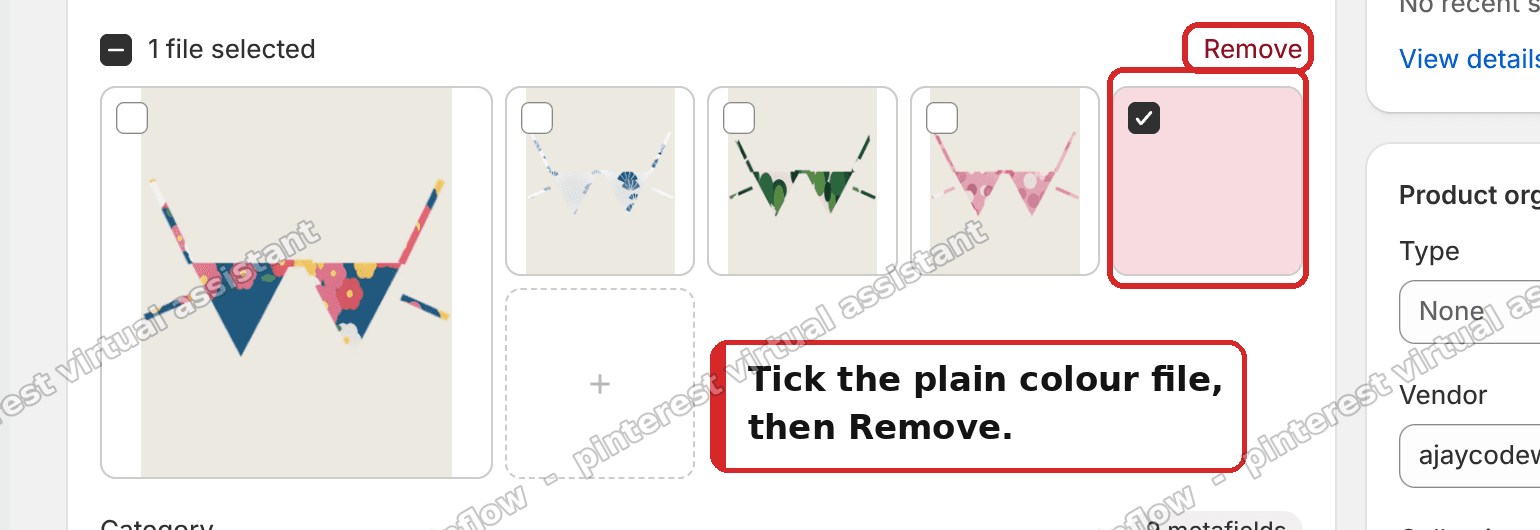 Tick the plain colour file, then Remove
Where the swatch image actually lives
If you want the circle to show a fabric print rather than a solid dot, that image goes somewhere else entirely.
In the Variants card, click the colour chip in the Colour row, then Edit. You get the colour entry, with a Label, a Color hex value, and an Image field.
The fabric print goes in Image.
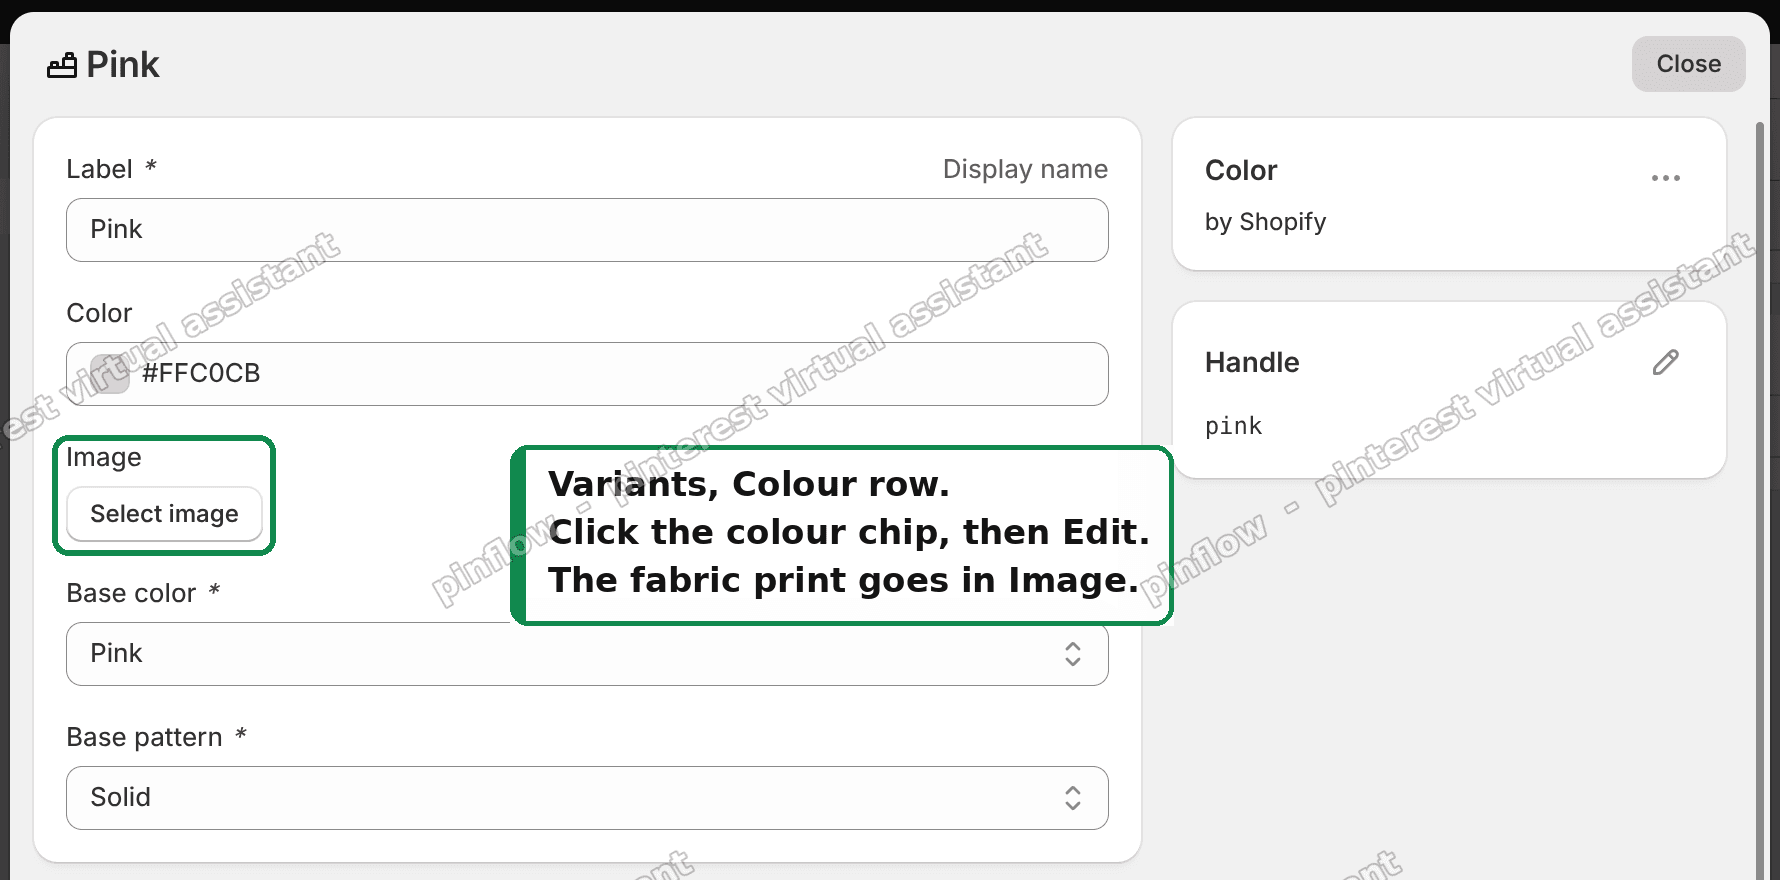 The colour entry, where the fabric print goes in the Image field
Two things to know before you use it.
First, this only appears when your Colour option is connected to Shopify's Colour category attribute. If your option is a free-text option named "Colour", there is no entry to edit.
Second, these entries are shared across your entire store. They are records in your catalog, not per-product settings. Put a floral print on the "Floral" entry and every product using Floral gets that same swatch. That is convenient for a consistent palette and a real problem if two products use the same colour name for different fabrics. If your prints genuinely differ per style, give them distinct names.
Can a variant have more than one image in Shopify?
No. One variant, one image.
This is the single most common follow-up, so to be direct: Shopify's data model gives each variant a single featured_image. There is no native way to attach a set of five photos to the Blue variant and a different five to the Red.
What actually happens is that the product's whole gallery stays visible and the theme jumps to the selected variant's one image. Shoppers can still scroll to every other photo.
If you need true per-colour galleries you have three options, in increasing order of effort:
- Separate products per colour, linked with Shopify's Combined Listings, so each product carries its own full gallery.
- A variant image app, which is what most merchants end up doing.
- Theme code, filtering the gallery by an alt-text convention or a metafield.
How to show only the selected colour's images
Related question, same root.
Dawn has no setting for this. I checked the theme settings schema on Dawn 15. There is no option to hide other variants' media. Anyone telling you to look for a toggle is describing a different theme.
Some paid themes do ship it, usually worded as "hide other variant images" or "group media by variant". If your theme has it, that is the easy path.
If it does not, the common no-app workaround is an alt-text convention. You name every Blue photo's alt text with a marker like #blue, then edit the gallery snippet to skip media whose alt text names a different colour. It works, it is fiddly, and it breaks when someone uploads a photo and forgets the alt text, with nothing to flag it.
Swatches on collection page cards
Worth separating from everything above, because it is a different feature that happens to fail for the same reason.
Dawn has no built-in swatches on product cards. I checked card-product.liquid on Dawn 15.5 and there is not a single reference to swatches in it. The native swatch support is in the product page's variant picker only.
If you are seeing circles under your products on a collection page while running Dawn, that is custom code someone added to your theme, or an app.
In the case above it was a custom snippet, and it drew each circle from the variant image. So for every colour with no photo assigned it fell back to Shopify's grey "no image" placeholder. Those blank circles were not broken code. They were the same 31 missing photos, showing up in a second place.
They fixed themselves once every colour had a photo.
If the photo still does not switch
Work through these in order.
Check the variant actually has an image. Use the .js URL above. featured_image: null means the assignment did not save, whatever the admin looked like.
Check you assigned it to the colour, not the size. With Group by set to Size, it is easy to assign a photo to "Small" and wonder why colours do nothing.
Check you are testing the right theme. If you have a draft theme open in one tab and the live store in another, you can easily fix one and test the other.
Clear the cache. Shopify's CDN and your browser both hold onto product pages. Test in a private window.
Check whether the swatch is even wired to variants. Some themes and most swatch apps render decorative swatches that are not connected to the variant picker at all. If clicking a circle does not change the URL or the price either, the swatch is not selecting a variant, and no amount of variant images will help.
The three things, named properly
Since the vocabulary is what causes most of this, here they are side by side.
Product media is the pool of photos and videos on the product. Everything else points into it.
Variant image is one media item, marked as the photo for one variant. This is what makes the gallery jump when a shopper picks a colour. One per variant.
Swatch is the small circle in the picker. It belongs to the option value, is shared across your store, and holds either a hex colour or a small image. It never affects which photo is shown.
Get those three straight and almost every "my variant images are not working" question answers itself. In the swimwear case the swatches were already perfect. The store just needed 31 photographs.
Good product photos deserve more than one audience
You just shot and uploaded a photo for every colourway. PinFlow turns that catalog into Pinterest pins and posts them on a schedule, so those photos keep working for people who have not found your store yet.
Get PinFlow on the Shopify App StorePart of a complete guide
Shopify Variants: The Complete Guide
Variants are one product sold in several forms. How they work, the 2,048 and 3-option limits, and where each variant fix lives - images, swatches, sorting, hiding and the theme-specific bugs.
More Shopify fixes
More community-sourced Shopify guides, tested on a live store.
Themes & Storefront
Hide Unavailable Variants in a Shopify Dropdown
Green has no 3XL, so Shopify prints "3XL - Unavailable" in the size dropdown anyway. How to remove combinations that do not exist, without the bug that kills the variant picker. Tested on Studio.
Shopify Admin
How to Hide a Variant in Shopify Without Deleting It
A colour is temporarily unavailable and you want it off every product page without deleting it and rebuilding it later. Shopify can now unpublish a single variant. The fast way to do it, tested on a live store.
Themes & Storefront
Shopify Craft Theme: Sync Thumbnails to the Variant Picker
In the Craft theme, clicking a product thumbnail changes the photo but leaves the variant selector behind. Here is why the sync only runs one way, and the Custom Liquid block that fixes it.