
Shopify Combined Listings App: Link Separate Products as Swatches
Shopify's Combined Listings app is Plus only. Here is how to link separate products as colour swatches on any plan with one collection and a Custom Liquid block, tested on Horizon.
By AjayCodeWiz · September 27, 2026 · 9 min read
The problem
You sell one T-shirt in three colours. Each colour is its own product, with its own sizes, photos and stock.
On the product page, a shopper sees one colour and has no way to see the others. They have to go back to the collection and hunt for the next colour.
A merchant asked exactly this on the Shopify Community. They had Lifestyle Tee - Gray, Lifestyle Tee - Brown and Lifestyle Tee - Black, each with 18 size variants. They wanted the three products shown as colour swatches, so a click on Brown opens the Brown product.
The one reply they got explained how to set up swatch colours for a Color option on a single product. That is a different job. It does not link three separate products together.
I rebuilt their setup on a Shopify test store running the Horizon theme and linked the three products with one collection and one short block of code. No app, and no Plus plan.
What "combined listings" means
Shopify calls this feature combined listings. Several separate products (the "children") are shown on the storefront as if they were one product with a colour choice. Each child keeps its own page, title, photos, description and stock.
That is the difference from variants. A variant is one version of a single product, such as a size. Variants share one page and one description. Separate products do not.
Merchants keep colours as separate products for good reasons:
- Each colour gets its own web address, which can rank on its own in Google.
- Each colour can have its own description and photo set.
- Each colour shows up as its own card in collections and search.
Shopify's Combined Listings app is Plus only
Shopify has its own Combined Listings app. It groups child products under a parent, and the theme shows them as one listing with a colour option.
The catch is the plan. Shopify's developer documentation says it plainly: "Combined listings are available only to stores on a Shopify Plus plan." Plus starts at about $2,300 a month, so for most stores the native app is out of reach.
That leaves three routes:
- Merge the products into one with a Color option. Native swatches work, but you lose the separate pages.
- Link the separate products with a little code. Free, on any plan. This is what I built below.
- Use a third-party combined listings app. The App Store has dozens.
How the free version works
Two pieces do all the work.
- A collection groups the colours. A collection is a list of products you can reuse anywhere on your store. You make one whose name starts with "Swatch -" and put the three colours in it.
- A Custom Liquid block draws the swatches. Liquid is the code Shopify themes are written in, and a Custom Liquid block is a box in the theme editor where you paste it.
On every product page, the code checks whether the product belongs to a collection whose web address starts with "swatch-". If it does, it shows one round swatch for each product in that collection, using each product's main photo, and links each swatch to its product. The current colour gets an outline.
The colour name comes from the product title. The code takes the part after the last " - ", so "Lifestyle Tee - Brown" shows as Brown. Keep that naming pattern for every colour.
Products that are not in a "Swatch -" collection show nothing, so the block is safe to leave on your product template for every product.
Before and after
On my test store the Gray product page had a Size picker and nothing else. There was no way to reach Brown or Black from it.
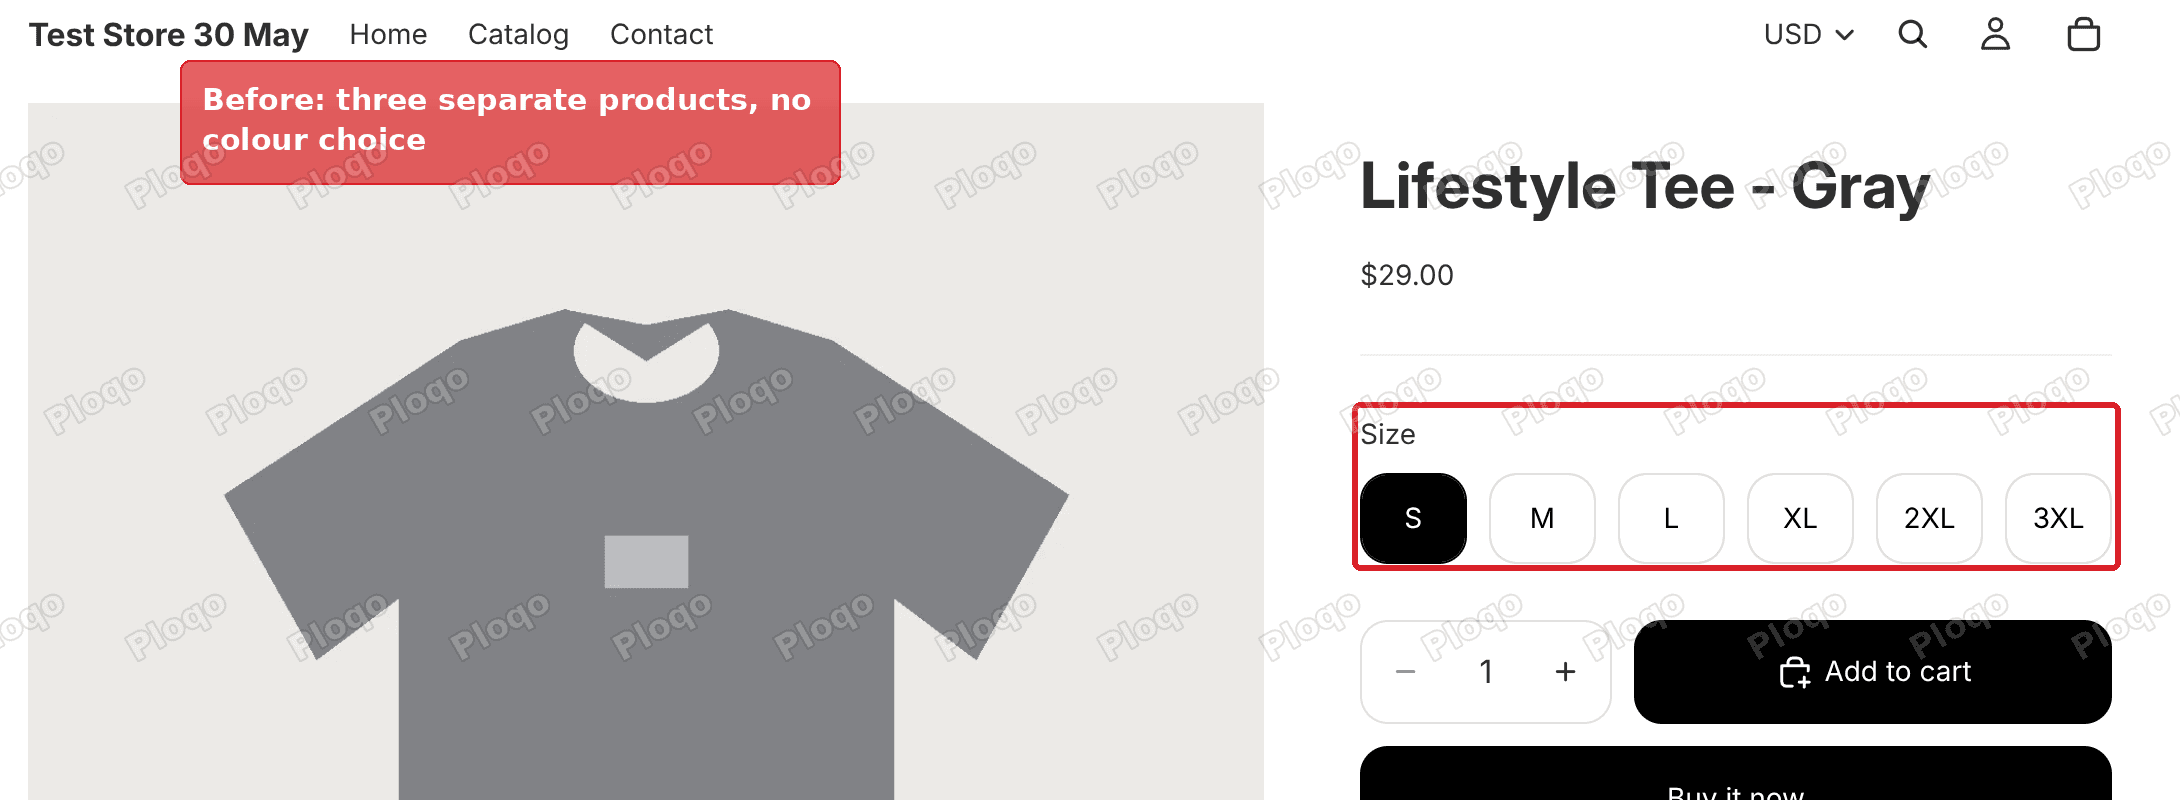 Before: Horizon product page for Lifestyle Tee - Gray with only a size picker
After the steps below, the same page shows "Color: Gray" with three round swatches above the sizes. Gray is outlined as the current colour.
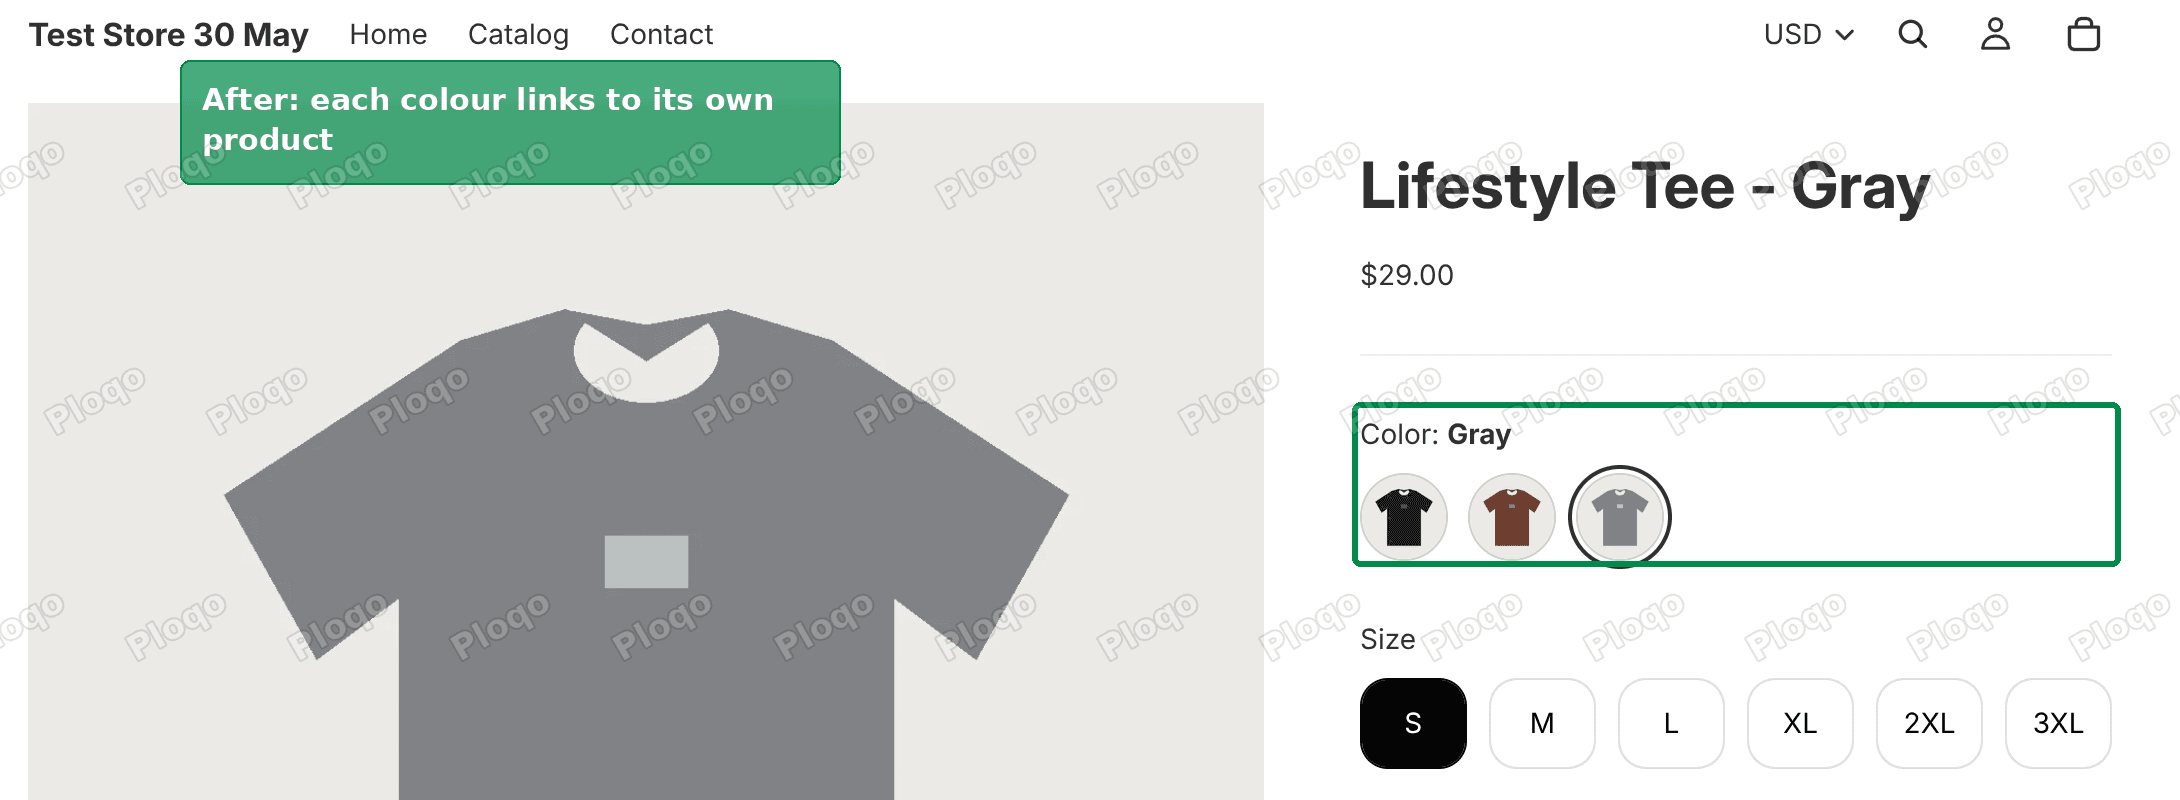 After: three colour swatches above the size picker, each linking to its own product
I checked the real storefront, not only the editor preview. The Gray, Brown and Black pages each showed three swatches with the right one marked as current, and a T-shirt outside the collection showed none.
Step 1: Make the swatch collection
Go to Products > Collections and click Add collection.
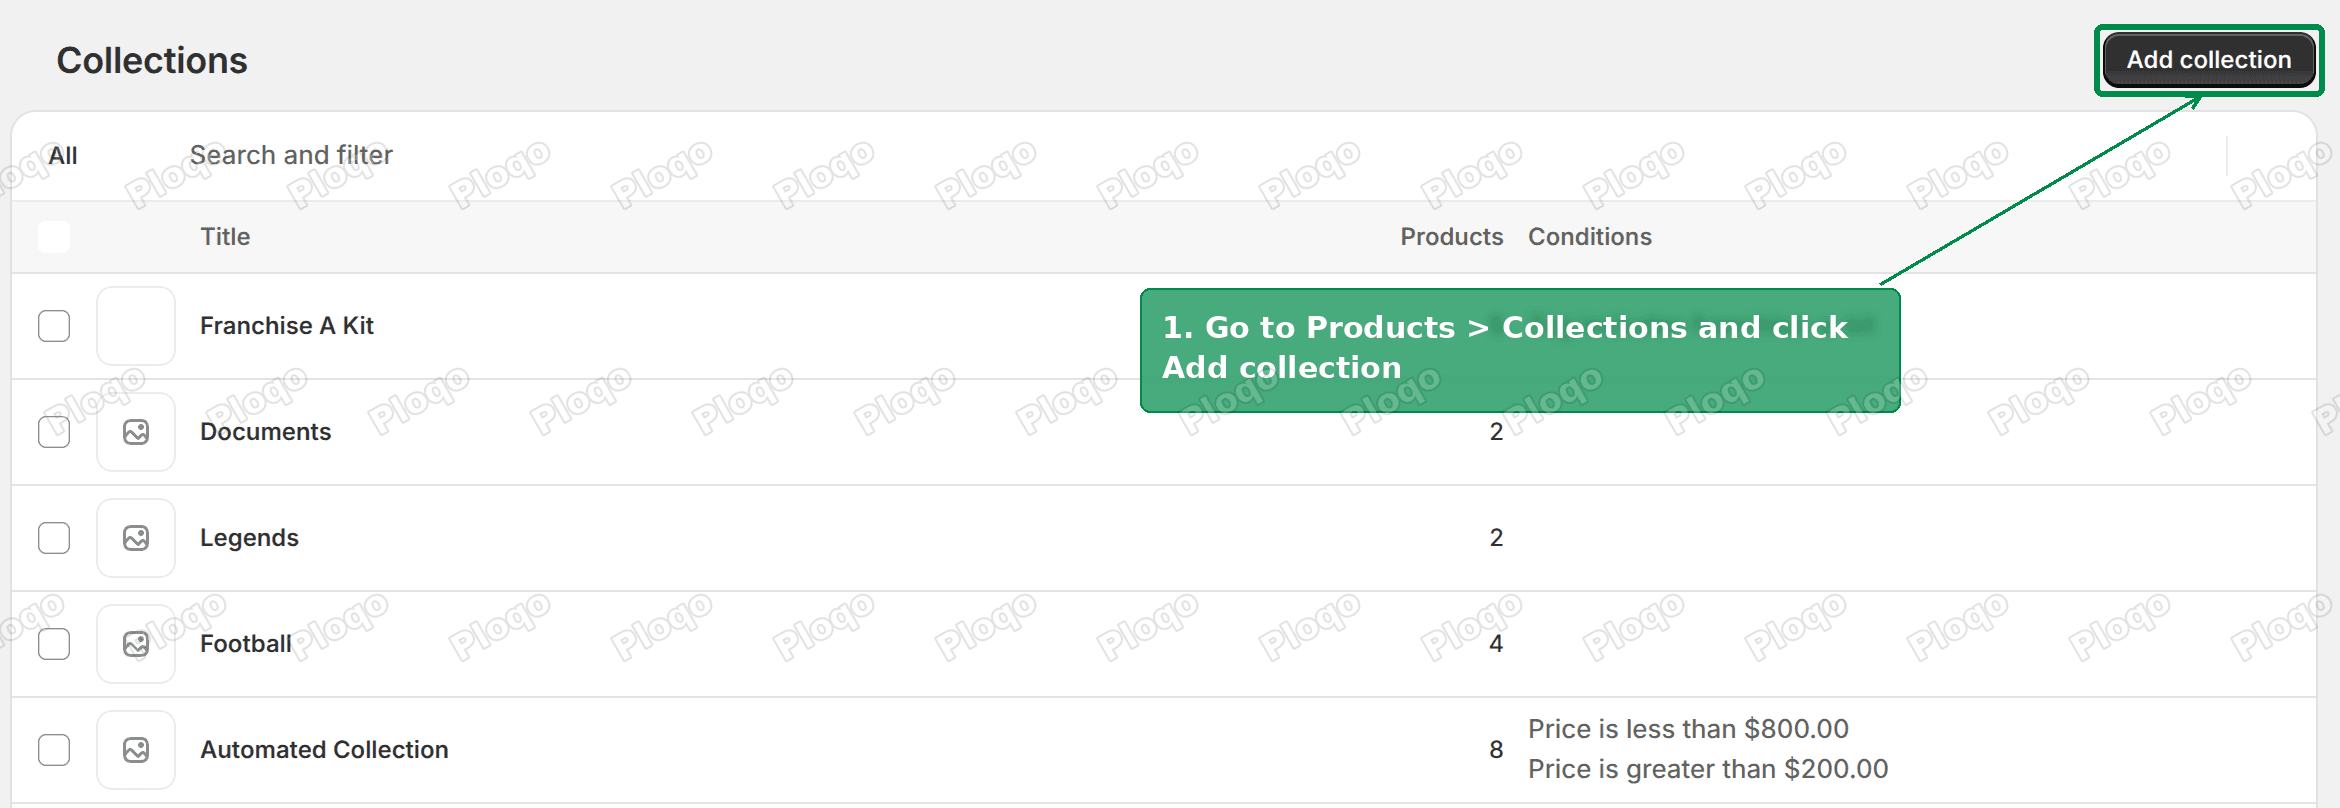 Products > Collections with Add collection highlighted
Name it Swatch - Lifestyle Tee. Shopify turns the name into the web address, so this collection's address becomes "swatch-lifestyle-tee". The code looks for the "swatch-" at the start.
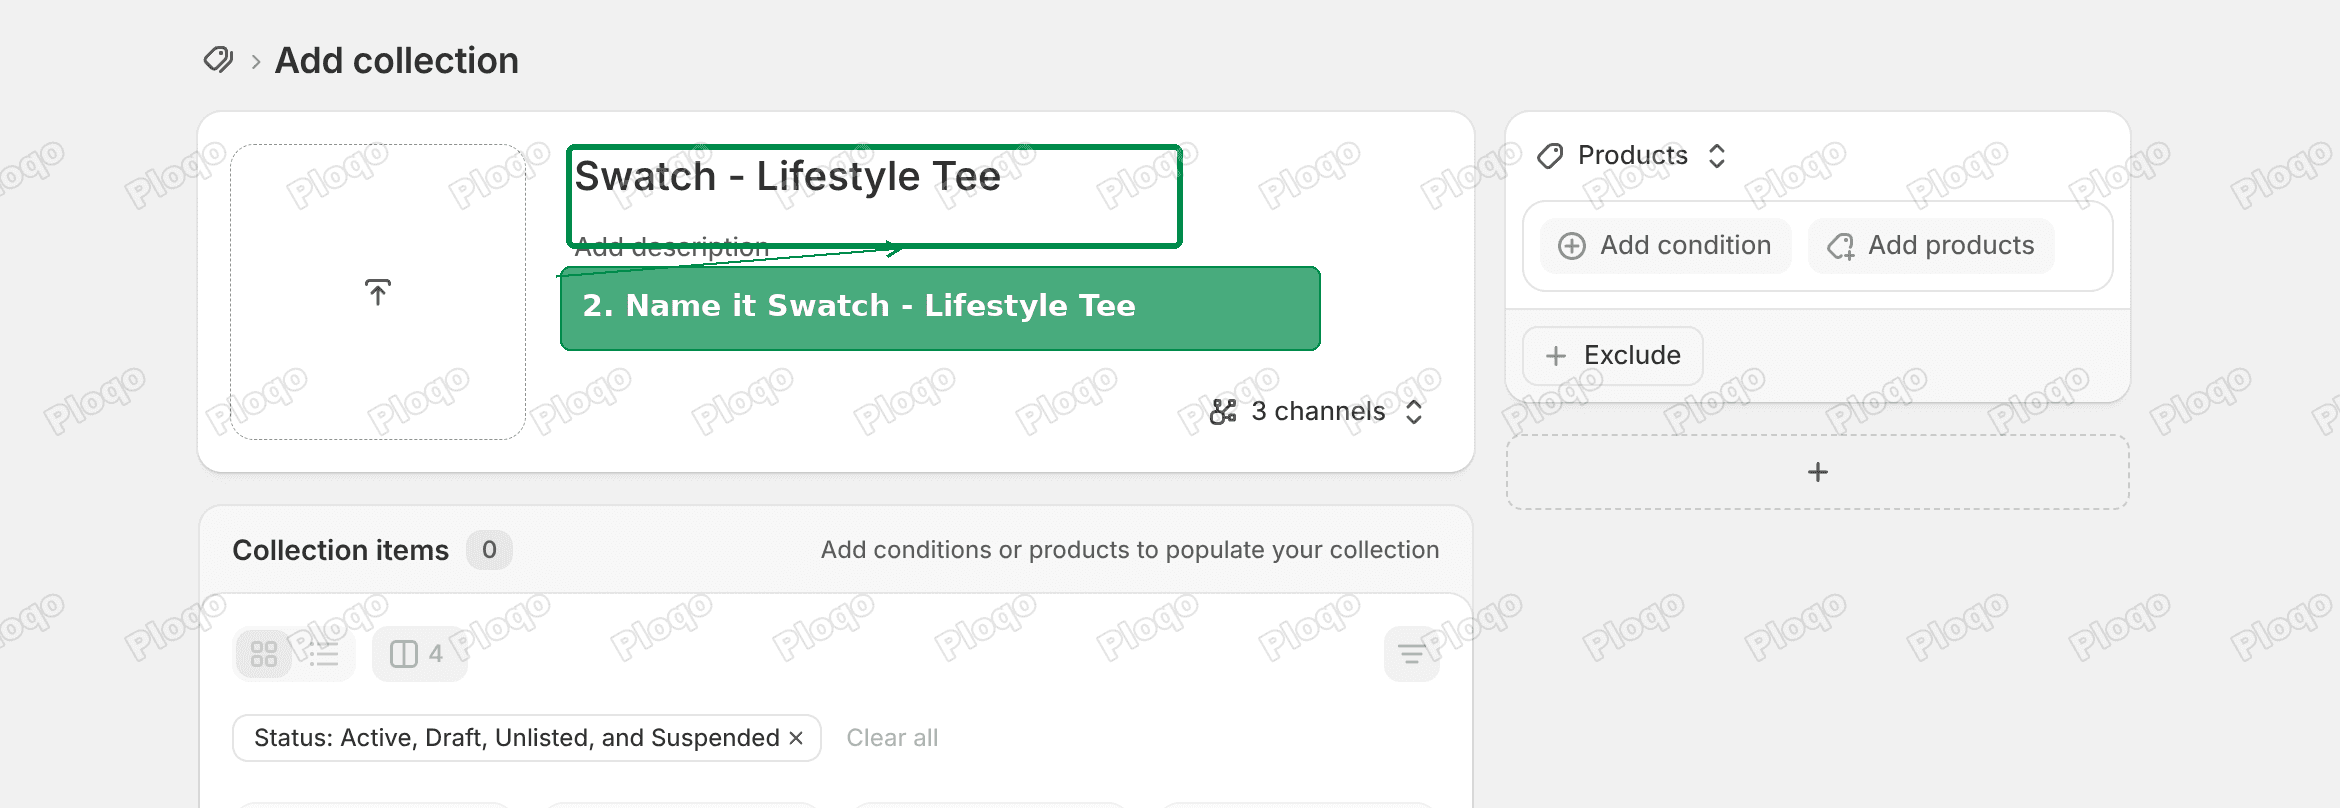 New collection with the title Swatch - Lifestyle Tee
Click Save.
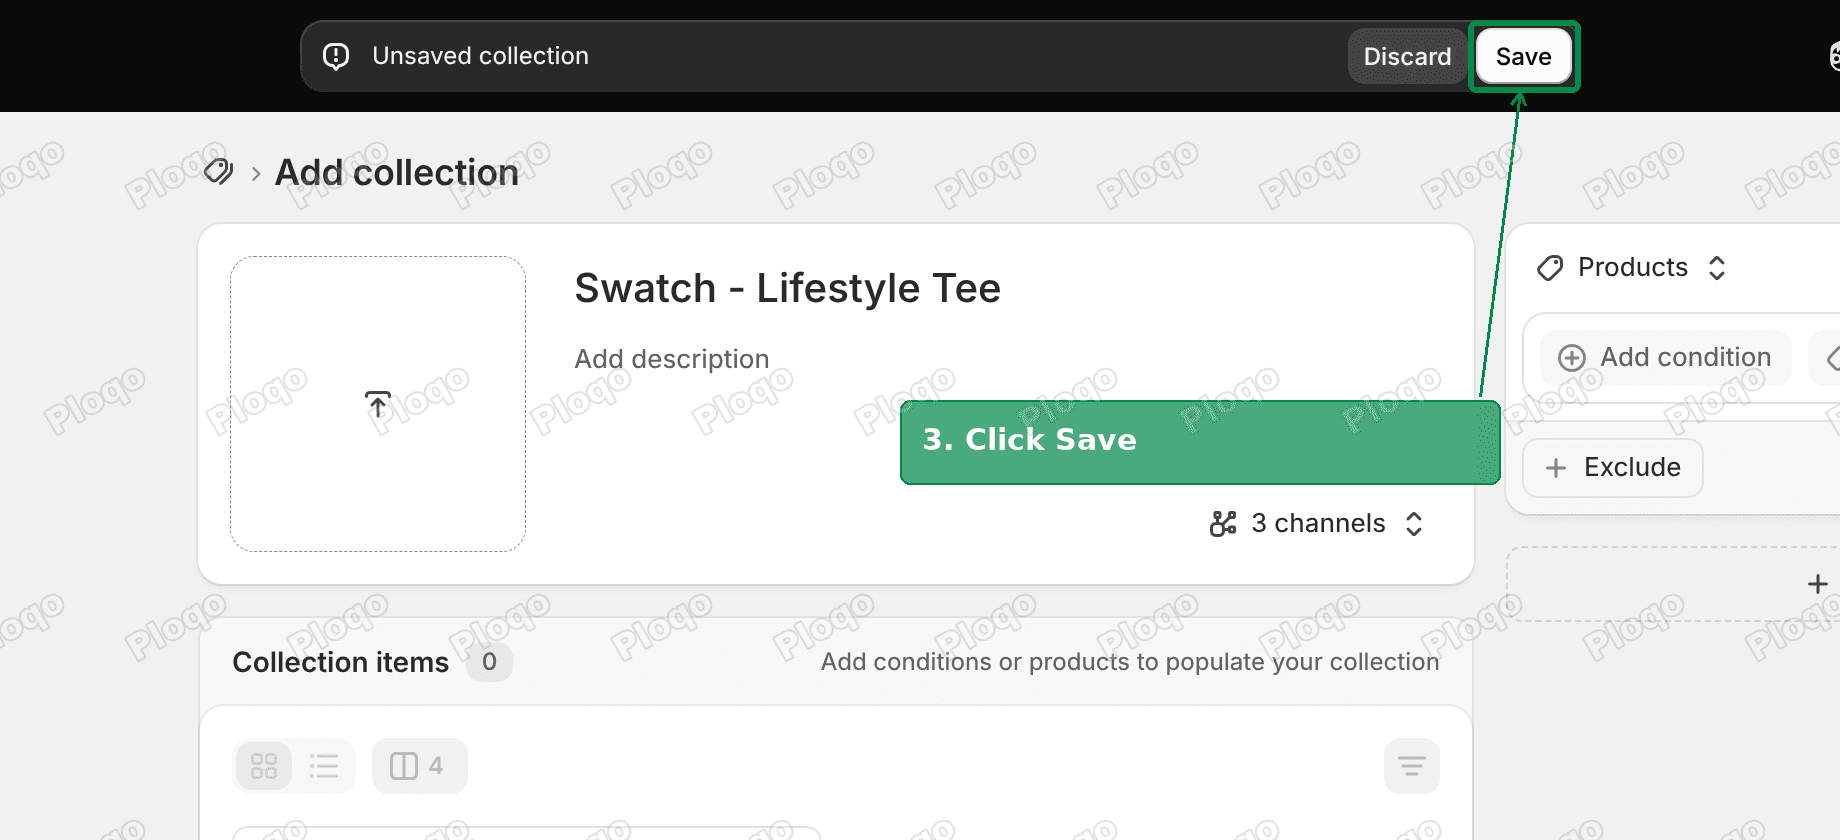 Save button on the new collection
Step 2: Add the colour products
Click Add products. This makes it a manual collection, where you pick products by hand.
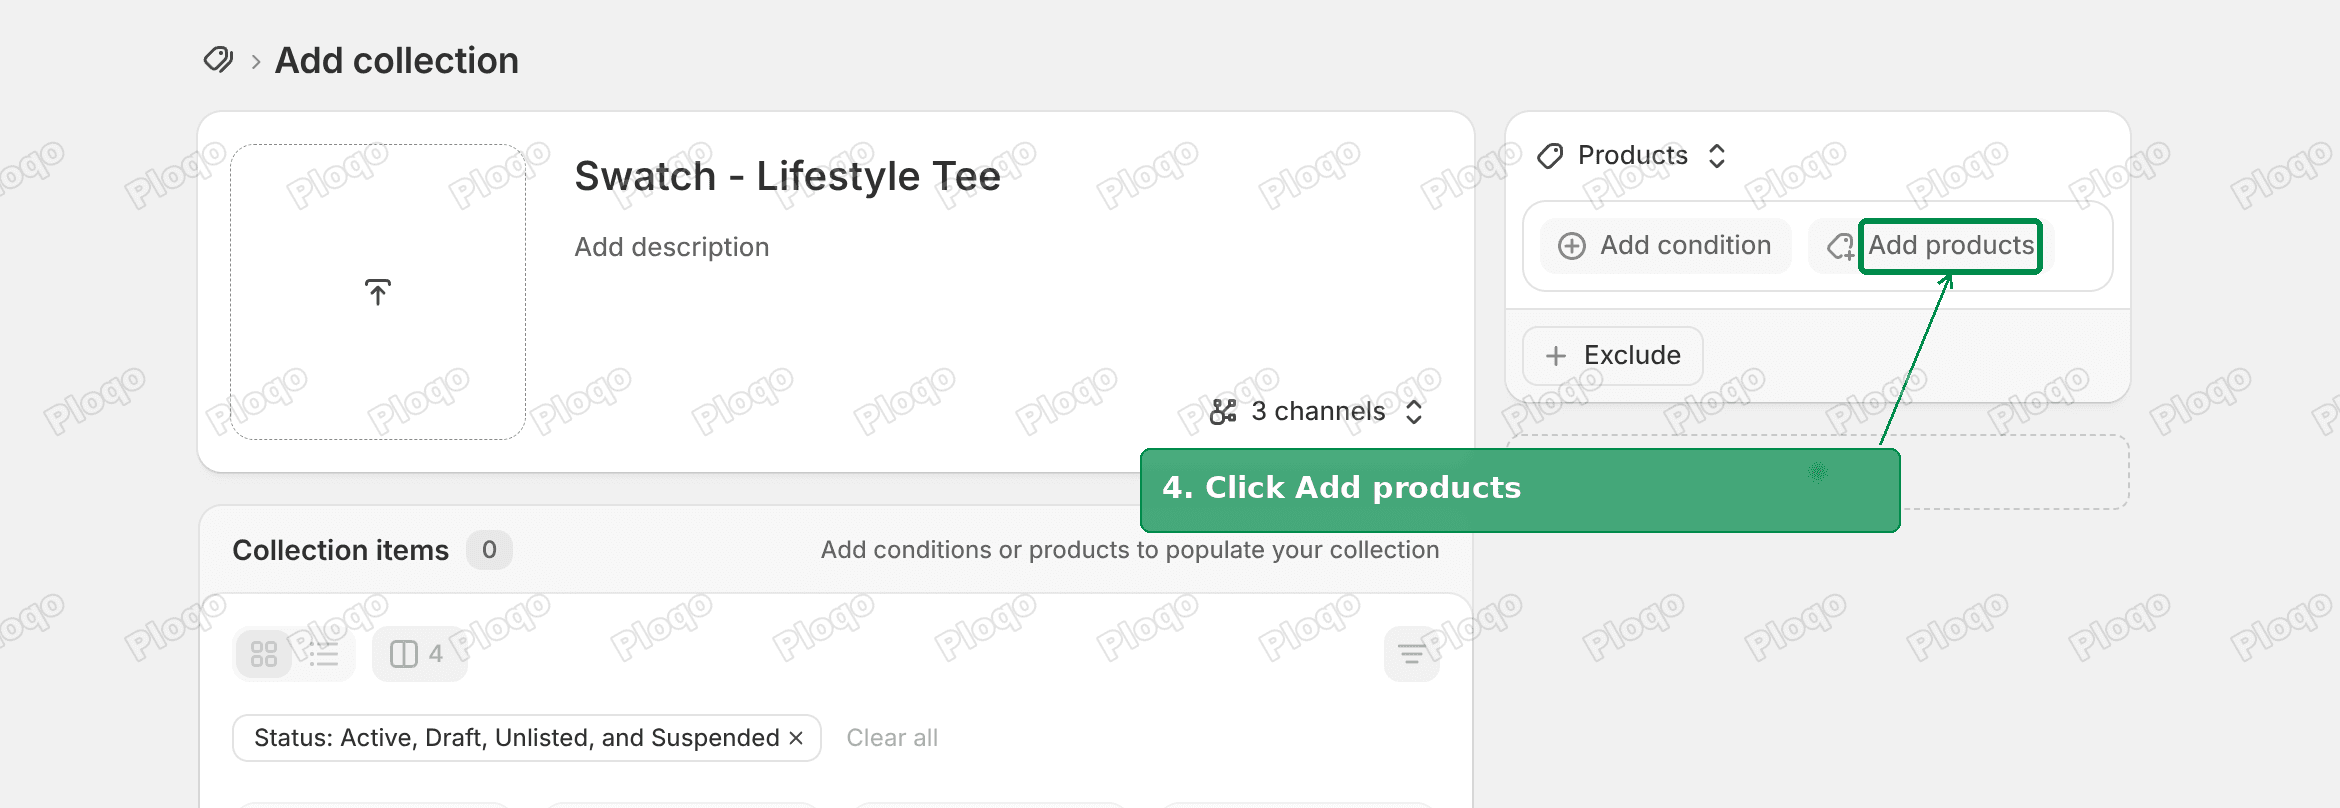 Add products button on the collection
Search for Lifestyle Tee and tick your three colours.
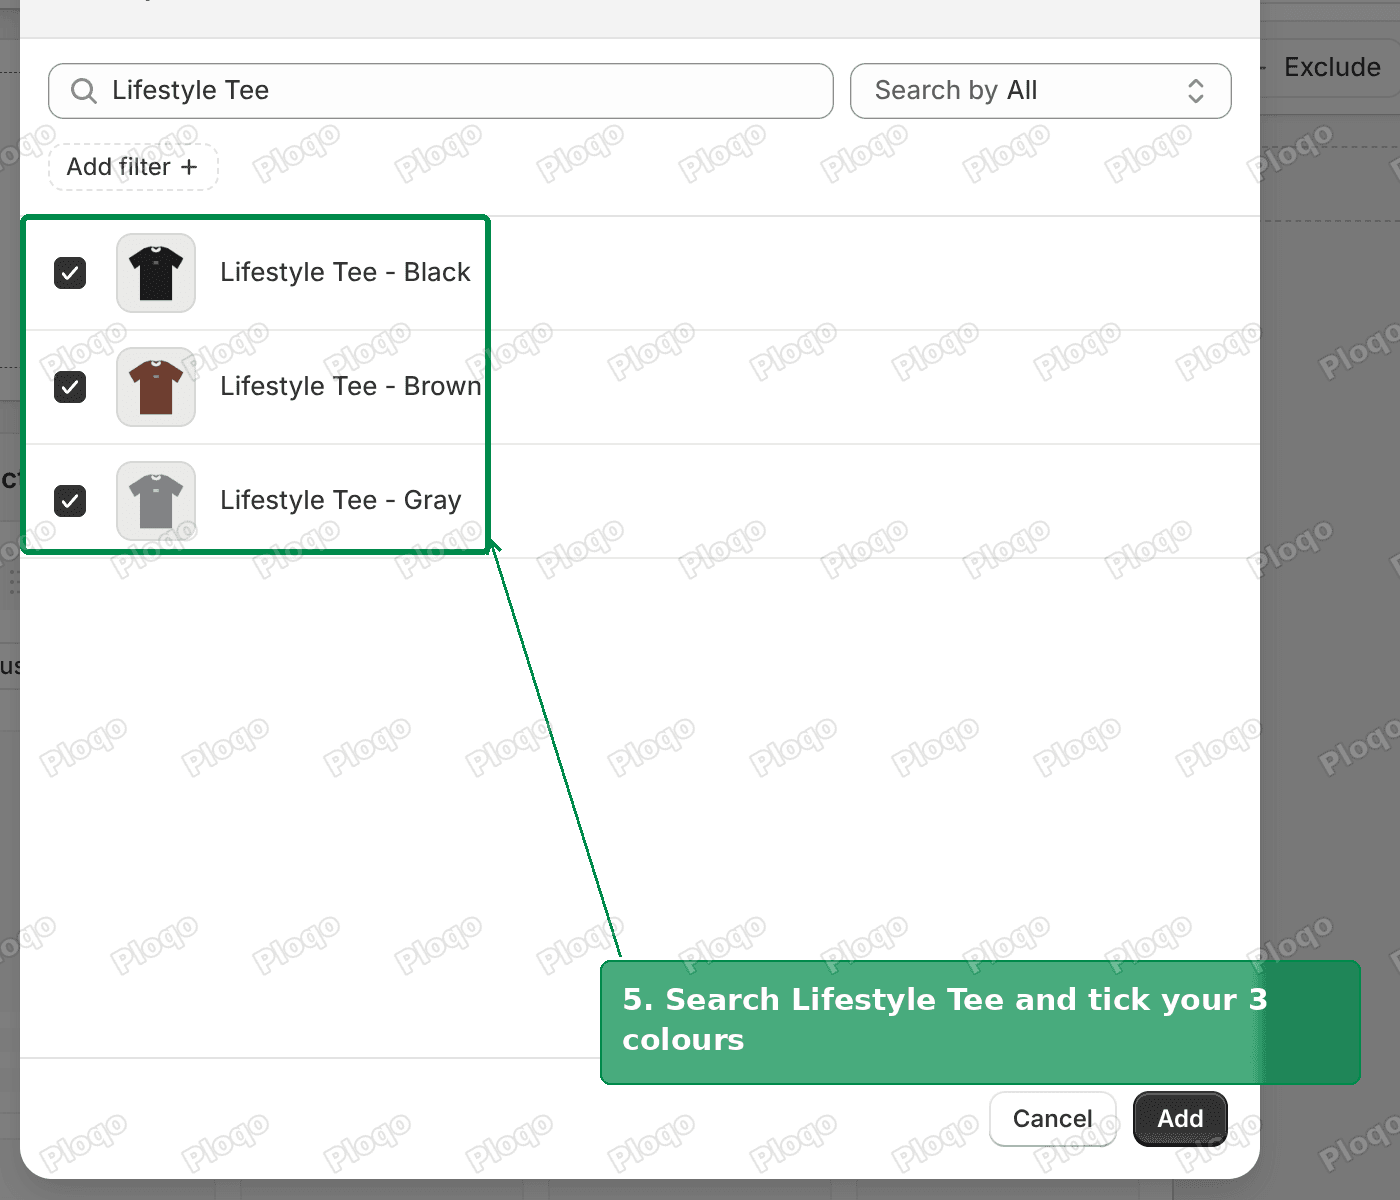 Product picker with the three Lifestyle Tee colours ticked
Click Add, then Save the collection.
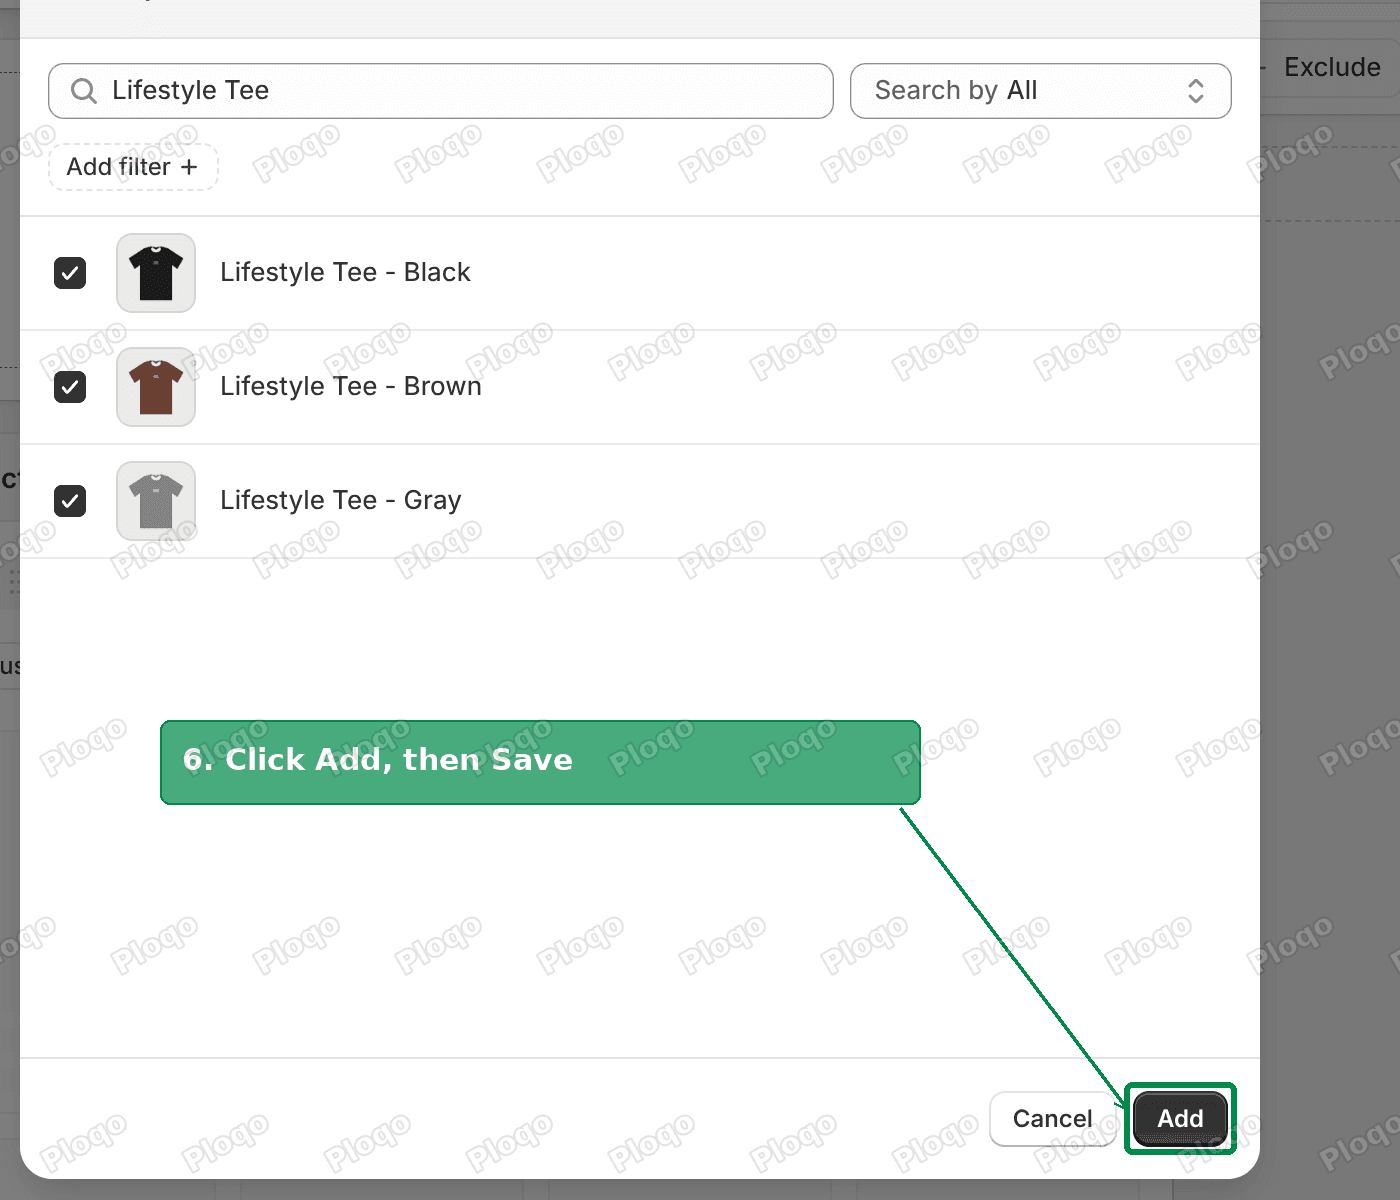 Add button in the product picker
The swatches appear in the order the products sit in this collection. Change the collection's sort order if you want Black first.
Step 3: Open the product page in the theme editor
Go to Online Store > Themes, click Customize, then switch the page selector at the top to a product page.
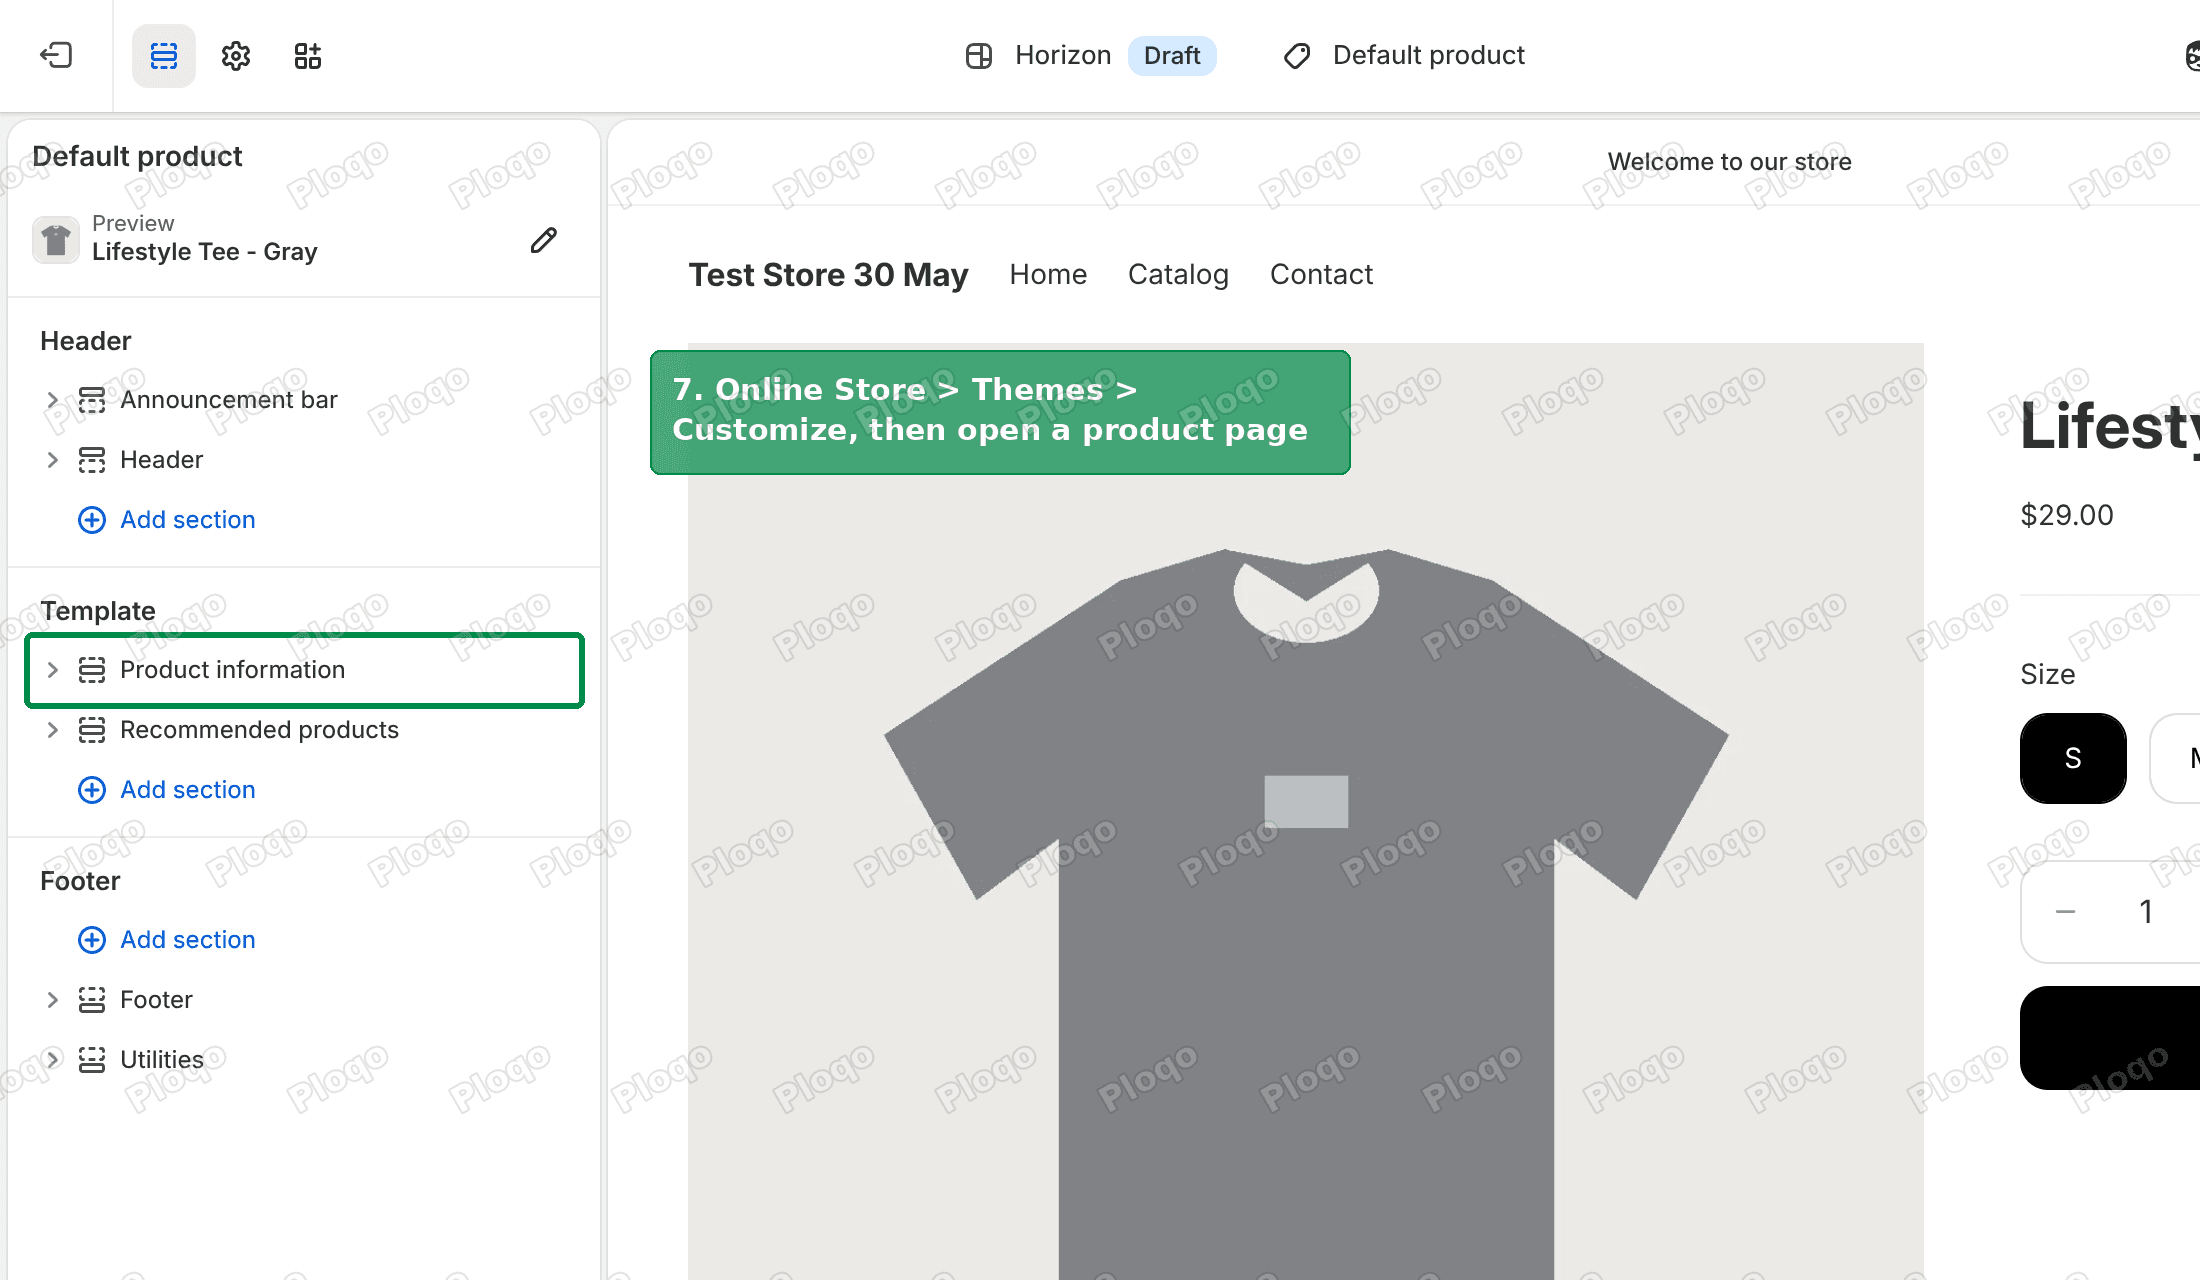 Theme editor on a product page with Product information in the sidebar
In the left sidebar you will see Product information. On Horizon it holds the title, price, Variant picker and Buy buttons.
Step 4: Add a Custom Liquid block
Hover just under Divider in the Product information list. A blue line with a + appears. Click the +.
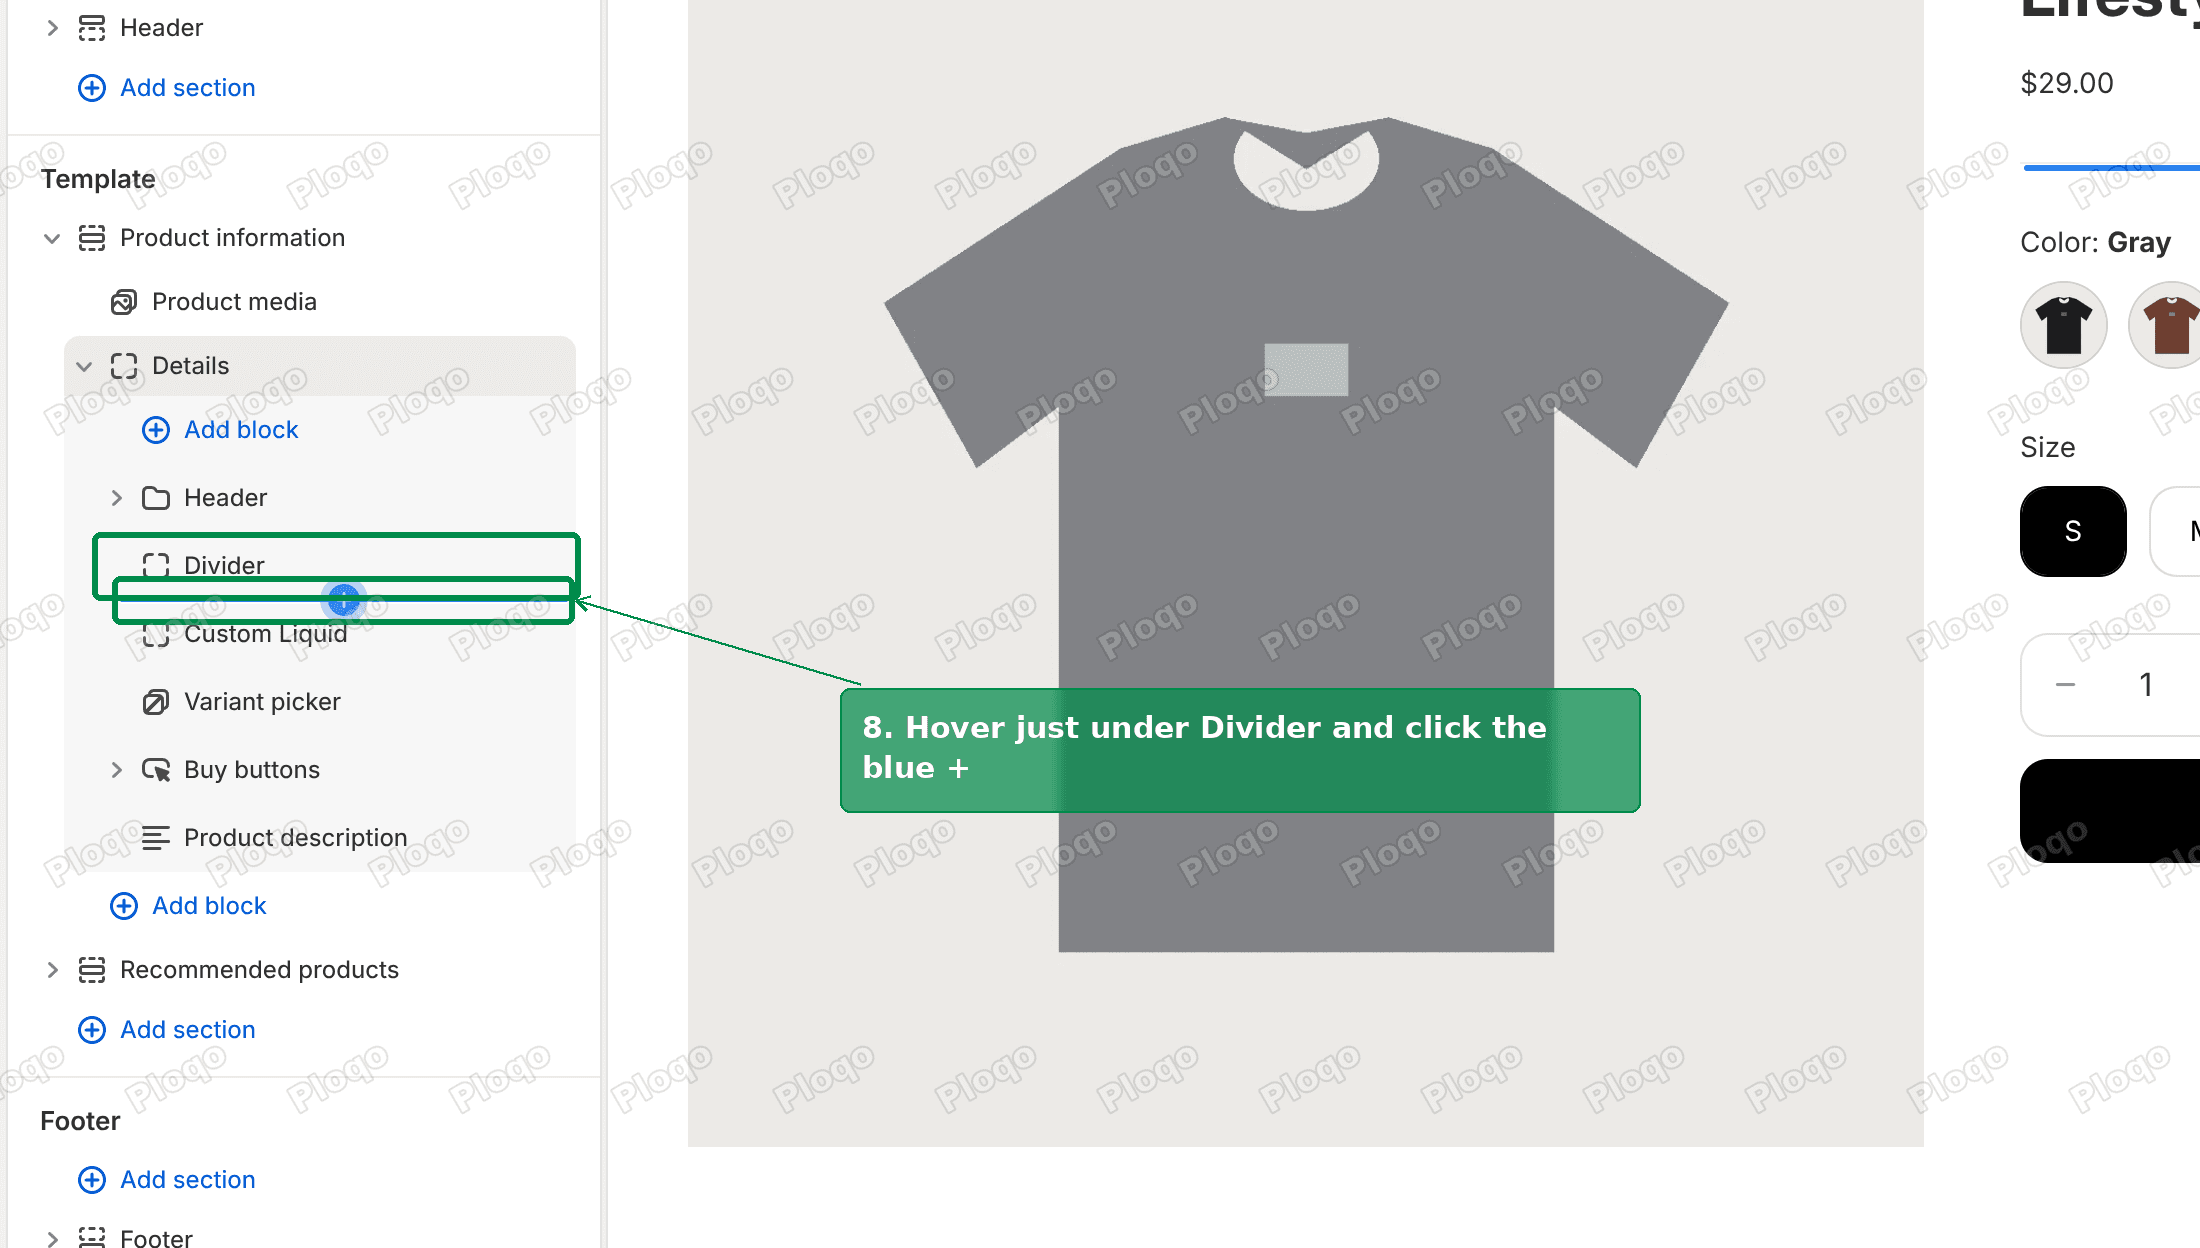 Blue plus insertion line under Divider in the Horizon theme editor
Search Custom liquid and pick it.
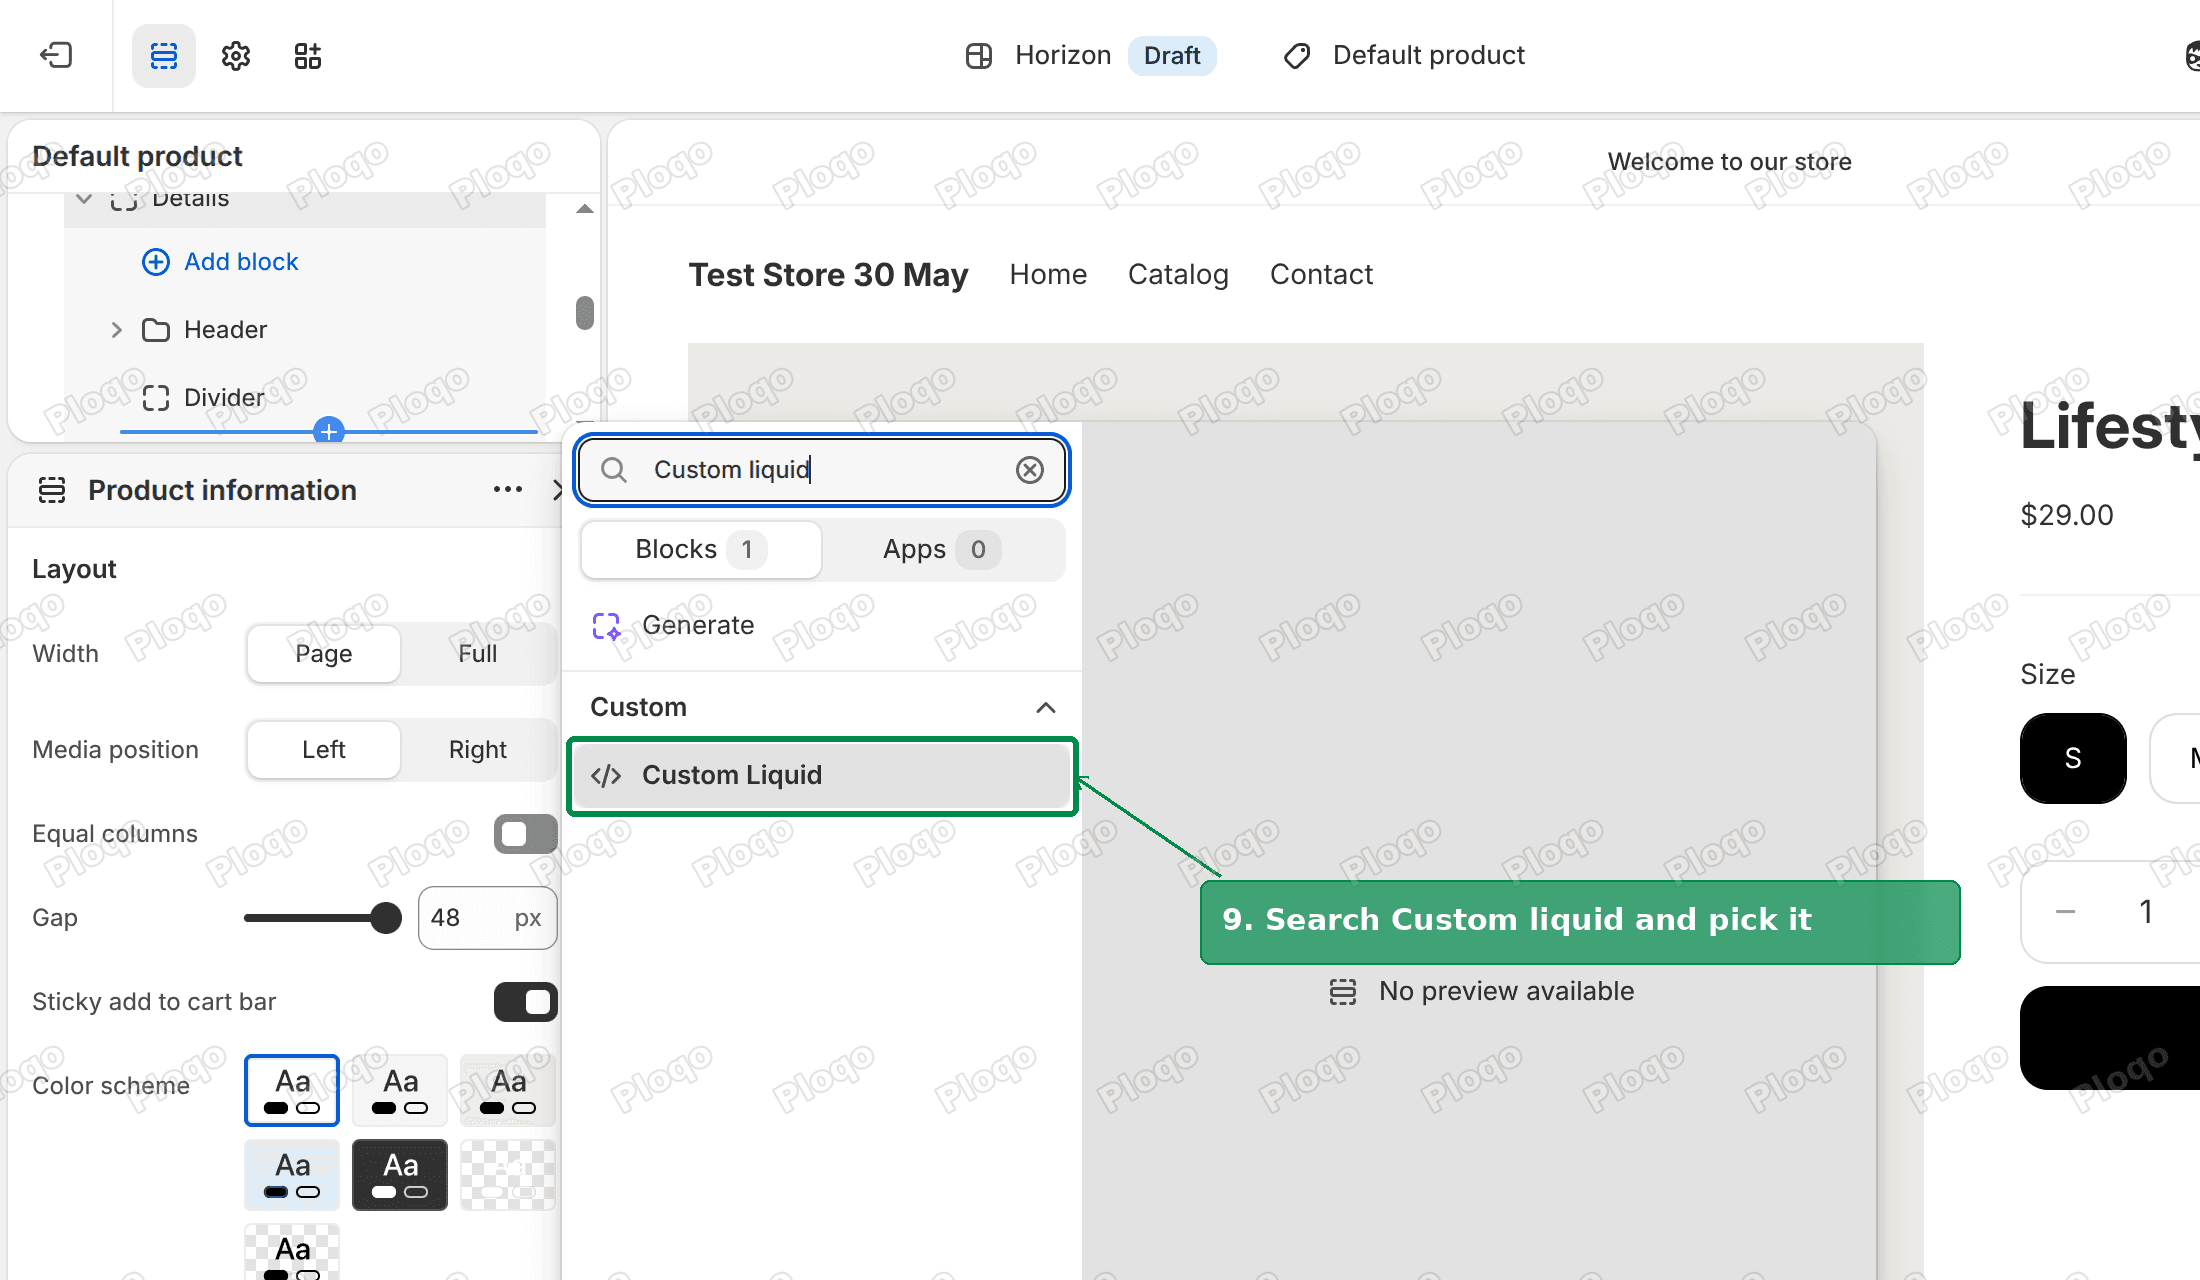 Block picker with Custom Liquid highlighted
Placing it above the Variant picker puts the colours before the sizes, which is where shoppers expect them. If it lands somewhere else, drag it in the sidebar.
Step 5: Paste the code and save
Paste this code into the Liquid code box:
{%- for group in product.collections -%}
{%- if group.handle contains 'swatch-' -%}
<div class="color-links">
<p class="color-links__label">Color: <strong>{{ product.title | split: ' - ' | last }}</strong></p>
<div class="color-links__list">
{%- for item in group.products -%}
{%- assign color_name = item.title | split: ' - ' | last -%}
<a href="{{ item.url }}" class="color-links__swatch{% if item.id == product.id %} is-current{% endif %}" title="{{ color_name }}" aria-label="{{ color_name }}"{% if item.id == product.id %} aria-current="page"{% endif %}>
{%- if item.featured_image -%}
<img src="{{ item.featured_image | image_url: width: 120 }}" alt="{{ color_name }}" width="44" height="44" loading="lazy">
{%- else -%}
<span style="background: {{ color_name | downcase }};"></span>
{%- endif -%}
</a>
{%- endfor -%}
</div>
</div>
{%- break -%}
{%- endif -%}
{%- endfor -%}
<style>
.color-links__label { margin: 0 0 8px; }
.color-links__list { display: flex; flex-wrap: wrap; gap: 10px; }
.color-links__swatch { display: block; width: 44px; height: 44px; border-radius: 50%; overflow: hidden; border: 1px solid rgba(0,0,0,.2); }
.color-links__swatch img, .color-links__swatch span { display: block; width: 100%; height: 100%; object-fit: cover; }
.color-links__swatch.is-current { outline: 2px solid currentColor; outline-offset: 2px; }
</style>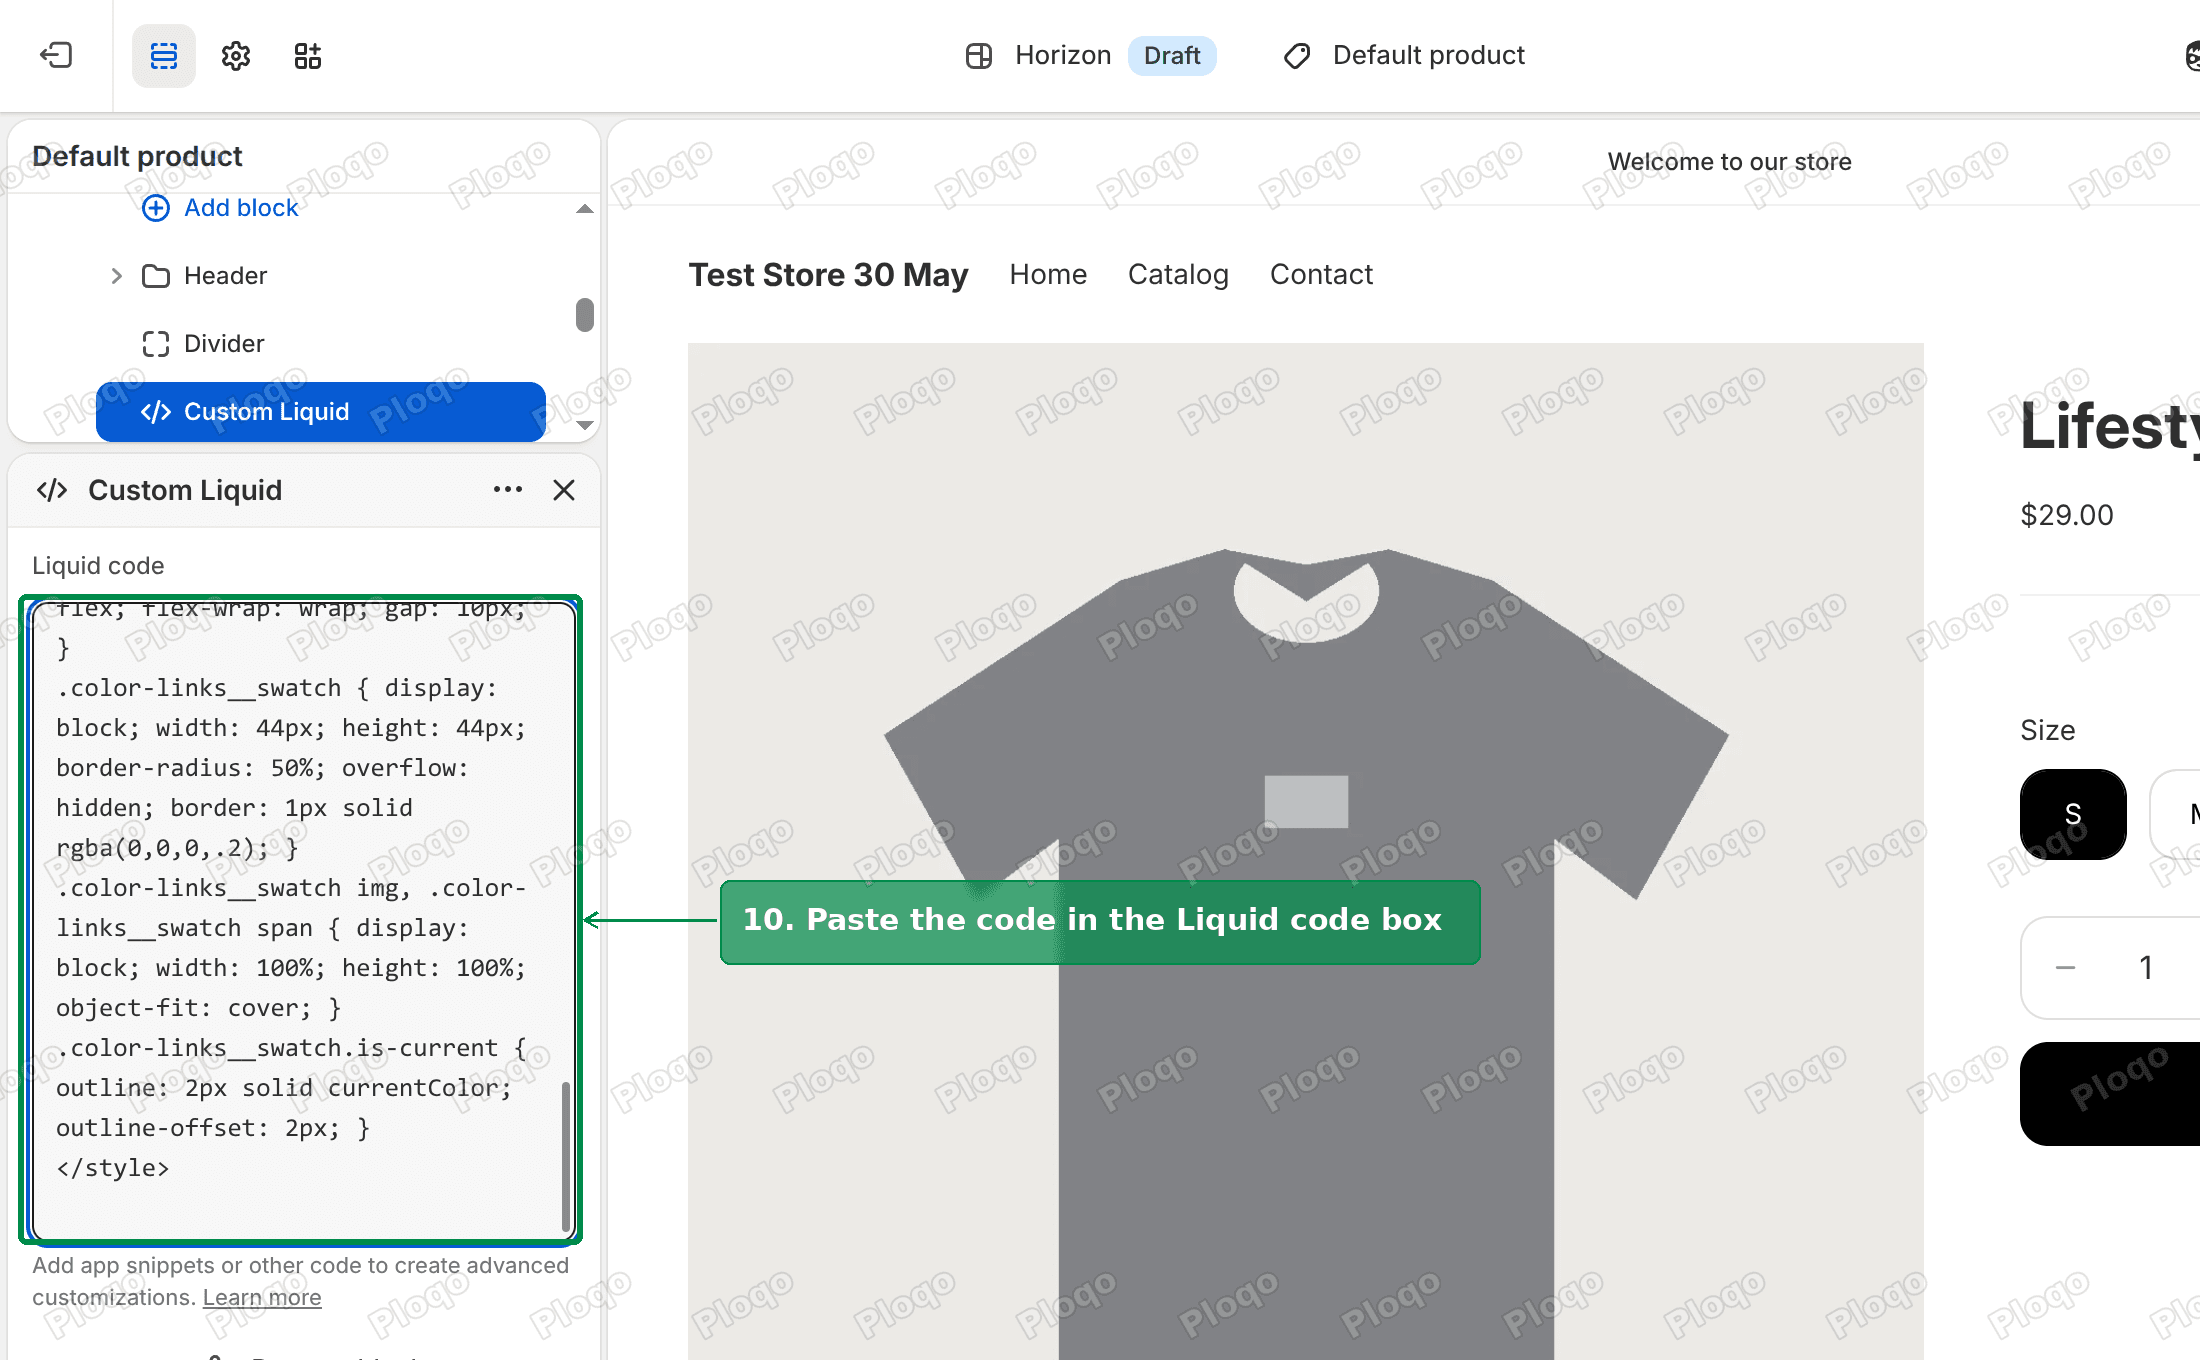 Custom Liquid block with the swatch code pasted into the Liquid code box
Click Save in the top right.
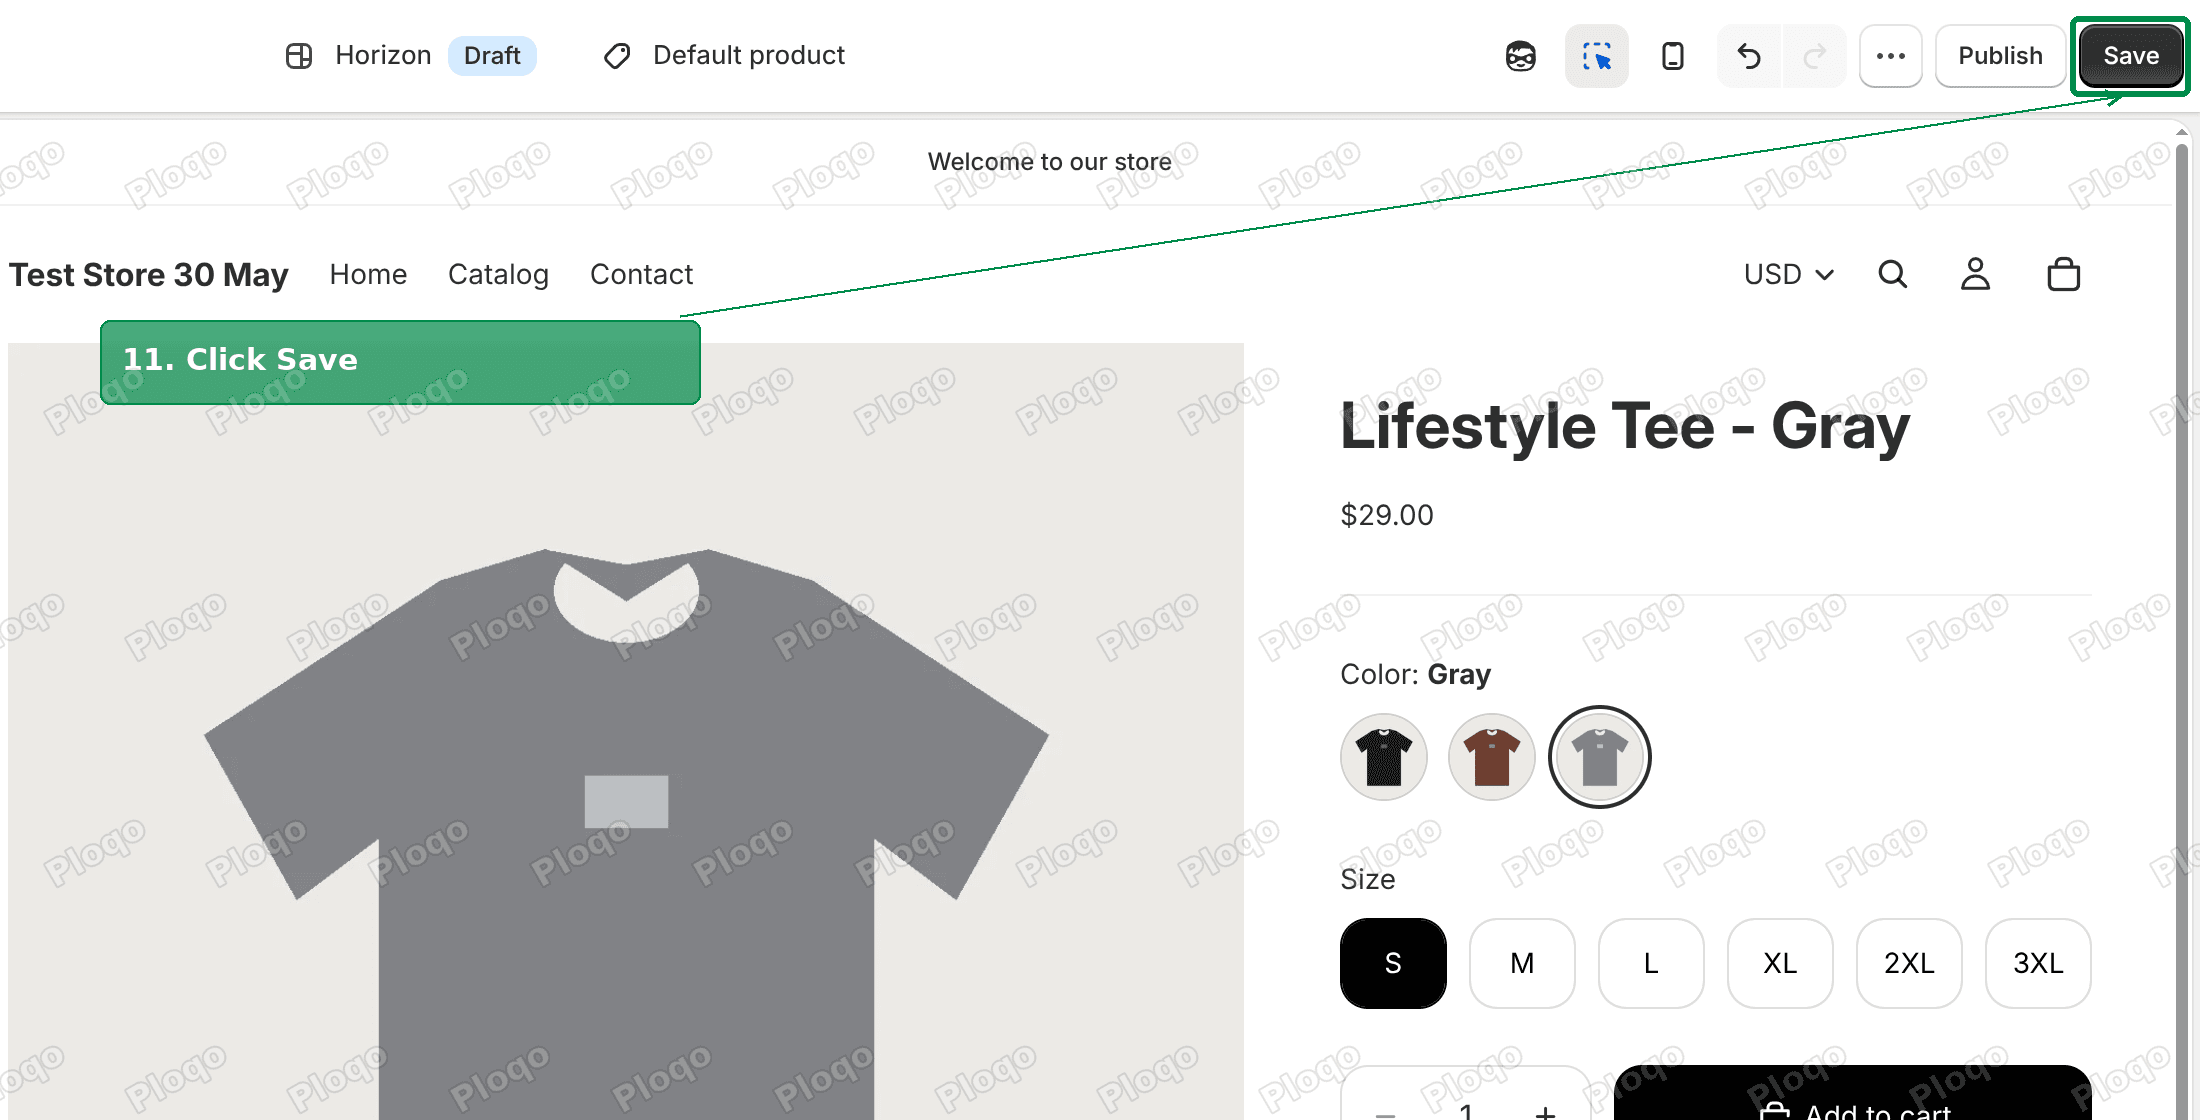 Save button in the theme editor
If a product has no photo, the swatch falls back to a plain circle in the colour named in the title. That works for simple names like Black, Brown and Gray, but not for names like "Ocean Mist".
Adding more colour groups
You do not touch the code again. For a hoodie in four colours, make a collection called Swatch - Hoodie, add the four hoodies, and name each one like "Hoodie - Navy". The same block picks it up.
Each product should sit in only one "Swatch -" collection. The code uses the first one it finds.
Option 1 instead: merge the colours into one product
If you do not need separate pages for each colour, a single product with a Color option is simpler. Shopify shows native swatches for a Color option, and you manage one listing instead of three.
The merchant's numbers fit easily. Three colours times 18 variants is 54 variants, and Shopify now allows up to 2,048 variants per product.
What you give up is the separate web addresses, descriptions and collection cards for each colour. I walked through native swatches for a single product in Shopify color swatches without an app.
Option 3: a combined listings app
If you want swatches on collection cards as well, or you have hundreds of colour groups, an app saves time. The most-reviewed ones that link separate products are:
- Color Swatch King: Variants
- GLO Color Swatch Variant Image
- SA Variants: Combined Listings
Most of them have a free plan with limits. Check that the app supports your theme before you install it. One low review for a swatch app in the App Store says only "Does not work with craft theme."
What the code does not do
- It does not add swatches to collection pages. It only runs on the product page. For colour dots on collection cards, see Shopify show variants as separate products.
- It does not keep the selected size. A shopper who picked Large on Gray starts again on Brown.
- It does not change your stock or orders. Each colour stays its own product, so reports and inventory work as before.
If the swatches do not show
- Is the collection name right? Its web address must contain "swatch-". Open the collection and check the search engine listing at the bottom.
- Is the product in the collection? Open the collection and check it lists all colours.
- Did you save both places? The collection and the theme editor each have their own Save.
- Are you looking at the right theme? The block only exists on the theme you edited.
- Does the title use " - "? "Lifestyle Tee Gray" without the dash shows the whole title as the colour name.
Summary
- Shopify's Combined Listings app only works on Plus.
- On any plan, put the colours in a collection named "Swatch - ..." and paste the code into a Custom Liquid block on the product page.
- Name products "Name - Colour" so the swatch labels read correctly.
- Merge into one product instead if you do not need a separate page per colour.
This article started as an answer on the Shopify Community.
Spending too long on manual Shopify busywork?
PinFlow turns your Shopify catalog into Pinterest pins and posts them on a schedule, automatically. Set it up once and let it run.
Get PinFlow on the Shopify App StoreMore Shopify fixes
More community-sourced Shopify guides, tested on a live store.
Themes & Storefront
Shopify AI Section: Fix a Price Badge Hidden Behind the Image
You built a section with Shopify's AI section generator, but the price badge on each card sits behind the photo. Here is the Custom Liquid fix that brings it to the front without regenerating anything. Tested on a Dawn store.
Themes & Storefront
Hide Shipping Calculated at Checkout on One Shopify Product
The line under Add to cart that says shipping is calculated at checkout shows on every product, gift cards included. Here is how to hide it on one product only, with the code, screenshots and the Eclipse theme steps.
Themes & Storefront
Shopify Dropdown Menu Behind Page Content (Z-Index Fix)
Your Shopify dropdown or mega menu opens, but the page title and products sit on top of its links and the menu closes before you can click. The fix is one Custom CSS rule in Theme settings. Tested on a Rebel store.