
Shopify Coming Soon Page: Add a Get Early Access Button
Turn the Shopify coming soon page into an early access sign-up with a real Get early access button, then email the list your store password before launch. Tested on the Flow theme, with a no-code option.
By AjayCodeWiz · September 23, 2026 · 9 min read
The problem
A merchant launching a drinks brand on Shopify wanted a pre-launch list. Their store was still behind the password page, and they wanted a clear Get early access button on it so visitors could register before the launch.
The plan was simple. Collect emails now. Three days before launch, email that list the store password so they can shop early and enter a competition.
Their theme is Flow. Flow's password page already has an email box, but the button next to it is a small arrow with no words. They could rename the heading and the text above the box, but not the button itself, and a bare arrow did not look like an invitation.
I reproduced this on a test store running Flow and built both a code fix and a no-code fix. This guide walks through both, then shows how to find the people who signed up and send them the password.
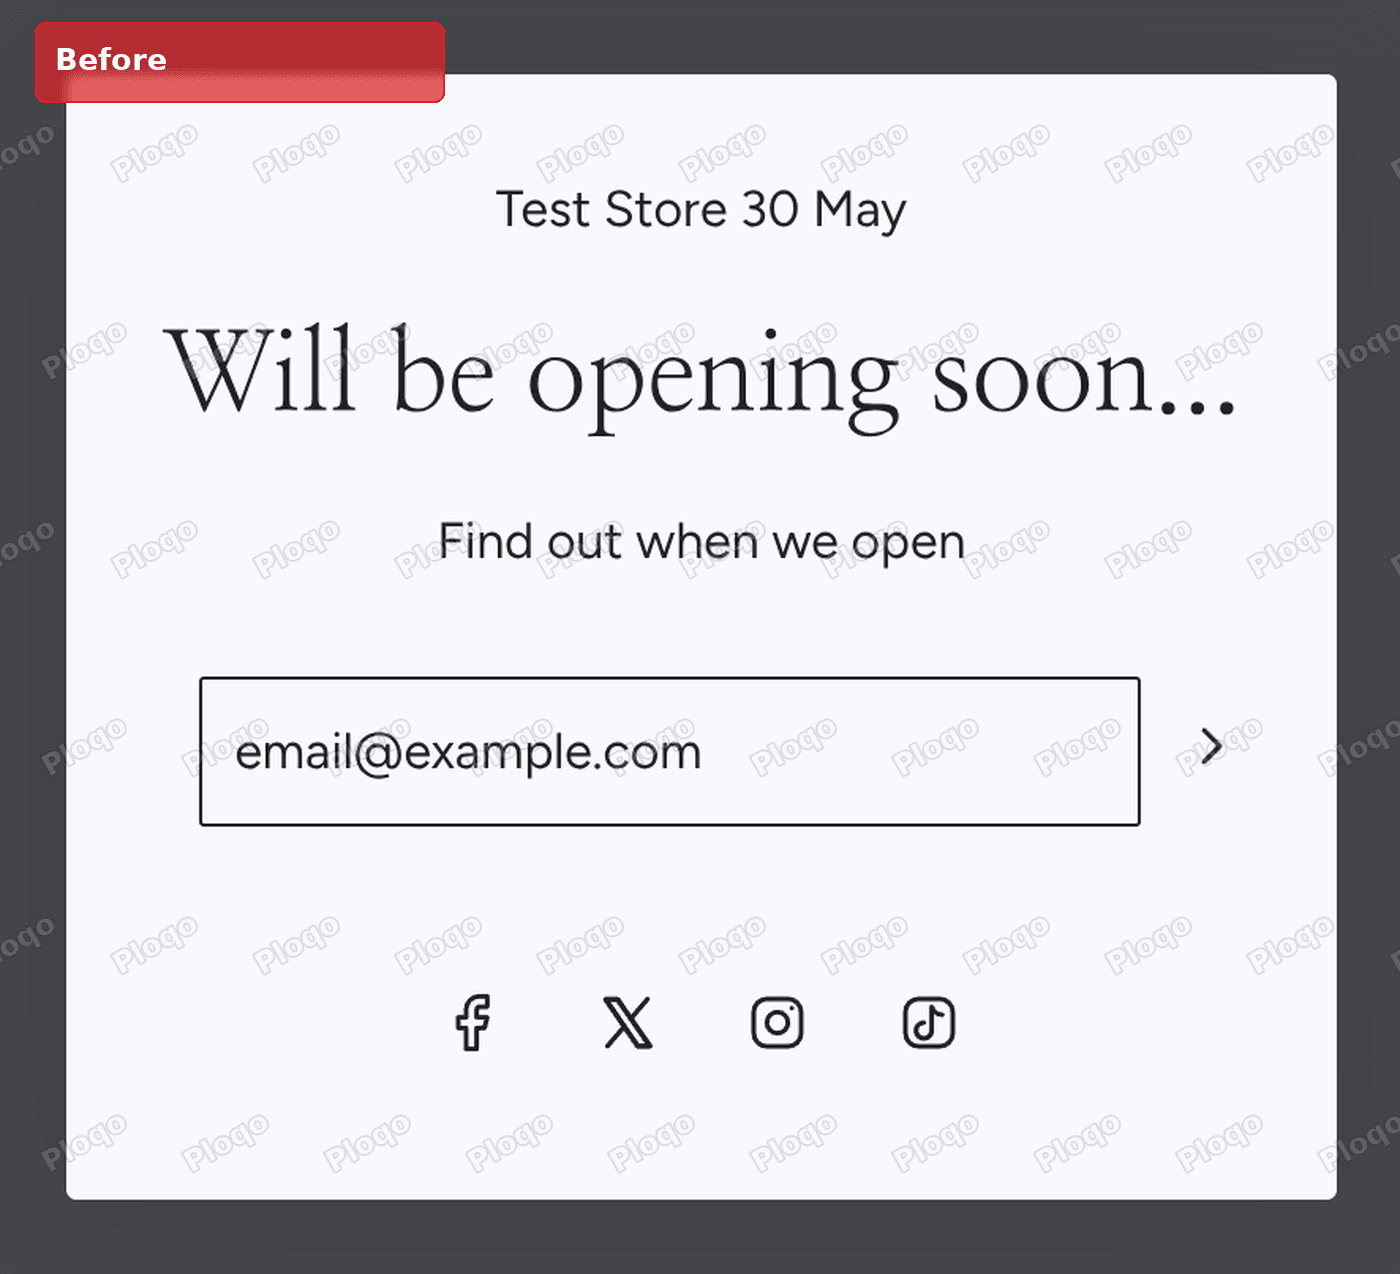 The Flow password page before: an email box with a bare arrow button
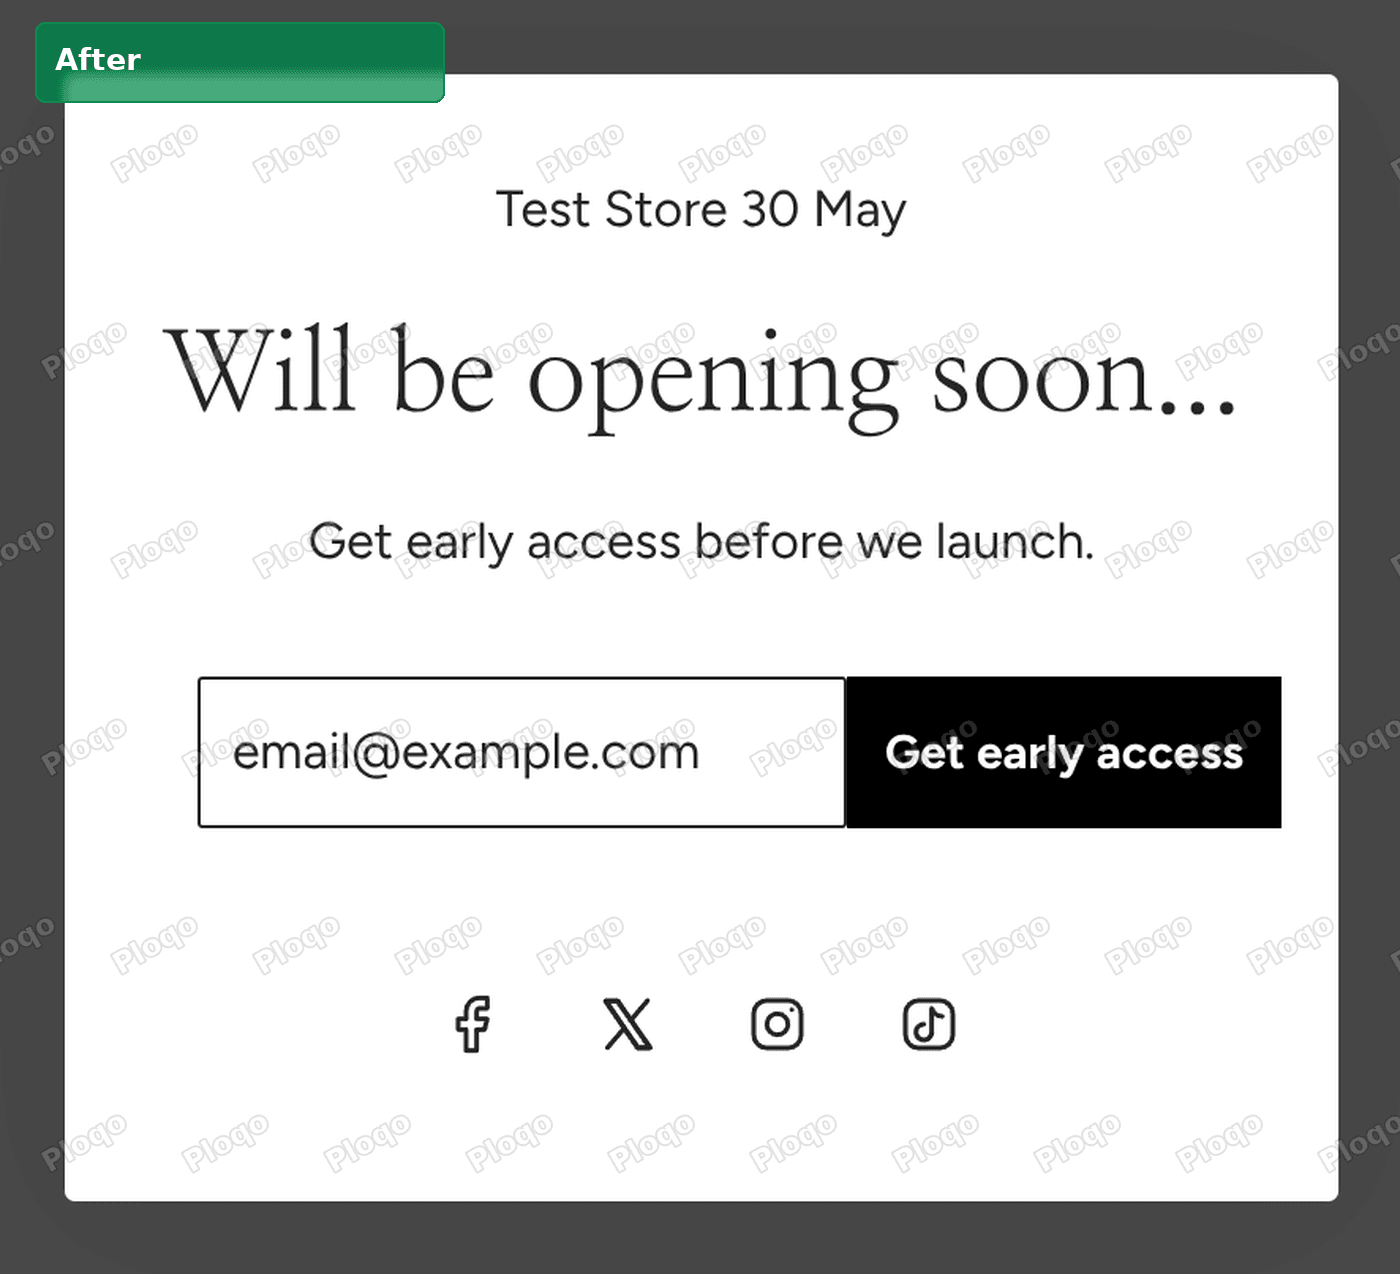 The Flow password page after: the same email box with a black Get early access button
What a Shopify coming soon page actually is
Shopify does not have a separate "coming soon" feature. The coming soon page is the password page, the screen visitors see while your store is locked.
You switch it on in Online Store > Preferences under password protection. While it is on, every visitor lands on that page. They can leave an email, or type the store password if you have given it to them.
Because the coming soon page is part of your theme, how it looks depends on the theme. Flow shows a centred white card with your store name, a heading, a line of text, an email box and your social icons.
Two things follow from that:
- Everything on the card is edited in the theme editor, the screen where you change your store's layout without code.
- The sign-up box is a normal newsletter form. Every email it collects becomes a customer in your admin, marked as subscribed to email marketing.
Why the button has no text
On Flow, the password page's sign-up form uses an icon button. It shows an arrow, and the theme editor has no field for button text.
I checked the obvious places first:
- The Password page section has settings for the logo, heading, description, background and colours, but not the button.
- Flow's separate Newsletter section, which you can add to the password page, also uses an arrow-only button.
So the words have to be added another way. There are two routes, and which one fits depends on whether you are happy to paste a short piece of code.
Add a Get early access button (no app)
This route keeps Flow's own sign-up box and turns the arrow into a black button that says Get early access. It takes about five minutes.
You will use a Custom Liquid section. That is a box in the theme editor where you paste code, and whatever you paste runs on that page.
- Go to Online Store.
- Click Edit theme on your current theme.
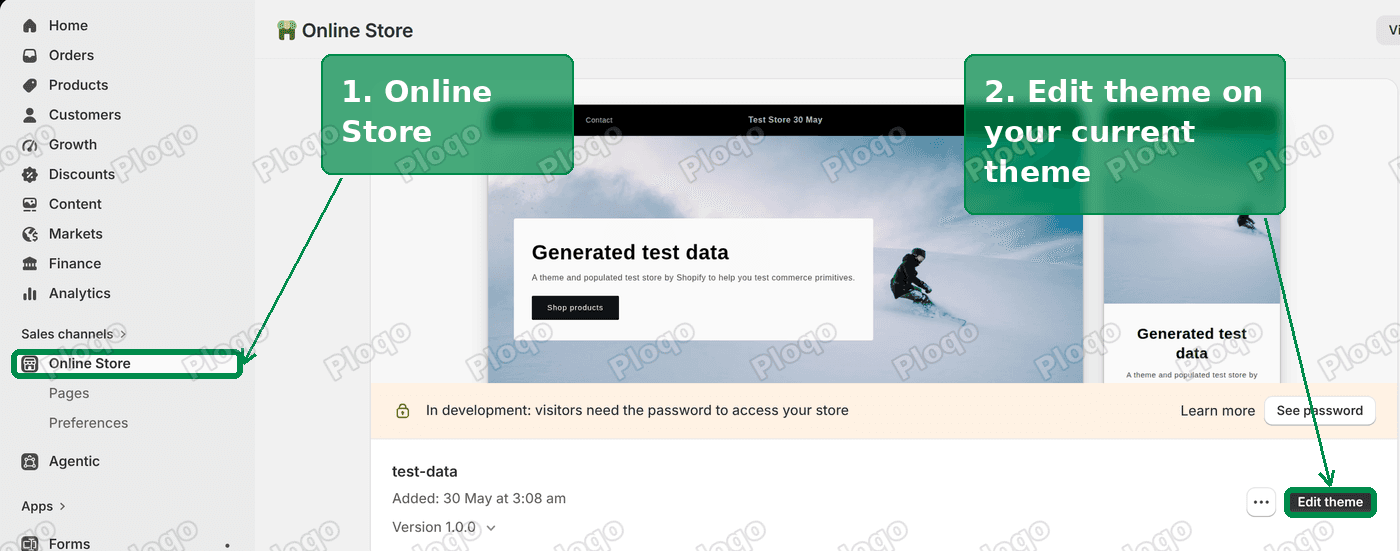 Online Store in the admin menu, and the Edit theme button on the current theme
- Open the page menu at the top of the editor and pick Password.
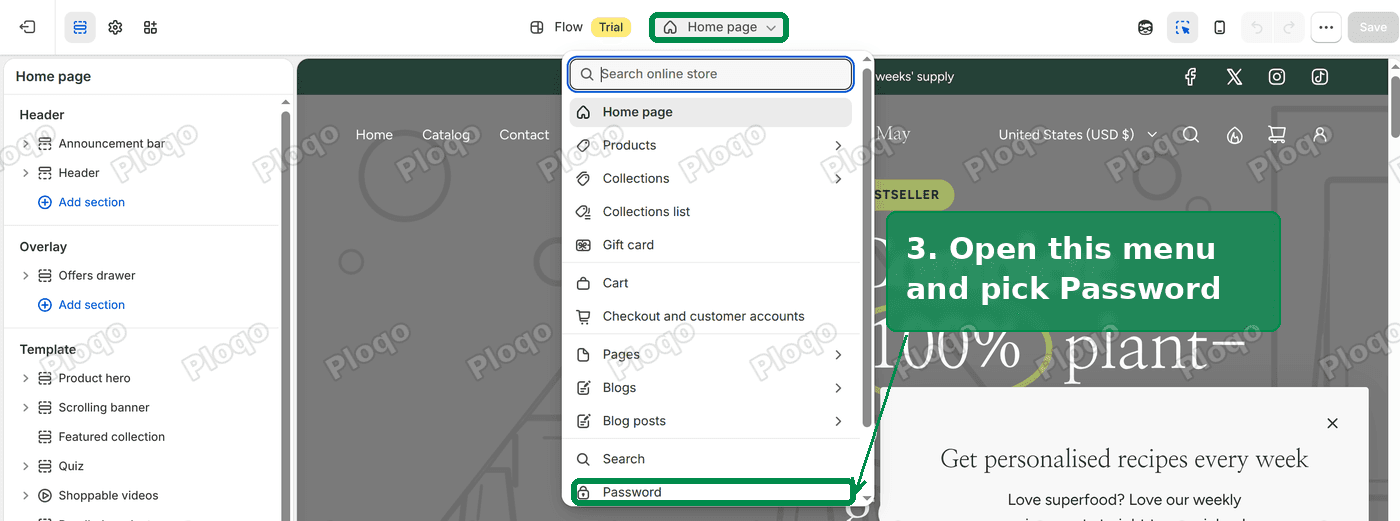 The theme editor page menu open, with Password at the bottom of the list
- Click Password page, then change the Description text. I used "Get early access before we launch." This is the line that sits above the email box.
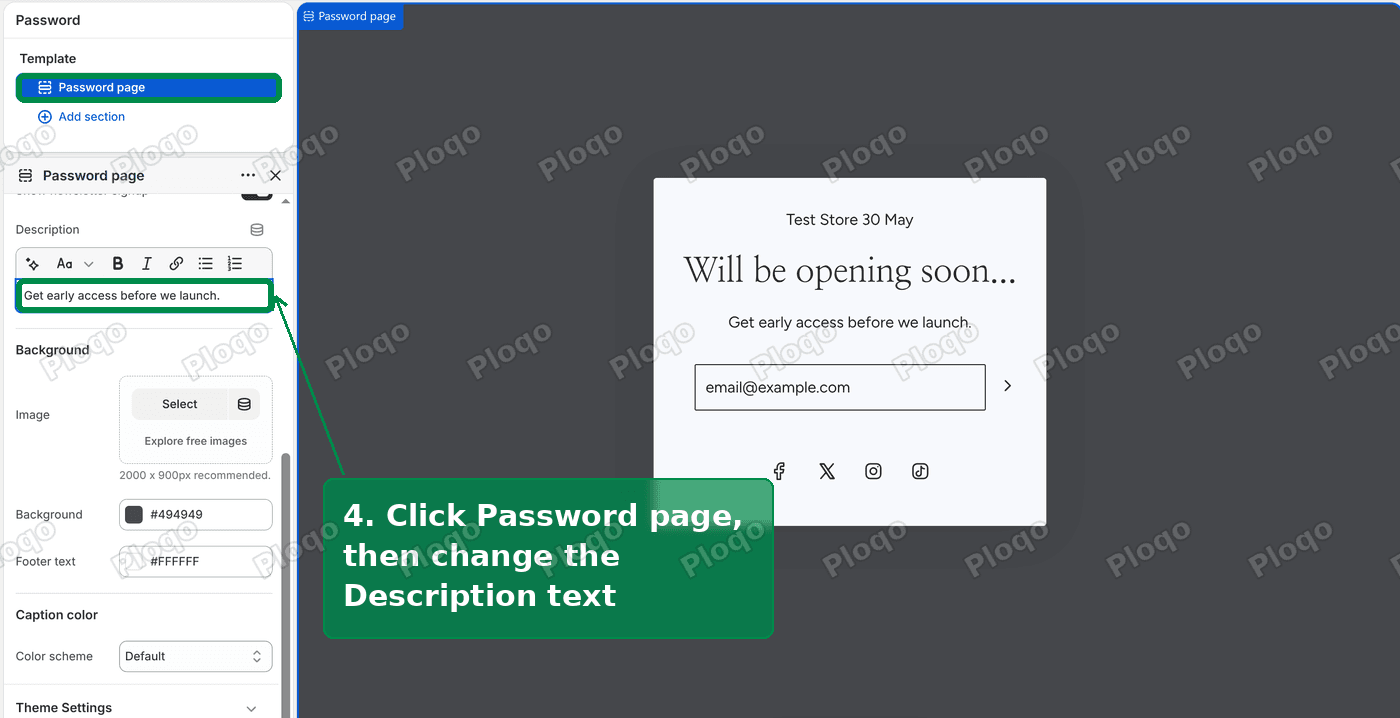 The Password page section settings with the Description field changed to Get early access before we launch
- Click Add section and choose Custom Liquid.
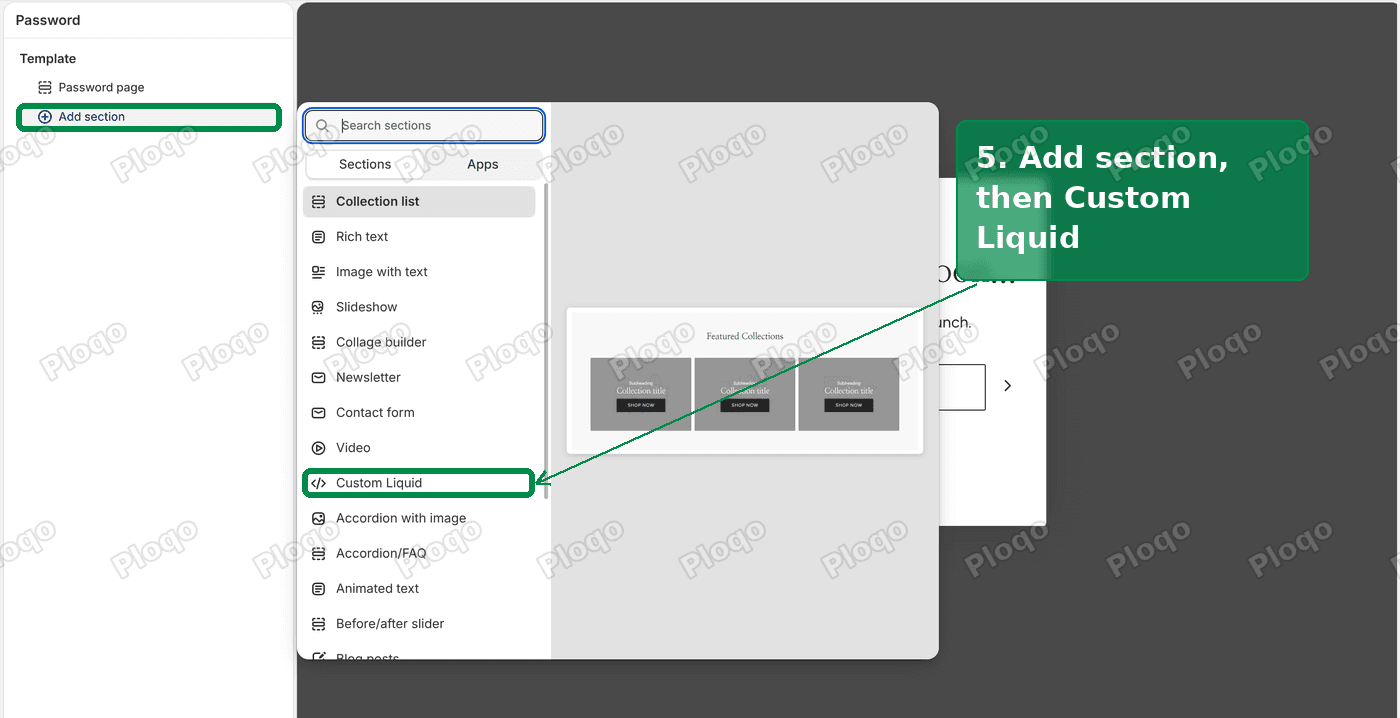 The Add section menu on the password page, with Custom Liquid highlighted
- Delete what is in the Liquid box and paste this code:
<style id="early-access">
#newsletter_password_form .input-group,
#newsletter_password_form .input-group-btn { display: flex; }
#newsletter_password_form button {
width: auto !important;
height: auto !important;
padding: 0 24px;
background: #000;
color: #fff;
font-size: 15px;
font-weight: 600;
white-space: nowrap;
}
#newsletter_password_form button svg { display: none; }
#newsletter_password_form button::after { content: "Get early access"; }
.shopify-section:has(#early-access) { display: none; }
</style>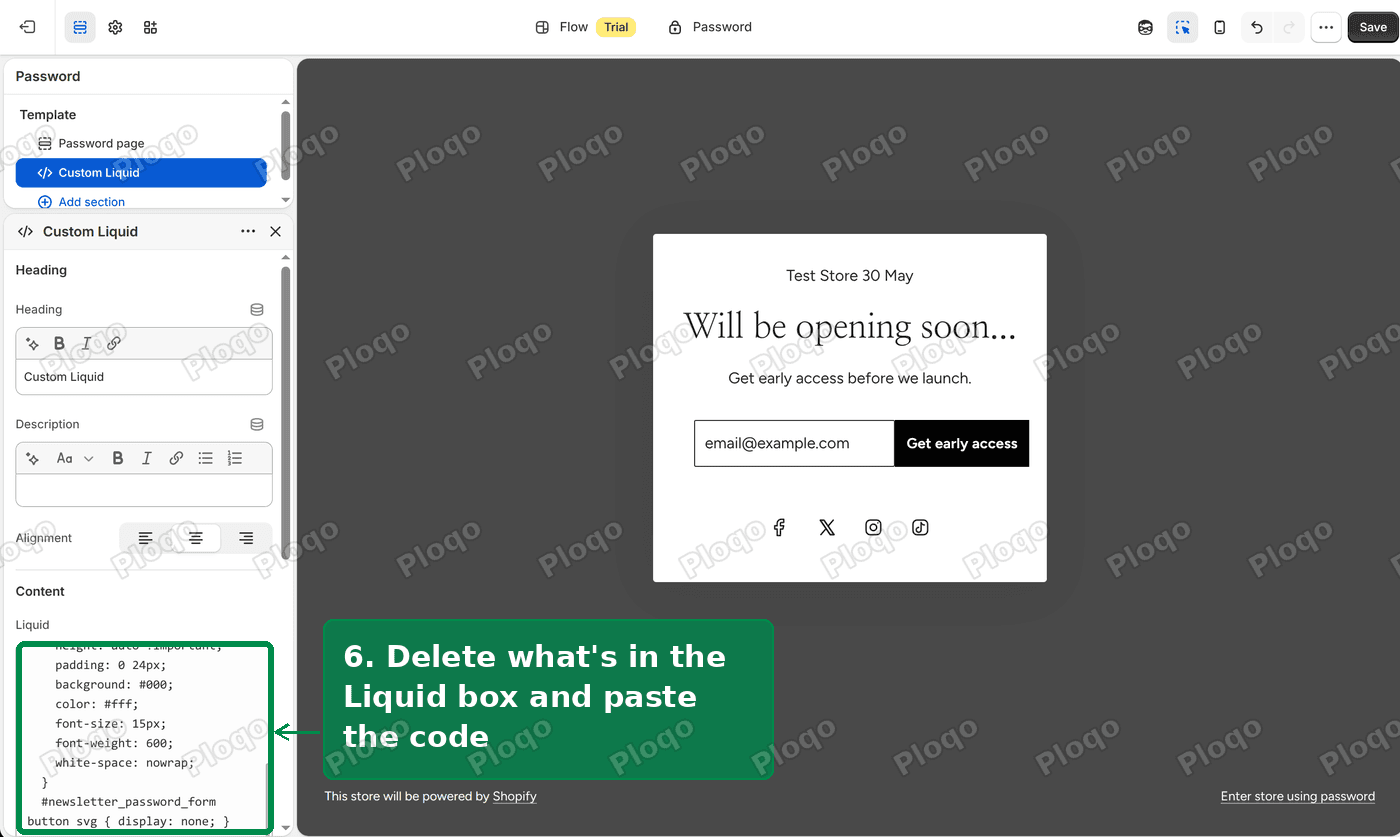 The Custom Liquid section with the code pasted into the Liquid box, and the preview showing the new button
- Click Save.
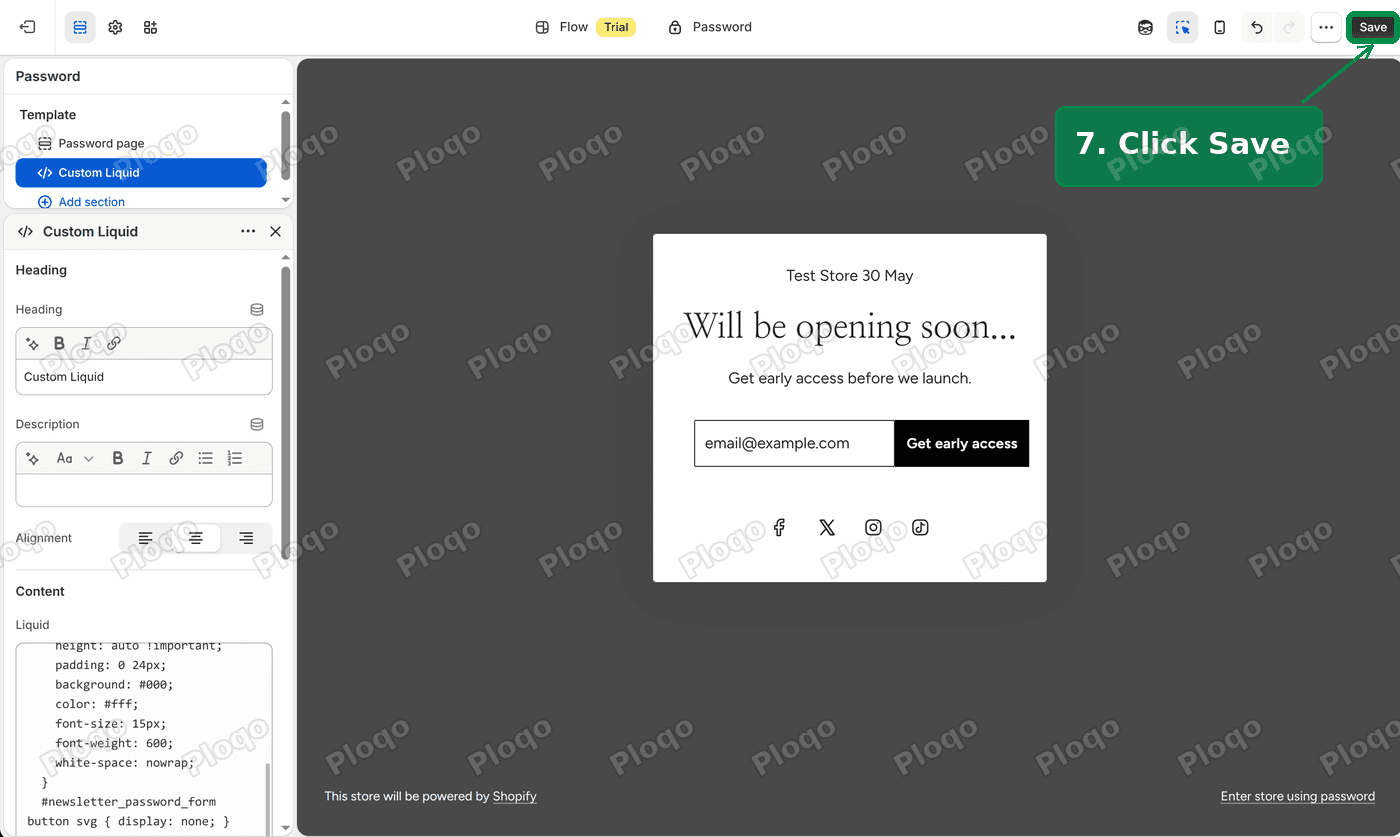 The Save button in the top right corner of the theme editor
The preview updates as soon as you paste. After saving, I reloaded the editor to make sure the change stuck, and the button still read Get early access.
What the code changes
You do not need to understand the code to use it, but in plain words it does four things:
- It hides the arrow.
- It writes the words Get early access on the button.
- It makes the button black with white text and wide enough for the words.
- It hides the empty Custom Liquid section itself. Flow gives that section a heading and padding by default, and without this line a blank strip would appear under your card.
To change the wording, edit the text between the quote marks on the line with content. To change the colour, edit #000 (the button) and #fff (the text).
Why not the Custom CSS box?
Every section in the theme editor has a Custom CSS box at the bottom, and it looks like the natural place for this. It will not work here.
Shopify's Custom CSS box refuses the one line that puts words on the button. When I pasted it there, the editor showed "Invalid property value: content", and the button text was dropped when the theme was saved. The same rule applies on other themes too. A Custom Liquid section accepts the code without complaint, which is why this guide uses one.
Find the people who signed up
Every email the password page collects is saved as a customer with the tags prospect and password page. A tag is a label on a customer that you can search by.
To email this group later, save them as a segment. A segment is a saved search of your customer list that keeps itself up to date, so people who sign up tomorrow are added to it without you doing anything.
- Go to Customers > Segments > Create segment.
- Paste
customer_tags CONTAINS 'password page'into the editor. - Save it with a clear name, such as "Early access".
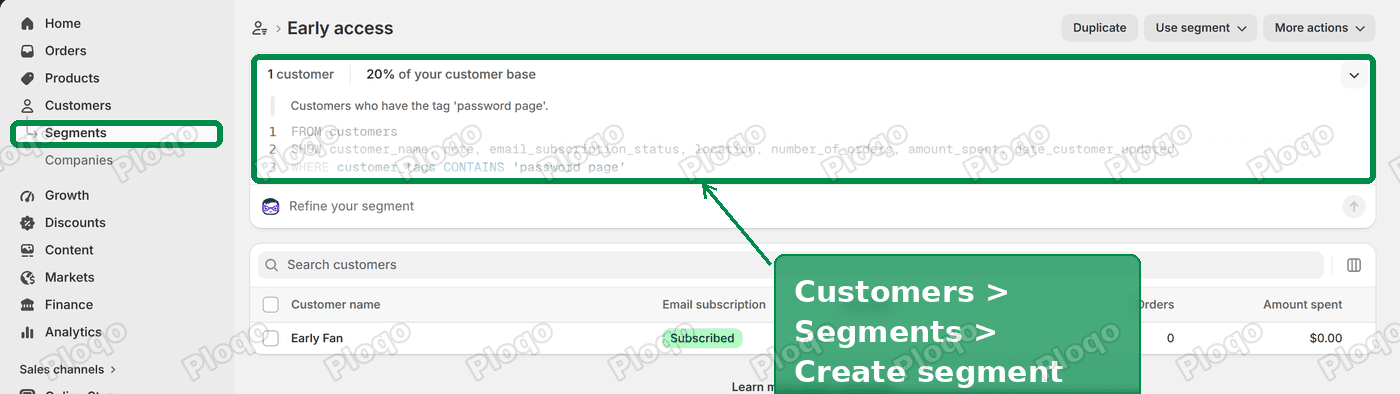 The Early access segment in the Shopify admin, filtering customers who have the password page tag
On my test store, a customer with the password page tag showed up in the segment within a couple of minutes, marked Subscribed.
Send the password 3 days before launch
When you are ready to let the list in early:
- Open the Early access segment.
- Click Use segment and pick your email app.
- Write the email with the store password, the date the store opens to the public and any competition details.
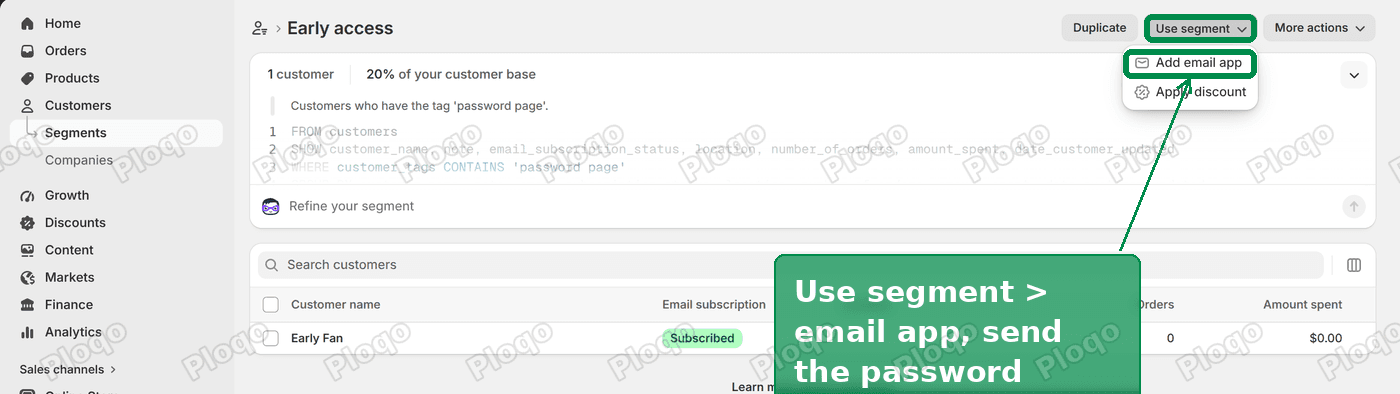 The Use segment menu on the Early access segment, with the email app option
You can see or change the store password in Online Store > Preferences, under password protection. Anyone with the password can get in, so if it gets shared widely, change it there.
Keep the password page switched on until launch day. The people you emailed can shop early, and visitors who were not on the list keep seeing the sign-up form. On launch day, switch password protection off and the store opens to the public.
No code: use the free Shopify Forms app
If you would rather not paste code, the free Shopify Forms app gives you a sign-up form with any button text you like. It adds its own form to the password page as an app block, which is a piece an installed app adds to your theme.
- Install Shopify Forms from the Shopify App Store. Click Create form, choose Inline form, give it a name and click Create.
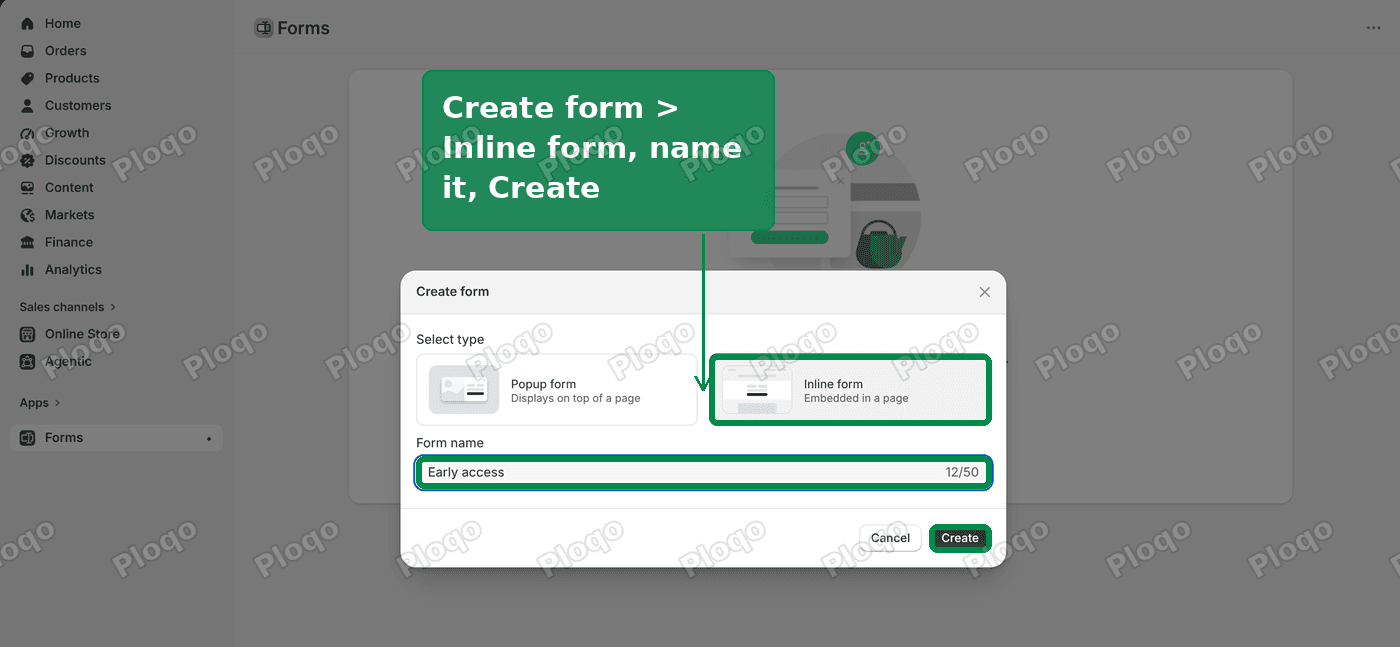 The Shopify Forms Create form window, with Inline form selected and the name Early access
- Set the Button label to "Get early access". The preview on the right shows the button as you type.
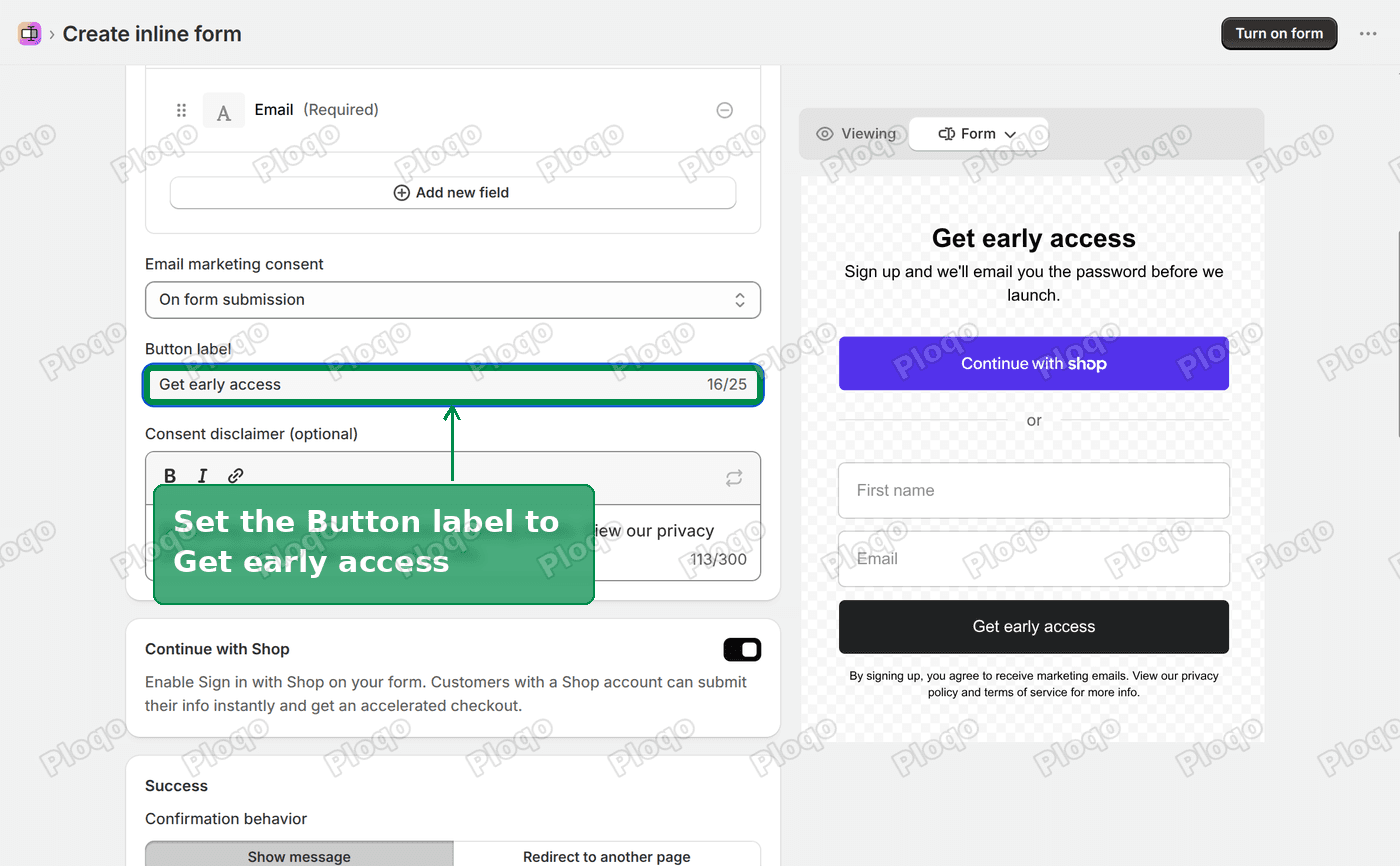 The Shopify Forms editor with the Button label set to Get early access
- Add the tag early access, click Save, then click Turn form on. An inline form only shows on your store once it is turned on.
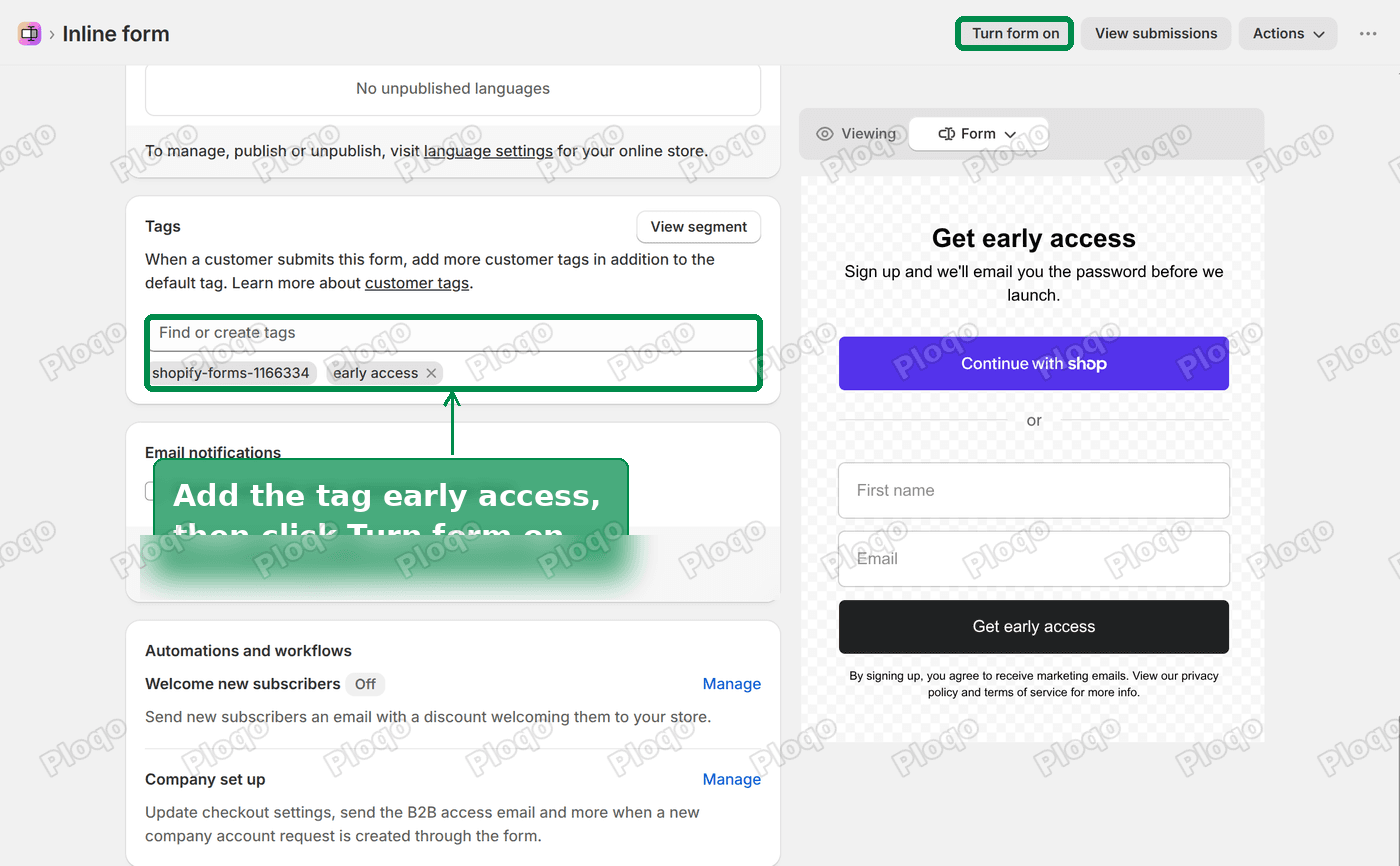 The Tags field in Shopify Forms with early access added, and the Turn form on button
- In the theme editor, open the Password page, click Add section, switch to Apps and choose Forms.
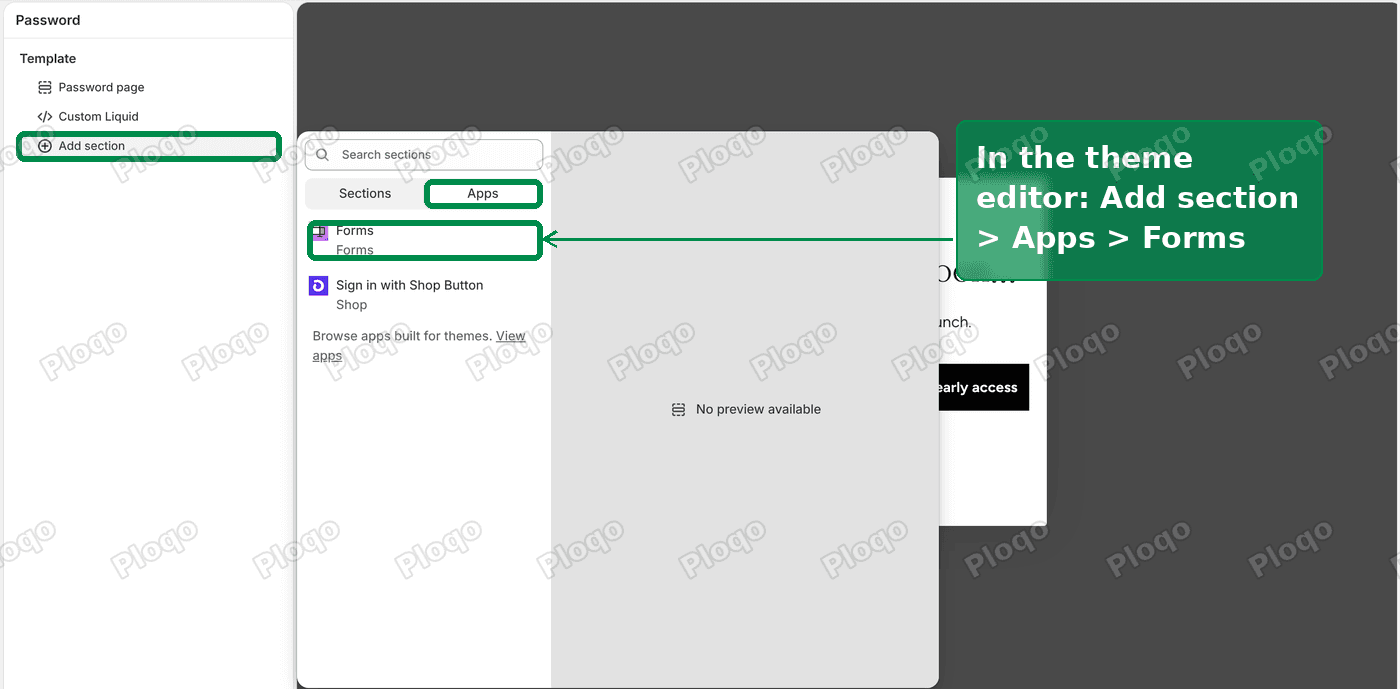 The Add section menu on the password page, on the Apps tab, with Forms highlighted
- Paste the Form ID from the Forms app into the section and click Save.
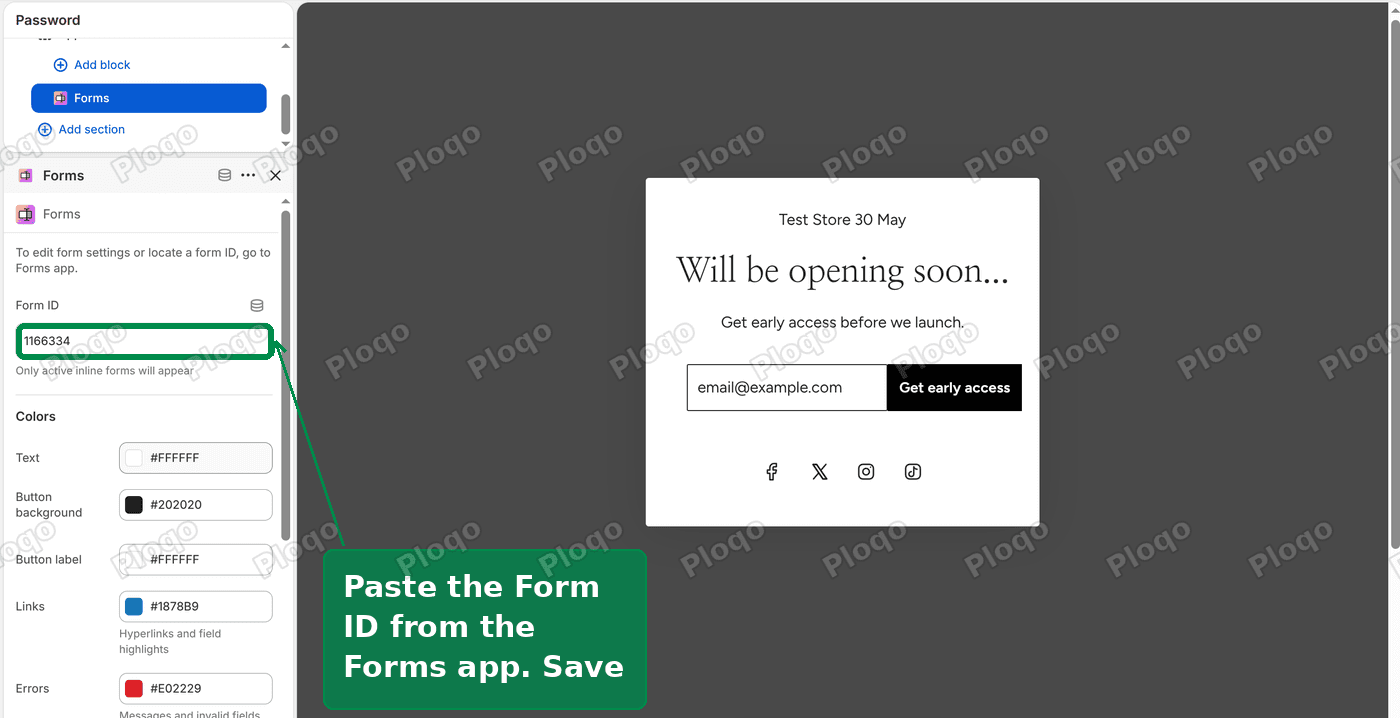 The Forms section settings with the Form ID pasted in
- Click Password page and turn off Show newsletter signup, so visitors see one form instead of two.
Two differences from the code route:
- The form sits under Flow's card, not inside it. On Flow the password card fills the screen, so visitors scroll down to reach it. On a dark background, change the form's Text colour to white in the section settings so the heading stays readable.
- The tag is different. Use
customer_tags CONTAINS 'early access'for the segment instead.
The Forms route also asks for a first name and offers a Continue with Shop button, which lets shoppers with a Shop account sign up in one click.
Coming soon page, password page and coming soon product
These three get mixed up, and they solve different problems.
- Coming soon page is the password page, shown to every visitor while the whole store is locked. This guide is about that one.
- Password page schedule is about unlocking the store at a set time. Shopify cannot do that on its own, which I covered in Shopify Password Page: Schedule It for Early Access.
- Coming soon product is a single product on a live store that shows a badge and cannot be bought yet. That is covered in Shopify Coming Soon Product: Add a Badge Without an App.
If your store is already open and you only want early access to one new product, the coming soon product guide is the one to follow.
Will this work on my theme?
I tested the code on Flow. It targets Flow's password page form by its name in the page, so on a different theme the button will not change, and nothing else breaks either.
The steps themselves are the same on most current themes: pick Password in the theme editor, add a Custom Liquid section, paste, save. What differs is the form's name inside the code. If your theme's button does not change, the Shopify Forms route is the safer choice, because it brings its own form.
If the button did not change
Work through these in order:
- You pasted into the Custom CSS box. Move the code into a Custom Liquid section. The Custom CSS box rejects the line that writes the button text.
- You edited the wrong page. The page menu at the top of the editor must say Password, not Home page.
- You did not click Save. The preview shows unsaved changes, but visitors only see them after saving.
- Show newsletter signup is off. With it off, Flow hides its own form, and there is no button to change.
- You are on a trial theme. A theme you are trying from the Theme Store before buying will not keep some code changes. The Custom Liquid section saved on my Flow trial, but the Custom CSS box did not.
Launching soon? Plan your Pinterest traffic now.
PinFlow turns your Shopify catalog into Pinterest pins and posts them on a schedule, automatically, so your products are already out there when the store opens.
Get PinFlow on the Shopify App StoreMore Shopify fixes
More community-sourced Shopify guides, tested on a live store.
Themes & Storefront
Shopify Search and Discovery App: Fix Unrelated Search Results
Synonyms are gone from the Shopify Search and Discovery app and store search now pads results with unrelated products. Here is a paste-in fix for Dawn that makes search strict again, and how to rebuild synonyms with tags.
Themes & Storefront
Remove the Variant ID From Your Shopify Product URL
Your product link keeps turning into /products/name?variant=43176780890281, before the customer has touched anything. One theme setting stops it, a second switch covers Dawn, and a short snippet cleans the links that already carry the ID.
Themes & Storefront
Make a Shopify Numbered List Start From Any Number
A Shopify numbered list always restarts at 1 because the toolbar button cannot set a starting number. The fix is one HTML edit on the page: change <ol> to <ol start="4">. Covers normal pages, theme sections via Custom Liquid, and jumping a single line with value.