
Shopify Custom Fields: Add Hundreds Without Hitting Limits
Shopify caps custom fields two different ways, and most stores hit both. Here is the structure that lets one product carry hundreds of spec rows, tested on a real store.
By AjayCodeWiz · September 5, 2026 · 10 min read
The problem
A merchant posted this on the Shopify Community and it is a problem worth understanding, because almost every store with technical products eventually walks into it.
They sell dash cameras in New Zealand. Over 40 models across two brands. Each model has a long list of technical detail, and the detail is deliberately different per model because it is what customers search for.
They built the product page properly. They made a custom field for every spec. They connected each one to the page in the theme editor.
Then Shopify stopped them twice.
First they ran out of custom field slots. Then, when they tried to put the fields on the page, the theme editor refused to connect any more.
Their words: the level of customisation is a business requirement, not something to be reduced.
They were about to hire a developer. They did not need one. The whole thing is a structure problem, and you fix it in the admin in under an hour.
The two limits you are actually hitting
These are two separate limits. Most advice online treats them as one, which is why the usual fixes only half work.
Limit one: 128 custom field definitions per resource. A "definition" is the field itself, like "Resolution" or "Night vision". Shopify allows 128 of them on products. Make a definition for every spec on every model and you burn through that fast.
Limit two: 100 dynamic sources per template. A dynamic source is a connection you make in the theme editor, when you click the little database icon and point a text block at a custom field. The cap is 100 per template, and 50 within a single section.
Here is the part that changes the maths.
That second limit only counts connections made through the theme editor interface. Code that reads your custom fields directly is not counted at all. Not once.
So the 100 limit is not really a limit on how much content your product page can show. It is a limit on how many times you click the connect button.
That single fact removes half the problem immediately.
Why moving to metaobjects is only half an answer
The common advice is "use metaobjects". That advice is right, but incomplete, and following it carelessly just moves the wall.
A metaobject is a custom record type you define once and then create many entries from. Think of it as your own little table.
If you make one metaobject that holds a field per spec, you have simply moved 100 definitions from one place to another. You will hit a cap again.
The version that scales looks different. You make a metaobject that represents one row of a spec sheet, not the whole sheet.
Three fields, and only three, no matter how many specs you end up with:
- Group, so rows can be bunched into sections like Video or Power
- Label, the name of the spec
- Value, the actual content
Then each product gets a single custom field that holds a list of those rows.
Now the count works out like this. You have one metaobject definition and one product field. Two definitions, total, forever. Every spec you add after that is content, not schema, so nothing counts against 128 ever again.
Step 1. Make the Spec row metaobject
Go to Content, then Metaobjects, then Add definition. Call it Spec row.
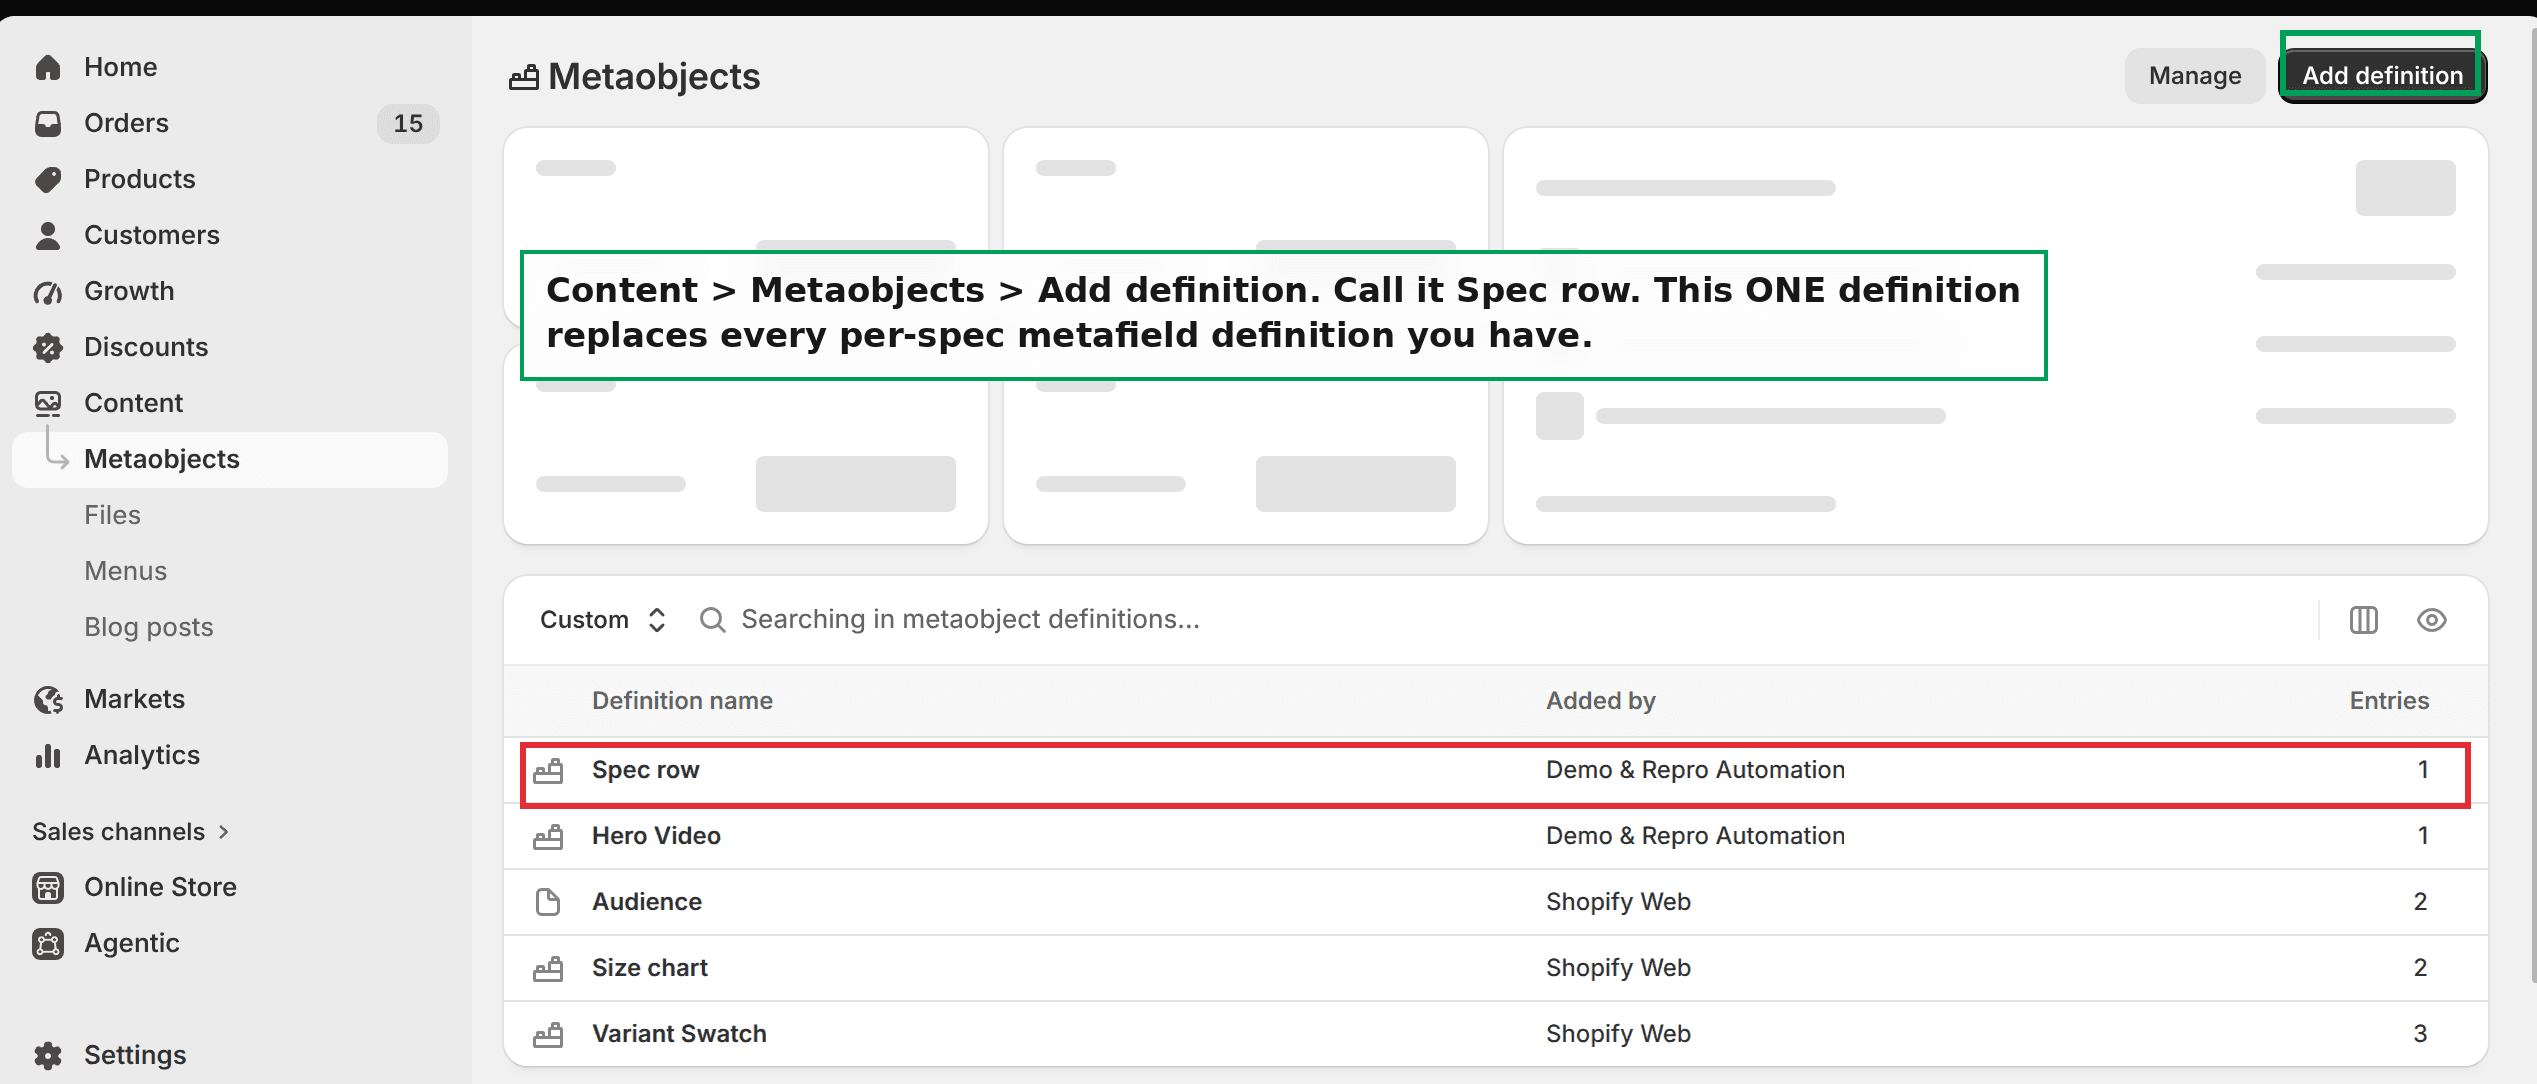 Content, Metaobjects, Add definition in the Shopify admin
Add the three fields. Group and Label can both be single line text. Value should be multi line text, because some specs need a sentence rather than a word.
Then open Options on the definition and turn on Storefront access.
Do not skip that. It is the single most common reason this build renders nothing at all, and nothing tells you why. Your entries exist, your field is filled in, and the page stays blank.
With that done you can add entries. Here are the rows on my test store, with the Group column doing the sorting work.
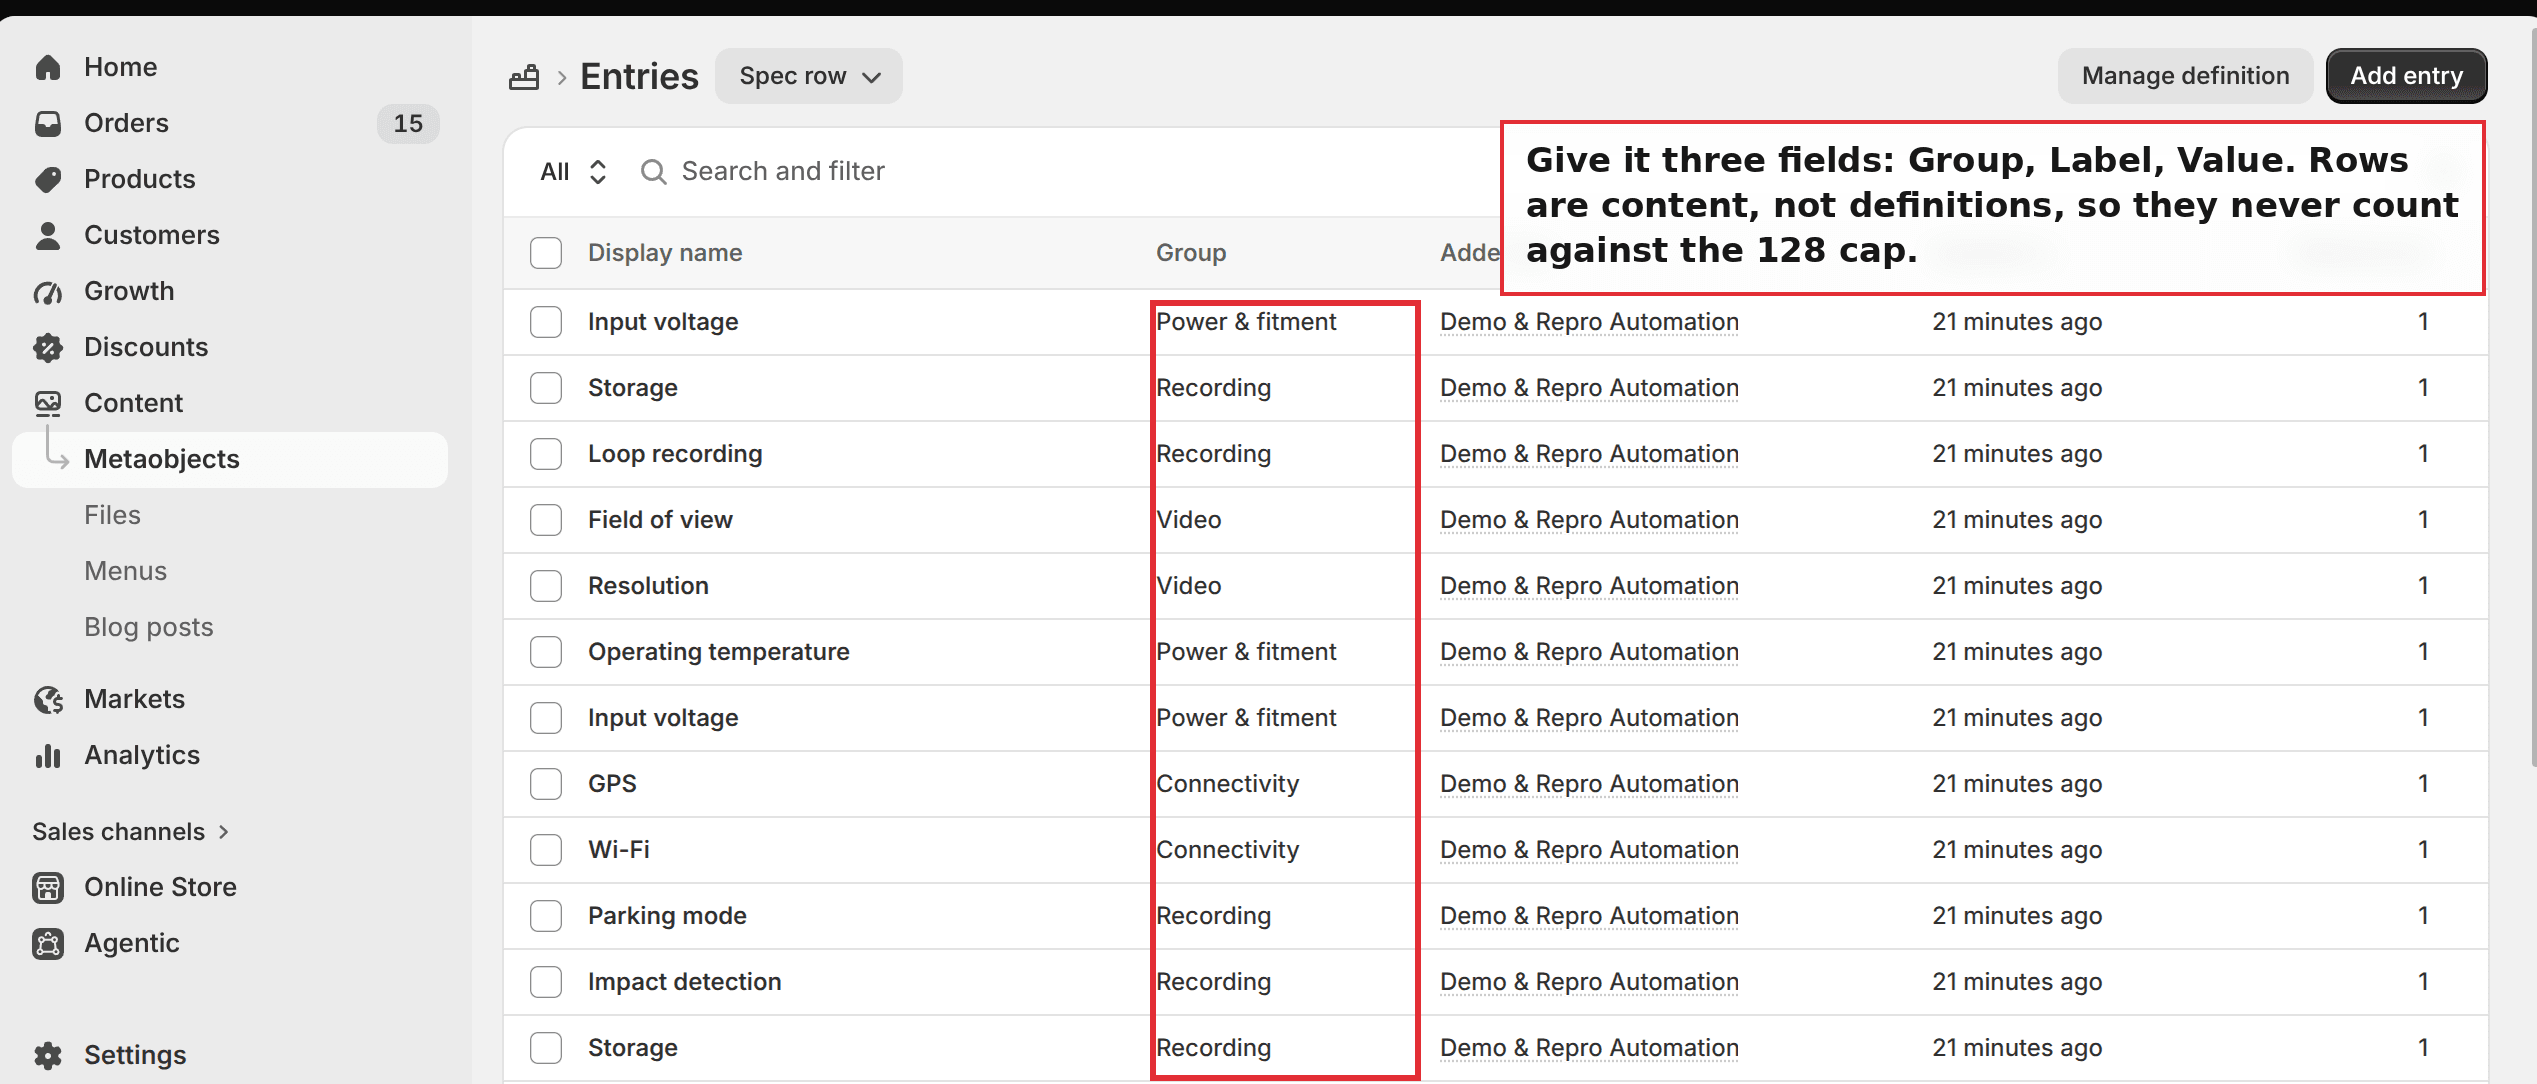 Spec row entries in the Shopify admin, showing the Group column
Every one of those rows costs nothing against your definition count. They are content.
Step 2. Add one custom field to your products
Go to Settings, then Custom data, then Products, then Add definition. Call it Specifications.
For the type, choose Metaobject, then pick Spec row. Tick List of entries, which is what lets one product hold many rows.
That is it. One definition, covering every spec on every product you will ever add.
Step 3. Fill it in on the product
Open a product and find Specifications. Add a row per spec.
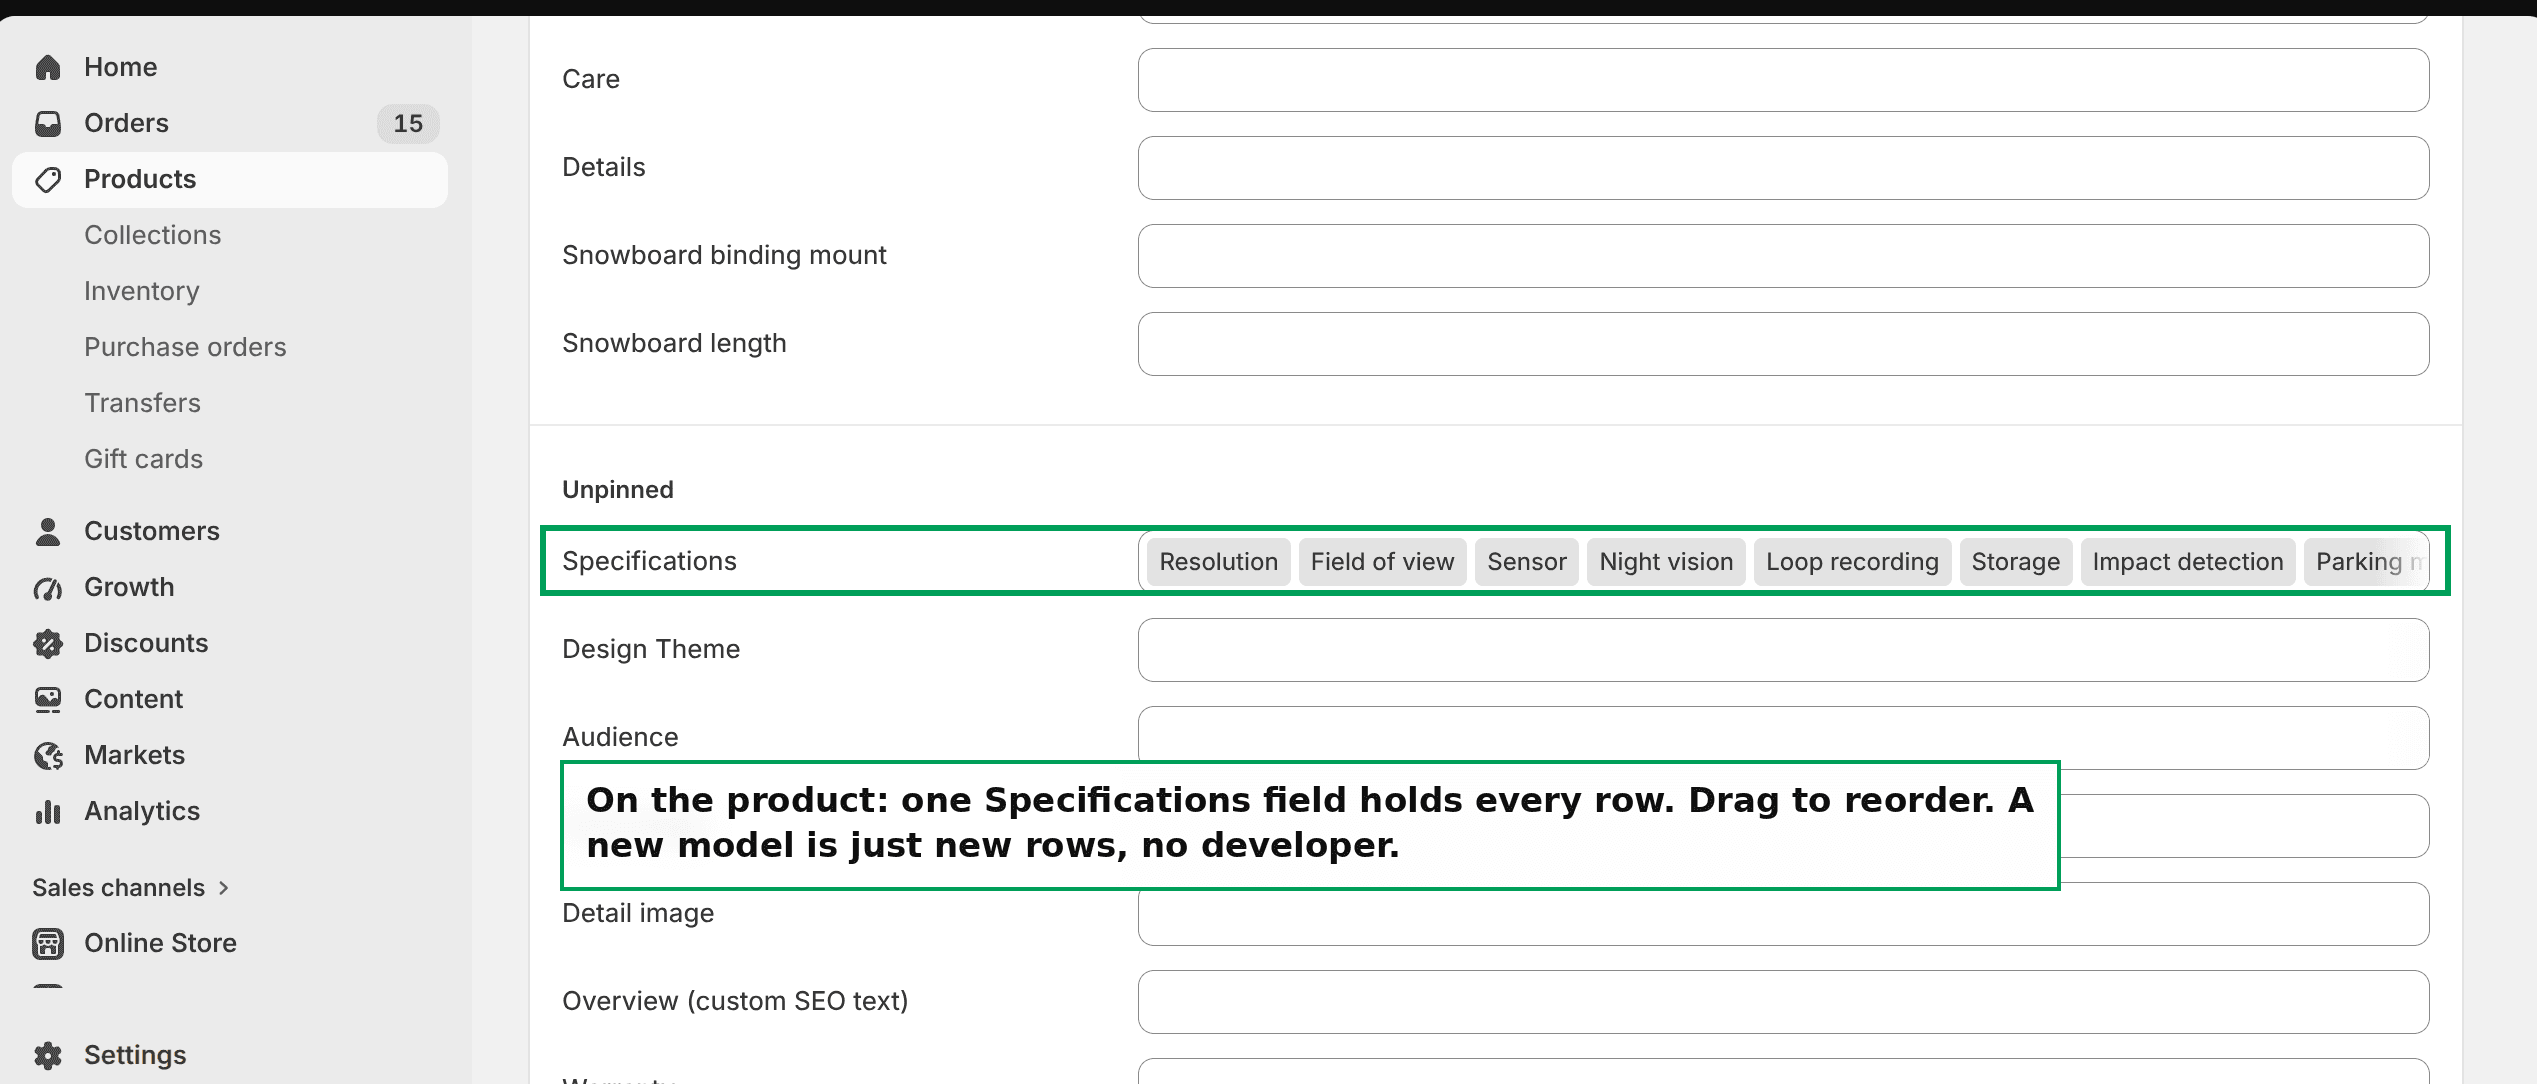 The Specifications field on a Shopify product, holding every spec row
Two things worth knowing here.
Rows print in the order you see them, and you reorder them by dragging. So you do not need a sort or position field, which is a common suggestion and is just extra typing.
And this screen is the only place your team ever enters content. Adding a new model means adding rows. No developer is involved after the setup.
Step 4. Print it all with one Custom Liquid section
This is the step that makes the 100 limit disappear.
Open Online Store, then Themes, then Customize. Open your product template. Choose Add section, then Custom liquid.
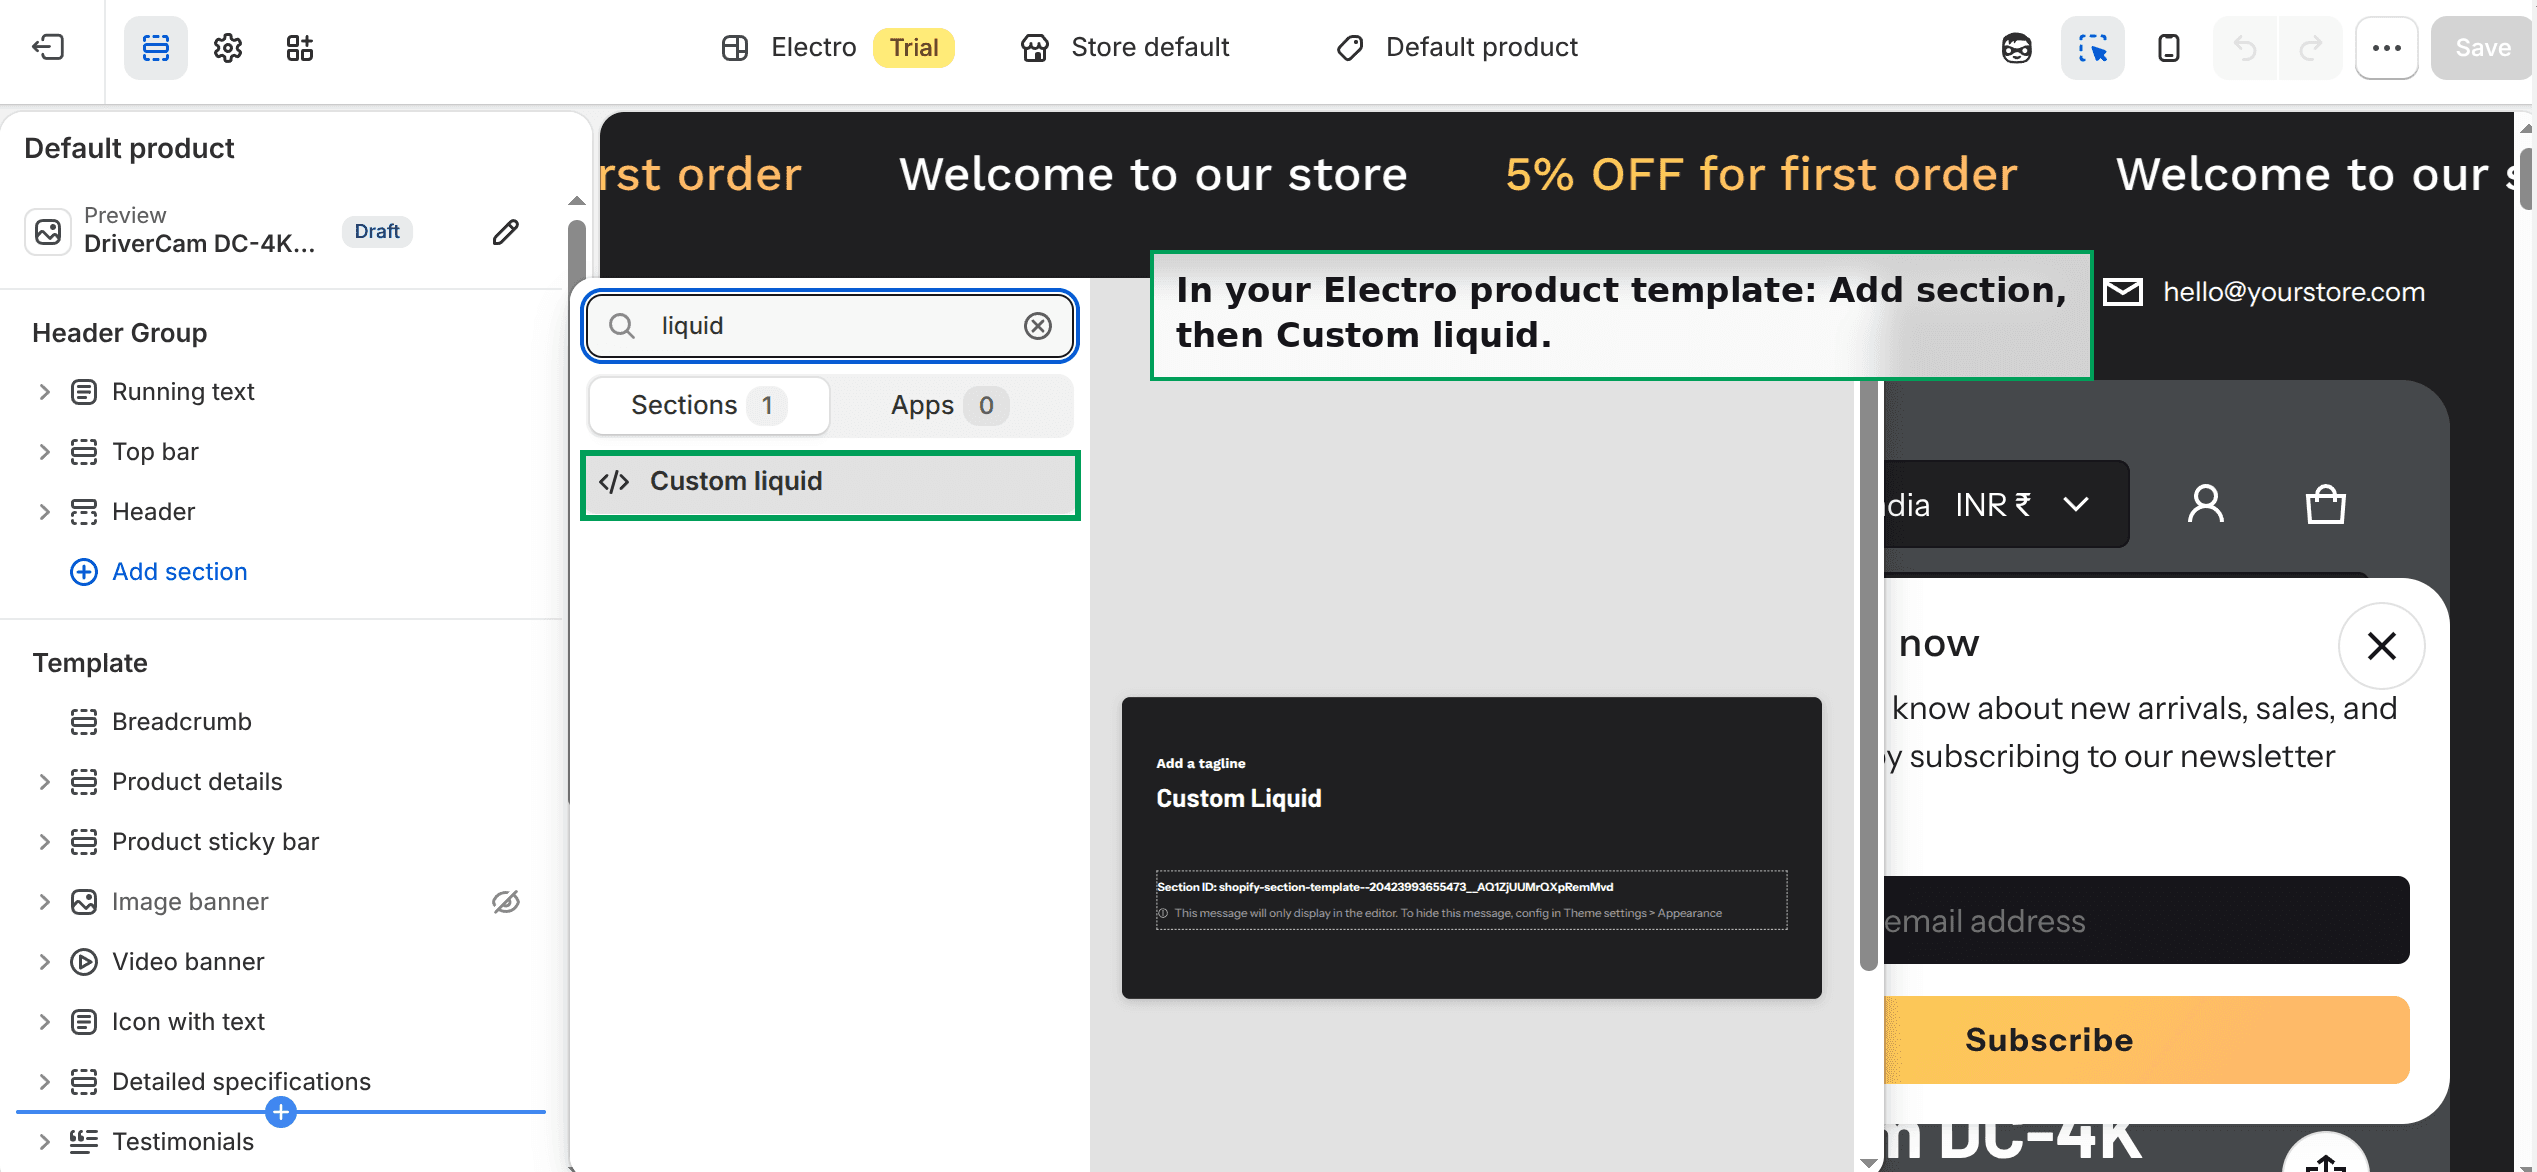 Add section, then Custom liquid, in the Shopify theme editor
Paste this into the Liquid code box, then Save.
{%- assign rows = product.metafields.custom.specs.value -%}
{%- if rows != blank -%}
{%- assign seen = '|~|' -%}
{%- for r in rows -%}
{%- assign g = r.group | default: 'Specifications' -%}
{%- assign probe = g | prepend: '|~|' | append: '|~|' -%}
{%- unless seen contains probe -%}
{%- assign seen = seen | append: g | append: '|~|' -%}
{%- endunless -%}
{%- endfor -%}
{%- assign groups = seen | remove_first: '|~|' | split: '|~|' -%}
<div class="spec-sheet">
{%- for g in groups -%}
<details class="spec-sheet__group"{% if forloop.first %} open{% endif %}>
<summary class="spec-sheet__head">{{ g }}</summary>
<div class="spec-sheet__body">
{%- for r in rows -%}
{%- assign rg = r.group | default: 'Specifications' -%}
{%- if rg == g -%}
<div class="spec-sheet__row">
<div class="spec-sheet__label">{{ r.label }}</div>
<div class="spec-sheet__value">{{ r.value | newline_to_br }}</div>
</div>
{%- endif -%}
{%- endfor -%}
</div>
</details>
{%- endfor -%}
</div>
<style>
.spec-sheet{max-width:900px;margin:0 auto}
.spec-sheet__group{border-bottom:1px solid rgba(128,128,128,.35)}
.spec-sheet__head{cursor:pointer;list-style:none;padding:16px 4px;font-weight:600;font-size:1.05rem;display:flex;justify-content:space-between;align-items:center}
.spec-sheet__head::-webkit-details-marker{display:none}
.spec-sheet__head::after{content:"+";font-weight:400;font-size:1.4rem;line-height:1}
.spec-sheet__group[open] .spec-sheet__head::after{content:"\2013"}
.spec-sheet__body{padding:0 4px 12px}
.spec-sheet__row{display:grid;grid-template-columns:240px 1fr;gap:12px;padding:10px 0;border-top:1px solid rgba(128,128,128,.2)}
.spec-sheet__label{font-weight:600}
.spec-sheet__value{opacity:.85}
@media (max-width:749px){.spec-sheet__row{grid-template-columns:1fr;gap:2px}}
</style>
{%- endif -%}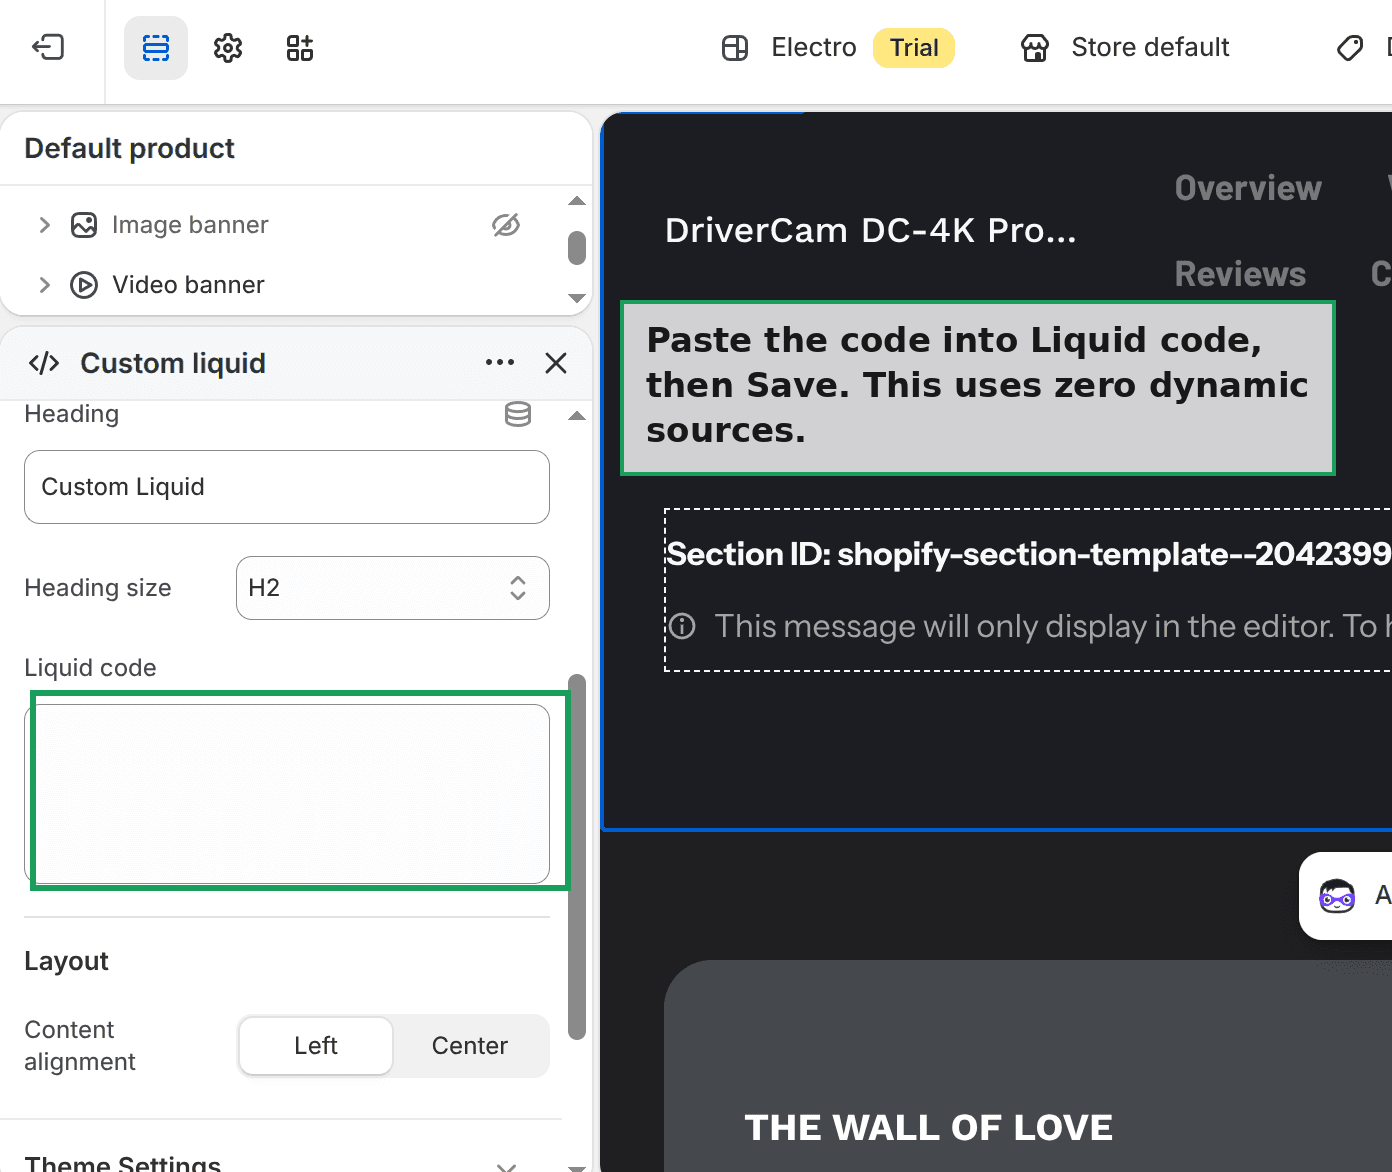 The Liquid code box in the Shopify theme editor, ready to paste into
One line in that code matters more than the rest.
product.metafields.custom.specs.value
The .value on the end is required. Without it you get the reference to the rows rather than the rows themselves, and the section prints nothing. This is the second failure that shows you nothing, after Storefront access.
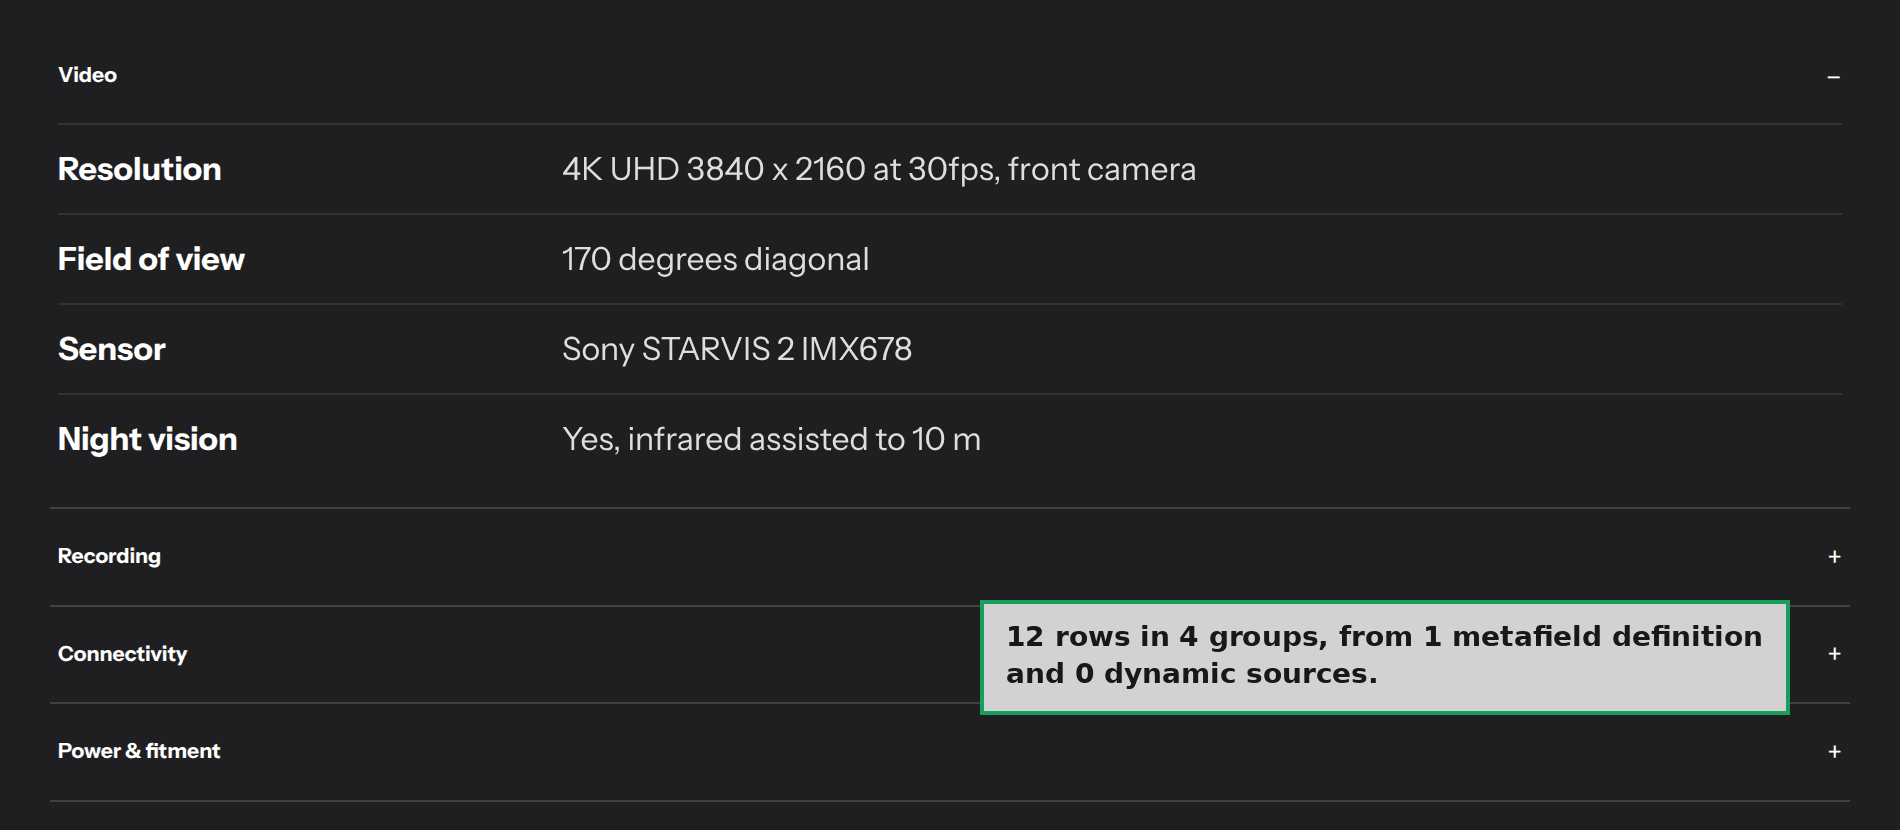
Here is the result on my test store. Twelve spec rows, four groups, from one field definition and zero dynamic sources.
 A grouped spec sheet on a Shopify product page
Add a hundred more rows and the count of dynamic sources used is still zero.
Hiding a section when a product has no data
This is usually the second half of the question, and with this structure you get it free.
Not every model has every feature. An entry level camera has no Wi-Fi. A budget model has no GPS. Showing an empty Connectivity heading looks broken.
You do not need any conditions for this.
If a product has no rows at all, the whole section prints nothing. If a product has rows but none in a particular group, that group is never created, so it never appears.
Same section, same code, a cheaper model. The Connectivity group is simply gone.
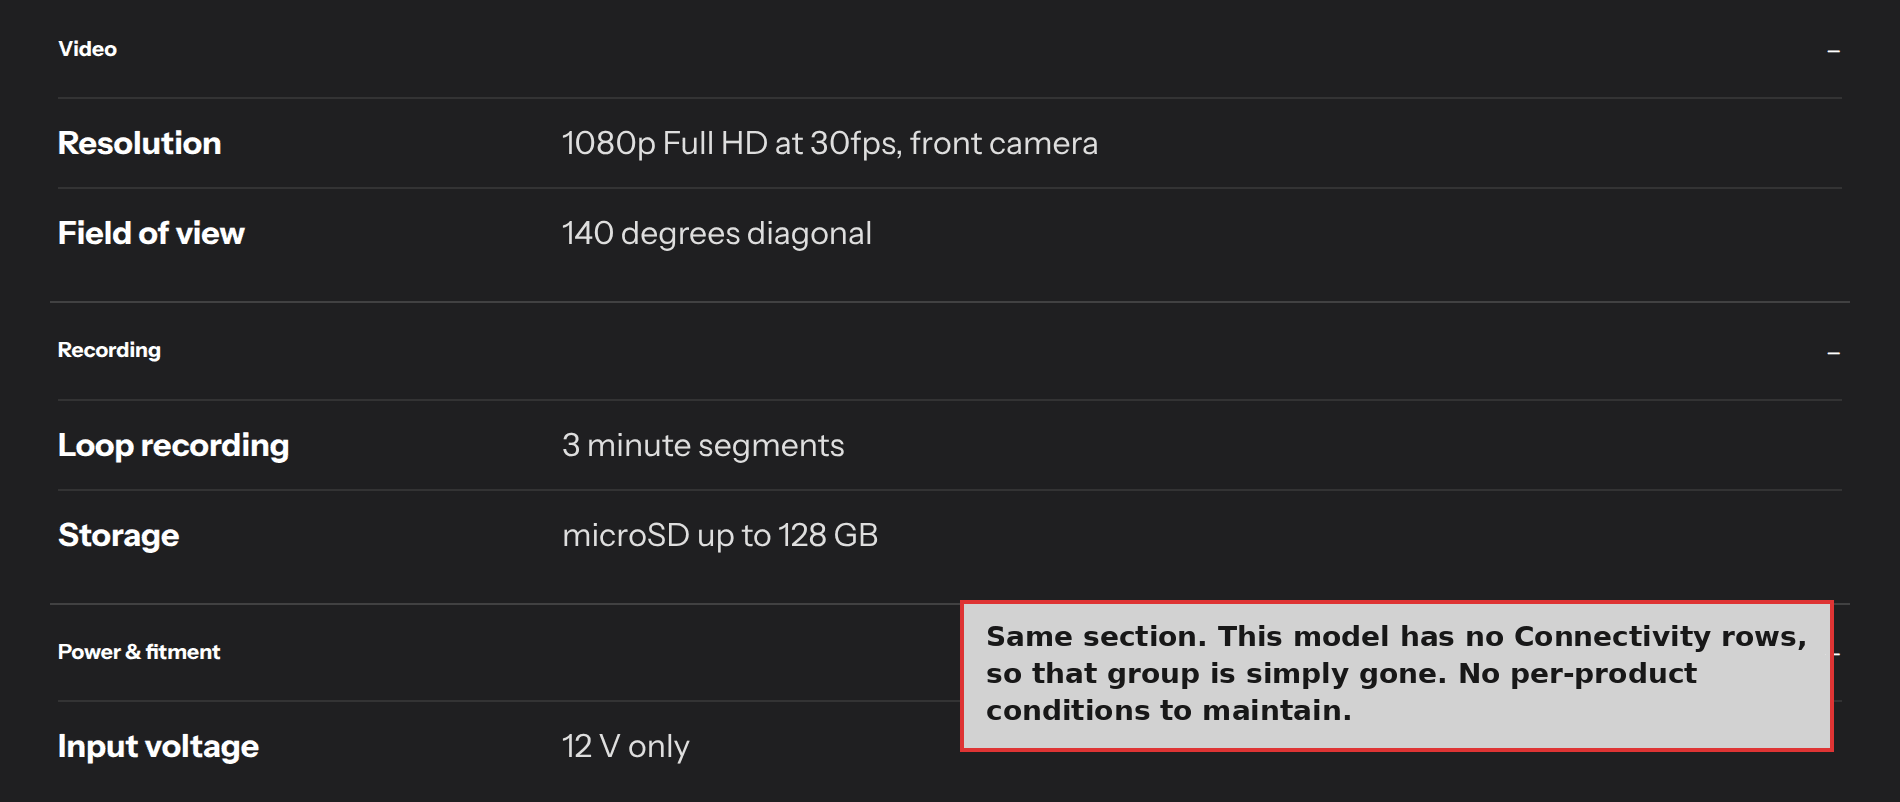 The same spec section on a product with no Connectivity rows, so that group is absent
There is nothing per product to configure and nothing to maintain when you add model 41.
You do not have to rebuild your product page
The merchant's real worry was this. They had spent a long time on the layout and did not want to start over.
You do not have to. Custom Liquid is additive. It is one more section sitting alongside everything you already built. Nothing gets deleted and nothing you already connected stops working.
The practical approach is to move only the field heavy part, which is almost always the spec sheet, and leave the rest of your sections connected the way they are. Your hero, your title, your one off marketing copy can all stay on dynamic sources. Those are a handful of connections, not a hundred.
One genuine limitation is worth flagging. You cannot paste Liquid inside a Collapsible content row. That field accepts typed text or one connected field, and nothing else.
So if collapsible rows are what consumed your 100, rebuild that one accordion using the code above. It uses the browser's own collapsible element, so it looks and behaves the way shoppers expect.
Loading hundreds of rows from a spreadsheet
If your content already lives in a spreadsheet, do not retype it.
Matrixify imports custom field values from Excel and CSV, which is the fastest way to load 40 products at once. Metafields Guru and Accentuate Custom Fields are both good for bulk editing values afterwards.
Set the structure up by hand on one product first. Get it rendering. Then import the rest against a structure you have already proven, rather than debugging an import and a template at the same time.
How many custom fields can a Shopify product have?
The definition limit is 128 per resource type. That means 128 on products, and separately 128 on collections, customers, orders and so on.
But the number of values a product can carry is effectively unbounded once you use the row structure above. My test product holds twelve spec rows through one definition. Two hundred rows would still be one definition.
If you are close to 128, that is the signal to restructure rather than to request more. Shopify will not raise it.
What is a dynamic source in Shopify?
A dynamic source is a link between a theme setting and a piece of your store's data.
In the theme editor, some settings have a small database icon next to them. Clicking it lets you point that setting at a product field instead of typing fixed text. That connection is a dynamic source.
They are convenient and they are the right tool for a handful of fields. They are the wrong tool for a spec sheet, because each one is a separate manual connection, they are capped at 100 per template, and you have to repeat the work on every template you create.
Reading the same data in Liquid has no cap and no repetition.
Custom fields, metafields and metaobjects are not the same thing
These three terms get used interchangeably and it causes real confusion, so here is the distinction in plain words.
Metafields are Shopify's name for custom fields. They attach extra data to something that already exists, like a product or a collection. If you are new to them, start with our guide on how to add metafields in Shopify.
Custom fields is just the everyday phrase for the same feature. Shopify's own admin calls the area Custom data.
Metaobjects are different. They are not attached to anything. They are your own record type, existing on their own, which you then point at from a product. That independence is what makes the row structure in this article possible. We use the same idea to build a size chart that applies itself to new products.
The short version: a metafield hangs data off a product, a metaobject is a record in its own right.
Do custom fields help SEO?
They can, and the merchant in this thread was right to care about it.
Detailed, specific, per product content is exactly what search engines and AI answer engines look for when deciding whether your page actually answers a query. A page saying "4K UHD 3840 x 2160 at 30fps" can rank for that query. A page saying "high quality video" cannot.
The thing to get right is that the content must be in the page's HTML, which is what the Liquid above produces. Content injected by an app after the page loads is far less reliable.
Two practical notes. Write real values rather than marketing adjectives, and keep labels consistent across models so comparison queries can match them.
What to check if nothing renders
Four failure modes, in the order they actually happen.
- Storefront access is off on the metaobject definition. This is the most common one by a wide margin. Open the definition, check Options.
.valueis missing from the end of the metafield reference in your code.- The namespace or key does not match. The code above expects
custom.specs. If you named your field something else, change that one line. - You are looking at the wrong template. If some products use a different product template, add the section there too.
If the section renders but looks wrong rather than empty, it is styling, not data. The CSS is all in the block you pasted and you can edit it in place.
Do you need a developer for this?
No, and that is the honest answer even though a lot of replies on that thread offered to quote for it.
Every step above is admin work plus one paste. There are no theme files to edit, so nothing breaks when your theme updates, and nothing has to be redone when you switch themes. The code lives in a section setting, not in your theme's code.
I built the whole thing on a test store to check it before answering, including the case where a product is missing an entire group. It took less time than writing this article about it.
If your catalog is large and technical, the structure is the thing that matters. Get that right once and the limits stop existing.
Your specs are written. Who is seeing them?
PinFlow turns your Shopify catalog into Pinterest pins and posts them on a schedule, so the products you have carefully detailed reach people who are still searching outside your store.
Get PinFlow on the Shopify App StoreMore Shopify fixes
More community-sourced Shopify guides, tested on a live store.
Shopify Admin
How to Edit a Packing Slip on Shopify to Show Big Product Photos
Shopify's order page shows each item as a 40 pixel thumbnail with no way to enlarge it. Here is how to edit the packing slip template so every line prints that exact variant's photo at 1000 pixels, including the one-line fix Shopify's default template needs.
Shopify Admin
Shopify Shipping Zones: Fix Products Sold Out in One Country
Products show Sold out for customers in one country while your admin shows stock. The cause is a shipping profile with no zone for that country. How Shopify shipping zones and profiles decide what a customer can buy, and the six-click fix, with screenshots.
Shopify Admin
Shopify Translate: Fix Mixed Languages on Product Pages
A Swedish Shopify store showed English words on translated product pages. The titles were translated, so the English came from option names and theme text. How to fix each one in Translate & Adapt, with screenshots.