
How to Edit the Shopify Order Confirmation Email
The order confirmation email is Liquid you can edit, but it is not in your theme and not in the checkout editor. Here is where it lives, plus two tested fixes for local pickup orders.
By AjayCodeWiz · July 18, 2026 · 9 min read
The problem: the email says the wrong thing and you cannot find it
A customer places a local pickup order. The confirmation email tells them:
You'll receive an email when your order is ready for pickup. Estimated delivery Sunday, Jul 19 to Tuesday, Jul 21
Two things are wrong with that.
There is no pickup address. The customer is collecting the order in person and the email never says from where.
And there is an estimated delivery window on an order that is not being delivered. Nothing is shipping, so the date range is meaningless at best and a support ticket at worst.
A bakery owner hit exactly this and asked how to edit the email code. That question has a real answer, but only once you know which of Shopify's several editors owns this particular text.
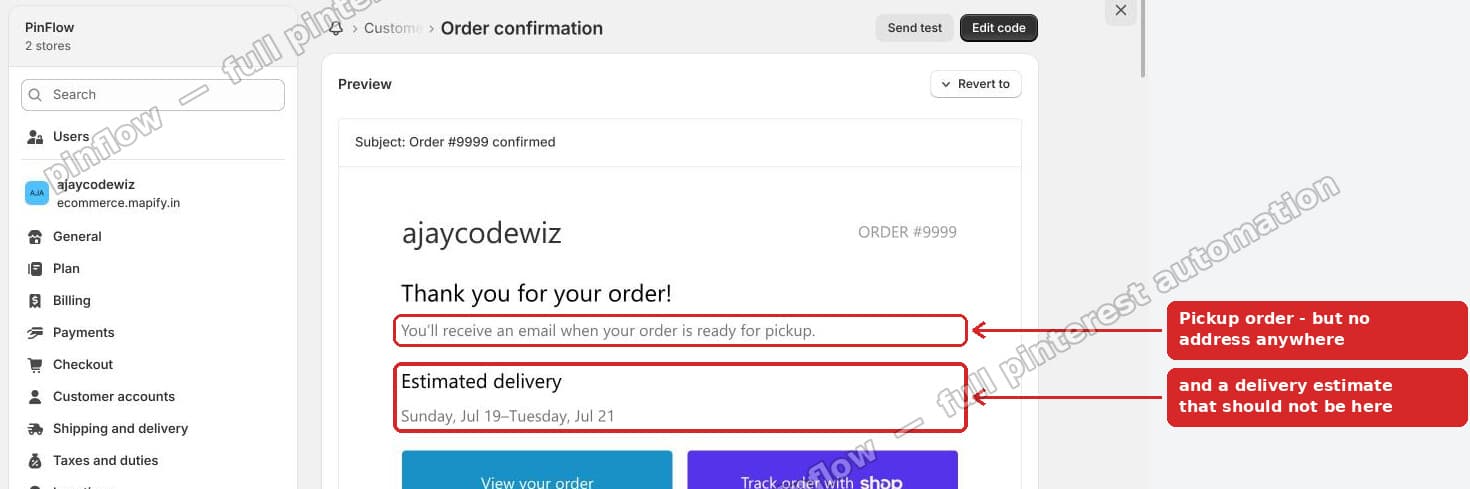 The order confirmation email with a pickup line but no address, and an estimated delivery that should not be there
I reproduced both problems on a test store and fixed them. Here is the result:
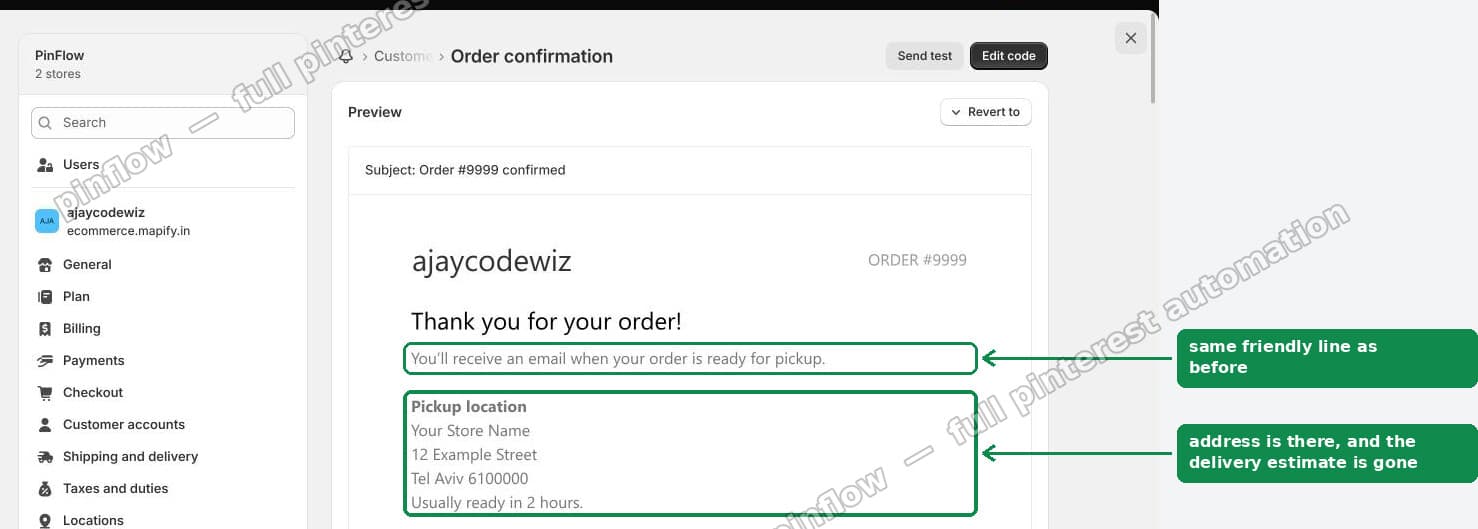 The same email with the pickup address showing and the delivery estimate gone
Where the email actually lives
This trips people up constantly, so it is worth being precise.
Shopify has three separate surfaces that all feel like "the store", and each has its own editor:
- Your theme is the online store. Home, collections, products, cart. Edited under
Online Store > Themes. - Checkout, the Thank You page and the Order status page are rendered by Shopify, not your theme. Edited under
Settings > Checkout. - Emails are neither. They are edited under
Settings > Notifications.
So if you have been searching your theme code for the pickup sentence, you will never find it. It is not there. If you have been hunting through the checkout editor, same story. Emails are their own thing.
A quick test that always works: did the text arrive in the customer's inbox, or was it on a web page they clicked to? Inbox means Notifications. Web page means the theme or the checkout editor. I wrote up that second case separately in how to edit the Shopify Thank You page.
The good news is that Notifications gives you the raw template. Not a block editor, not a set of toggles. The actual HTML and Liquid, which you can change however you like.
Step 1: open the template
Go to Settings > Notifications.
Find Order confirmation under Customer notifications and open it, then click Edit code.
You now have the full email template: HTML, inline CSS, and Liquid tags that pull in the order data.
Before you touch anything, note the Revert to default button at the top. That is your undo. Whatever you break here, one click puts the template back to how Shopify shipped it. It makes this whole job far lower risk than it looks, so do not be timid.
Fix 1: show the pickup address
Search the template for pick-up. You are looking for this:
{% when 'pick-up' %}
  You'll receive an email when your order is ready for pickup.
Add your address directly beneath the sentence:
{% when 'pick-up' %}
You'll receive an email when your order is ready for pickup.
<br><br>
<b>Pickup location</b><br>
Your Store Name<br>
12 Example Street<br>
Tel Aviv 6100000<br>
Usually ready in 2 hours.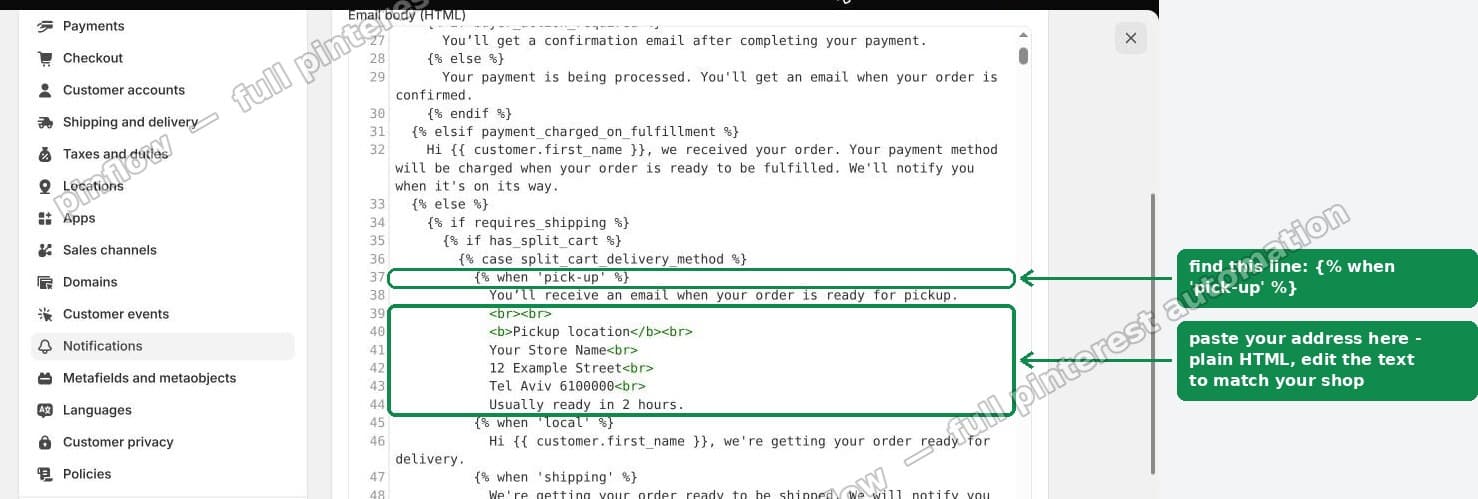 Finding the pick-up case and pasting the address underneath it
That is plain HTML inside a Liquid template, which is all these emails are. <br> for line breaks, <b> for the label. Email clients are conservative about CSS, so simple tags are the right call here rather than anything clever.
There are two copies of the template
Search results will show {% when 'pick-up' %} twice.
One sits under a {% case split_cart_delivery_method %}, which runs when a single order is split across more than one delivery method. The other sits under {% case delivery_method %}, the normal single-method path.
Edit both. If you only do one, the address appears on some orders and not others, and which orders depends on how the customer's cart was fulfilled. That produces a bug that looks random and is miserable to chase down later.
This is the single most common reason a change here "only works sometimes".
Fix 2: remove the estimated delivery line
Still in the same file, find:
{% unless delivery_method_types.size > 1 %}Change it to:
{% unless delivery_method_types.size > 1 or delivery_method == 'pick-up' %}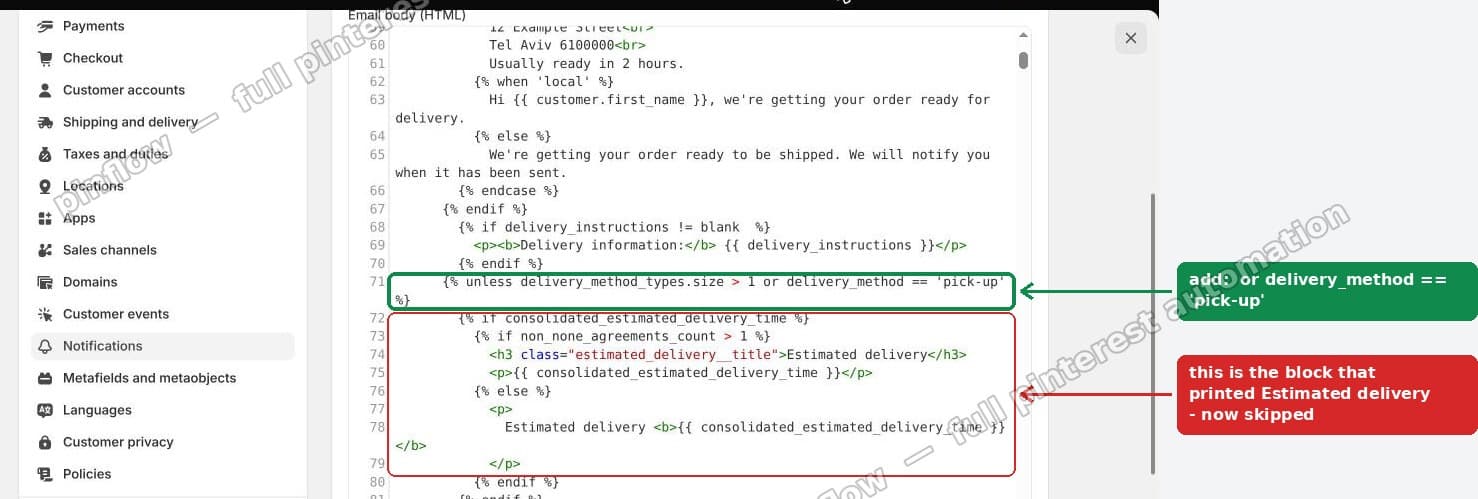 Adding the pick-up condition so the estimated delivery block is skipped
That block is what prints Estimated delivery followed by a date range. Adding the second condition means it is skipped entirely for pickup orders while shipped orders keep their estimate, which is what you want. You are not deleting the feature, just excluding one case from it.
If pickup and shipping still get mixed up
On orders containing both a shipped item and a pickup item, there is a second estimate rendered per line-item group. Find this and remove the inner {% if %} block:
{% if delivery_agreement.delivery_method_type == 'pick-up' %}
{% if delivery_agreement.estimated_delivery_date %}
<p class="order-list__estimated-delivery">
Estimated delivery · <strong>{{ delivery_agreement.estimated_delivery_date }}</strong>
</p>
{% endif %}The pattern is consistent throughout this template: anything that can vary per delivery method tends to exist in more than one place, because Shopify renders the whole-order summary and the per-group detail separately. When a change half-works, the answer is almost always a second copy you have not found yet.
More than one pickup location
Hardcoding one address works fine for a single-location store. With several branches, you want the email to print the right one.
Wrap the address in a case statement on the delivery method name:
{% case delivery_agreement.delivery_method_name %}
  {% when 'Main Street Store' %}
    <b>Pickup location</b><br>
    Main Street Store<br>
    12 Example Street<br>
  {% when 'Airport Branch' %}
    <b>Pickup location</b><br>
    Airport Branch<br>
    4 Terminal Road<br>
{% endcase %}
The strings must match your location names in Settings > Locations exactly, including capitalisation. A near-miss prints nothing and reports no error, since no when branch matches and there is no else.
If you would rather the failure be visible, add an {% else %} with a fallback line such as your main address or a "check your order page" note. On something customer-facing, an obviously generic message beats a blank space.
Test it before you trust it
Use Send test at the top of the template editor. It emails you a preview using placeholder data.
The catch: the test email uses sample order data, so it may not exercise the pickup branch at all. The sample order is usually a straightforward shipped order, which means your pickup edits can appear to do nothing.
The reliable test is a real one. Place a genuine test order on your store, choose local pickup at checkout, and read the email that arrives. Then cancel and refund it. It takes five minutes and it is the only way to see the exact template branch your customers will hit.
Check it on a phone too. These templates use table-based layouts and inline styles precisely because email clients are unpredictable, and a <br> stack that looks tidy on desktop can wrap oddly in a narrow mobile client.
What else you can and cannot change here
Since you are in the file already, a sense of the boundaries.
You can change any wording, add HTML, pull in any order data Shopify exposes to the template ({{ order.name }}, line items, shipping address, custom attributes), restyle with inline CSS, and add conditional content with Liquid.
You cannot run JavaScript. Email clients strip it. Anything interactive is out, and that is a property of email, not a Shopify limitation.
Be careful with images and external CSS. Many clients block remote images by default, so a design that depends on them will look broken for a meaningful share of recipients. Keep the important information as text.
Each notification is its own template. Order confirmation, shipping confirmation, order cancelled and the rest are edited separately. A change here does not propagate. If you want the pickup address in the "ready for pickup" email too, you have to make the same edit there.
You cannot change the sender address from inside the template. That lives one screen up, in Settings > Notifications > Sender email. If yours is a free Gmail or Yahoo address, Shopify rewrites the visible sender to store+<shop id>@shopifyemail.com, which is why some customers ask whether the email is a scam.
The data you can pull in
Half the work in these templates is knowing what is available to print. The order confirmation gets a fairly rich set:
{{ order.name }}is the order number as customers see it,#1001.{{ order.order_number }}is the bare number.{{ customer.first_name }}and{{ customer.last_name }}, already used in the stock template's greeting.{{ order.line_items }}is loopable, withline.title,line.quantity,line.variant_titleandline.final_priceon each.{{ shipping_address }}and{{ billing_address }}expose.name,.street,.city,.zipand the rest.{{ order.note }}and{{ order.attributes }}carry anything your cart collected, which is where gift messages and delivery instructions usually live.{{ shop.name }},{{ shop.email }}and{{ shop.url }}for your own details.
Money needs formatting. A bare price prints in cents, so use {{ line.final_price | money }} to get the customer's currency and format.
A worked example, showing delivery instructions only when the customer left some:
{% if order.note != blank %}
  <p><b>Order notes</b><br>{{ order.note }}</p>
{% endif %}
That != blank guard matters. Without it, orders with no note render an empty labelled block, which looks like a bug to the customer.
When to stop editing and use an app
Template edits are the right tool for wording, layout and conditional content. There are jobs they cannot do.
Attachments. You cannot attach a PDF invoice from the template. Liquid produces the email body and nothing else.
Sending to extra recipients. There is no way to CC a second address from here. That needs Shopify Flow or an app, and it comes up often enough to be worth its own section below.
Different emails to different customer segments. You can branch on order data with Liquid, and on tags with {% if customer.tags contains 'wholesale' %}, but anything more involved gets unreadable fast inside an email template.
Design-heavy templates. If you want drag-and-drop layout and brand theming across every notification, a dedicated email app will be faster than hand-editing a dozen templates.
The dividing line is roughly: changing what the email says is a template job, changing where it goes or what it carries is not.
CC a second address, such as a customer's accountant
This is the most common "where it goes" request, and it is worth walking through because the obvious approach fails.
A B2B merchant asked how to automatically copy their customer's accounts department on the order confirmation. The buyer places the order, but the invoice needs to reach a different person. Doing it by hand means saving a PDF and forwarding it every time.
You cannot do this from the template. Liquid renders the email body. The recipient is part of the envelope, set by Shopify from the order's contact email, and nothing you write inside the template can change it. No amount of editing gets you a CC field, which is why searching the template for one is time wasted.
The recipient is a workflow concern, so it needs Shopify Flow.
For a handful of customers: a tag and one flow each
Tag the customer, for example cc-acme, then build a flow:
- Trigger: Order created
- Condition: Tags is equal to
cc-acme - Action: Send internal email to
[email protected], subjectNew CC ACME Order: {{ order.name }}
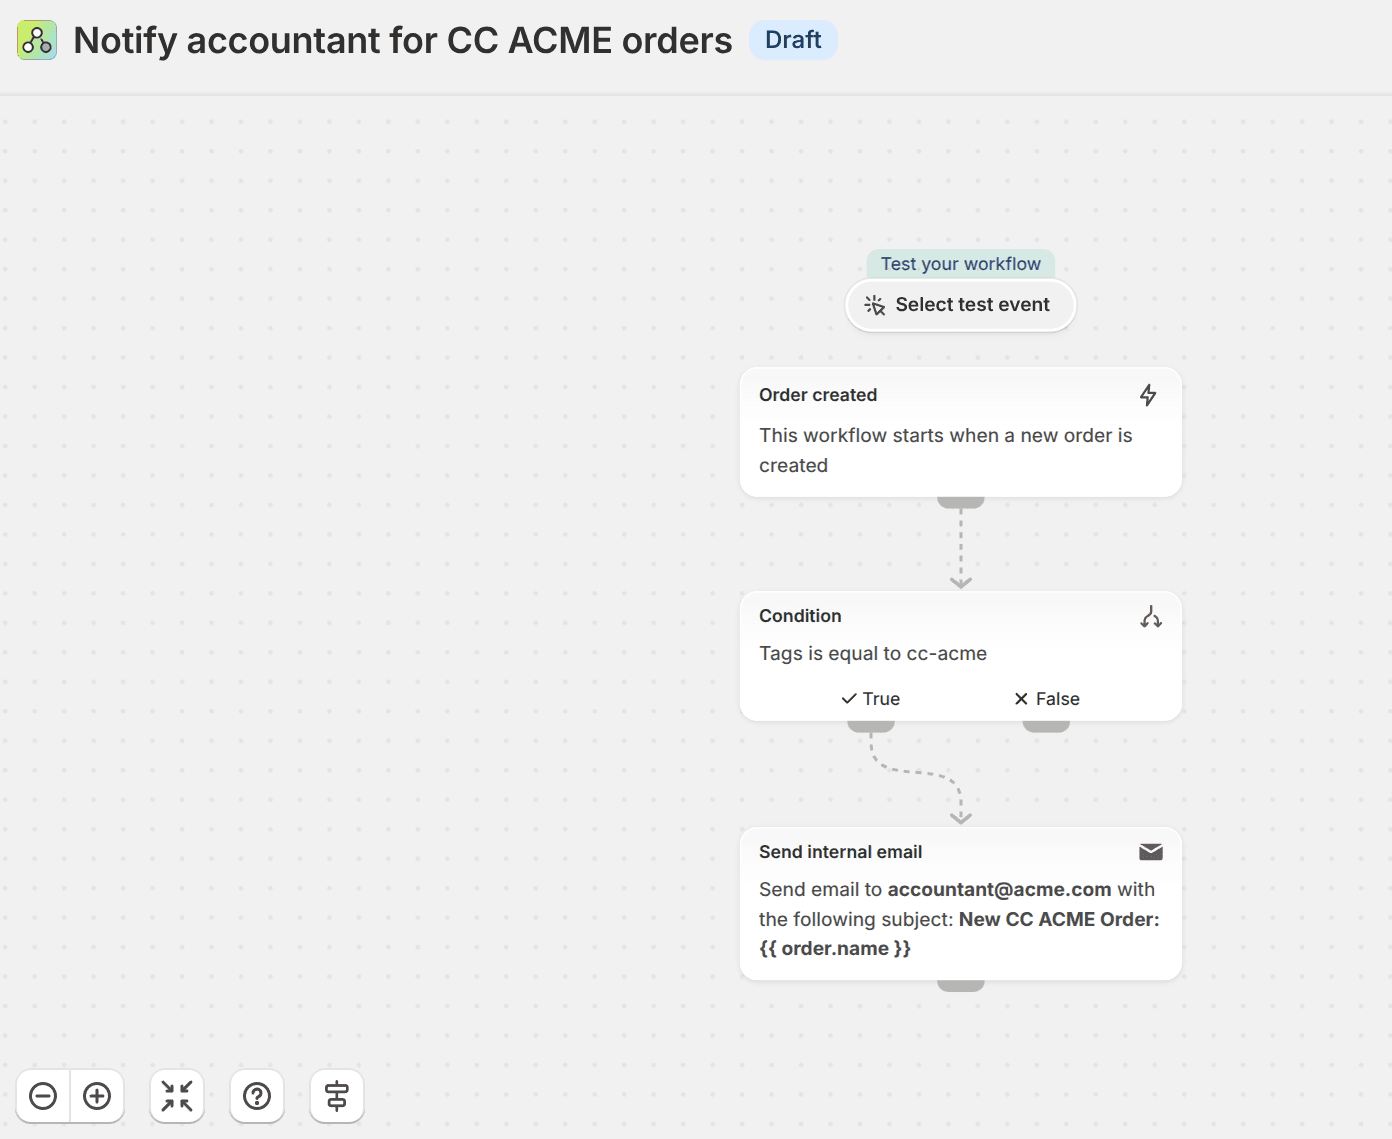 A Shopify Flow workflow: order created, condition on the customer tag, then send internal email
One honest caveat. "Send internal email" sends an email that Flow composes. It is not a copy of your actual order confirmation, so the accountant gets a plain notification rather than the branded template you just spent an afternoon editing. You compose that body yourself inside the Flow action, with access to the order data.
For most accounting use cases that is fine, and arguably better, since an accounts team wants the order number and total rather than your hero image. But if you need them to receive the identical customer-facing email, Flow's internal email will not do it, and you are into app territory.
This approach does not scale. It is one flow per customer, so it is right for three or four and unmanageable at thirty.
For many customers: a metafield and an HTTP request
Store the accountant's address on the customer record instead of encoding it in the flow.
Create a customer metafield, custom.accountant_email, exactly as described in how to add metafields in Shopify. Then one flow serves every customer: trigger on Order created, check the metafield is not empty, and use the Send HTTP request action to pass the order and that address to an email service that accepts a dynamic To.
Send HTTP request rather than Send internal email, because the internal email action needs a fixed recipient typed into the action. The HTTP request lets the destination come from data, which is the whole point.
The plan limits, which decide this for you
Check these before designing anything, because they are the real constraint:
- Send HTTP request is available on Grow, Advanced and Plus only.
- Shopify Flow is not available on Starter at all.
- On Basic, you have Flow but not Send HTTP request, so the tag-per-customer method works and the metafield method does not. An app such as Mechanic covers the gap.
So the honest answer to "which method" is usually settled by your plan rather than your preference.
If it is not working
The change appears on some orders only. You edited one of the two {% when 'pick-up' %} copies. Go back and do both.
Nothing changed at all. Confirm you saved, and confirm you edited Order confirmation rather than one of the similarly named templates. Shipping confirmation and Order ready for pickup are separate files.
The estimate is still showing. There is a second per-line-item copy, covered above.
Your {% case %} for multiple locations prints nothing. The location name does not match exactly. Copy it straight from Settings > Locations rather than retyping it.
You have made a mess. Click Revert to default. You lose your customisations to that one template and nothing else.
What I confirmed on the test store
- The pickup address is not available by default in the order confirmation email. It genuinely is not in the template, which is why no setting turns it on.
- Adding it takes plain HTML under the
pick-upcase, in both copies. - The estimated delivery line is removed by one extra condition on the existing
unless, with no effect on shipped orders. - Revert to default restores the stock template cleanly, so the whole job is reversible.
The thing worth taking away: Shopify splits store text across three editors that do not talk to each other, and emails are the one people look for last. Once you know the confirmation email is Liquid sitting in Settings > Notifications, it stops being a limitation and becomes an ordinary template edit.
Your confirmation email is the one message they always open
PinFlow turns your Shopify catalog into Pinterest pins and posts them on a schedule, so the products in that email keep finding new buyers after the order ships.
Get PinFlow on the Shopify App StoreMore Shopify fixes
More community-sourced Shopify guides, tested on a live store.
Notifications & Emails
How to Edit the Shopify Gift Card Email
Shopify sends the same stock gift card picture to every recipient, whatever product they bought. Here is the one edit that makes each gift card email show its own product image, tested end to end.
Notifications & Emails
Shopify Inbox Notifications Not Working? How to Fix It
Who gets a Shopify Inbox alert, why there is no admin recipient list, how chat routing really works through assignment, and how to fix desktop push in Chrome on Windows. Tested, with screenshots.
Notifications & Emails
Shopify Order Confirmation Email: Logo by Location
A merchant wanted a different brand logo on the order email for each POS location. The location logic came back blank in the Order confirmation email. Here is why, and the template that actually works, with screenshots.