
Horizon: Show Only the Selected Variant's Images
In the Horizon theme, clicking a colour does not hide the other colours' photos, because Shopify only swaps one image per variant. Here is the free alt-text plus Custom Liquid fix that shows every image for the chosen colour, tested on Horizon.
By AjayCodeWiz · August 2, 2026 · 8 min read
The problem: you pick a colour in Horizon and the other photos stay
A merchant asked about this on the Shopify Community. They run the Horizon theme, and they wanted the product gallery to react to the colour a shopper picks.
The goal is simple to describe. Click Black, see only the Black photos. Click White, see only the White photos. No paid app. No Shopify Plus. A free solution that works on Horizon.
What actually happens on Horizon out of the box is different. You assign a photo to the Black variant, and clicking Black jumps to that one photo. But the White photos are still sitting in the gallery. So a shopper on Black scrolls straight into White images, which looks broken and costs you the sale.
I reproduced it on a Horizon test store. Here the Black variant is selected, yet the White images are still in the gallery.
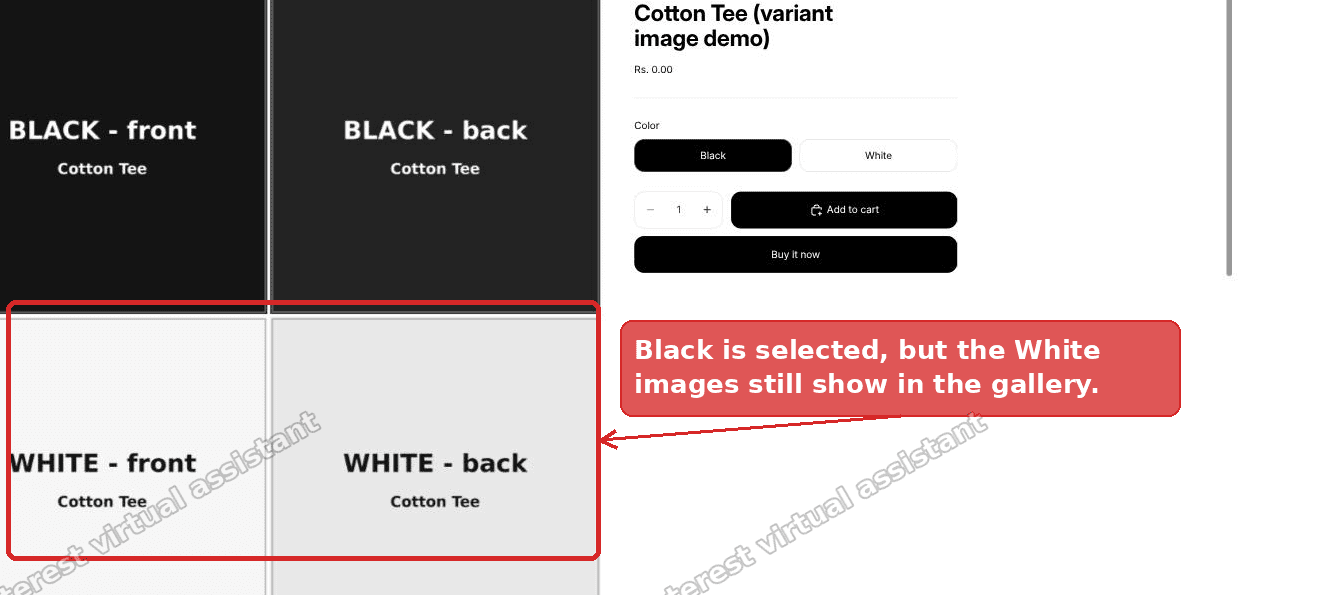 Horizon product gallery with Black selected but White images still showing
You are not missing a checkbox. Horizon genuinely has no setting that filters a colour's full set of images. To understand why, and to fix it, it helps to know what Horizon is actually doing when you click a variant.
Why Horizon does not hide the other images
Every variant in Shopify can have exactly one featured image. That is the image Shopify swaps to when the variant is selected.
Horizon respects that. Click a colour and the gallery scrolls to, or highlights, the single image you assigned to that variant. That part works as designed.
The problem is everything else in the gallery. A product page usually has more than one photo per colour. A second angle. A lifestyle shot. A close-up of the fabric. A size chart. Shopify has no concept of "these five images belong to Black." It only knows about the one featured image.
So every image that is not a variant's single featured image is treated as shared. Shared images show for every colour, all the time. That is why your White photos still appear when Black is selected. To Shopify they are not White photos. They are just photos on the product.
Once you see it that way, the fix becomes obvious. You cannot ask Shopify to filter by colour, because Shopify does not know which colour most images belong to. You have to tell it, and then hide the ones that do not match.
The built-in toggle, and exactly where it stops
Before the code, there is a native setting worth knowing about, because for some stores it is all you need.
Open the theme editor, select the product media block, and look for Hide unselected variant media. Turn it on and Horizon hides the other variants' assigned images. Click Black and White's featured image disappears.
Here is the catch, and it is the whole reason this article exists. That toggle only hides the one image assigned to each other variant. Every unassigned image, the second angle, the lifestyle shot, the size chart, still counts as shared and still shows for every colour.
So the built-in toggle gets you one clean image per colour. If that is your setup, you are done and you do not need any code. If you have several images per colour, the toggle is not enough, and you need the small block below.
If you are still setting up variant photos in the first place, or a swatch is not switching the image at all, start with our guide on how to add variant images in Shopify. This article assumes your variant images already work and you now want the full gallery to filter by colour.
When you actually need the code
Use the free block below if any of these is true.
- You have more than one image per colour.
- You keep shared images, like a size chart, that should show on every colour.
- You want the gallery to filter, not just swap the single featured image.
The approach has two parts. First you label every image with the colour it belongs to, using the Alt text field you already have. Then you add one small Custom Liquid block that reads those labels and hides the images that do not match the selected colour.
Nothing is hardcoded to your colour names. The block detects the colour option automatically, so it keeps working when you add or remove images and colours later.
Step 1: tag every image with its colour
This is the label step. You are telling the theme which colour each photo belongs to, and Alt text is the field to do it in. Alt text is the short description used for accessibility and SEO, and it is editable on every image.
- Go to Products, open your product, and click an image.
- In the Alt text field, type the colour that image belongs to. Black, White, and so on.
- Do this for every colour photo.
- Leave shared images untagged. A size chart, or anything you want on all colours, gets no colour word.
 Typing the colour name into each image's Alt text field in Shopify admin
You are not changing the images. You are just naming them so the next step can tell them apart. Alt text is also good for SEO, so this is not wasted effort even beyond the gallery.
Step 2: add the Custom Liquid block
Now add the small block that does the filtering.
- Go to Online Store, Themes, then Customize.
- Open the product template.
- In the product section, click Add block and choose Custom Liquid.
- Paste the code below and Save.
{%- liquid
assign vf_options = closest.product.options_with_values
-%}
<script>
(function () {
if (window.__variantMediaFilter) return;
window.__variantMediaFilter = true;
var OPTIONS = [
{%- for o in vf_options -%}
{ "values": [ {%- for v in o.values -%}{%- assign vn = v.name | default: v -%}{{ vn | json }}{%- unless forloop.last -%},{%- endunless -%}{%- endfor -%} ] }{%- unless forloop.last -%},{%- endunless -%}
{%- endfor -%}
];
if (!OPTIONS.length) return;
var norm = function (s) { return (s || '').toLowerCase().trim(); };
function gallerySection() {
var g = document.querySelector('media-gallery');
return (g && g.closest('.shopify-section')) || document.body;
}
function pickOption(section) {
var alts = [].map.call(section.querySelectorAll('.product-media img'), function (i) {
return norm(i.getAttribute('alt'));
});
var best = null, bestScore = 0;
OPTIONS.forEach(function (o) {
var score = o.values.filter(function (v) {
var lv = norm(v);
return lv && alts.some(function (a) { return a.indexOf(lv) > -1; });
}).length;
if (score > bestScore) { bestScore = score; best = o; }
});
return best;
}
function selectedValue(section, values) {
var vals = values.map(norm);
var r = [].filter.call(section.querySelectorAll('input:checked'), function (i) {
return vals.indexOf(norm(i.value)) > -1;
})[0];
if (r) return norm(r.value);
var s = [].filter.call(section.querySelectorAll('select'), function (el) {
return vals.indexOf(norm(el.value)) > -1;
})[0];
return s ? norm(s.value) : null;
}
function box(m) { return m.closest('slideshow-slide') || m.closest('li') || m; }
function apply() {
var section = gallerySection();
var opt = pickOption(section);
if (!opt) return;
var values = opt.values.map(norm);
var selected = selectedValue(section, opt.values);
if (!selected) return;
var medias = section.querySelectorAll('.product-media');
var visible = 0;
[].forEach.call(medias, function (m) {
var img = m.querySelector('img');
var alt = norm(img && img.getAttribute('alt'));
var mentions = values.filter(function (v) { return v && alt.indexOf(v) > -1; });
var show = mentions.length === 0 || mentions.indexOf(selected) > -1;
var el = box(m);
el.style.display = show ? '' : 'none';
el.hidden = !show;
if (show) visible++;
});
if (!visible) {
[].forEach.call(medias, function (m) { var el = box(m); el.style.display = ''; el.hidden = false; });
}
}
function boot() {
var section = gallerySection();
apply();
section.addEventListener('change', function () { setTimeout(apply, 60); });
new MutationObserver(function (muts) {
for (var i = 0; i < muts.length; i++) {
if (muts[i].addedNodes && muts[i].addedNodes.length) { apply(); return; }
}
}).observe(section, { childList: true, subtree: true });
}
if (document.readyState === 'loading') document.addEventListener('DOMContentLoaded', boot);
else boot();
})();
</script>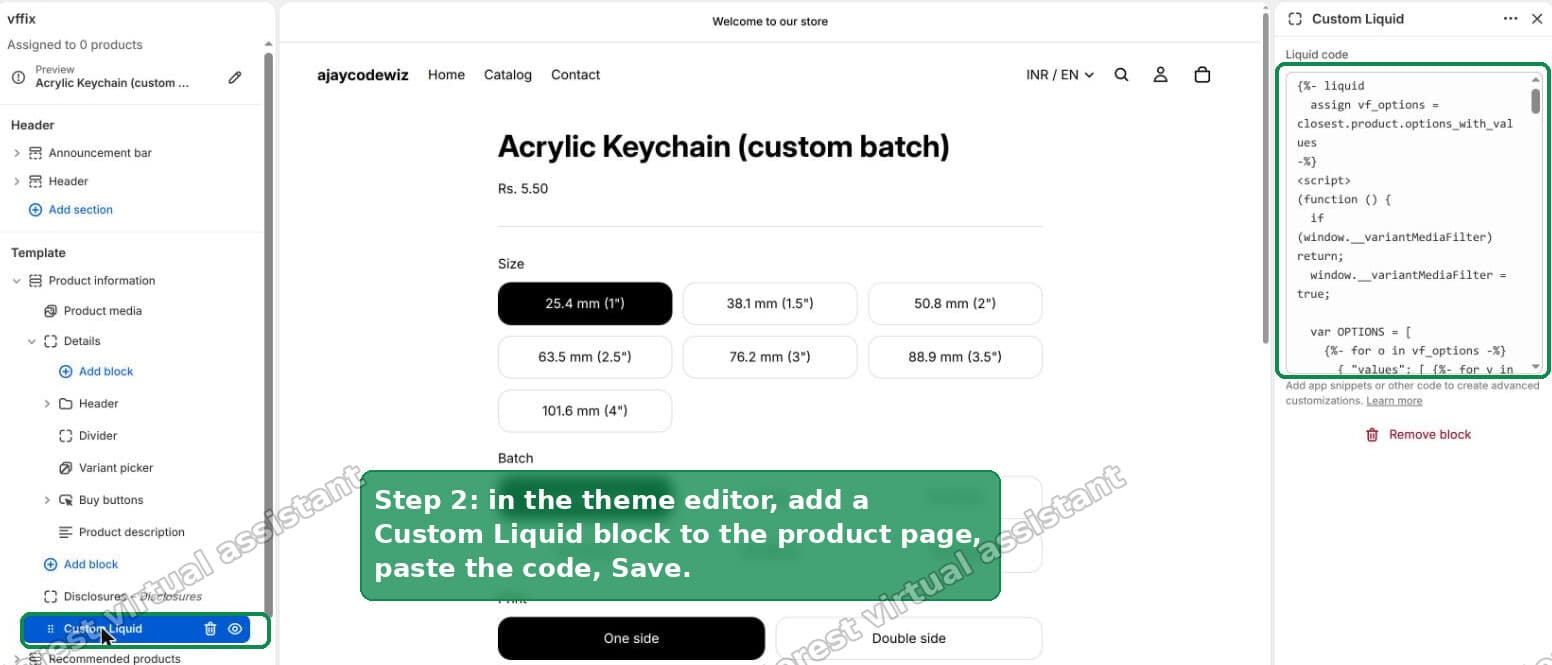 Adding a Custom Liquid block in the Horizon theme editor and pasting the filter code
One detail matters here, and it is the reason a simpler script does not work on Horizon. When a shopper changes the variant, Horizon does not just tweak the gallery. It replaces the whole gallery with a fresh block of HTML from the server. Any filter you applied to the old gallery is gone the instant the new one arrives.
The block above handles that. It watches the gallery for the new HTML and re-applies the filter every time Horizon rebuilds it. That is what the MutationObserver in the code is doing. You do not need to touch that. It just means the fix keeps holding after every colour change, which is exactly where the naive versions fall apart.
The result on a test store
With both steps in place, the gallery finally behaves. On my Horizon test store, selecting Black now shows only the Black images plus the shared size chart. The White images are gone.
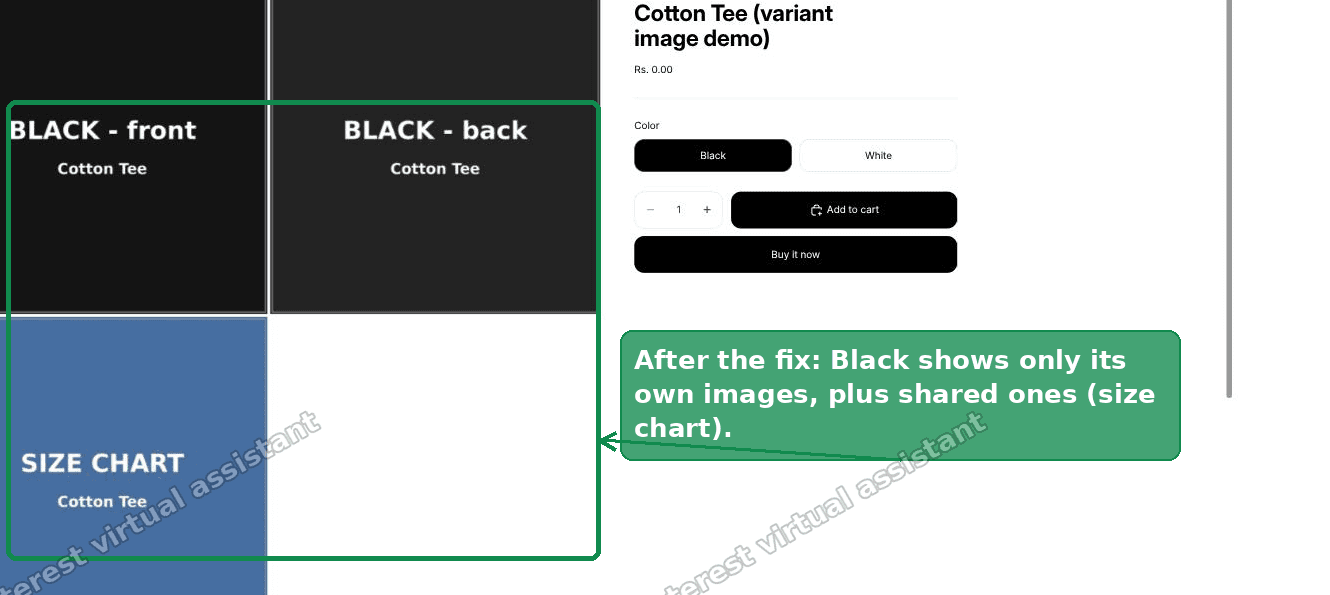 Horizon gallery after the fix, Black selected showing only Black images plus the shared size chart
Switch to White and the gallery swaps to the White set. Same shared size chart, different colour photos.
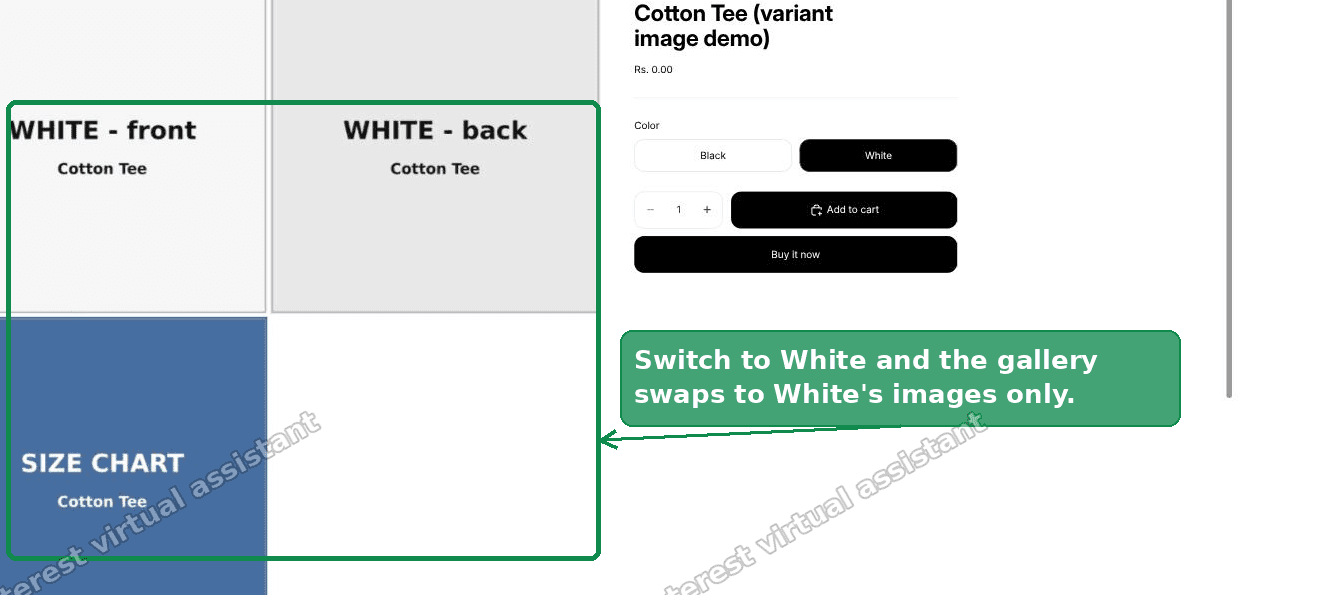 Horizon gallery switching to White, now showing only the White images
The behaviour matches the shorthand from the reply. Pick Black, see Black. Pick White, see White. Untagged images stay for every colour. Nothing is hardcoded, so it keeps working when you add or remove images.
Can a Horizon variant have more than one image?
Not natively, and this trips up a lot of people, so it is worth stating plainly.
A variant can have exactly one featured image. That is a Shopify limit, not a Horizon one. There is no field where you attach five photos to the Black variant.
The alt-text approach is the workaround for that limit. You are not giving the variant five images. You are labelling five product images with the word Black, and hiding the ones that are not Black when Black is selected. The end result looks like multiple images per variant to the shopper, which is the part that matters.
Does this work on mobile and with the grid gallery?
Yes to both. Horizon's default product layout is a grid gallery, and the block targets the media containers directly, so it filters the grid the same way it filters a carousel or slideshow layout.
On mobile the gallery is still the same media block underneath, so the same filter applies. A shopper on a phone who taps Black sees the Black images and the shared ones, nothing else.
If the images still do not filter
A few things cause this, and they are quick to check.
- Alt text typos. The block matches the colour word inside the Alt text. If the option value is Navy but a photo's Alt text says Navi, that photo will not match. Keep the spelling identical to the option name.
- The colour is not a real option. The block auto-detects the option whose values appear in your Alt text. If your colours are baked into product titles rather than a proper Colour option, there is nothing for it to match. Set colours up as a variant option.
- Everything disappeared. The block has a safety net. If a colour matches no images at all, it shows everything rather than leaving a blank gallery. If you see all images on one colour, that colour has no tagged photos yet.
- It reverted after clicking a colour. That is the re-render issue. Make sure you pasted the full block, including the part that watches the gallery, not just the filtering function.
Variant image, shared image, and swatch: three different things
People mix these up, and the confusion is usually why the gallery misbehaves.
A variant image is the single featured image Shopify swaps to when a variant is selected. One per variant.
A shared image is any other image on the product. It has no variant attached, so it shows for every option. Your extra angles and your size chart are shared images until you label and filter them.
A swatch is the little colour dot or thumbnail a shopper clicks. It is part of the variant picker, not the gallery. A swatch changing does not, on its own, filter the gallery. For the swatch side of this, see how to add variant images in Shopify, which covers getting a single photo to switch cleanly per colour.
This article is the next step up from that. Once your variant images switch, the block here makes the entire gallery filter by colour, multiple images and all, for free, on Horizon.
Spending too long on manual Shopify busywork?
PinFlow turns your Shopify catalog into Pinterest pins and posts them on a schedule, automatically. Same idea as the fix above, let the system handle the repetitive part.
Get PinFlow on the Shopify App StorePart of a complete guide
Shopify Variants: The Complete Guide
Variants are one product sold in several forms. How they work, the 2,048 and 3-option limits, and where each variant fix lives - images, swatches, sorting, hiding and the theme-specific bugs.
More Shopify fixes
More community-sourced Shopify guides, tested on a live store.
Themes & Storefront
Hide Unavailable Variants in a Shopify Dropdown
Green has no 3XL, so Shopify prints "3XL - Unavailable" in the size dropdown anyway. How to remove combinations that do not exist, without the bug that kills the variant picker. Tested on Studio.
Shopify Admin
How to Hide a Variant in Shopify Without Deleting It
A colour is temporarily unavailable and you want it off every product page without deleting it and rebuilding it later. Shopify can now unpublish a single variant. The fast way to do it, tested on a live store.
Themes & Storefront
Shopify Craft Theme: Sync Thumbnails to the Variant Picker
In the Craft theme, clicking a product thumbnail changes the photo but leaves the variant selector behind. Here is why the sync only runs one way, and the Custom Liquid block that fixes it.