
Horizon Theme Variant Images: Photos and Covers per Colour
Horizon shows every colour's photos whichever colour a shopper picks, and the collection card shows the first photo. Here is how to fix both with Ploqo.
By AjayCodeWiz · Updated October 4, 2026 · 9 min read
The problem with variant images in Horizon
Horizon is Shopify's newer free theme. If you sell a product in several colours and upload a few photos of each, Horizon puts every one of them on the product page. A shopper who picks Red still scrolls past the blue and yellow photos to reach the size guide.
I reproduced it on a fresh, unedited copy of Horizon on my test store. My product, Classic Tee, comes in Red, Blue and Yellow. It has nine photos: a front and back for each colour, a lookbook photo of a person wearing the tee, a size guide and a fabric close-up. With Red picked, the Horizon product page showed all nine photos in its grid.
The product looked off in two more places. The card on the collection page used the red front photo, since that is the first photo on the product. The home page section that lists products from a collection used that same red front photo.
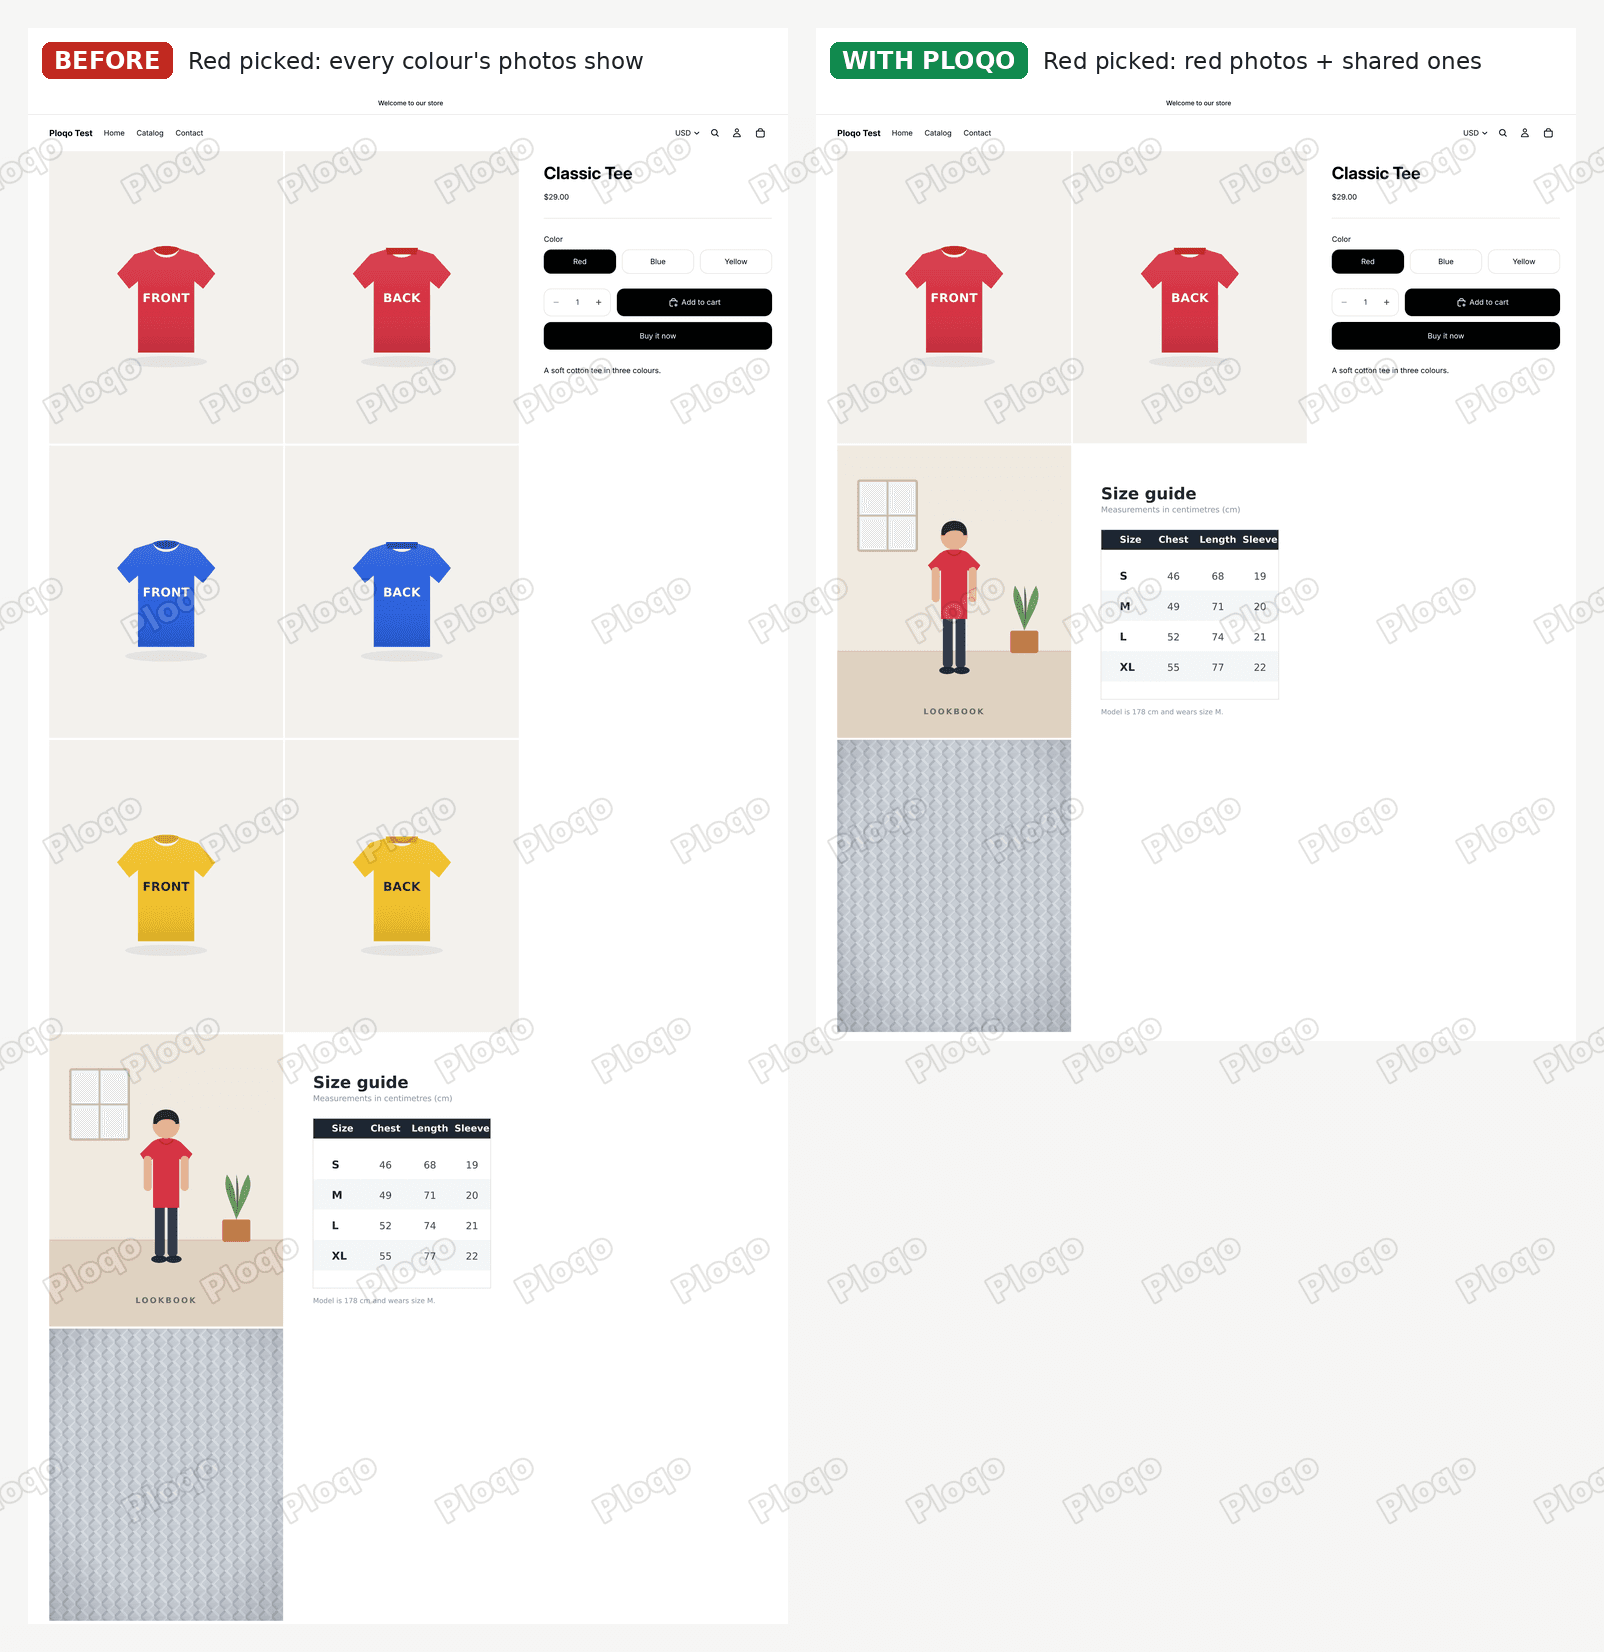 Horizon product page with Red picked: before, all nine photos in the grid including the blue and yellow ones; with Ploqo, five photos, the red front and back followed by the lookbook, size guide and fabric photos
Why Horizon cannot tell which photos are red
Shopify stores a single image link on each variant. A variant is one version of a product a shopper can buy, such as the red tee. That link is the variant image, and there is only room for one.
None of my nine photos were linked to a colour. Plenty of stores look like this after uploading photos in bulk. With nothing to go on, Horizon treats every photo as belonging to every colour. Linking would not solve it either. Red can hold the red front, but the red back has no colour to belong to, so it would still show for Blue and Yellow.
That one link feeds three places on the storefront:
- The product page gallery. The theme knows at most one photo per colour. Every other photo stays on the page for every colour.
- The collection card. The card uses the product's first photo, whether or not it is the photo that sells the product.
- Home page product lists. They reuse the same card, so they show the same first photo.
A merchant who reorders photos to get a better card also changes the first photo on the product page. The two places pull in different directions.
What Ploqo changes in Horizon
Ploqo is a Shopify app that adds two things to each product: a list of which photos go with which colour, and one cover photo.
Here is what Horizon showed on my test store once Ploqo was set up:
- Red picked: the red front, the red back, then the lookbook photo, the size guide and the fabric close-up. That is five photos, down from nine.
- Blue picked: the blue front and the blue back first, then the same three shared photos.
- Collection card and home page: the lookbook photo, which I locked as the cover.
Any photo you leave unticked for every colour stays on the page whichever colour is picked. That is how the size guide and fabric close-up reach every shopper.
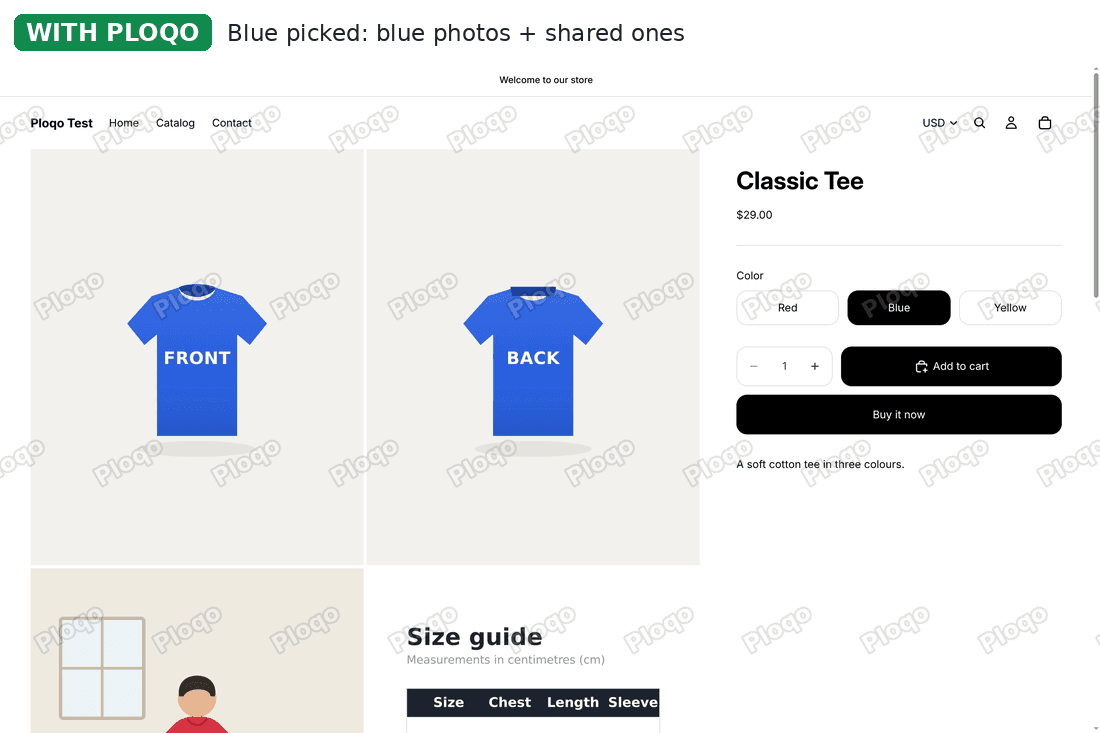 Horizon product page with Blue picked and Ploqo on: the blue front and back photos at the top of the grid, then the lookbook, size guide and fabric photos
Step 1: Install Ploqo and add its card to your product pages
Install Ploqo from the Shopify App Store and open it once. Then open any product in your Shopify admin and scroll down to the Blocks section. Click + Block and choose Ploqo photos.
 The Blocks section on a Shopify product page, with the + Block button highlighted
The Ploqo card appears. Click the pin icon at its top right, so the card shows on every product page from now on, not only on this one.
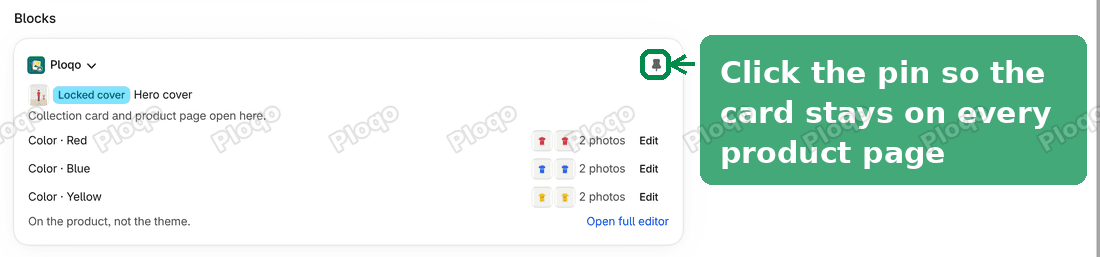 The Ploqo card on a product page, with the pin icon highlighted
Step 2: Pick each colour's photos
The card lists every colour of the product. Click Edit next to a colour.
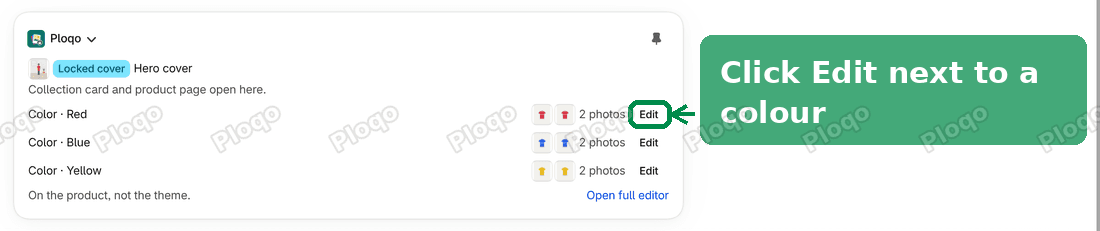 The Ploqo card listing Red, Blue and Yellow, each with two photos and an Edit button
A window opens with all the product's photos. Tick the ones that belong to this colour and click Save. Leave shared photos, such as a size guide, unticked. The window marks them "On every variant", and the line at the bottom tells you what a shopper who picks this colour will see.
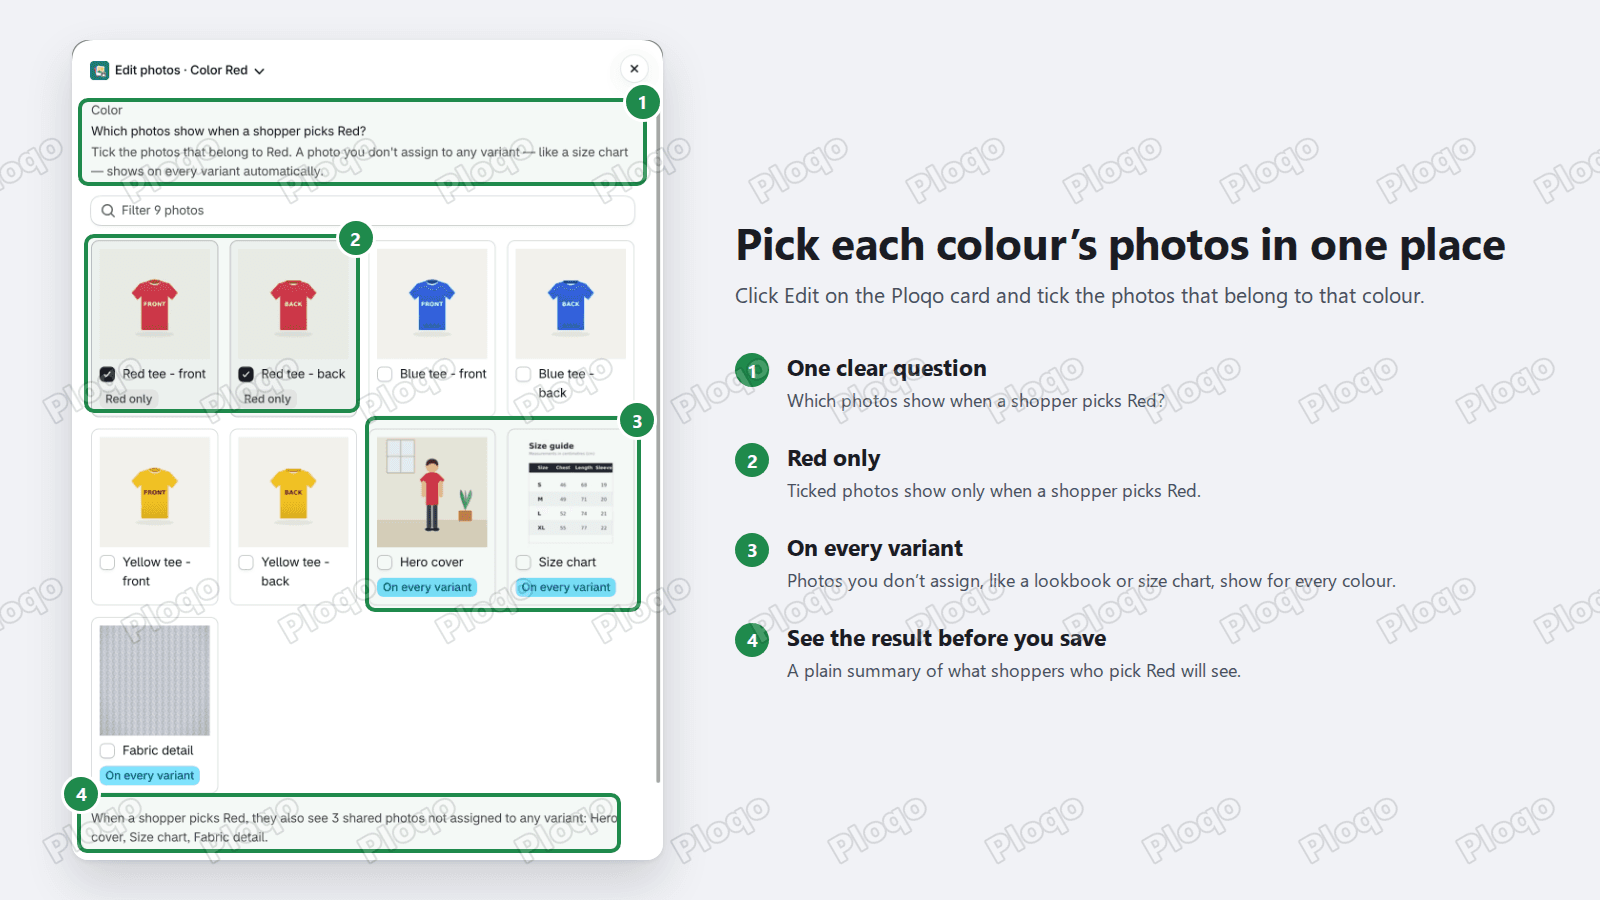 The Edit photos window for Red, with the red front and back ticked and the shared photos marked On every variant
Do the same for each colour. My test product had three colours with two photos each, which took about a minute.
Step 3: Lock the cover photo
The cover is the photo shoppers see on collection pages and in home page product lists. On the Ploqo card, click Open full editor.
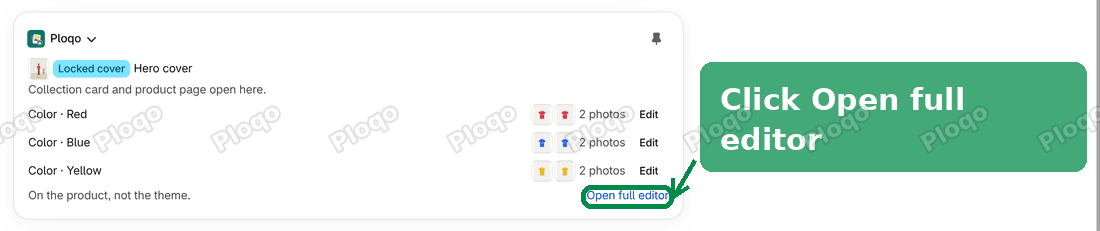 The Ploqo card with the Open full editor link highlighted
Under Card cover, click Choose.
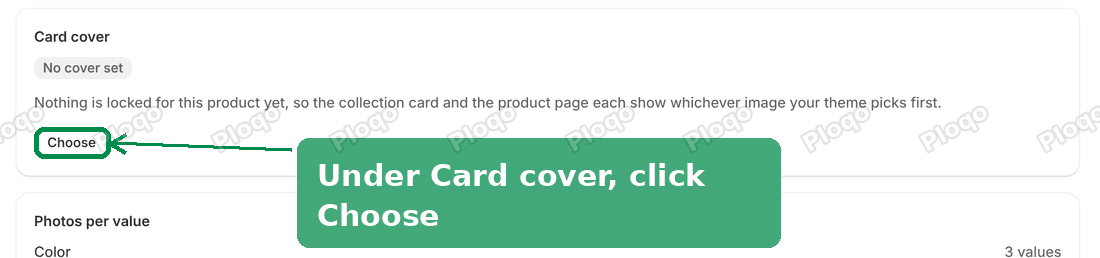 The Card cover section of the Ploqo editor, with the Choose button highlighted
Tick the photo you want as the cover and click Save cover. I chose the lookbook photo. A person wearing the tee by a window shows the product better than a flat front shot.
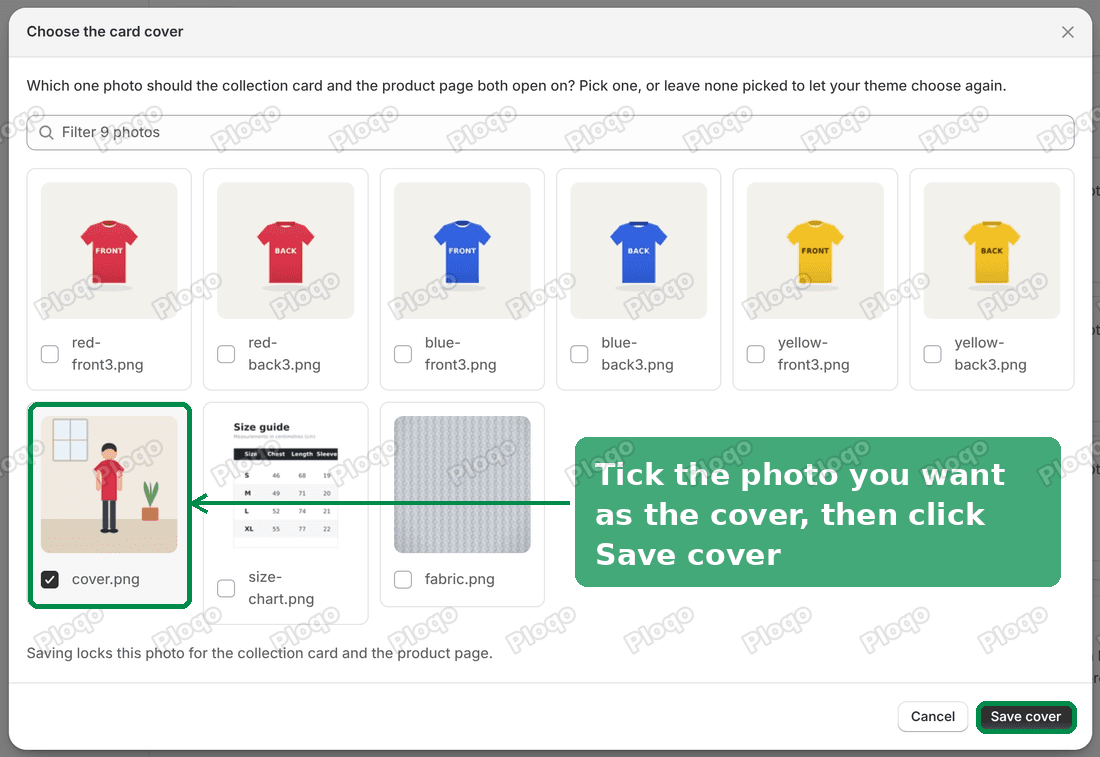 The Choose the card cover window, with the lookbook photo ticked and the Save cover button highlighted
Step 4: Add the gallery filter to the Horizon product page
The colour filtering comes from an app block, which is a piece an installed app adds to your theme. You place it in the theme editor, the page where you customise your theme. Go to Online Store, then Themes, then click Customize on Horizon.
Open the product page template from the page menu at the top. In the left sidebar, under Template, expand Product information. Horizon shows two Add block links inside this section: one inside the Details group, and one further down, directly above Disclosures and outside the Details group. I used the second one, the one above Disclosures, shown in the screenshot below.
In the window that opens, switch to the Apps tab. On my store it listed Ploqo card cover, Ploqo gallery filter and Sign in with Shop Button. Choose Ploqo gallery filter, then click Save at the top right.
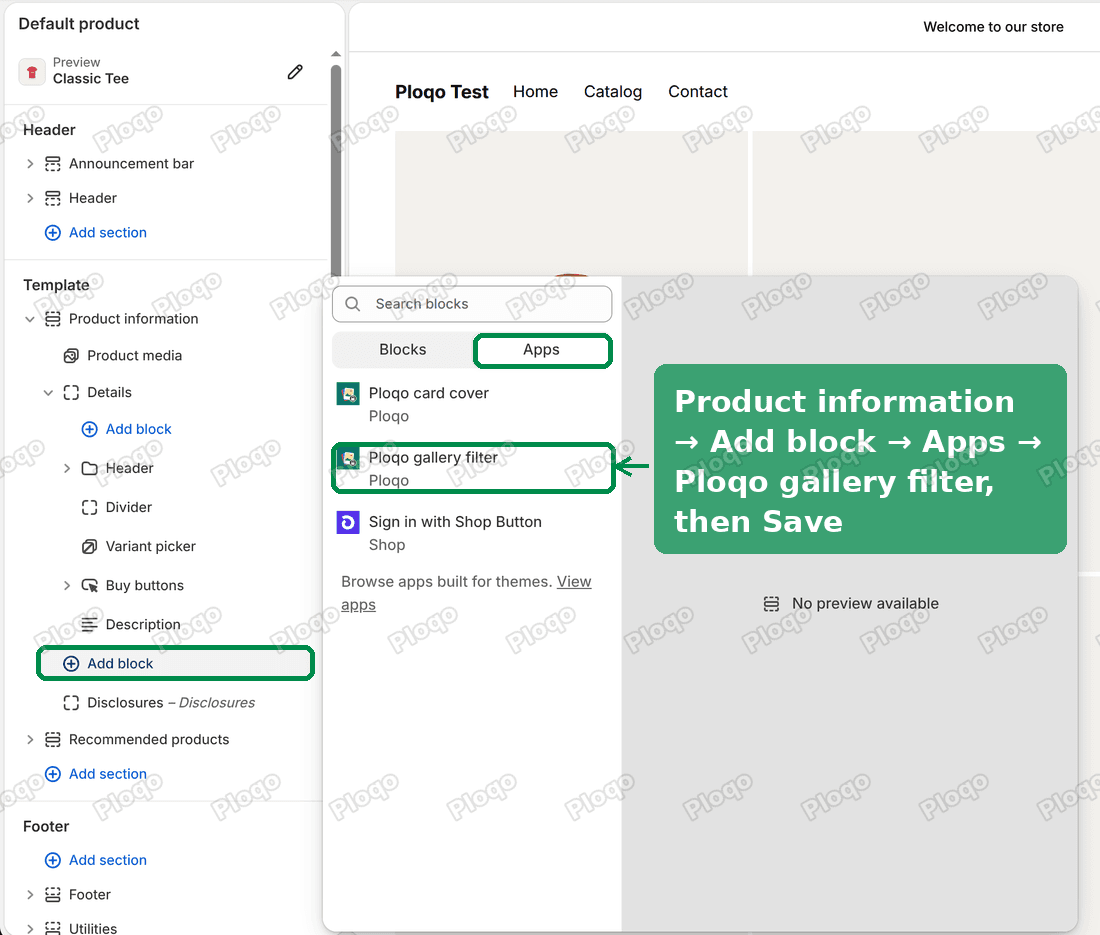 The Horizon theme editor on the product page: under Product information, the Add block link above Disclosures, the Apps tab and Ploqo gallery filter are highlighted
The block has no settings and adds nothing you can see. It reads which colour the shopper picks and hides the photos that belong to the other colours.
Step 5: Show the cover on Horizon collection pages
Switch the page menu to the collection template. Under Template, click Add section, which sits below the Collection section. Open the Apps tab and choose Ploqo card cover. Click Save.
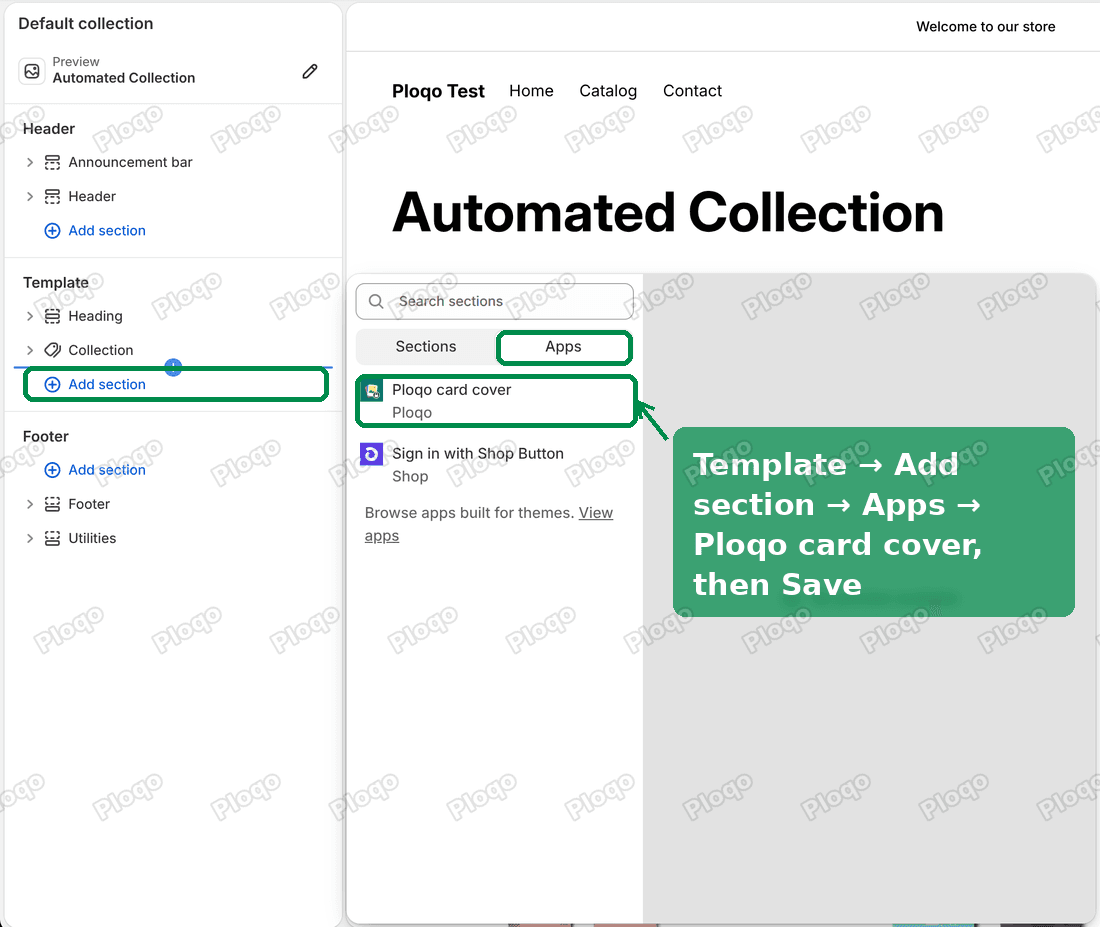 The Horizon theme editor on the collection page: Add section under Template, the Apps tab and Ploqo card cover highlighted
Horizon adds the block as a new section of its own. On my test store, the Classic Tee card changed from the red front photo to the lookbook cover after I saved.
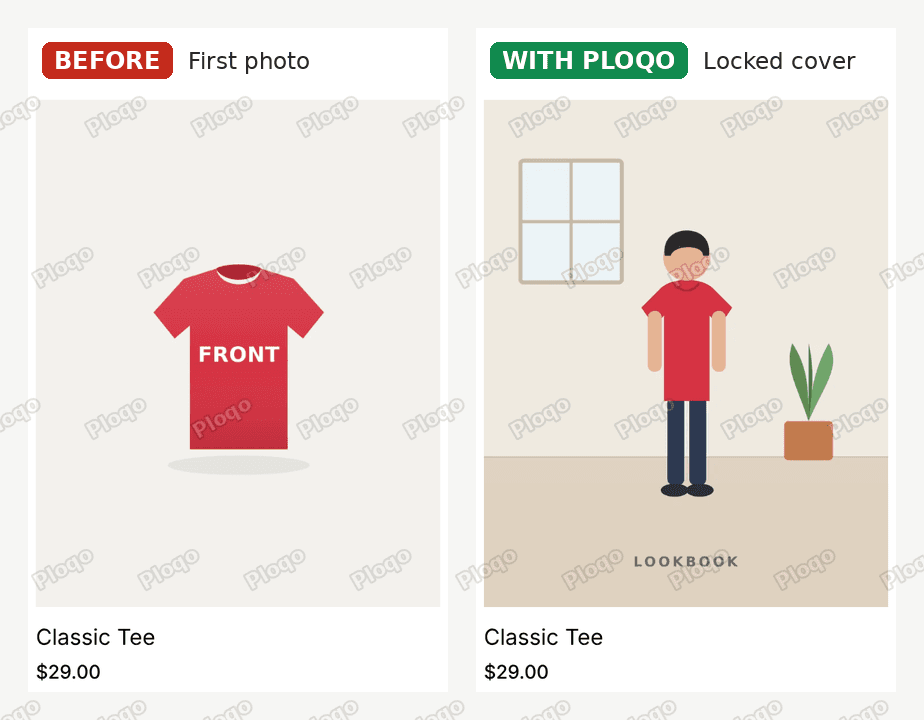 The Horizon collection card for Classic Tee: before, the red front photo; with Ploqo, the locked lookbook cover
Step 6: Show the cover on the Horizon home page
The card cover block needs to know which collection your home page lists, so this step has one extra setting.
On my copy of Horizon, the home page section that lists products was set to a collection called Products. I switched that section to a collection called Home page, which holds The Complete Snowboard and Classic Tee. After that, the section's heading read "Home page".
Next, open the home page template. Under Template, click Add section, open the Apps tab and choose Ploqo card cover. Select the new block in the sidebar. Under Featured collections to cover, click Select and pick the collection your home page section lists. I picked Home page. Click Save.
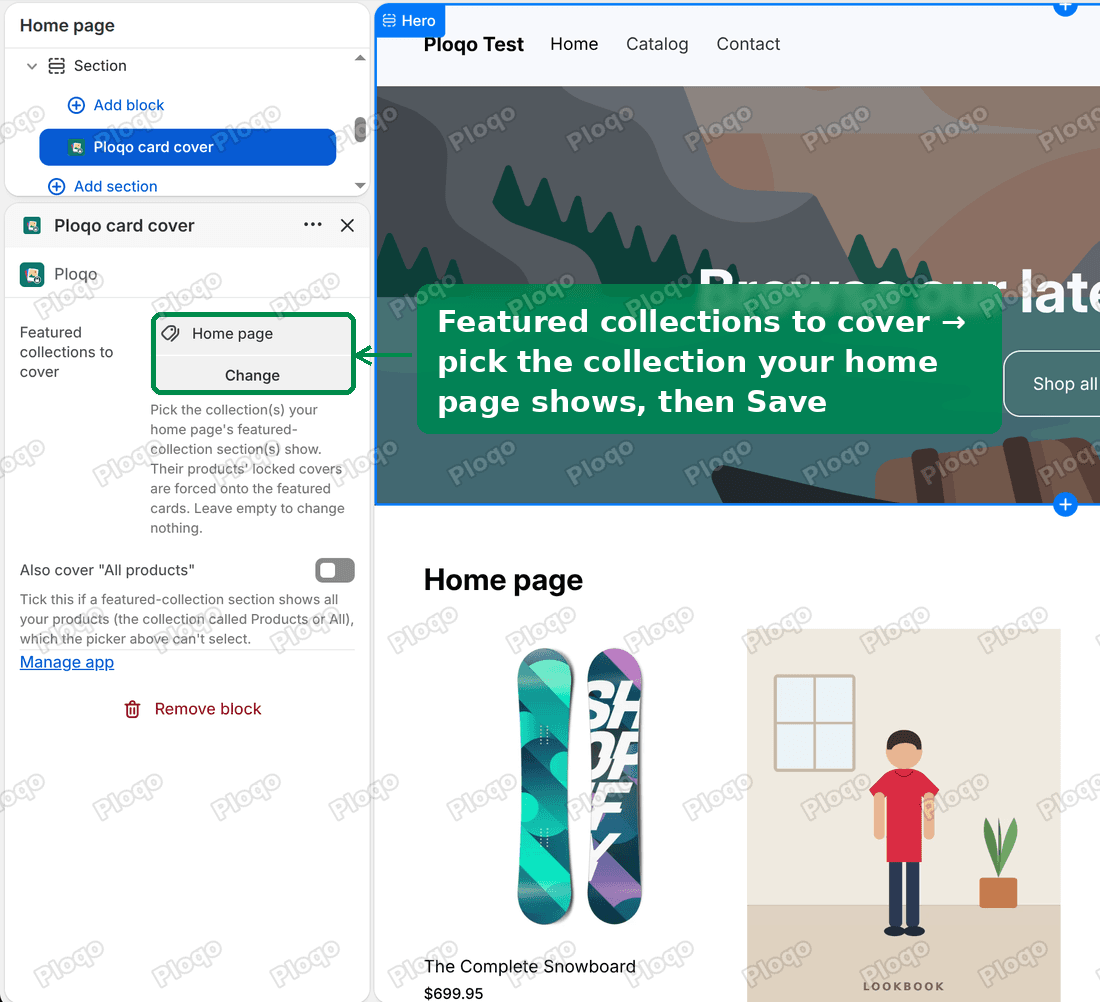 The Ploqo card cover settings in the Horizon theme editor, with Featured collections to cover set to Home page
If your home page section lists every product in your store, the picker cannot select that collection. Turn on Also cover "All products" in the same block instead.
With the block saved, the Classic Tee card on my home page changed from the red front photo to the lookbook cover. The snowboard card next to it did not change.
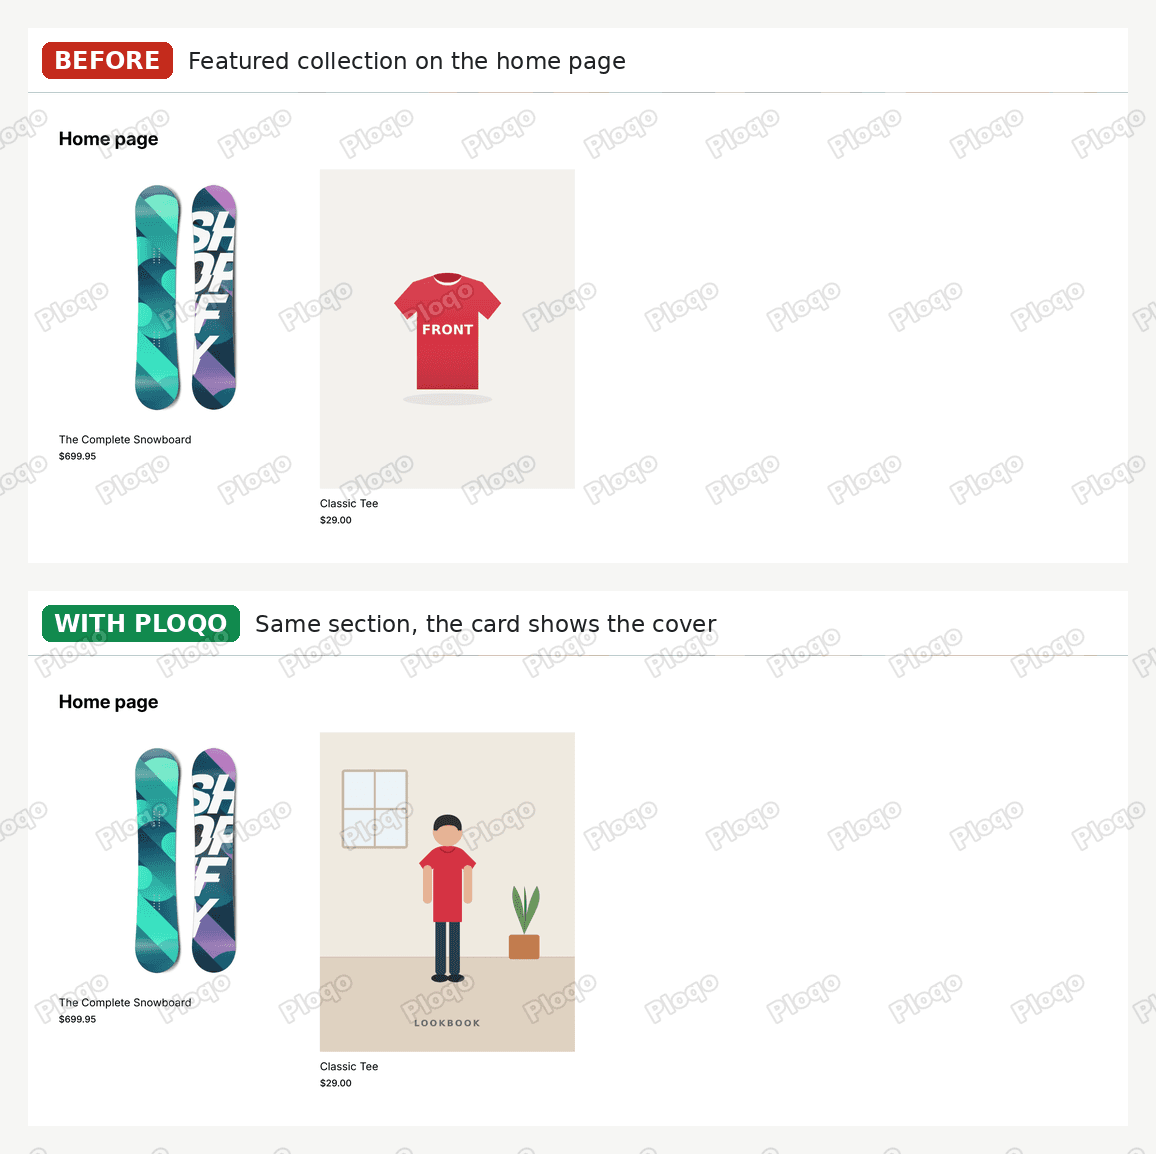 The Horizon home page section titled Home page: before, the Classic Tee card shows the red front photo; with Ploqo, the lookbook cover
How Horizon orders the photos on the product page
Horizon does not use a slider for product photos. It lays them out in a stacked grid with two photos to a row. Horizon also picks Red for the shopper when the page loads, so the first view is already filtered.
Ploqo removes photos from the page, but it never changes their order. Whatever survives keeps its upload position. With Red picked on page load, the first photo on my test product was the red front, and the lookbook cover came third, after the red back. With Blue picked, the blue front and back moved to the top because the red and yellow photos ahead of them were hidden.
This split works well in Horizon. The lookbook cover leads on the collection card and the home page, where a shopper is browsing. On the product page, the colour they are about to buy comes first, with the lookbook just after it.
The small photo in Horizon's sticky add-to-cart bar
Horizon has a bar that sticks to the screen with an add-to-cart button and a small product thumbnail. That thumbnail is part of the theme, not part of the product photo gallery. The Ploqo gallery filter works on the gallery, so check the thumbnail separately if it matters to you.
Free ways to do part of this in Horizon
There is a free method written for Horizon on this site: Horizon: Show Only the Selected Variant's Images. It uses each photo's alt text plus a Custom Liquid block, which is a box in the theme editor where you paste code. If you are comfortable pasting a snippet into your theme, start there.
Two general posts cover Shopify's own variant images, which are free in every theme. How to add variant images in Shopify walks through linking one image to each colour. Shopify product variant image switching explains why the wrong photo can show first.
Shopify's variant images give a colour one photo, and they cannot set a cover separate from the first photo. Ploqo adds both, with no code in your theme.
If it did not work
Still seeing every colour's photos? Check that Ploqo gallery filter is listed under Product information in the product template (Step 4). Then check you clicked Save. If you added it to an unpublished copy of Horizon, it only shows in that copy's preview.
One colour shows only the shared photos? Open the Ploqo card on that product and click Edit next to the colour. If no photos are ticked, tick that colour's photos and save.
The collection card did not change? Check the Ploqo card shows a "Locked cover" badge on that product. Then check that Ploqo card cover is saved as its own section on the collection template.
The home page card did not change? Open the Ploqo card cover block on the home page. Check that Featured collections to cover includes the collection your home page section lists. If the section lists every product, turn on Also cover "All products".
The editor shows the change but your store does not? Hard-refresh the page with Ctrl+Shift+R, or Cmd+Shift+R on a Mac. Your browser may still be showing an older copy.
Definitions
- Variant: one buyable version of a product, such as the red tee in size M.
- Variant image: the single image Shopify links to a variant.
- Cover photo: the one photo Ploqo shows for a product on collection cards and home page product lists.
- Shared photo: a photo you did not tick for any colour. It shows for every colour.
- App block: a piece an installed app adds to your theme, placed from the theme editor.
- Custom Liquid block: a box in the theme editor where you paste code.
- Stacked grid: Horizon's product photo layout, with photos two to a row down the page.
Ploqo keeps your colour photos and cover on the product itself in Shopify, so they stay put if you switch themes. You add the two app blocks again in the new theme. For the other free themes, see Ploqo's theme guides.
Give every colour its own photos
Ploqo groups your product photos by colour, locks one cover per product, and shows that cover on collection pages and the home page. No theme code to edit.
Get Ploqo on the Shopify App StoreMore Ploqo guides
Getting Started
Ploqo Theme Guides: Variant Photos on Every Free Theme
Ploqo gives each colour its own photos and locks one cover for the collection card and the home page. Pick your theme for a step-by-step guide with screenshots.
Theme Guides
Dawn Theme Variant Images: Give Each Colour Its Own Photos
In Dawn, picking a colour still shows every other colour's photos, and the collection card shows whatever photo is first. Here is how to fix both with Ploqo.
Theme Guides
Craft Theme Variant Images: Each Colour's Own Photos
Craft shows every photo for every colour and puts the first one on the collection card. Here is how to give each colour its own photos and lock a cover.
Theme Guides
Crave Theme Variant Images: Photos per Colour, Locked Cover
In Crave, the photo slider and the collection card ignore which photos belong to which colour. Here is how to show each colour's photos and keep your cover on the card.