
Show a Discount on the Shopify Product Page
An automatic discount is invisible on the product page until the cart. Here is a tag-driven badge that shows the discounted price on the page itself, and matches checkout exactly.
By AjayCodeWiz · September 10, 2026 · 9 min read
The problem
You set up an automatic discount. 20% off. It works perfectly at checkout.
And the product page still says the full price.
The shopper has no idea the promotion exists until they have already added to cart, which is exactly the moment you needed them convinced. Every sale you lose there is a sale the discount was supposed to win.
I reproduced this on a test store and built the fix that closes it. The result shows the discounted price on the product page and matches the checkout to the paisa.
Why Shopify does not do this for you
This is not a theme problem and it is not a setting you have missed.
Automatic discounts are evaluated on the cart. Liquid, the template language your product page is built in, has no access to them. There is no product.discount object, no product.automatic_discount, nothing. Shopify does not know which discounts apply to a product until there is a cart with that product in it, because discounts can depend on quantity, cart total, customer and market.
So the product page cannot ask "is this on offer?" and get an answer. It has to be told.
That is why "which app shows the discount on the product page" is such a busy question in the forums. The apps are not doing anything magic. They are being told, the same way the fix below is told.
The mechanism: one tag drives everything
The design that works is to make one product tag the single source of truth:
- The tag defines an automated collection.
- The collection scopes the discount.
- The same tag switches on the badge on the product page.
There is one switch. Tag a product and it joins the promotion, gets discounted at checkout, and starts showing the badge. Untag it and all three stop together.
That matters more than it sounds. The usual homemade version of this badge is hard-coded text, which drifts the moment someone edits the discount, and then your product page is advertising a promotion that no longer applies. With one tag there is nothing to drift.
Step 1: tag the products
Pick a tag name for the promotion. I used promo-20.
Open each product in the promotion and add the tag, or select them all on the Products list and use Add tags for a batch.
Step 2: build the collection from the tag
Go to Products → Collections → Create collection. Name it something like "Promo eligible", and choose Automated.
Set one condition:
Tag - is equal to - promo-20
Save. Every tagged product falls in, and anything you tag later joins automatically.
Watch the sales channel
New collections are created published to zero channels, and you can see the count on the collection page.
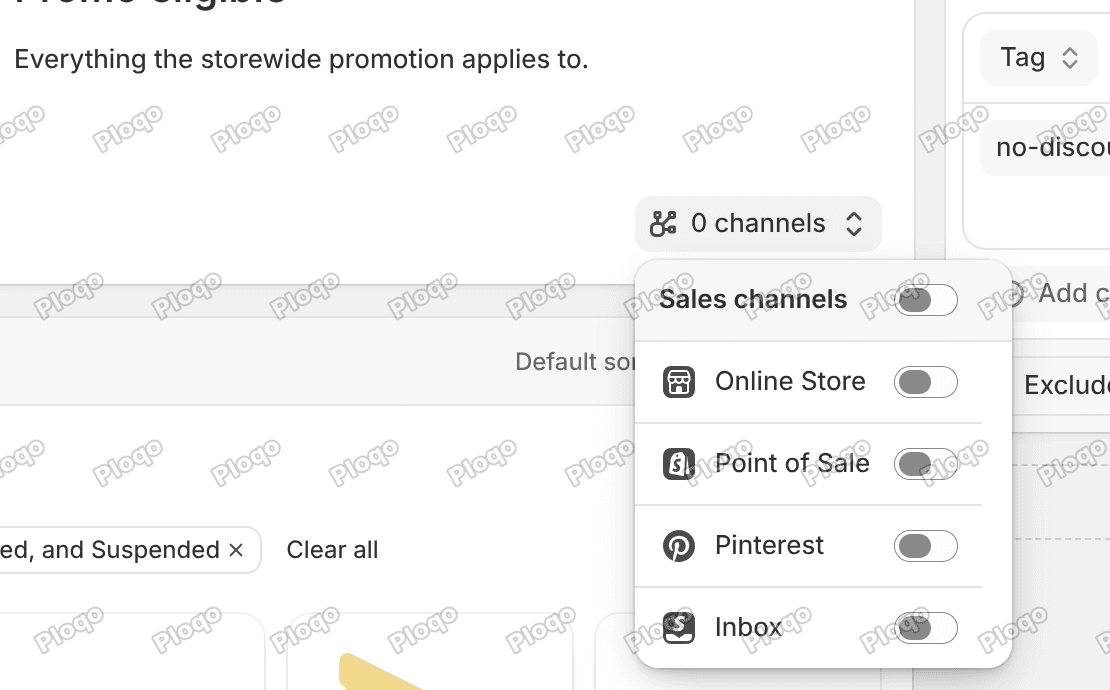 The collection page showing the sales channel popover with 0 channels and Online Store toggled off
For the discount this does not matter, and you can leave it unpublished if you do not want shoppers browsing the collection. But if you ever plan to link to it, or to write Liquid that reads it, publish it to the Online Store here.
Which leads to the part that cost me the most time on this build.
Do not drive the badge from product.collections
My first version checked whether the product was in the promo collection, using product.collections in Liquid. It rendered nothing at all.
A debug block explained why. On a product that was definitely in the new collection, Liquid returned this:
DEBUG collections: [tops-and-shirts] | count=1One collection, a long-standing one, and no sign of the collection I had just made, even after publishing it to the Online Store.
A tag has no such problem. product.tags is available immediately and does not depend on collection indexing. So the badge reads the tag, and only the discount reads the collection.
Step 3: point the discount at the collection
Create your automatic discount as normal. Under Applies to, choose Specific collections and pick the collection you just built.
Choosing a collection rather than "All products" matters for a second reason: a percentage against "All products" is treated as an order discount and shows as one lump against the cart, while a collection-scoped one is a product discount and shows per line item, which is what makes the numbers on the product page match what the shopper sees later.
Step 4: add the badge to the product page
In Online Store → Customize, switch the top dropdown to a Product template. In the left panel, open the Product information section, click Add block, choose Custom Liquid, and drag it to sit directly under the Price block.
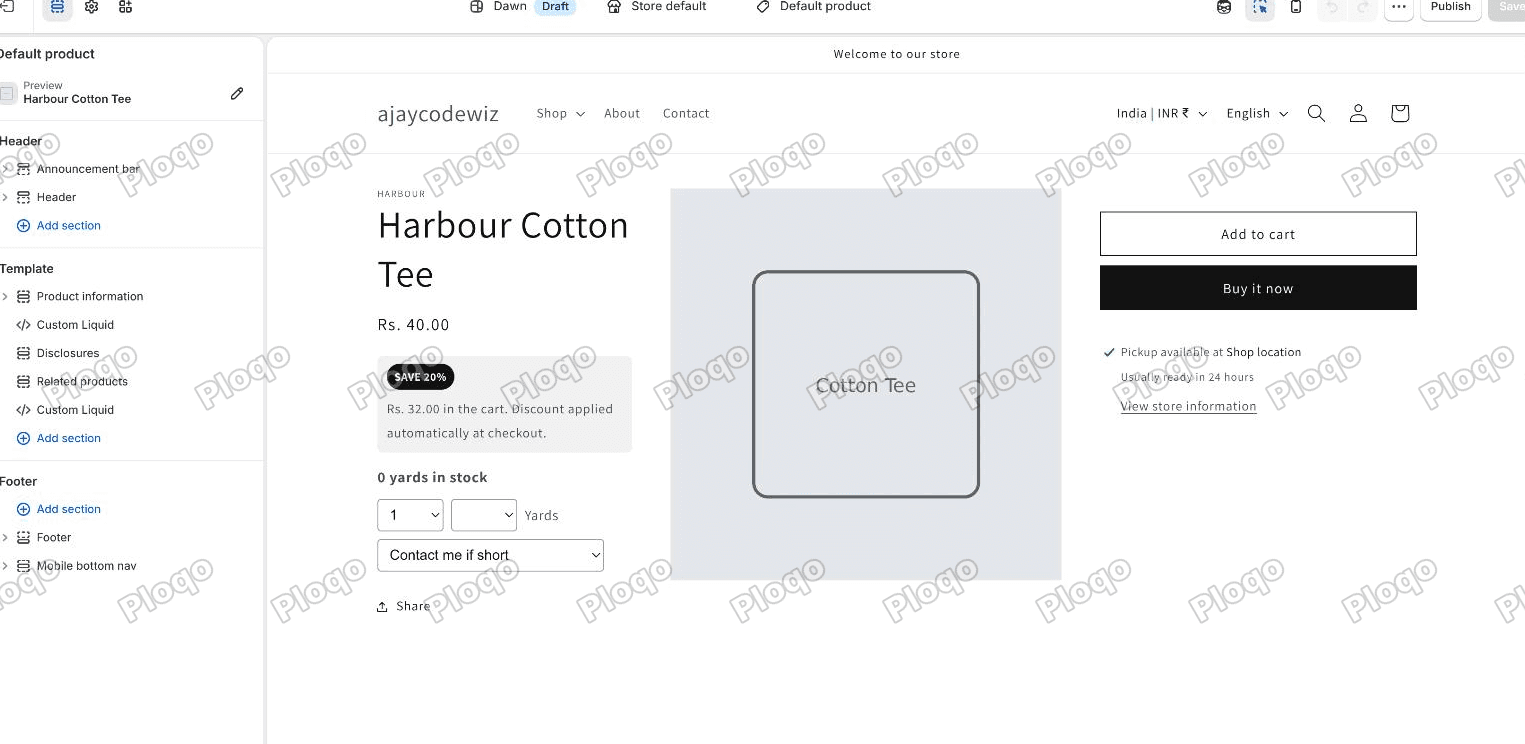 The Shopify theme editor on a product page, with Product information and Custom Liquid in the section list on the left, and the finished discount badge showing under the price
Paste this in and press Save.
{%- assign promo_tag = 'promo-20' -%}
{%- assign promo_percent = 20 -%}

{%- if product.tags contains promo_tag -%}
  {%- assign price = product.selected_or_first_available_variant.price -%}
  {%- assign saving = price | times: promo_percent | divided_by: 100 -%}
  {%- assign after = price | minus: saving -%}
  <div class="promo-badge">
    <span class="promo-badge__pill">Save {{ promo_percent }}%</span>
    <span class="promo-badge__text">
      {{ after | money }} in the cart. Discount applied automatically at checkout.
    </span>
  </div>
  <style>
    .promo-badge { display: flex; align-items: center; gap: 0.8rem; flex-wrap: wrap;
      margin: 0 0 1.2rem; padding: 0.8rem 1rem; border-radius: 0.6rem;
      background: rgba(var(--color-foreground), 0.06); }
    .promo-badge__pill { flex: none; padding: 0.3rem 0.8rem; border-radius: 999px;
      font-size: 1.2rem; font-weight: 600; letter-spacing: 0.04em; text-transform: uppercase;
      background: rgb(var(--color-button)); color: rgb(var(--color-button-text)); }
    .promo-badge__text { font-size: 1.4rem; }
  </style>
{%- endif -%}
Two values at the top are yours:
promo_tagmust match the tag exactly, including case.promo_percentmust match the discount. This is the one number that exists in two places, so change both together.
The price maths uses selected_or_first_available_variant, so a product with variants shows the figure for the variant currently selected.
What it looks like
Tested on Dawn. A tagged product, priced Rs. 40.00:
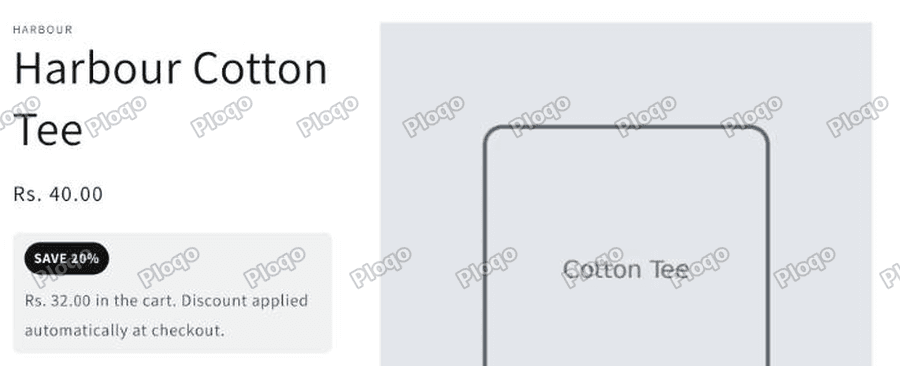 A Shopify product page showing Rs. 40.00 with a SAVE 20% pill underneath reading Rs. 32.00 in the cart, discount applied automatically at checkout
The badge sits directly under the price: a SAVE 20% pill and the line "Rs. 32.00 in the cart. Discount applied automatically at checkout."
A product without the tag shows nothing at all:
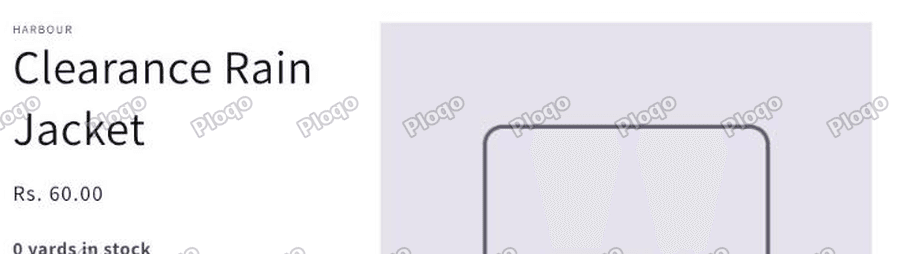 The same theme on an untagged product, showing only Rs. 60.00 with no badge
That second screenshot matters as much as the first. The badge cannot leak onto items outside the promotion, because it is gated by the same tag that scopes the discount.
Proving the number is real
A badge that promises a price the checkout does not honour is worse than no badge. So, both products in one cart:
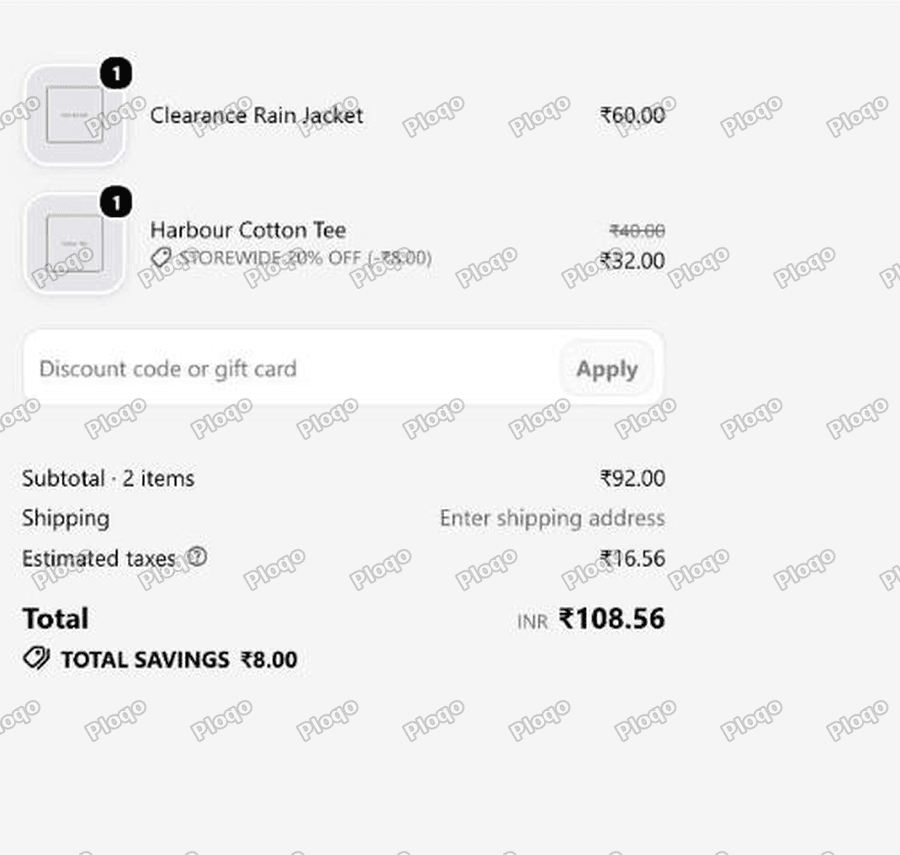 Checkout showing the tee reduced from 40.00 to 32.00 by STOREWIDE 20% OFF, the jacket untouched at 60.00, subtotal 92.00 and savings 8.00
- Harbour Cotton Tee: Rs. 40.00 → Rs. 32.00, labelled "STOREWIDE 20% OFF (-Rs. 8.00)"
- Clearance Rain Jacket: Rs. 60.00, untouched
- Subtotal Rs. 92.00, total savings Rs. 8.00
The badge said Rs. 32.00. The checkout charged Rs. 32.00. That is the whole objective.
Why not just use a compare-at price?
You can, and for a permanent price cut you probably should. Set the compare-at price to the old figure and the price to the new one, and every free theme renders a strike-through and a Sale badge with no code at all.
It is the wrong tool for a promotion, though, for three reasons:
- You have to edit every product to start it, and edit every product again to end it.
- The real price changes, so your reporting shows the discounted figure as the price rather than as a discount.
- It does not follow rules. "20% off this collection for the weekend" has to be applied by hand, product by product.
If the crossed-out price is what you are actually after, that is covered in compare at price, including why it sometimes fails to show at all.
Showing a percentage next to the price instead
Some stores want just "-20%" rather than a sentence. Replace the badge markup with the pill on its own:
<span class="promo-badge__pill">-{{ promo_percent }}%</span>If you want that on collection pages as well as the product page, the same product.tags contains test works inside a product card, but the card is built from a theme file rather than a block you can drop in, so it means editing snippets/card-product.liquid rather than adding a Custom Liquid block. That is a theme file edit and it does not survive a theme update, so weigh it up.
Common problems
The badge does not appear. Check the tag matches exactly, including capitals. Promo-20 and promo-20 are different strings to contains.
The badge appears but the price is wrong. promo_percent and the discount value have drifted apart. They are two separate numbers and nothing keeps them in sync for you.
It shows on the wrong products. The tag is on more products than you thought. Open the automated collection and read the item count; it is the fastest audit.
The discount is not applying at checkout even though the badge shows. The badge and the discount are independent. Check the discount is Active, in date, and that another discount is not knocking it out. Two discounts refuse to run together by default, and combinations explains the switch.
The discount shows as one lump instead of per item. The discount is targeting "All products", which makes it an order discount. Point it at your collection.
The main points
- Liquid cannot see automatic discounts. The product page has to be told, which is all any app is doing.
- Use one tag as the single source of truth: tag defines collection, collection scopes discount, tag gates the badge.
- Build the collection as Automated, condition Tag is equal to your tag.
- Do not drive the badge from
product.collections- in testing it returned only a long-standing collection and missed the new one.product.tagsis immediate and reliable. - Add the badge as a Custom Liquid block under the Price block. No theme file edited.
- Verified on Dawn: badge said Rs. 32.00 off a Rs. 40.00 tee, checkout charged Rs. 32.00, and an untagged Rs. 60.00 product showed no badge and paid full price.
Spending too long on manual Shopify busywork?
PinFlow turns your Shopify catalog into Pinterest pins and posts them on a schedule, automatically. Same idea as the badge above, let the system handle the repetitive part.
Get PinFlow on the Shopify App StoreMore Shopify fixes
More community-sourced Shopify guides, tested on a live store.
Shopify Admin
Shopify Discount Types: Amount Off Products vs Order
Shopify has four discount types, and two of them work out a percentage in different ways. One rounds every single unit, the other rounds the order once. On low unit prices that difference is real money. Tested on a live store.
Shopify Admin
Shopify POS Discount Code: Where the Controls Are
A discount code is Online Store only, and the POS switch lives on the discount, not in POS settings. Here is what each control actually does, checked in a live admin.
Shopify Admin
How to Set a Minimum Order on Shopify (Tested)
Shopify has no minimum order setting, and the one that looks like it only gates a discount. Here is a cart guard that blocks checkout below your minimum, tested on Dawn.