
Shopify Video Carousel: Add a Scrolling Video Section
Most Shopify themes have no video carousel, so a row of short customer videos means a paid app. Here is a free custom section that gives you a scrolling video row with captions, arrows and tap-to-play. Tested on Kalles.
By AjayCodeWiz · August 2, 2026 · 9 min read
The problem: you want a row of short videos, and your theme has no section for it
A merchant asked about this on the Shopify Community. They run the Kalles theme, and they wanted the block you see on a lot of modern product pages: a horizontal row of short vertical videos, each with a caption, that a shopper can scroll through and tap to play. Think social-style customer clips under a heading like "See what people think".
Their theme has no section for that. Kalles is not unusual here. Most Shopify themes let you drop in a single video, but not a scrolling carousel of them. So the merchant assumed they needed a paid app.
You do not. You can add a video carousel to Shopify for free with one custom section. No app, no Shopify Plus.
I reproduced the request and built the section, then tested it on a Kalles storefront. Here it is running live, a scrolling row of videos with a caption under each and arrows on the sides.
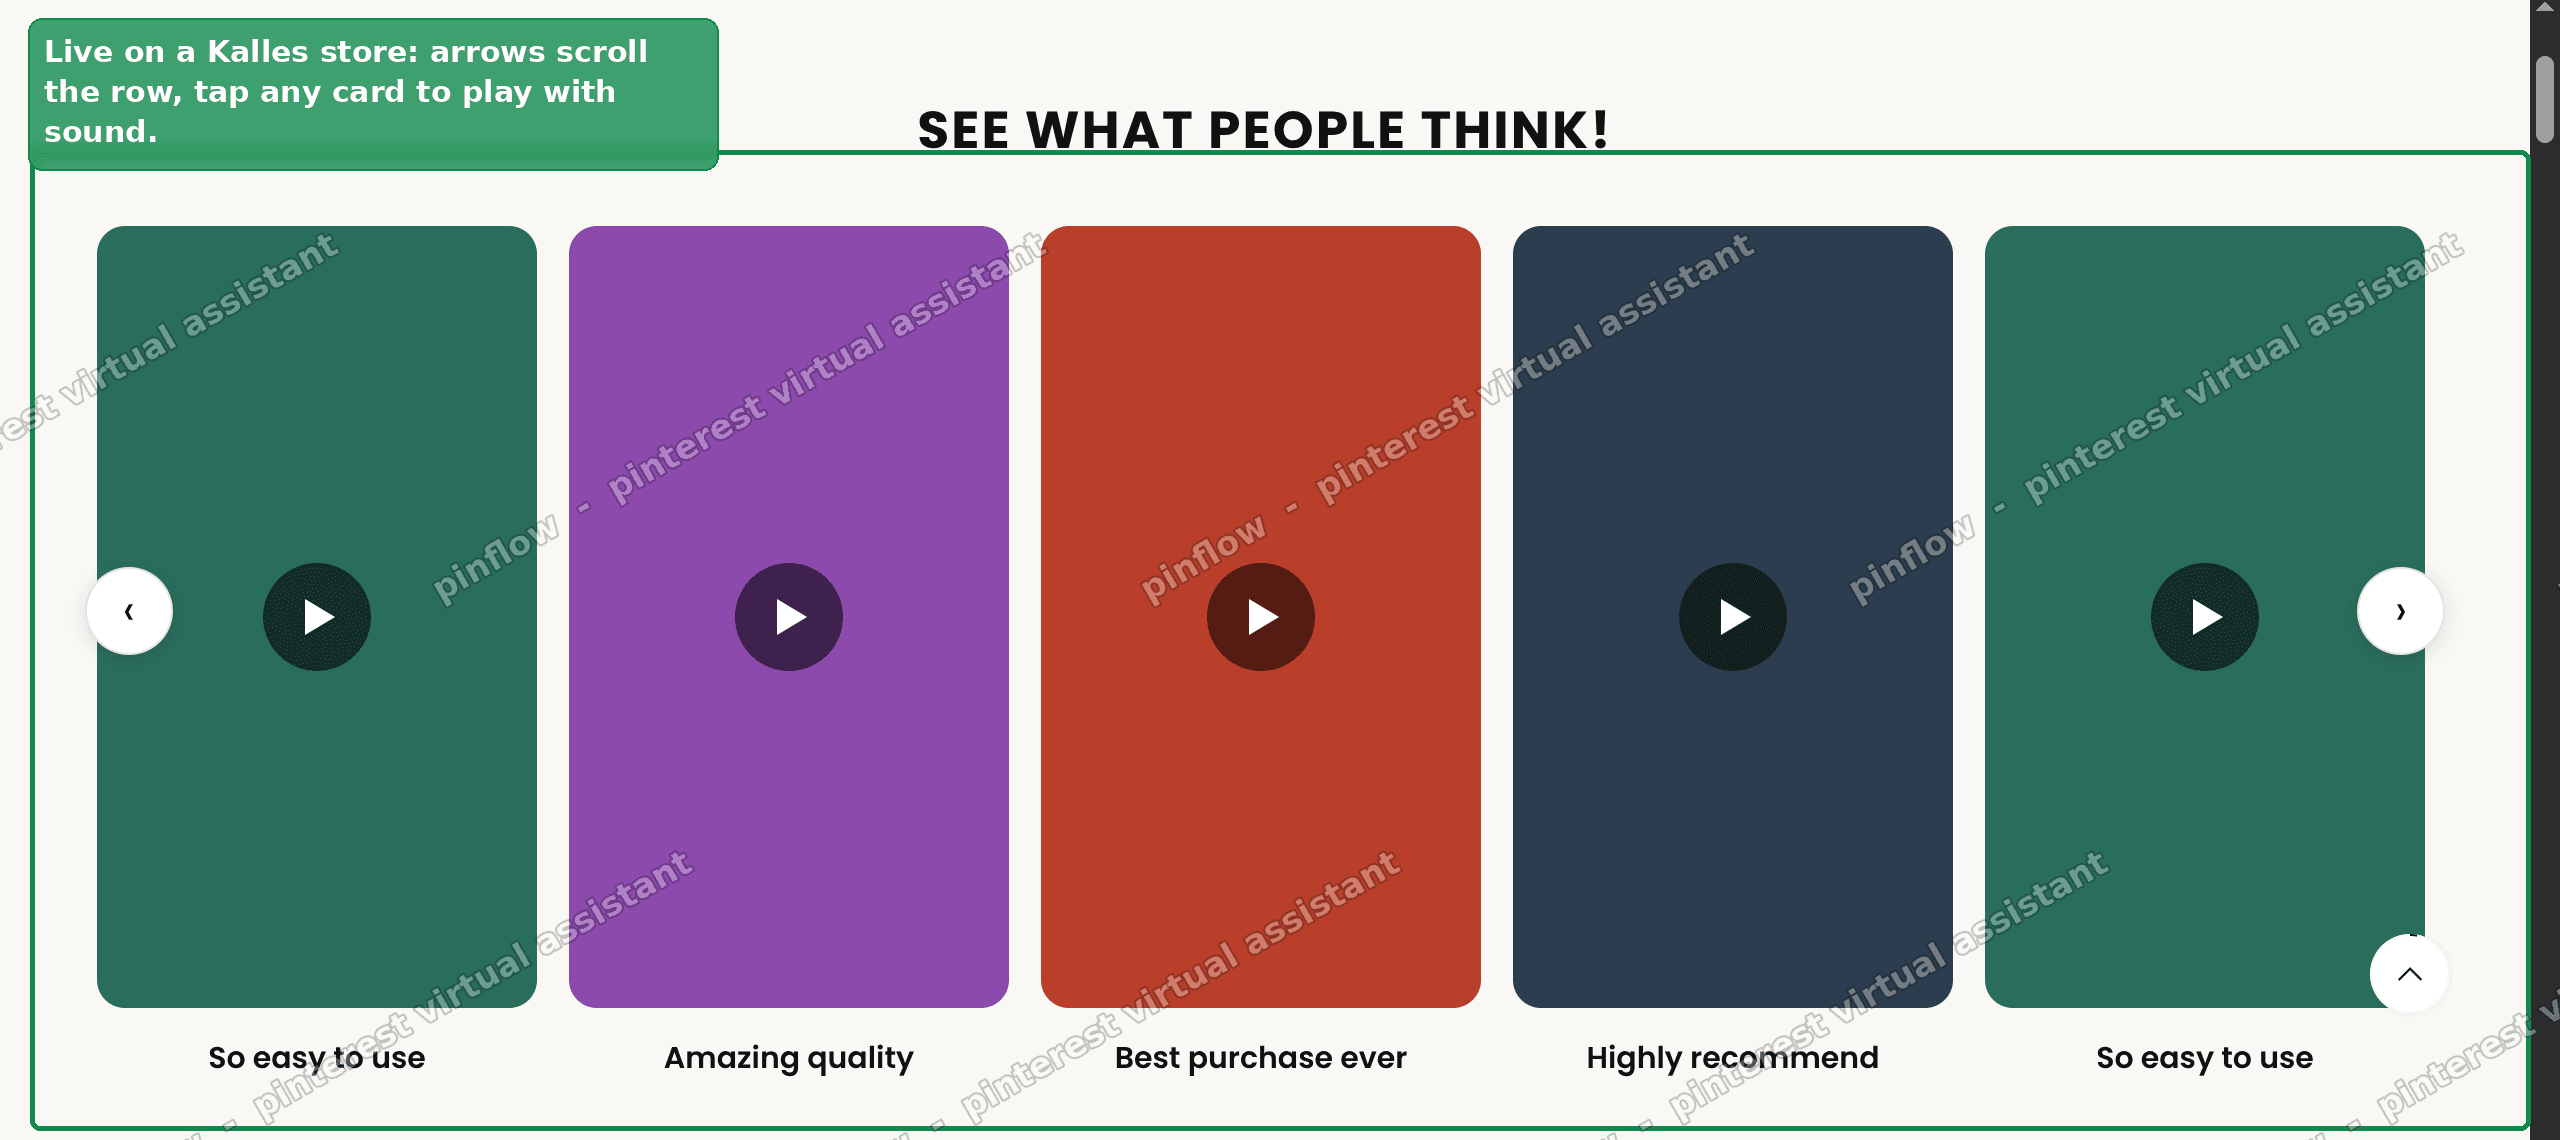 The video carousel section running on a Kalles storefront
The rest of this guide is the exact section, how to add it, and how to fill it with your own clips.
Why themes do not ship a video carousel
It helps to know what a theme actually gives you, because it explains why this needs a small section rather than a setting.
A native Shopify video lives in one of two places. It can be a product media item, shown in the product gallery next to the photos. Or it can be a single video inside a section like a video banner or a rich-text block. Both are one video at a time.
What no standard theme gives you is a row of many videos that scrolls sideways, each with its own caption and its own play control. That is a specific layout, and themes leave it out because it is a design choice, not a core feature.
So the gap is not that video is hard on Shopify. It is that the carousel of videos layout is missing. That is exactly the kind of thing a custom section is for. If you have never added one, our guide on creating a Shopify custom section covers the basics of how sections and their editor settings work. This article is a ready-made one for the video-carousel case.
What you are adding
The section below is self-contained. It carries its own styles and its own script, so it drops into any theme without touching the rest of your code.
Each video is a block you add in the theme editor. Per block you set the video, a cover image, and a caption. The section then lays the blocks out in a scrolling row with left and right arrows on desktop, swipe on mobile, and tap-to-play with sound. Playing one clip pauses the others.
Nothing is hardcoded, so you can add or remove videos later and the row just grows or shrinks.
Step 1: add the section
First you create the section file. This is the one time you touch code, and it is only paste-and-save.
- Go to Online Store, then Themes.
- Next to your theme click the ... button, then Edit code.
- Under Sections click Add a new section, name it video-carousel, delete the sample content it gives you, paste the code below, and Save.
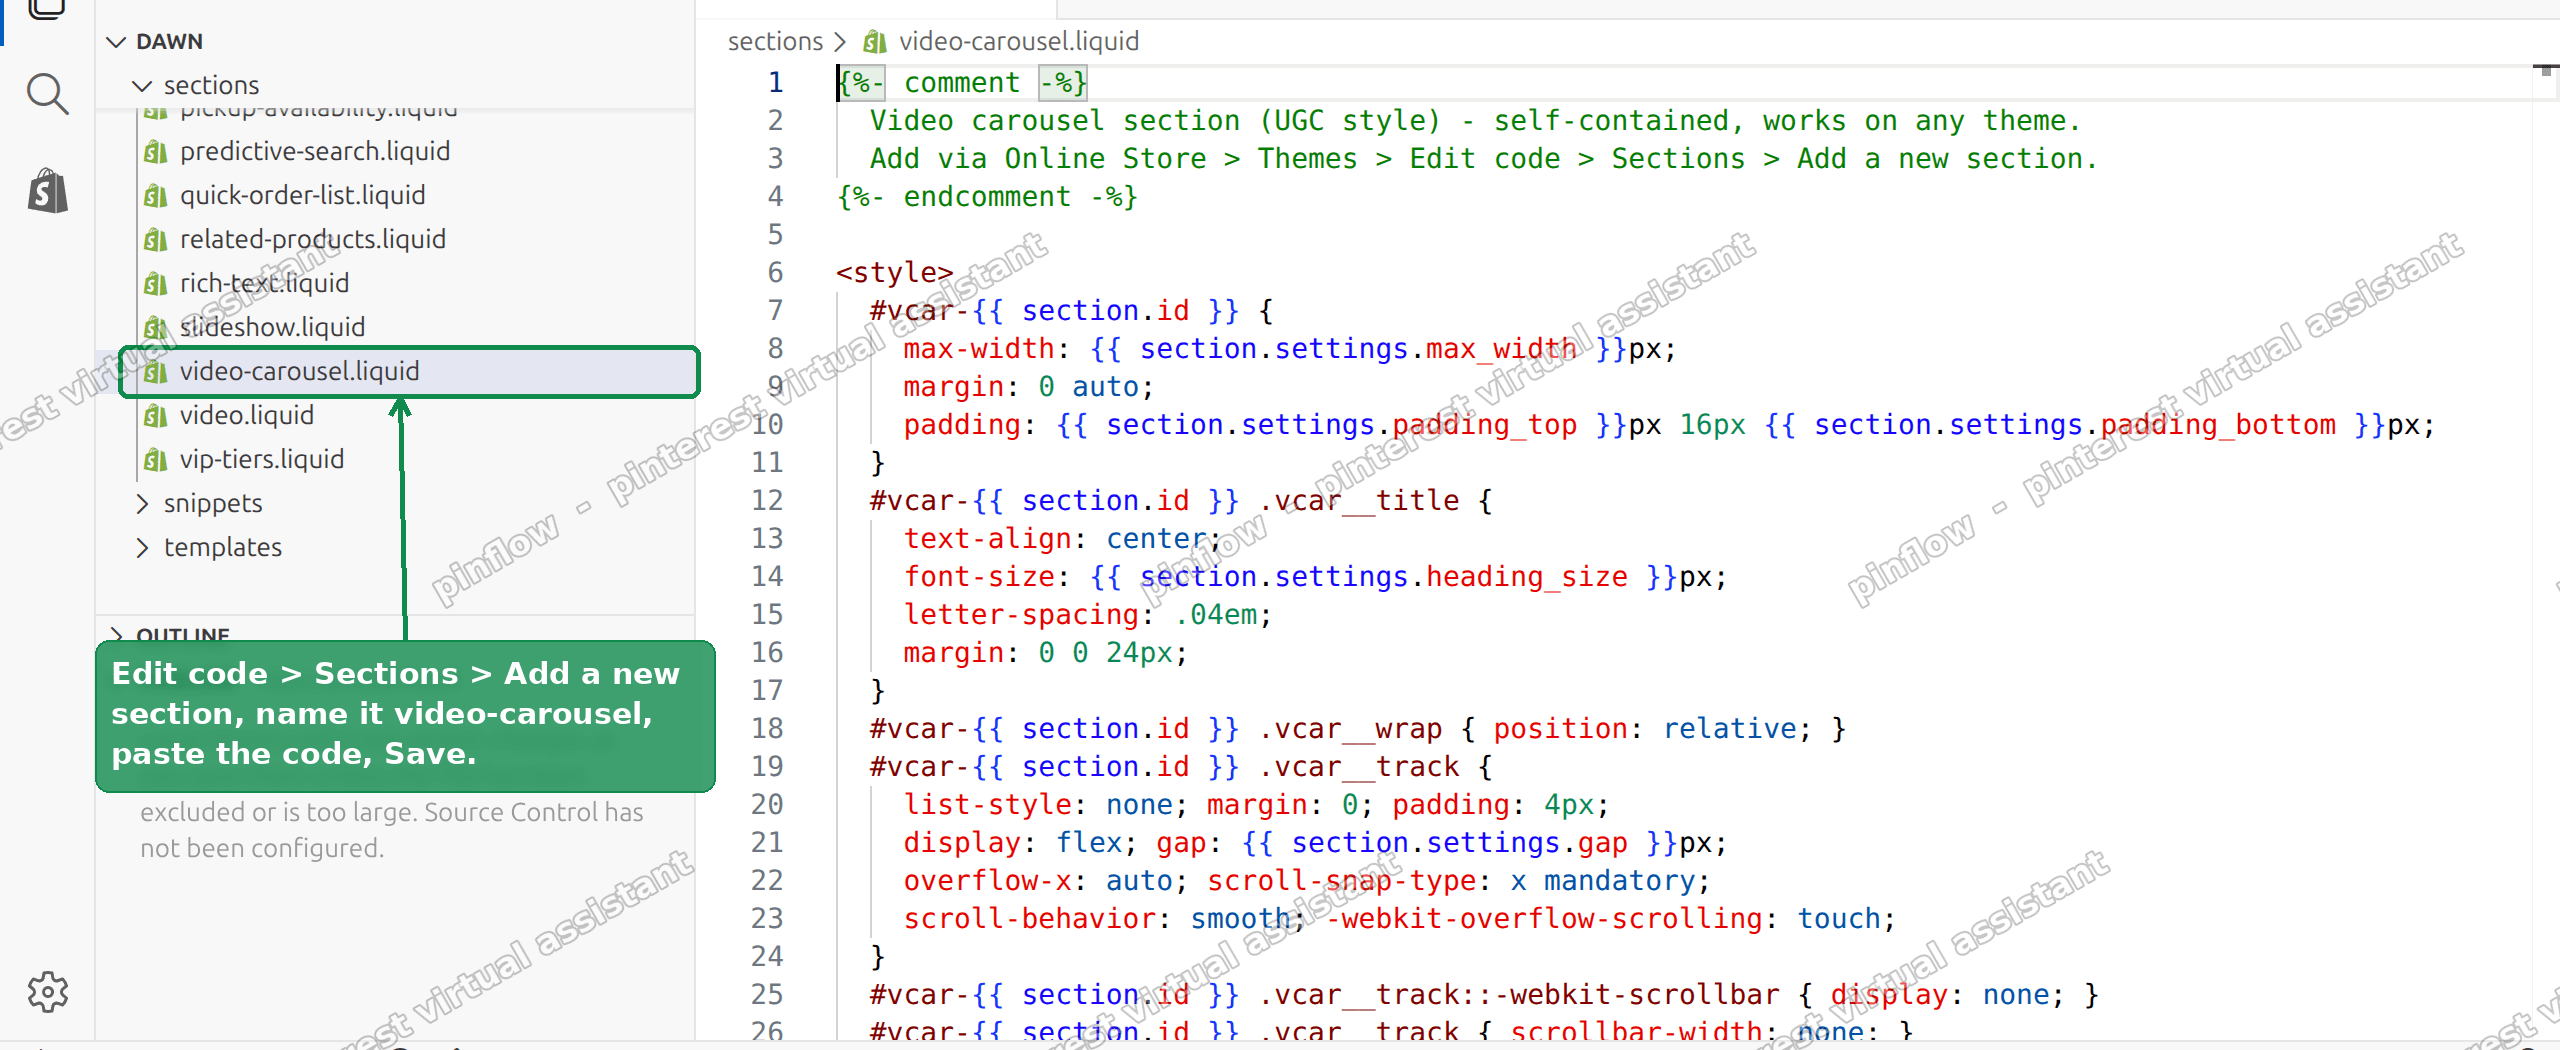 Edit code, add a new section named video-carousel, paste the code, and Save
{%- comment -%}
Video carousel section (UGC style) - self-contained, works on any theme.
Add via Online Store > Themes > Edit code > Sections > Add a new section.
{%- endcomment -%}
<style>
#vcar-{{ section.id }} {
max-width: {{ section.settings.max_width }}px;
margin: 0 auto;
padding: {{ section.settings.padding_top }}px 16px {{ section.settings.padding_bottom }}px;
}
#vcar-{{ section.id }} .vcar__title {
text-align: center;
font-size: {{ section.settings.heading_size }}px;
letter-spacing: .04em;
margin: 0 0 24px;
}
#vcar-{{ section.id }} .vcar__wrap { position: relative; }
#vcar-{{ section.id }} .vcar__track {
list-style: none; margin: 0; padding: 4px;
display: flex; gap: {{ section.settings.gap }}px;
overflow-x: auto; scroll-snap-type: x mandatory;
scroll-behavior: smooth; -webkit-overflow-scrolling: touch;
}
#vcar-{{ section.id }} .vcar__track::-webkit-scrollbar { display: none; }
#vcar-{{ section.id }} .vcar__track { scrollbar-width: none; }
#vcar-{{ section.id }} .vcar__item {
flex: 0 0 {{ section.settings.card_width }}px;
scroll-snap-align: start;
}
#vcar-{{ section.id }} .vcar__video {
position: relative; width: 100%;
aspect-ratio: 9 / 16; border-radius: 14px; overflow: hidden;
background: #f2f2f2; cursor: pointer;
}
#vcar-{{ section.id }} .vcar__video video {
width: 100%; height: 100%; object-fit: cover; display: block;
}
#vcar-{{ section.id }} .vcar__play {
position: absolute; inset: 0; margin: auto;
width: 54px; height: 54px; border: none; border-radius: 50%;
background: rgba(0,0,0,.55); cursor: pointer;
display: flex; align-items: center; justify-content: center;
transition: opacity .2s;
}
#vcar-{{ section.id }} .vcar__play::before {
content: ""; border-style: solid;
border-width: 9px 0 9px 15px; border-color: transparent transparent transparent #fff;
margin-left: 3px;
}
#vcar-{{ section.id }} .vcar__video.is-playing .vcar__play { opacity: 0; pointer-events: none; }
#vcar-{{ section.id }} .vcar__caption {
text-align: center; margin: 12px 4px 0;
font-size: 15px; font-weight: 600;
}
#vcar-{{ section.id }} .vcar__arrow {
position: absolute; top: calc(50% - 22px); transform: translateY(-50%);
z-index: 2; width: 44px; height: 44px; border-radius: 50%;
border: 1px solid #e3e3e3; background: #fff; color: #111;
font-size: 22px; line-height: 1; cursor: pointer;
box-shadow: 0 2px 10px rgba(0,0,0,.12);
display: flex; align-items: center; justify-content: center;
}
#vcar-{{ section.id }} .vcar__arrow--prev { left: -6px; }
#vcar-{{ section.id }} .vcar__arrow--next { right: -6px; }
#vcar-{{ section.id }} .vcar__arrow[disabled] { opacity: 0; pointer-events: none; }
@media (max-width: 749px) {
#vcar-{{ section.id }} .vcar__item { flex-basis: {{ section.settings.card_width_mobile }}px; }
#vcar-{{ section.id }} .vcar__arrow { display: none; }
}
</style>
<div id="vcar-{{ section.id }}" class="vcar">
{%- if section.settings.heading != blank -%}
<h2 class="vcar__title">{{ section.settings.heading }}</h2>
{%- endif -%}
<div class="vcar__wrap">
<button class="vcar__arrow vcar__arrow--prev" type="button" aria-label="Previous">‹</button>
<ul class="vcar__track">
{%- for block in section.blocks -%}
<li class="vcar__item" {{ block.shopify_attributes }}>
<div class="vcar__video">
{%- assign v = block.settings.video -%}
{%- if v != blank -%}
<video playsinline muted loop preload="none"
{%- if block.settings.poster != blank %} poster="{{ block.settings.poster | image_url: width: 500 }}"{% endif -%}>
{%- for src in v.sources -%}
{%- if src.format == 'mp4' -%}<source src="{{ src.url }}" type="video/mp4">{%- endif -%}
{%- endfor -%}
</video>
<button class="vcar__play" type="button" aria-label="Play"></button>
{%- elsif block.settings.mp4_url != blank -%}
<video playsinline muted loop preload="none"
{%- if block.settings.poster != blank %} poster="{{ block.settings.poster | image_url: width: 500 }}"{% endif -%}>
<source src="{{ block.settings.mp4_url }}" type="video/mp4">
</video>
<button class="vcar__play" type="button" aria-label="Play"></button>
{%- else -%}
{{ 'lifestyle-1' | placeholder_svg_tag: 'vcar__placeholder' }}
{%- endif -%}
</div>
{%- if block.settings.caption != blank -%}
<p class="vcar__caption">{{ block.settings.caption }}</p>
{%- endif -%}
</li>
{%- endfor -%}
</ul>
<button class="vcar__arrow vcar__arrow--next" type="button" aria-label="Next">›</button>
</div>
</div>
<script>
(function () {
var root = document.getElementById('vcar-{{ section.id }}');
if (!root) return;
var track = root.querySelector('.vcar__track');
var prev = root.querySelector('.vcar__arrow--prev');
var next = root.querySelector('.vcar__arrow--next');
function step() { return Math.max(track.clientWidth * 0.85, 200); }
function update() {
var max = track.scrollWidth - track.clientWidth - 2;
prev.disabled = track.scrollLeft <= 2;
next.disabled = track.scrollLeft >= max;
}
prev.addEventListener('click', function () { track.scrollBy({ left: -step(), behavior: 'smooth' }); });
next.addEventListener('click', function () { track.scrollBy({ left: step(), behavior: 'smooth' }); });
track.addEventListener('scroll', update, { passive: true });
window.addEventListener('resize', update);
update();
// Tap a card to play (with sound); tap again to pause. Only one plays at a time.
root.querySelectorAll('.vcar__video').forEach(function (card) {
var vid = card.querySelector('video');
if (!vid) return;
card.addEventListener('click', function () {
if (vid.paused) {
root.querySelectorAll('.vcar__video video').forEach(function (o) {
if (o !== vid) { o.pause(); o.closest('.vcar__video').classList.remove('is-playing'); }
});
vid.muted = false;
vid.play();
card.classList.add('is-playing');
} else {
vid.pause();
card.classList.remove('is-playing');
}
});
});
})();
</script>
{% schema %}
{
"name": "Video carousel",
"tag": "section",
"class": "section-video-carousel",
"settings": [
{ "type": "text", "id": "heading", "label": "Heading", "default": "SEE WHAT PEOPLE THINK!" },
{ "type": "range", "id": "heading_size", "min": 16, "max": 48, "step": 1, "unit": "px", "label": "Heading size", "default": 26 },
{ "type": "header", "content": "Layout" },
{ "type": "range", "id": "card_width", "min": 140, "max": 320, "step": 10, "unit": "px", "label": "Card width (desktop)", "default": 220 },
{ "type": "range", "id": "card_width_mobile", "min": 120, "max": 260, "step": 10, "unit": "px", "label": "Card width (mobile)", "default": 150 },
{ "type": "range", "id": "gap", "min": 8, "max": 40, "step": 2, "unit": "px", "label": "Gap between cards", "default": 16 },
{ "type": "range", "id": "max_width", "min": 600, "max": 1600, "step": 20, "unit": "px", "label": "Section max width", "default": 1200 },
{ "type": "range", "id": "padding_top", "min": 0, "max": 100, "step": 4, "unit": "px", "label": "Padding top", "default": 40 },
{ "type": "range", "id": "padding_bottom", "min": 0, "max": 100, "step": 4, "unit": "px", "label": "Padding bottom", "default": 40 }
],
"blocks": [
{
"type": "video_item",
"name": "Video",
"settings": [
{ "type": "video", "id": "video", "label": "Video (upload)" },
{ "type": "text", "id": "mp4_url", "label": "or paste an MP4 URL", "info": "Use this only if you are hosting the video elsewhere." },
{ "type": "image_picker", "id": "poster", "label": "Cover image (poster)" },
{ "type": "text", "id": "caption", "label": "Caption", "default": "Cookware that lasts" }
]
}
],
"max_blocks": 16,
"presets": [
{
"name": "Video carousel",
"blocks": [
{ "type": "video_item" },
{ "type": "video_item" },
{ "type": "video_item" },
{ "type": "video_item" }
]
}
]
}
{% endschema %}Step 2: add your videos
Now you fill it in from the normal theme editor, no code.
- Go back to Customize.
- The Video carousel section is now in the section list. Drag it to where you want it on the page.
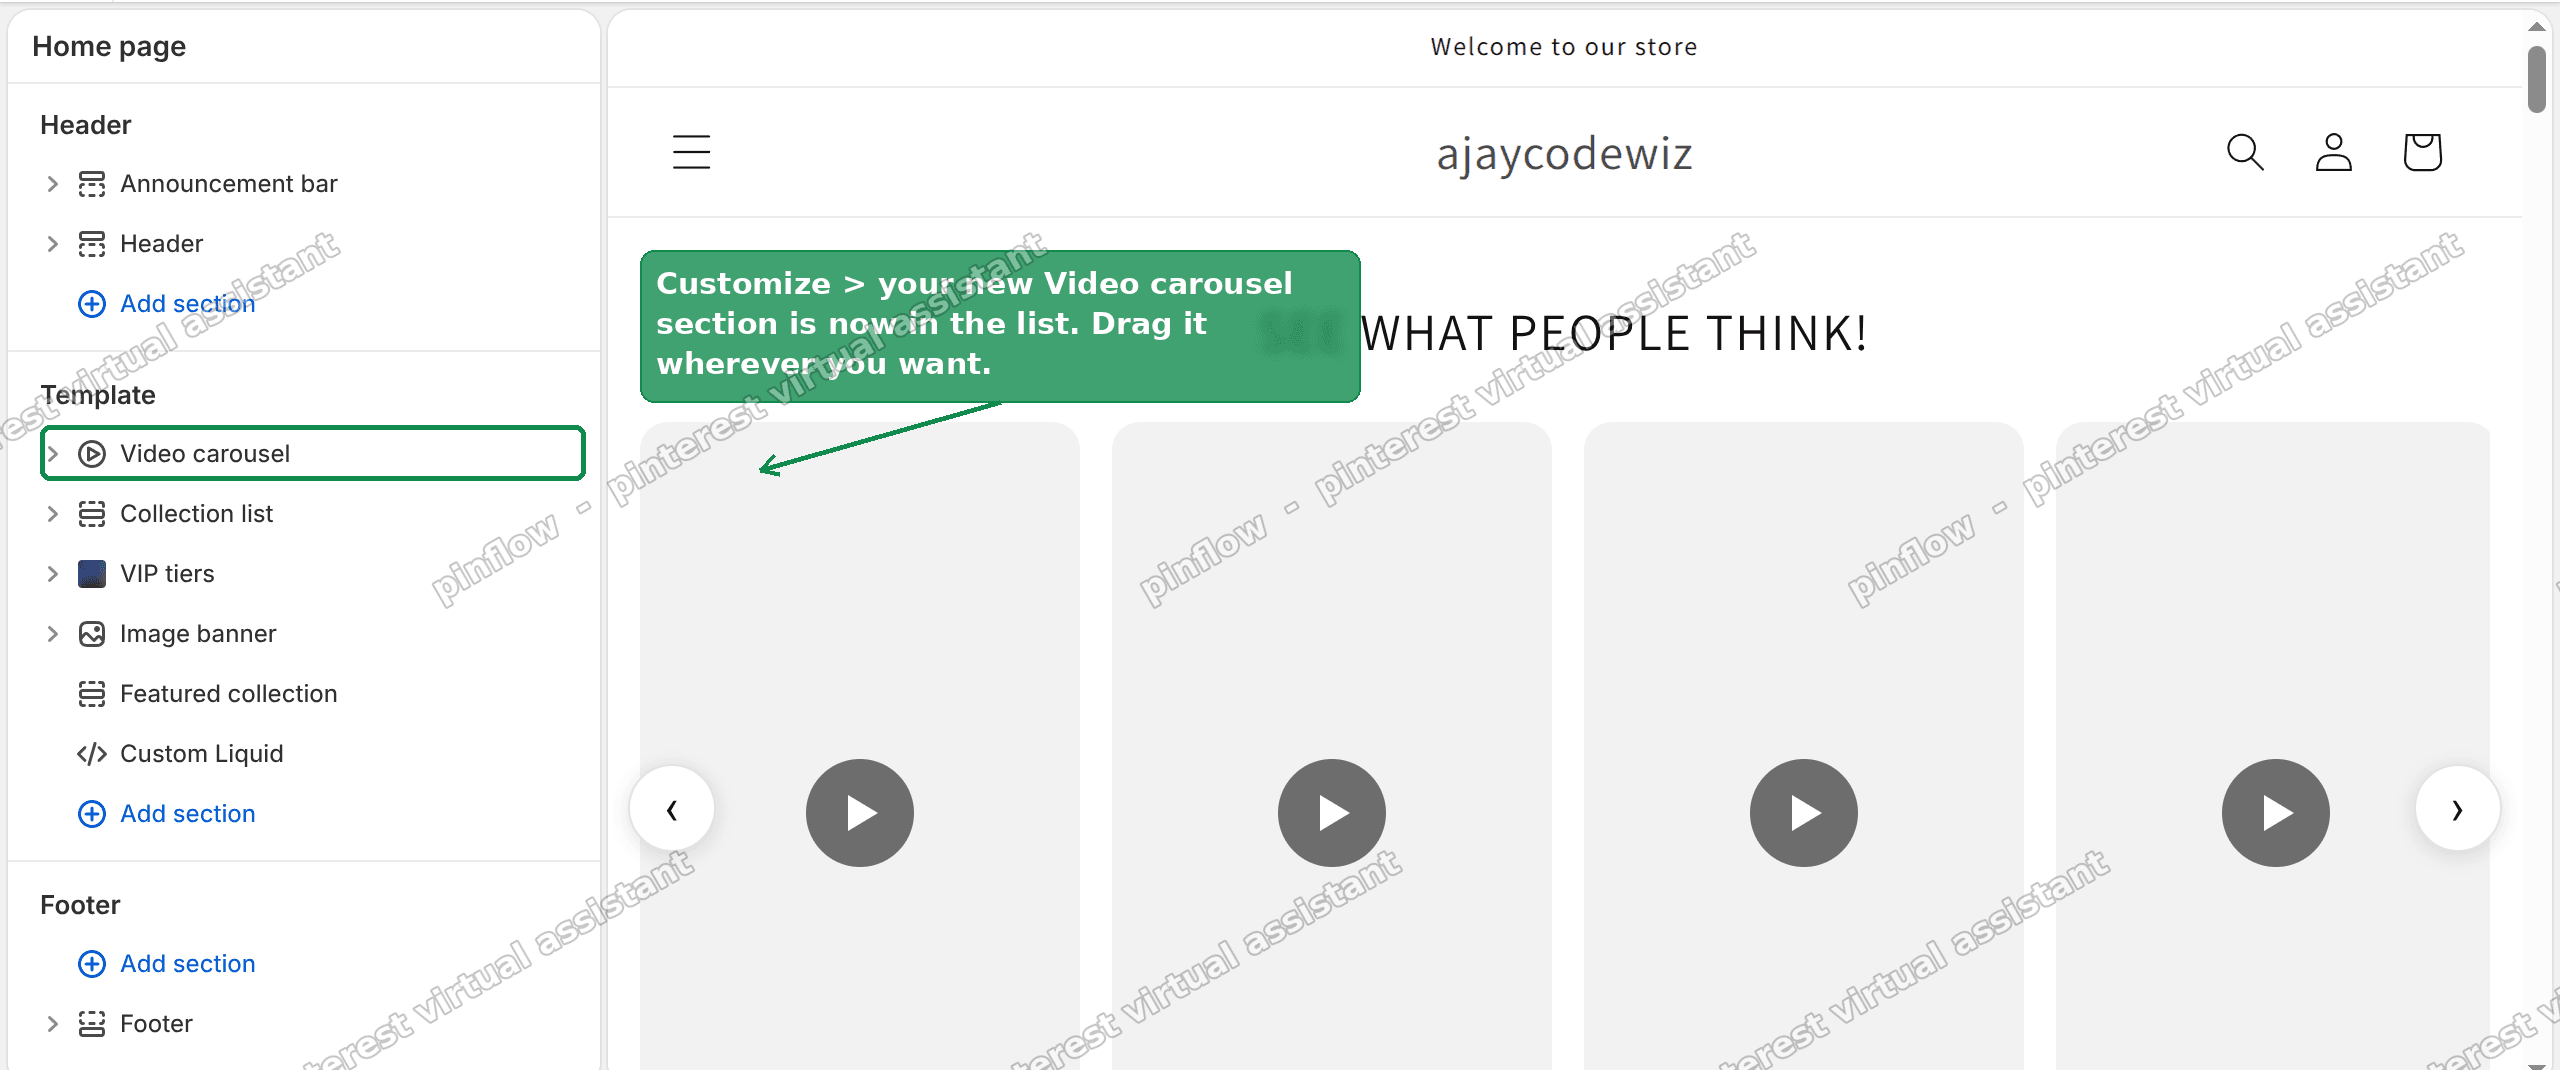 The Video carousel section now shows in the theme editor
- Open the section and click Add block, choose Video, once per clip.
- In each block, upload the video, pick a cover image, and write the caption.
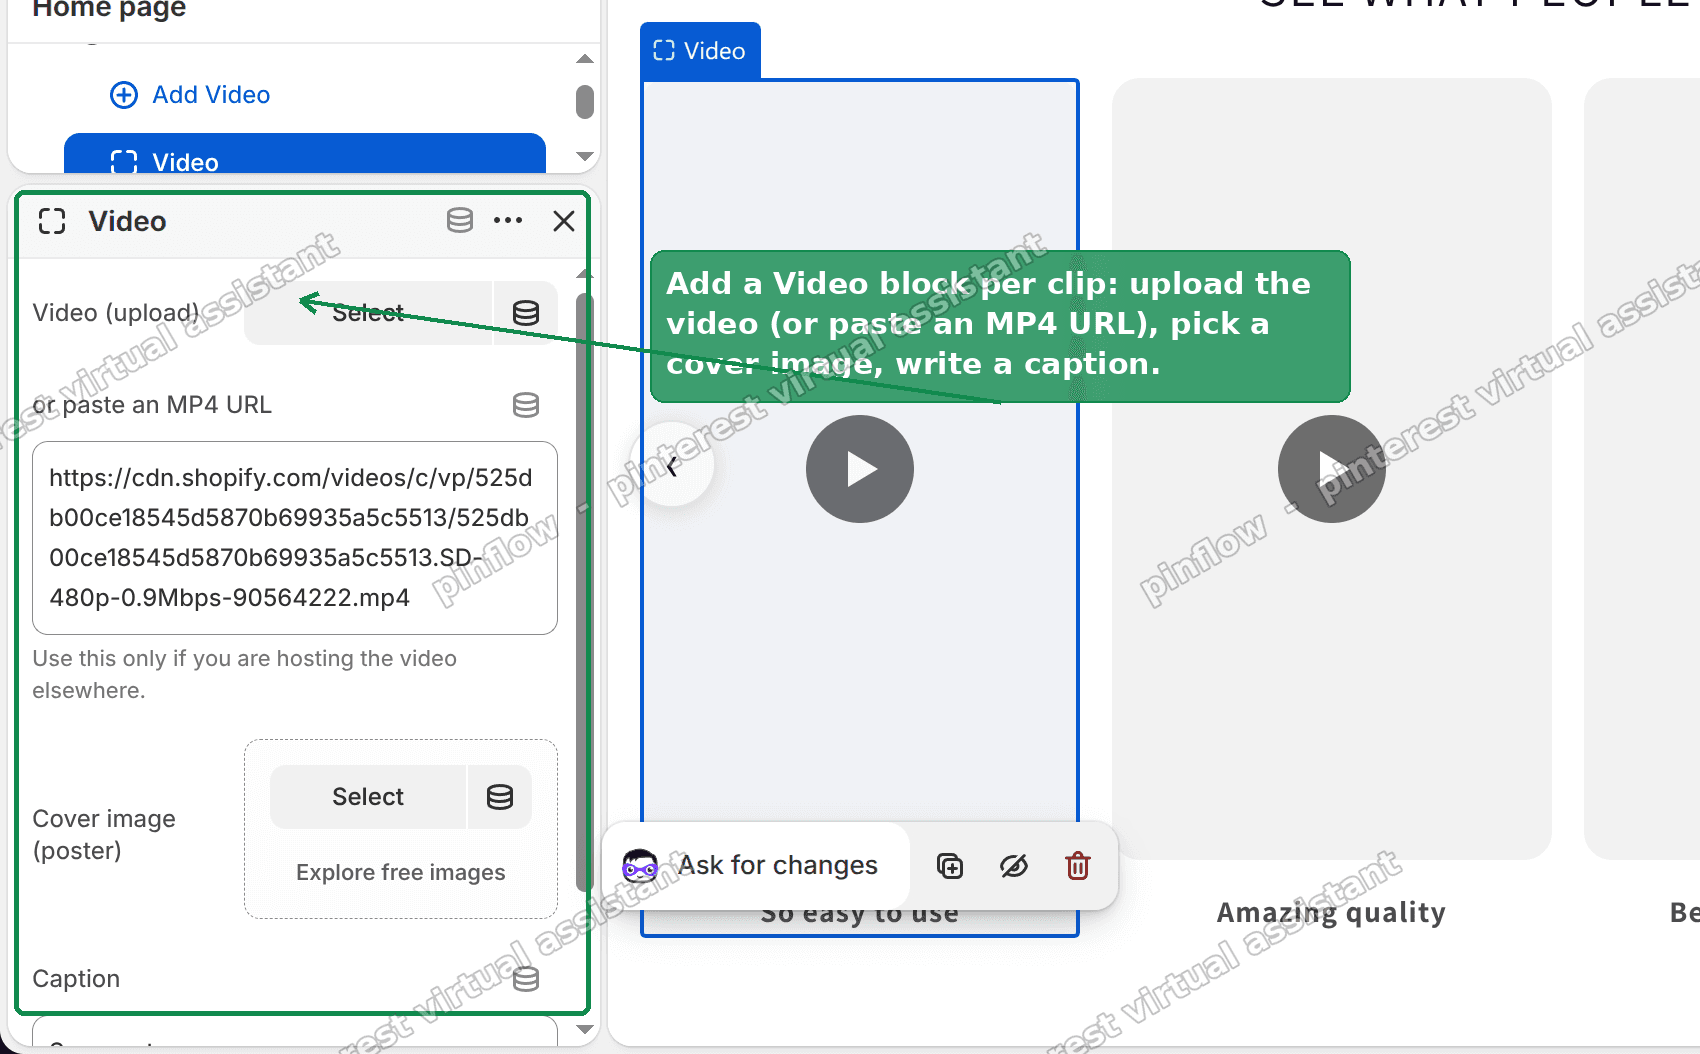 Add a Video block per clip: upload the video, set a cover image and a caption
That is the whole setup. Save, and the row is live.
How to add a single video to Shopify, if that is all you need
Not every store needs a carousel. If you just want one video somewhere, you do not need the section above.
To add a video to a product, open the product in your admin, go to the Media area, and upload the video the same way you upload a photo. It then appears in the product gallery.
To add a video to a page or the homepage, most themes have a video section or a video block you can add from the theme editor. Look for "Video" in the Add section or Add block list.
The carousel section is only for the case the native options miss: several videos in a row that a shopper scrolls through.
Autoplay, sound and the play button
Two questions always come up with video on Shopify, so here is how this section handles them.
By default each clip is muted and shows a play button. A shopper taps to play, and that is when sound turns on. This is deliberate. Browsers block autoplay with sound, and a wall of clips all playing at once is noise. Tap-to-play keeps it calm and lets the shopper choose.
If instead you want a product video that autoplays and loops muted, with no play button, that is a different behavior and a different setup. We cover it in Shopify product video autoplay. The short version is that autoplay only works when the video is muted.
Where to host the videos
Upload the clips straight into Shopify. When you add a Video block, the uploader stores the file on Shopify's own video hosting, and the section reads it from there. That is the simplest path and it keeps everything in your admin.
The section also has an "or paste an MP4 URL" field for the rare case where you host a clip somewhere else and want to point at it. Most stores never need that. Uploading in the editor is the normal way.
Keep the clips short and vertical. The row is designed for portrait cards, the same shape as social videos, so a 9:16 clip fits without cropping.
Does it work on mobile?
Yes. On desktop you get the left and right arrows. On mobile the arrows hide and the row becomes a swipe, which is what shoppers expect on a phone.
The card width is a setting, with a separate value for mobile, so you can show more or fewer cards per screen on each. The default fits neatly on both.
If the videos do not show
A few things to check if the row looks empty or broken.
- The block has no video. Each Video block needs either an uploaded video or an MP4 URL. An empty block shows a placeholder.
- The video is still processing. Shopify takes a minute to process a freshly uploaded video. Give it a moment and refresh.
- You pasted only part of the code. The section needs the whole block, including the script at the bottom. That script is what makes the arrows scroll and the tap-to-play work.
- Nothing plays with sound on the first tap. Some browsers need a second tap after a page load before they allow sound. That is a browser rule, not the section.
Will a video carousel slow my store down?
This is a fair worry, because video files are heavy and speed affects both shoppers and rankings.
The section is built to avoid that. Each clip is set to load only when needed rather than all at once, so the page does not try to download every video the moment it opens. A shopper who never scrolls to the row never pays for it.
The cover image you set per block matters here too. It is what shows before a clip is tapped, so a light, well-compressed cover keeps the row looking sharp without pulling the full video down first.
Keep the clips short, a few seconds each, and trimmed to the moment that matters. Short vertical clips are small, and small is fast. If you have very long videos, host the full version elsewhere and use short teasers in the row.
Can I use YouTube, TikTok or Vimeo videos?
The section plays your own uploaded clips, or an MP4 file you host. It does not embed a YouTube or TikTok player, and that is on purpose.
Embedded players load a lot of third-party code, add their own branding and controls, and often show related videos you do not want next to your product. For a clean product-page row, self-hosted clips look far better and stay fully yours.
If your videos currently live on TikTok or Instagram, download your own clip and upload it into the Video block. It plays inline, on brand, with the caption and tap-to-play the section gives it. That is almost always the look merchants are actually after when they point at a reference store.
Video carousel, product video, and video banner are different things
People mix these up, and the confusion is usually why they cannot find the right setting.
A product video is a single clip in the product gallery, sitting next to the photos. One per media slot.
A video banner is a single background or feature video in a section, usually one wide clip.
A video carousel is the row of many clips this section adds, each its own card with a caption, scrolling sideways. No standard theme ships this, which is why it needs the section above.
Once you see them as three separate things, it is clear which one you want. For the social-style row of customer clips, the free section here is the whole answer, on Kalles or any other theme.
Spending too long on manual Shopify busywork?
PinFlow turns your Shopify catalog into Pinterest pins and posts them on a schedule, automatically. Same idea as the fix above, let the system handle the repetitive part.
Get PinFlow on the Shopify App StoreMore Shopify fixes
More community-sourced Shopify guides, tested on a live store.
Themes & Storefront
Shopify Horizon: Carousel Blank Until You Drag It
A Horizon carousel that shows an empty strip until you drag it, then fills in, is usually the theme skipping the painting of slides it thinks nobody is looking at. Here is how to tell that apart from a genuinely broken carousel, and the one line of CSS that covers it.
Themes & Storefront
Shopify Sold Out Overlay: Grey Out Products and Add a Sold Out Box
Shopify themes mark a sold out product with a small pill in the corner of the card. Here is how to turn that pill into a black Sold Out box across the middle of the photo, and fade the photo behind it, with no theme code and no app.
Themes & Storefront
How to Change the Price Font Size on a Shopify Collection Page
Shopify themes have no setting for the price size on a product card. Here is the one rule that shrinks it on collection pages only, where to paste it so it cannot reach your product pages, and how to keep the crossed out sale price in proportion.