
Upload Your Own Pin Image Instead of a Template
PinFlow used to stamp its own frame, text and graphics on every pin. Two new options skip that: a frameless template, and your own Canva uploads.
Updated September 13, 2026 · 6 min read
Watch the walkthrough
Three and a half minutes covering both new options end to end. Where the video and the app disagree, this article is the authority - the app keeps moving.
What changed
Until now every pin PinFlow generated went through one of its templates, and each template laid its own structures, graphics, text and borders over your product photo. That is useful when you want a designed pin in one click, and Pin Studio covers those templates in full. It is in the way when you already have the pin you want.
Two things are new:
- A frameless template, which puts nothing on the image at all.
- Your own image uploads, so the pin can use a design you made elsewhere.
They are independent. Use either, or both together, which is what you want if you made the whole pin in Canva.
The frameless template
Open a pin from the calendar's review queue and scroll to Templates. The first thumbnail under Basic is the frameless one. It is the only one that shows the photo with nothing over it.
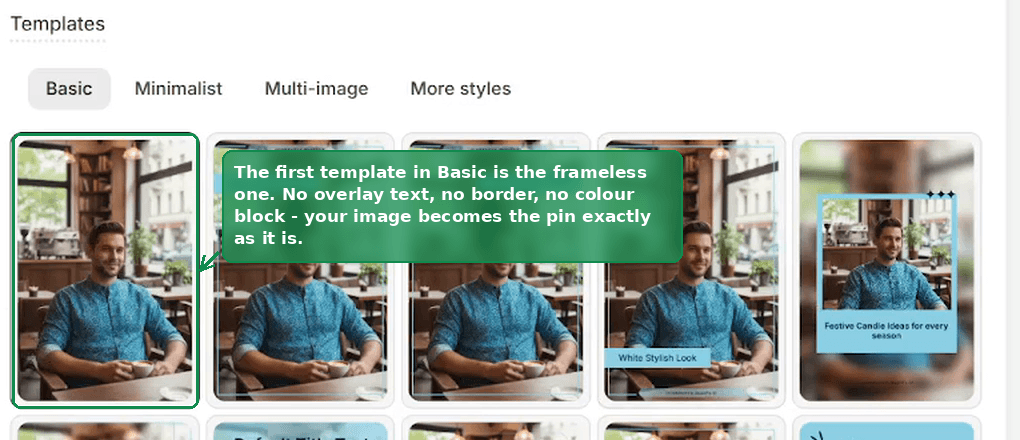 The Templates section of the PinFlow pin editor, with the first frameless template in the Basic row outlined
Pick it and the pin is your image, full bleed. No overlay text, no border, no colour block, no title bar. If your image already carries its own words, this is the option that stops PinFlow writing a second set on top of them.
The rest of the pin still works normally. The title and the description and the outbound URL are separate fields and are unaffected by which template you choose, so a frameless pin still gets its Pinterest copy. Only the picture changes.
Uploading your own image
Scroll up to Images. The row labelled Available Images holds every photo attached to the product, and the tile at the end of that row, the one with the plus, opens your computer's file browser.
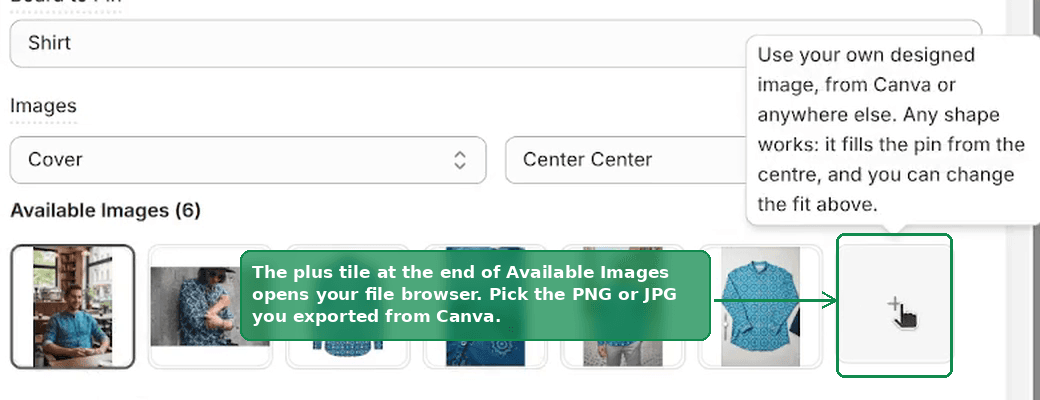 The Available Images row in the pin editor with the plus upload tile outlined, next to the in-app tooltip explaining it
Pick the PNG or JPG you exported. Any shape works: it fills the pin from the centre, and you can change how it is fitted afterwards.
Where the file goes
The upload does not live only on this pin. It goes into your store's Shopify Files, which is why it then shows up as an option on other products too. Your own uploads are tagged Yours in the row so you can tell them from the product photos Shopify already had.
 Two uploaded images at the start of the Available Images row, each carrying a Yours badge
Upload a branded background or a logo lockup once and it is available across the catalogue, rather than being re-uploaded for every pin.
The one limit worth knowing
Shopify rejects images above 25 megapixels. If it refuses yours, this is the message you get:
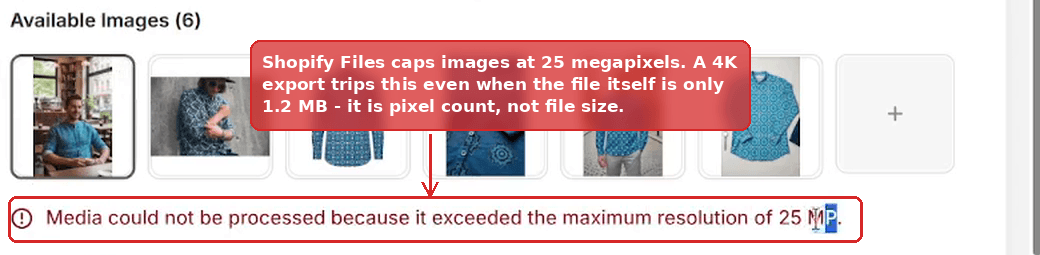 The pin editor showing the error, media could not be processed because it exceeded the maximum resolution of 25 MP
Megapixels are width multiplied by height, not file size. A 4K or larger export trips this easily even when the file itself is small, so an image can be rejected at 1.2 MB. Shopify applies a separate 20 MB file size cap on top of it, and you can fail either one independently.
Export at a smaller pixel size and it uploads. Pinterest serves pins at 1000 x 1500 anyway, so nothing is lost by staying well under the ceiling.
Cover or Contain
Once an image is in, the first dropdown under Images decides how it fills the pin. Cover is the default: the image fills the whole pin and anything that does not fit is cropped off. Contain shrinks the image until all of it fits, which leaves empty bands down the sides or along the top and bottom.
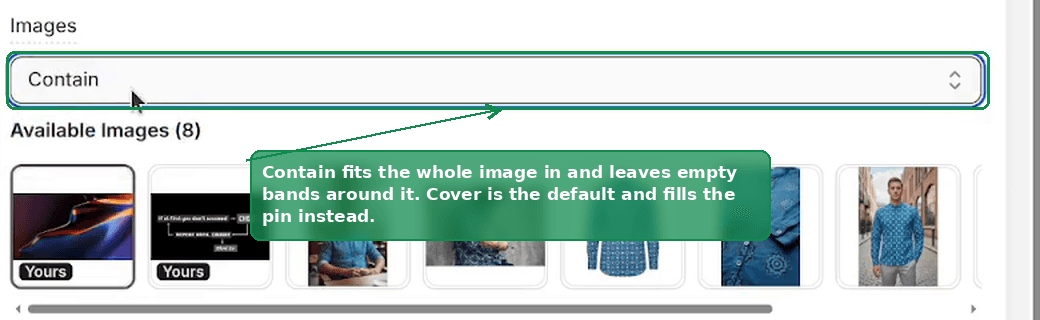 The fit dropdown in the pin editor set to Contain
Cover is almost always the right choice, because a Pinterest pin is tall and empty bands waste the part of the feed you paid attention for. Contain is there for the case where cropping would cut something you cannot lose.
Choosing what survives the crop
Because Cover crops, it matters which part of the image it keeps. The second dropdown sets that, and it only appears when the fit is Cover - Contain shows the whole image, so there is nothing to choose.
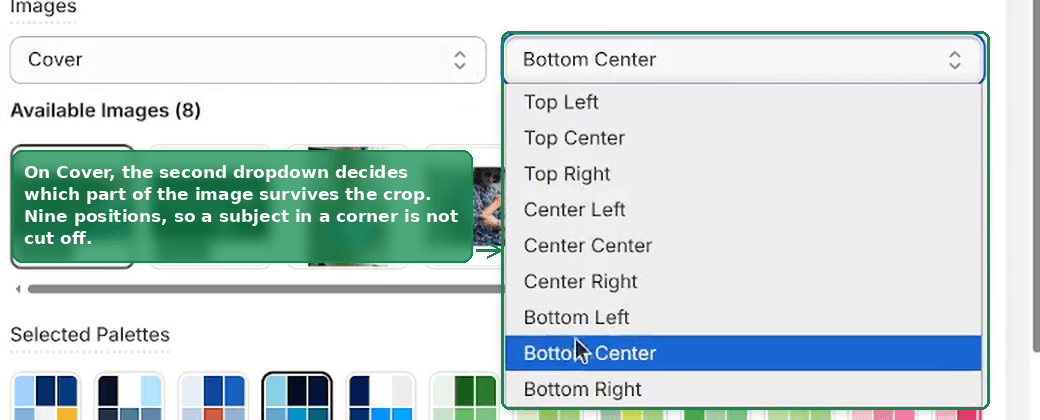 The focus area dropdown open, listing nine positions from Top Left to Bottom Right
Nine positions, from Top Left to Bottom Right. The default is Center Center. If the subject of your design sits in a corner, or your logo is along the bottom, move the focus there and it stops being cropped away.
Scheduling it
Nothing else changes. Pick the date and time under Schedule, then use the Schedule button to queue the pin to the board named in Board to Pin. How often those slots come round is set on the scheduling page.
 The bottom action bar of the pin editor with the Schedule button outlined
Reject skips the pin instead, and Cancel closes the editor without deciding. You can reopen a pin and apply a different template at any point before it goes out - choosing frameless once does not lock the pin to it.
When to use which
Use the frameless template with your own upload when you designed the whole pin somewhere else and want PinFlow only for the scheduling.
Use the frameless template with a product photo when the photography is strong enough to carry the pin on its own.
Use your own upload with a normal template when you want PinFlow's text and layout, but over a background you control rather than a catalogue shot.
Use a normal template with a product photo, the original behaviour, when you want a designed pin without opening a design tool at all. Most stores end up mixing these, which is the point of keeping them independent.
Not using PinFlow yet?
PinFlow turns your Shopify catalog into Pinterest pins and posts them on a schedule, automatically. Install it and follow this guide to get your first month of pins live.
Get PinFlow on the Shopify App StoreRelated articles
Pin Studio
Pinterest Pin Description Character Limit: What Actually Fits
The Pinterest pin description character limit is 500, and the title limit is 100. Mobile cuts both sooner. Here is what fits and how to make AI respect it.
Pin Studio
Pin Studio: Design Your Pinterest Pins
Pick the templates, colours, fonts and AI wording that every generated pin inherits, and build a single pin by hand when you want one.
Scheduling & Autopilot
How to Post on Pinterest Without Getting Banned
Pinterest wants a pin every day, but a 50 product store runs dry in weeks. Here is what Pinterest flags when you repeat, and how to repeat safely.