
How to Schedule Pinterest Pins: Review, Edit and Approve
Every pin PinFlow generates waits in the calendar. How to read the four tabs, edit a pin before it goes out, and fill the gaps in your queue.
Updated September 6, 2026 · 8 min read
Watch the walkthrough
Six minutes on the calendar, including the pin editor and filling empty slots. The written version below covers the same ground with a bit more explanation.
Nothing publishes without you
The calendar is where every pin PinFlow generates waits for a decision. Nothing reaches Pinterest until you approve it, so you always see a pin before anyone else does.
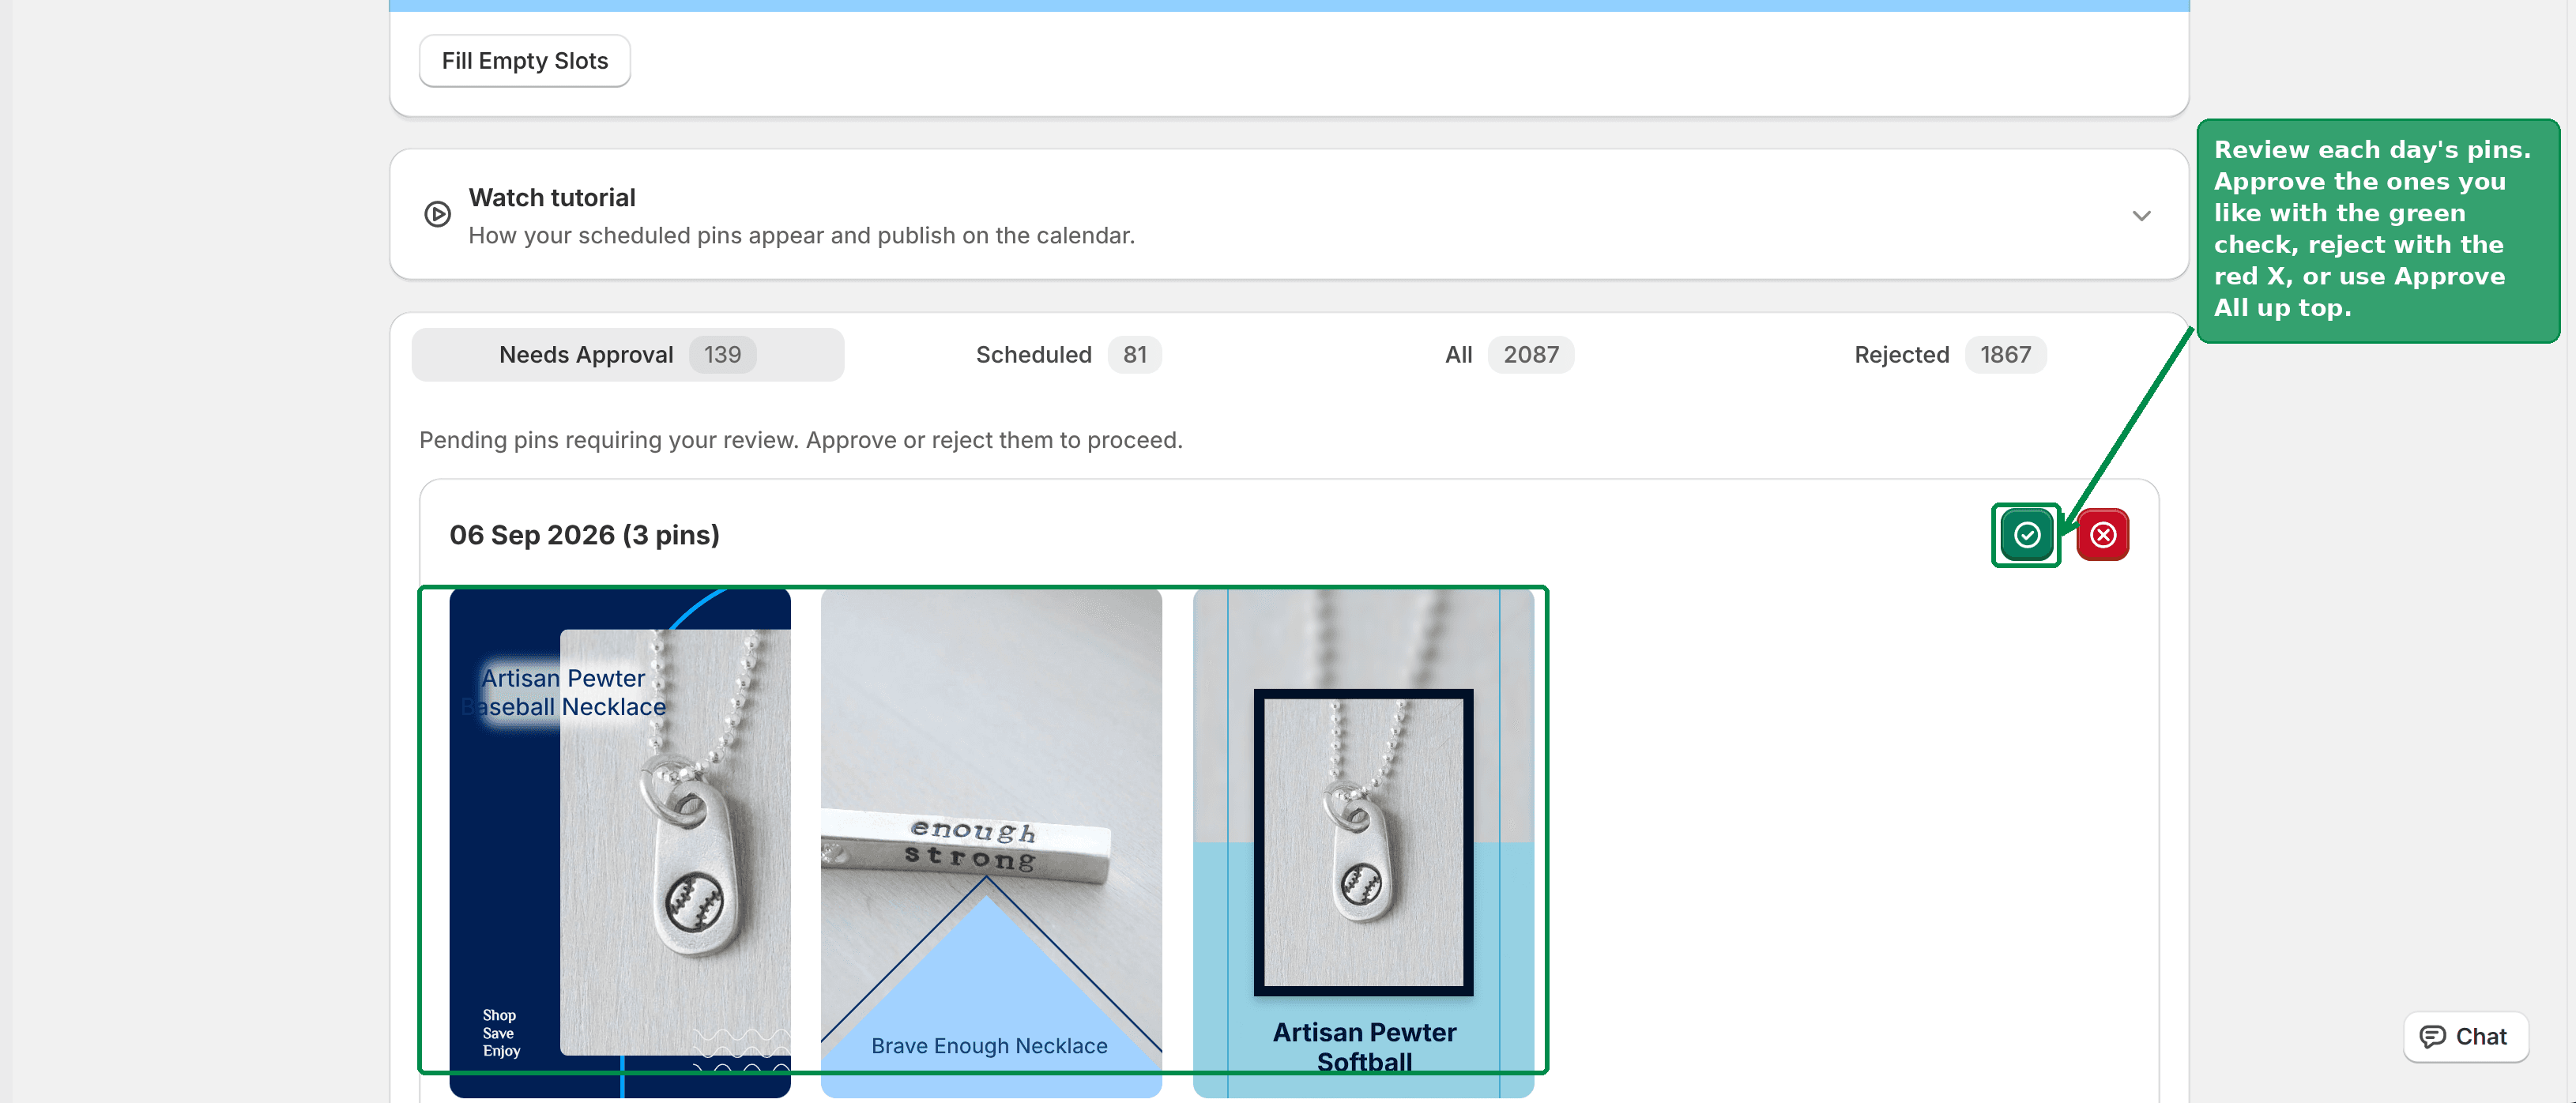 The PinFlow calendar with pins grouped by day, awaiting approval
The four tabs
Needs Approval is where newly generated pins land. This is your review queue and the tab you will spend nearly all your time on.
Scheduled holds pins you have approved. They are waiting on their slot and will publish on their own. Pins that have already gone out are marked as published and are no longer editable, since they now exist on Pinterest.
All is everything, across every state.
Rejected is what you skipped. Rejecting is not deleting, so if you change your mind, the pin is still here.
Approve a day at a time
Pins are grouped by the day they are due to post, with a count next to each date, for example "September 7, 6 pins".
Each day's header has an approve button and a reject button that act on the whole day. This is the fast path, and it is how the queue is meant to be worked: if a day's six pins all look fine, approve the day and move on. Only open the individual ones that look off.
 A day header showing the date and pin count, with the approve and reject buttons for the whole day
You can also approve or reject pins one at a time from their own row, and there is a control to approve everything at once if you are feeling brave.
Tip
Skim by day, not by pin. A month of pins at five a day is 150 decisions if you take them one at a time, and about 30 if you take them a day at a time.
Editing a pin before it goes out
Hover a pin and click the pencil to open the editor. Everything about that pin can be changed here.
Image Text is the headline drawn on the pin image itself. Type a longer line and the font size adjusts to fit, so you do not have to size text by hand.
Pinterest Title and Description are what appear under the pin on Pinterest. Both are written for you from the product, and both are worth a glance because they are what Pinterest reads when deciding who to show the pin to.
Alt Text describes the image for Pinterest and for screen readers.
Outbound URL is the page that opens when someone clicks the pin. It points at the product on your store and rarely needs changing.
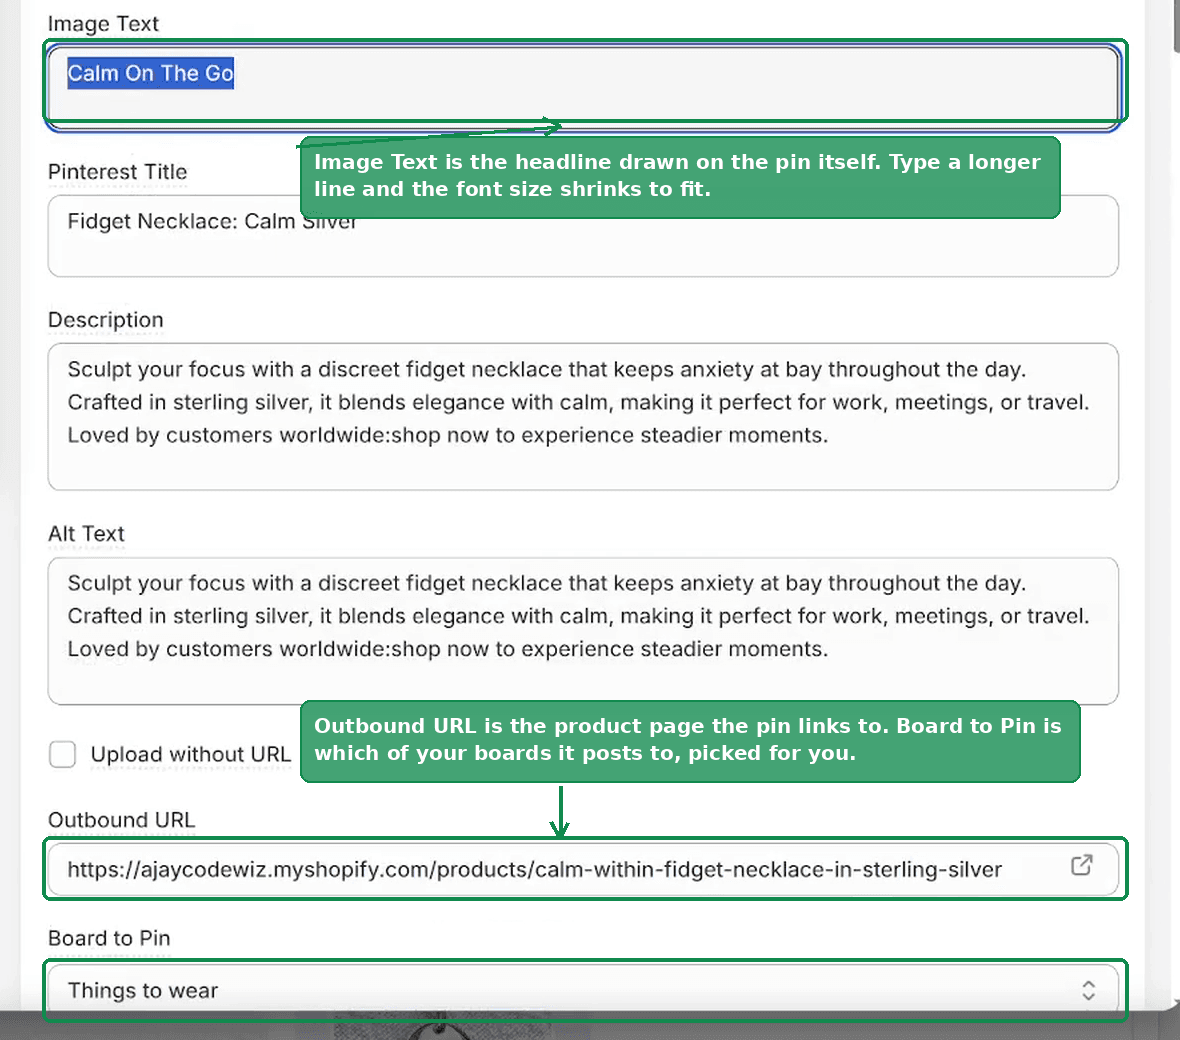 The pin editor showing Image Text, Pinterest Title, Description, Alt Text, Outbound URL and Board to Pin
Boards are chosen for you
Each pin shows the board it will post to, picked automatically based on how well the product matches the boards you have.
That matching only works if there is something to match against. With two or three boards, most pins end up in the same place regardless of what they are.
Tip
Create more boards on Pinterest, and make them specific. "Things to Wear" and "Gift Ideas" give the matcher something to work with in a way that one general board never can. You can add boards from PinFlow's Settings, on the Boards tab.
Image fit and position
Image fit is Cover or Contain.
Choose Cover. It stretches the photo to fill the pin, so there is no empty space. Contain fits the whole photo in and leaves blank bands, which looks unfinished in a feed.
Image position decides which part of the photo survives the crop, from top left through to bottom right, and the preview updates as you change it. The default of centre works for most product photography. Change it when the subject of the photo is not in the middle of the frame.
Palettes, fonts and templates
The pin opens with the palette, font and template it was generated with, taken from your Pin Studio defaults, and each can be swapped for this pin alone.
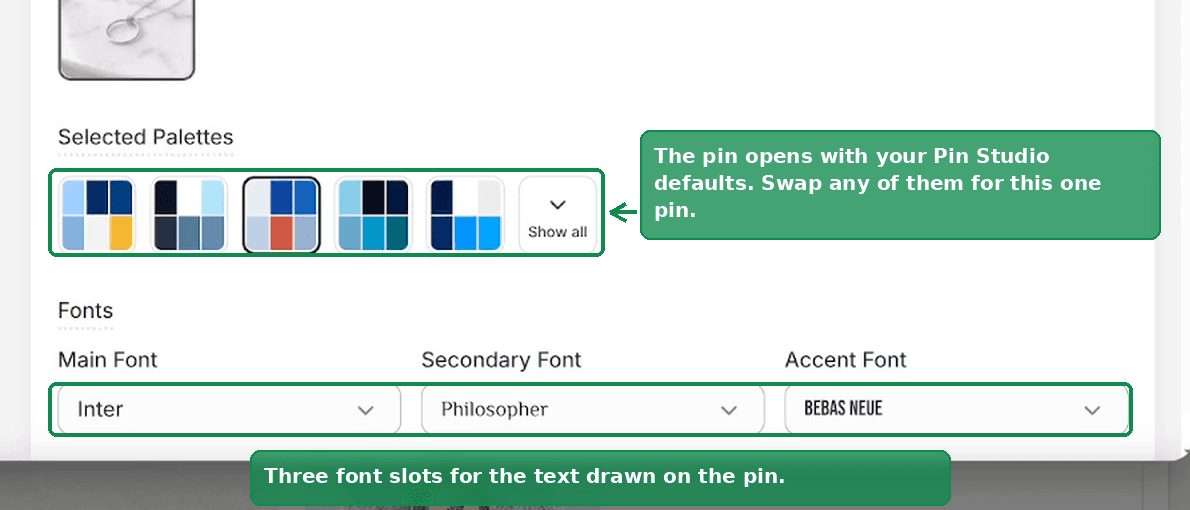 Selected Palettes and the three font slots in the pin editor
The template is the one worth checking. Templates lay their design over the product photo in different places, so on some products a template will sit right over the thing you are selling. If a pin looks wrong, try two or three other templates and pick the one that leaves the product visible.
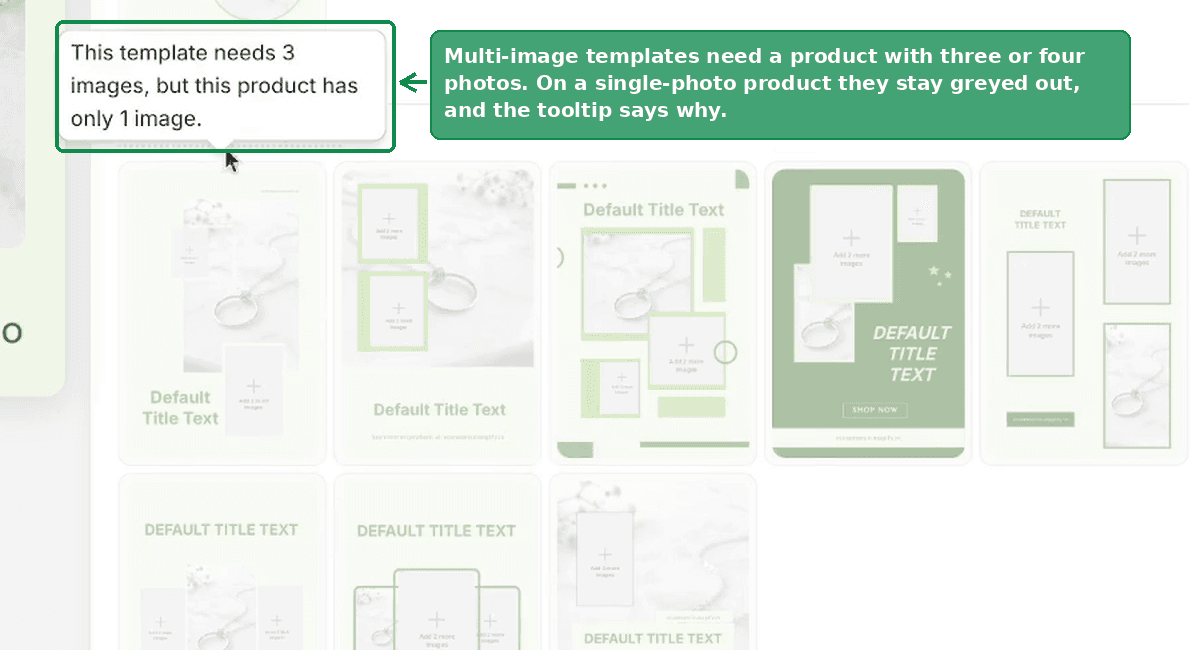 Greyed-out multi-image templates with a tooltip explaining the product has only one image
Note
Some templates will be greyed out with a tooltip explaining why. Multi-image templates need a product with three or four photos, so on a product with a single photo only the single-image templates are available. If you want those layouts, add more photos to the product in Shopify.
Moving a pin to another slot
At the bottom of the editor is a date picker. Choose a date, then one of the time slots on it.
Dates that are already full show as disabled, and so do dates in the past. If everything looks greyed out, page forward until you reach dates with room.
Saving keeps your edits, approves the pin, and moves it to Scheduled at the slot you chose.
Filling empty slots
Reject a few pins and you leave holes in the schedule: slots that were going to be filled and now are not.
When PinFlow spots them, a banner appears telling you how many empty slots you have and between which dates. Fill Empty Slots generates exactly enough new pins to cover them, and tells you which dates they landed on.
 The empty slots banner with the Fill Empty Slots button
This is the tidy way to reject freely. Skip anything you do not like, then fill the gaps in one click rather than losing posting days.
If the queue is thin further out rather than patchy, that is a job for the bulk generator instead: see Settings, on the Status tab, which builds a fresh batch out to a date you pick.
Related
- Pin Studio: Design Your Pinterest Pins for changing the templates and colours that every pin is generated with.
- Setting Your Pinterest Posting Schedule for how many pins a day and at what times.
- How to Post Fresh Pins Consistently With Only 50 Shopify Products for keeping the queue full from a small catalog.
Not using PinFlow yet?
PinFlow turns your Shopify catalog into Pinterest pins and posts them on a schedule, automatically. Install it and follow this guide to get your first month of pins live.
Get PinFlow on the Shopify App StoreRelated articles
Content Calendar
How to Post Fresh Pins Consistently With Only 50 Shopify Products
Pinterest rewards fresh pins, but a small catalog runs dry in weeks. Here is how to turn a few dozen products into a month of different pins, and review them before they go out.
Pin Studio
Upload Your Own Pin Image Instead of a Template
PinFlow used to stamp its own frame, text and graphics on every pin. Two new options skip that: a frameless template, and your own Canva uploads.
Pin Studio
Pinterest Pin Description Character Limit: What Actually Fits
The Pinterest pin description character limit is 500, and the title limit is 100. Mobile cuts both sooner. Here is what fits and how to make AI respect it.