
Refresh Theme Variant Images: Photos per Colour and a Cover
In Refresh, picking a colour moves to one photo and leaves the rest. Here is how to show only that colour's photos and lock the cover on cards and the home page.
By AjayCodeWiz · Updated October 4, 2026 · 9 min read
The problem with variant images in Refresh
Refresh is a free Shopify theme from the same family as Dawn, and it is the theme Ploqo's App Store listing names. Its product page uses a slider: one large photo, with a strip of small thumbnails under it. When a shopper picks a colour in Refresh, that strip still holds the photos of every other colour.
Refresh is the live theme on my test store, so I set this up there. The product is a T-shirt called Classic Tee, in Red, Blue and Yellow. It has nine photos: a front and a back for each colour, a lookbook photo of a person wearing the tee, a size guide and a fabric close-up.
With Red picked, the large photo was the red front. The thumbnail strip held all nine photos. The first four on show were the red front, the red back, the blue front and the blue back, so a shopper buying red was looking at blue shirts one click away.
The product also looked wrong off the product page. On the collection page, the Classic Tee card showed the red front photo, because that is the first photo on the product. The home page showed the same red front photo in its featured products row.
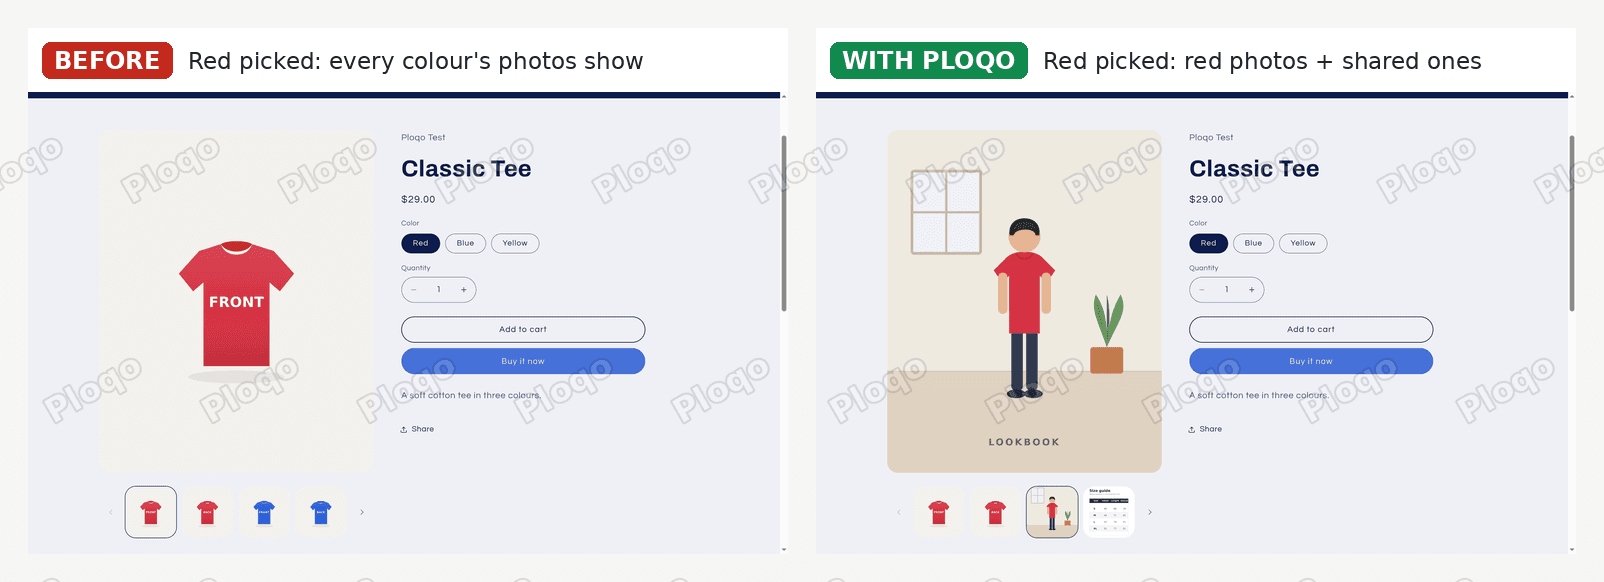 Refresh product page with Red picked: before, the red front photo large and red and blue thumbnails in the strip; with Ploqo, the lookbook cover large and only the red and shared photos in the strip
Why the Refresh slider mixes colours
Shopify lets you link one image to each variant. A variant is one buyable version of a product, like the red T-shirt. That one link is called the variant image, and Shopify has no place to store a second.
On my test product, no photo was linked to any colour. Products often end up like that after a bulk upload or a supplier import. With no links, Refresh cannot tell a red photo from a blue one, so it puts all nine in the slider for every colour.
Linking a photo to each colour fixes only part of it. Each colour can hold one photo, so the red back photo has no colour to belong to. It stays in the strip when a shopper picks Blue or Yellow.
That one link per variant also decides what shoppers see in three places:
- The product page slider. Refresh can jump to the linked photo when a colour is picked. Every photo without a link stays in the strip.
- The collection card. Refresh shows the product's first photo. For a T-shirt that is usually a flat front shot.
- The featured products row on the home page. It uses the same card, so it shows the same first photo.
If you move a better photo to the first spot to fix the card, the product page opens on that photo too. You can choose a good card photo or a good first slide, but Shopify gives you one setting for both.
What Ploqo changes in Refresh
Ploqo is a Shopify app that keeps two extra things on each product: which photos belong to which colour, and one cover photo for cards.
In Refresh, once it was set up, the product page looked like this:
- When the page loads: the large photo is the lookbook cover. That held whether the link named no colour, Red, Blue or Yellow.
- Red picked: the strip holds the red front, the red back, the lookbook, the size guide and the fabric close-up. Five photos instead of nine.
- Blue picked: the strip holds the blue front, the blue back and the same three shared photos.
- Collection card and home page: the lookbook photo, the one I locked as the cover.
Photos you leave unticked for every colour stay in the strip for every colour. That is how the size guide and the fabric close-up stay on the page whichever colour a shopper picks.
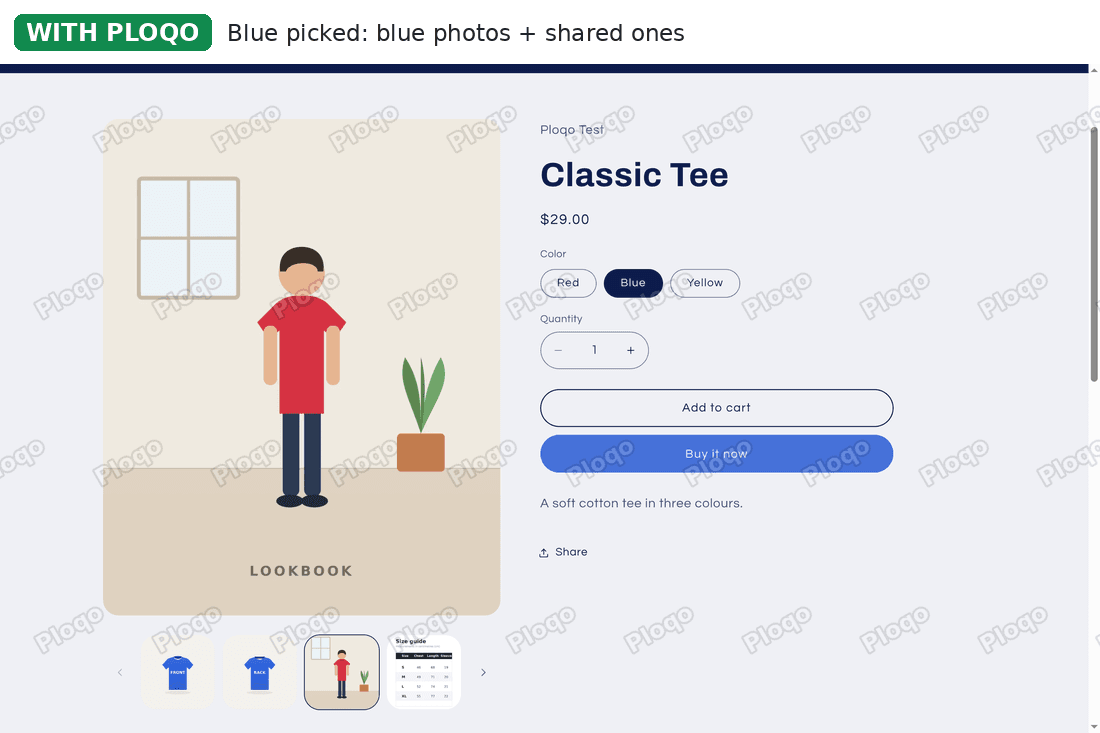 Refresh product page with Blue picked and Ploqo on: the lookbook cover large, then blue front, blue back, lookbook and size guide in the thumbnail strip
Step 1: Install Ploqo and add its card to your product pages
Install Ploqo from the Shopify App Store and open it once. Then open any product in your Shopify admin and scroll down to the Blocks section. Click + Block and choose Ploqo photos.
 The Blocks section on a Shopify product page, with the + Block button highlighted
The Ploqo card appears. Click the pin icon at its top right. Pinned, the card shows on every product page, not only this one.
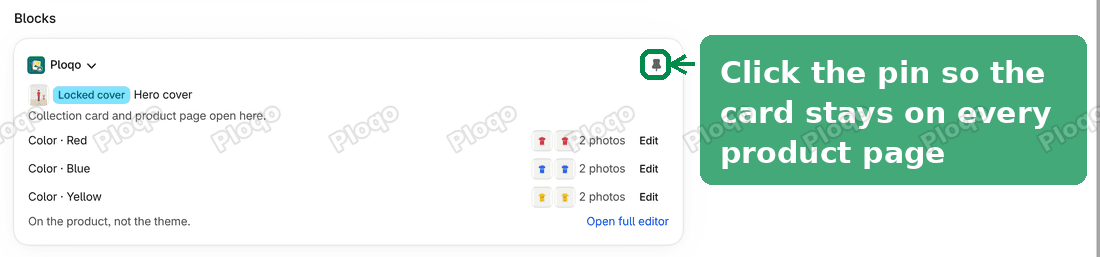 The Ploqo card on a product page, with the pin icon highlighted
Step 2: Pick each colour's photos
The card lists every colour of the product. Click Edit next to a colour.
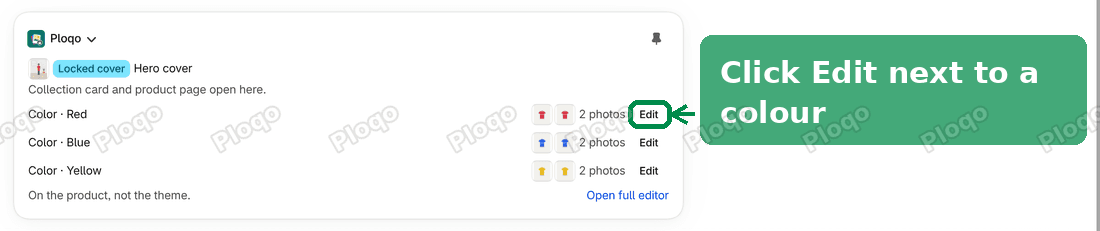 The Ploqo card listing Red, Blue and Yellow, each with two photos and an Edit button
A window opens with every photo on the product. Tick the photos that belong to this colour and click Save. Leave shared photos, like a size guide, unticked. The window marks those "On every variant", and the line at the bottom tells you what a shopper who picks this colour will see, before you save.
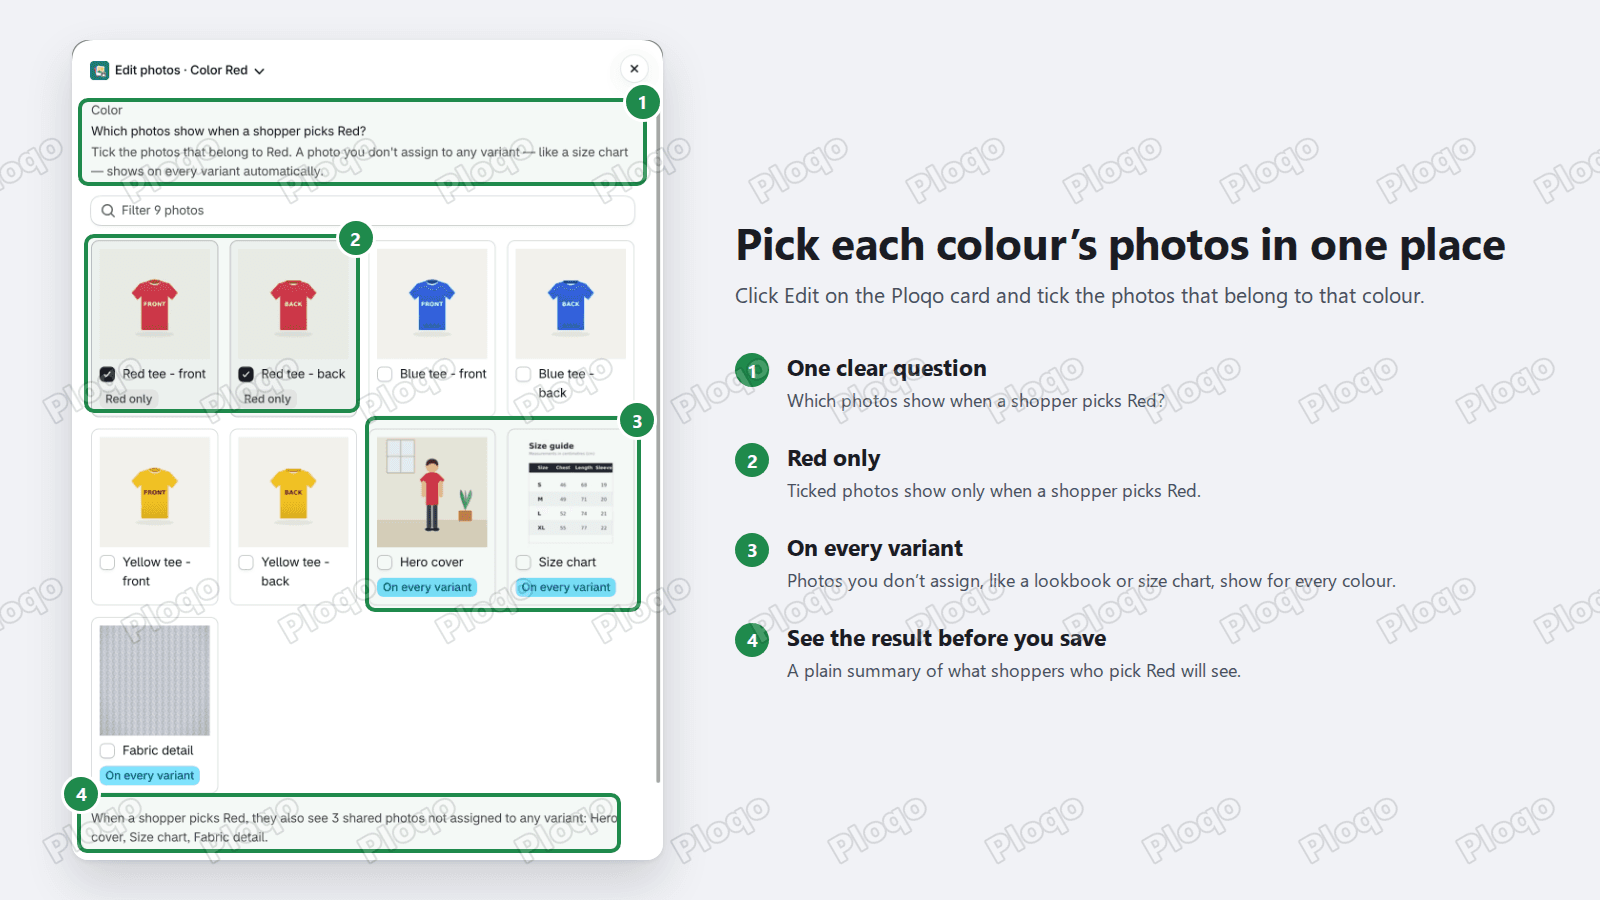 The Edit photos window for Red, with the red front and back ticked and the shared photos marked On every variant
Do the same for each colour. My test product had three colours with two photos each, which took about a minute.
Step 3: Lock the cover photo
The cover is the photo shoppers see on collection pages and in featured sections. On the Ploqo card, click Open full editor.
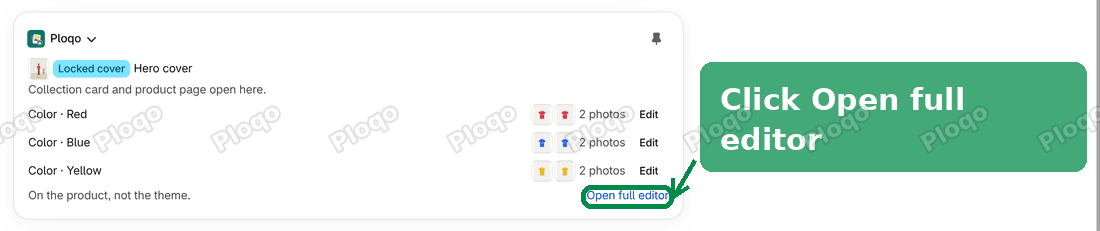 The Ploqo card with the Open full editor link highlighted
Under Card cover, click Choose.
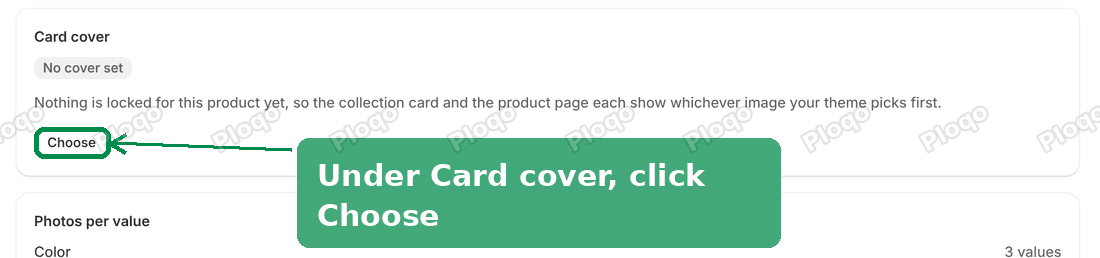 The Card cover section of the Ploqo editor, with the Choose button highlighted
Tick the photo you want as the cover and click Save cover. I chose the lookbook photo, because a person wearing the tee sells it better than a flat front shot.
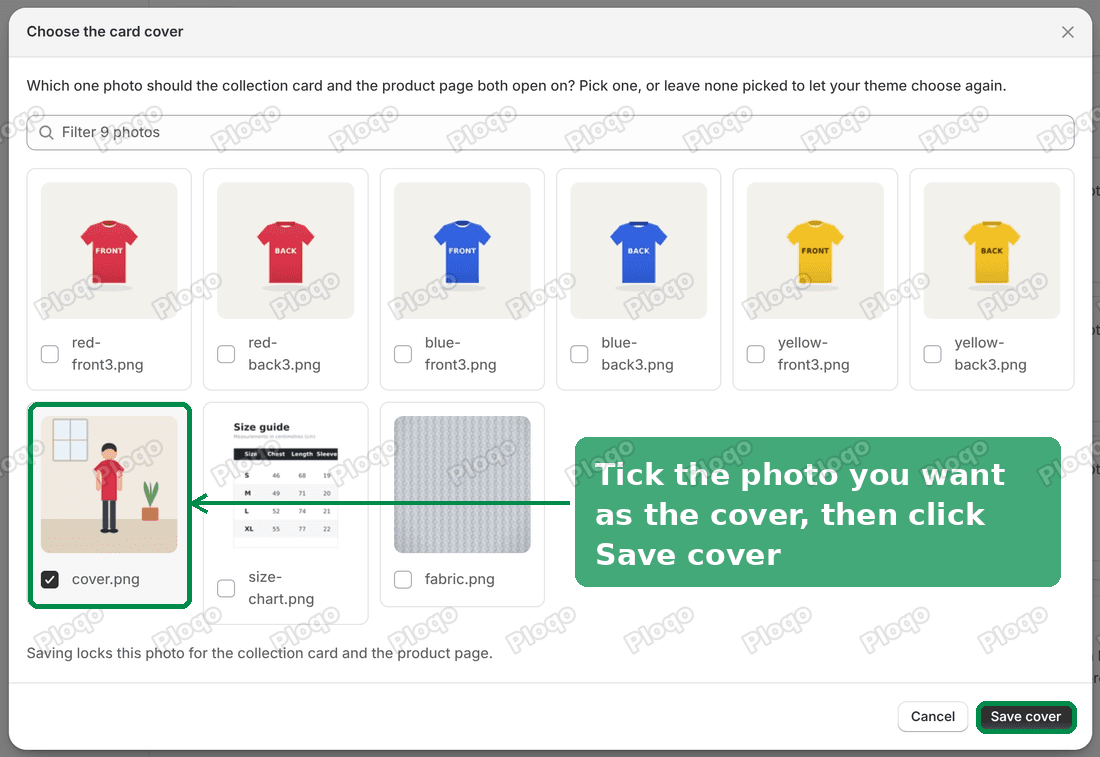 The Choose the card cover window, with the lookbook photo ticked and the Save cover button highlighted
Step 4: Add the gallery filter to the Refresh product page
The colour filtering on the product page comes from an app block. An app block is a piece an installed app adds to your theme, and you place it from the theme editor. The theme editor is where you customise your theme: go to Online Store, then Themes, and click Customize on Refresh.
Use the page menu at the top of the editor to open a product page. In the left sidebar, under Template, open Product information and click Add block. Switch to the Apps tab and choose Ploqo gallery filter. Click Save at the top right.
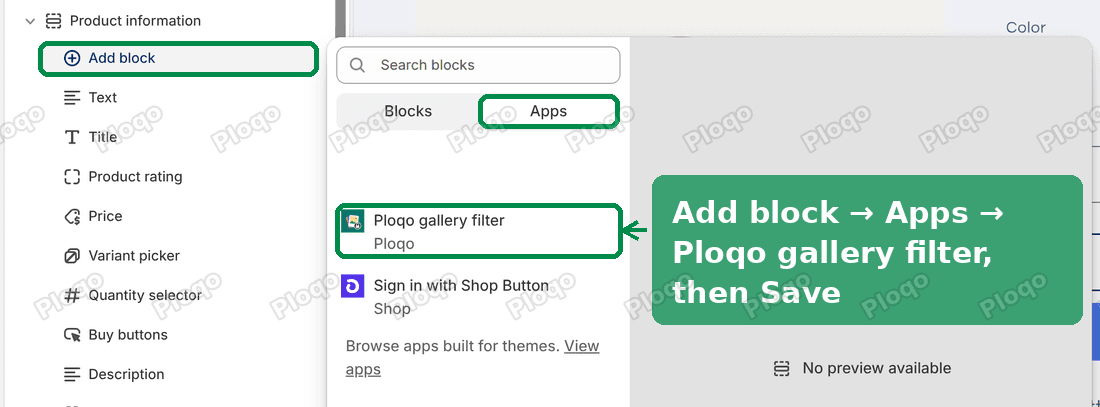 The Refresh theme editor on the product page, with Add block, the Apps tab, Ploqo gallery filter and the Save button highlighted
The gallery filter shows nothing by itself. It reads the colour a shopper picks and hides the photos that belong to the other colours.
Step 5: Add the card cover to the Refresh collection page
Switch the page menu to a collection page. The cover cannot go inside the product grid, because Refresh's grid has no card blocks of its own. It goes in as a section of its own instead.
Under Template, click Add section. Switch to the Apps tab and choose Ploqo card cover. Click Save.
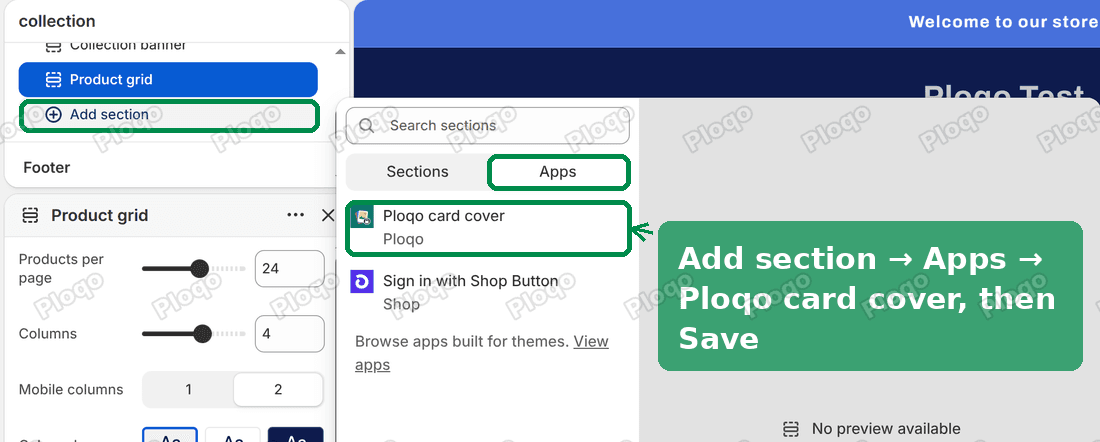 The Refresh theme editor on the collection page, with Add section, the Apps tab, Ploqo card cover and the Save button highlighted
After I saved, the Classic Tee card on my collection page showed the lookbook photo where it had shown the red front.
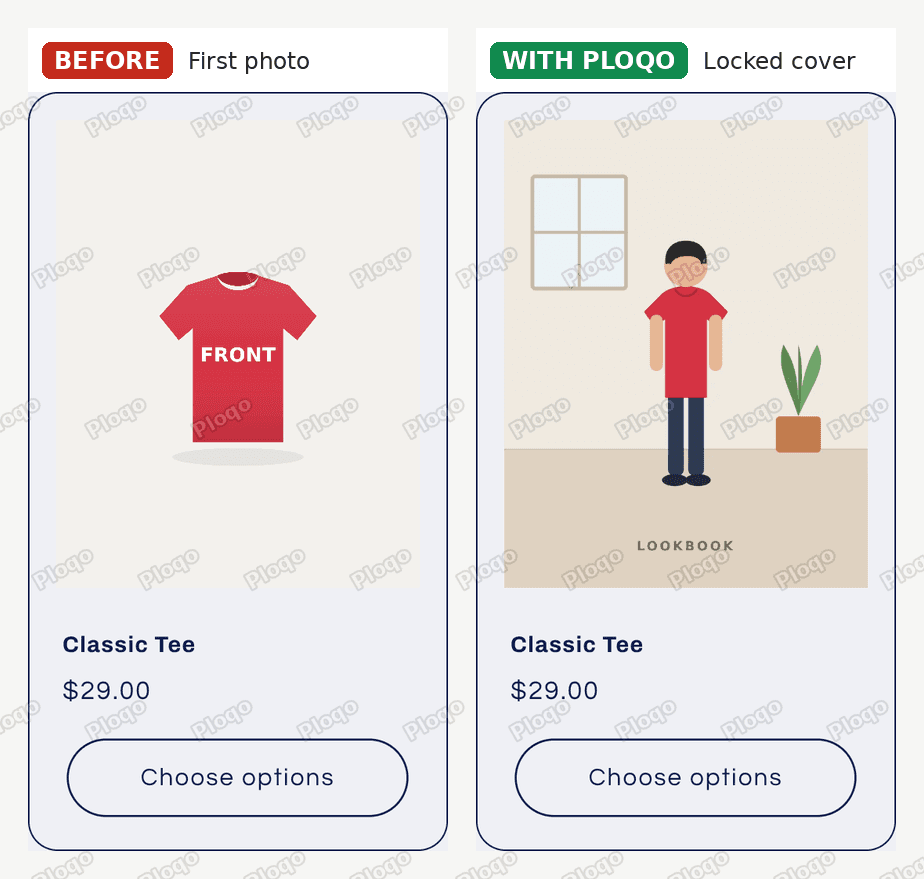 The Refresh collection card for the Classic Tee: before, the red front photo; with Ploqo, the locked lookbook cover
Step 6: Put the cover on the Refresh home page
Refresh's home page has a Featured collection section, titled "Featured products". On my store it showed all products. Shopify keeps those in its own all-products collection, and the card cover block needs to be told which collection to cover.
Switch the page menu to the home page. Under Template, click Add section, open the Apps tab and choose Ploqo card cover again. Select the new block to see its settings.
The block has two settings. Featured collections to cover is a picker for a named collection. Its Select button cannot choose the all-products collection, so on Refresh I turned on the second setting, Also cover "All products", and clicked Save. That switch is what put the cover on my home page card.
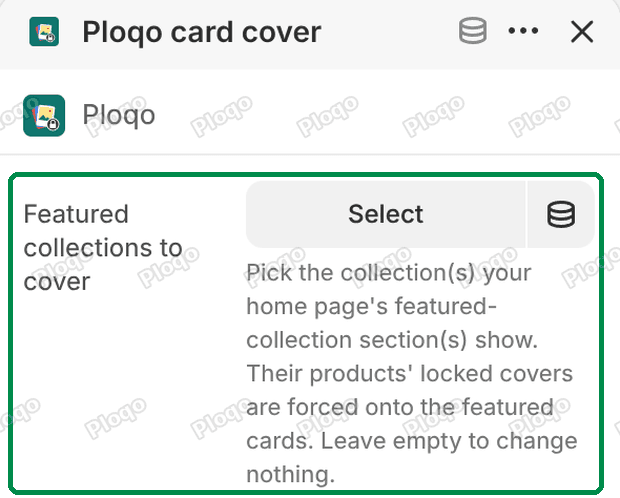 The Ploqo card cover settings in the Refresh theme editor, showing the Featured collections to cover picker with its Select button
Your Refresh home page may show a specific collection instead, such as a summer range. In that case, click Select under Featured collections to cover and pick that collection. Then click Save.
On my store the Classic Tee card in "Featured products" changed from the red front photo to the lookbook cover. The other products in the row kept their usual photos.
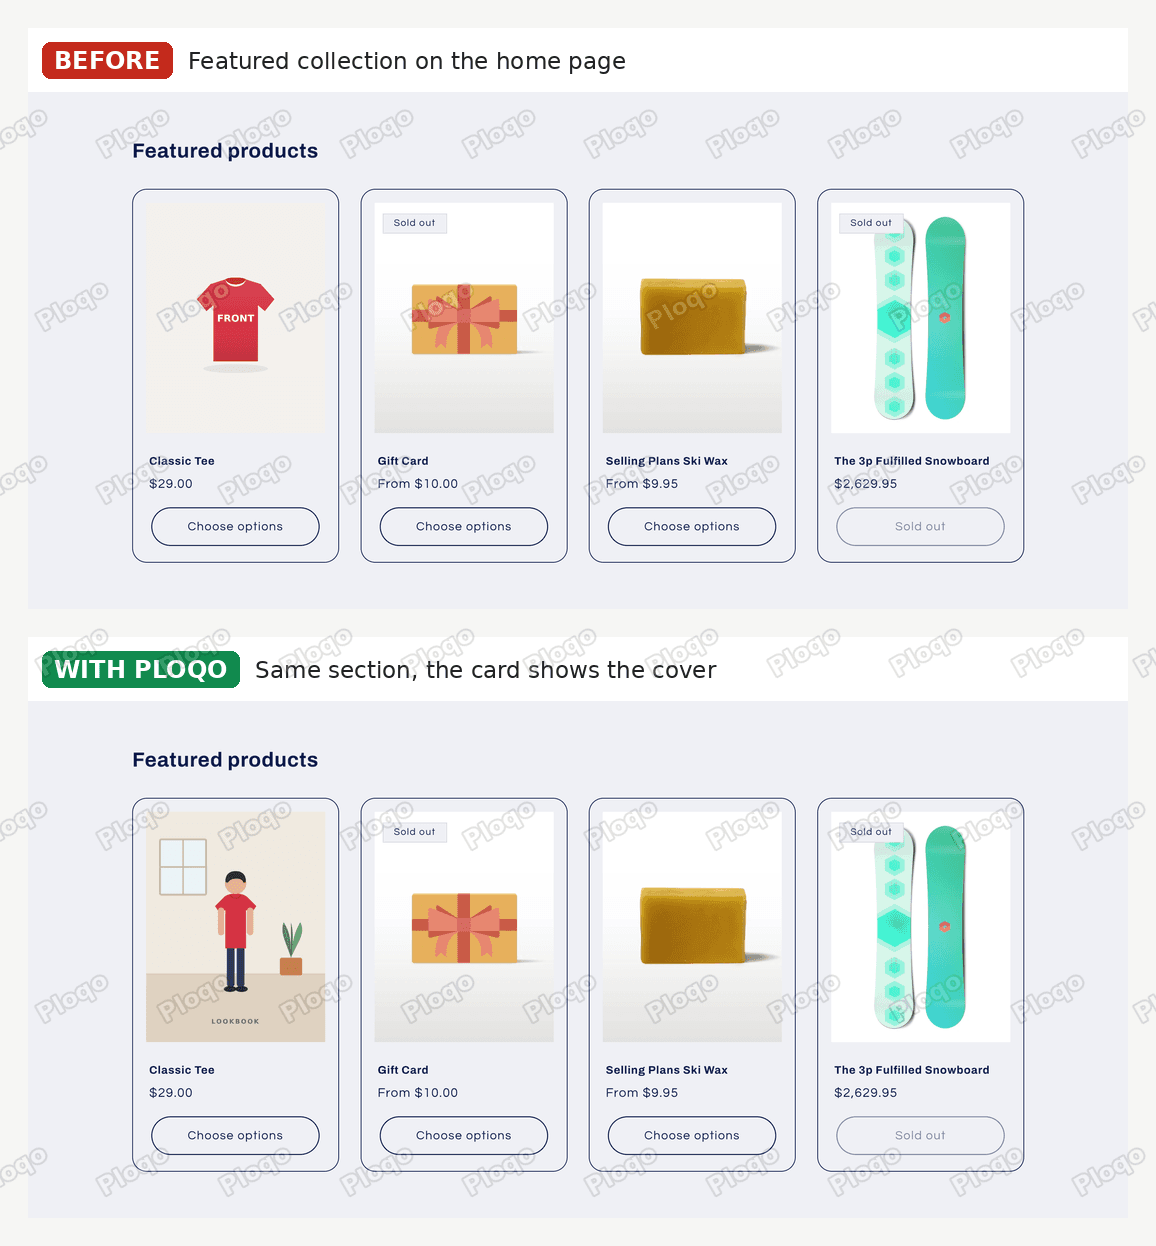 The Refresh home page Featured products row: before, the Classic Tee shows the red front photo; with Ploqo, the lookbook cover
How the Refresh slider shows the photos
Refresh's product template sets Layout to Thumbnail carousel. That gives one large photo with a strip of thumbnails under it. Four thumbnails fit at a time, and the strip has its own arrows for the rest. Refresh also selects the first colour when the page loads, so a shopper lands on Red without clicking.
With Ploqo on, the large photo on every page load is the lookbook cover. The strip under it holds only the chosen colour's photos and the three shared ones. Ploqo hides photos and does not reorder them, so the strip keeps the upload order: the colour's front, its back, then the lookbook, size guide and fabric close-up.
When a shopper clicks a colour button, the large photo switches to that colour's front photo. Blue shows the blue front, Yellow shows the yellow front, and a click back on Red shows the red front. Clicking any thumbnail shows that photo large.
I loaded the product page 85 times, across all three colours, hard reloads, colour clicks and a phone-sized screen. The large photo was always one of the photos shoppers should see: the cover on load, and the picked colour's front after a click.
In Refresh, then, the cover leads in three places: the collection card, the home page card and the first view of the product page. The colour a shopper is about to buy takes over the large spot as soon as they choose it.
Shopify Refresh theme settings that affect product photos
Refresh keeps its media settings in the Product information section of the product template. Two of them sit close to what Ploqo does:
- Layout. The options are Stacked, 2 columns, Thumbnails and Thumbnail carousel. Refresh's template uses Thumbnail carousel, the slider in my screenshots.
- Hide other variant media after one is selected. This is on in Refresh's template. It hides the one photo linked to each other colour and nothing more, so it cannot hide a colour's second photo. My test product had no linked photos, so this setting hid nothing.
Because that setting works on linked photos only, a colour with a front and a back can never be fully filtered by it. Ploqo works from the photos you tick per colour instead, so both photos of each colour are covered.
A free way to do part of this in Refresh
Shopify's own variant images cost nothing. If you only need the slider to jump to a colour's photo, and the other colours' photos can stay in the strip, they may be all you need. How to add variant images in Shopify shows how to link one image to each colour. Shopify product variant image switching, explained covers why the wrong photo can show first.
The free route has two limits. A colour can hold only one photo, and the card photo is always the product's first photo. Ploqo adds a list of photos per colour and a cover photo that is set apart from the photo order.
If it did not work
Still seeing other colours in the thumbnail strip? Check that Ploqo gallery filter is under Product information in the product template, as in Step 4. Then check you clicked Save. If you added it to a copy of Refresh that is not published, it only shows in that copy's preview.
A colour shows only the shared photos? Open the Ploqo card on that product and click Edit next to the colour. A colour with nothing ticked shows only the photos shared by every colour.
The collection card still shows the first photo? Check the product has a locked cover. The Ploqo card shows a "Locked cover" badge when it does. Then check that the Ploqo card cover section is saved on the collection template.
The home page card did not change? Open the Ploqo card cover block on the home page. If your featured section shows all products, turn on Also cover "All products". If it shows a named collection, pick that collection under Featured collections to cover. Click Save after either change.
The large photo is the cover, not the colour you picked? On page load, Refresh with Ploqo shows the cover large. Click a colour button and the large photo moves to that colour's front photo.
Your change shows in the editor but not on the live store? Hard-refresh the page with Ctrl+Shift+R, or Cmd+Shift+R on a Mac. Browsers keep an old copy of a page for a while.
Definitions
- Variant: one buyable version of a product, such as the red T-shirt in size M.
- Variant image: the single image Shopify links to a variant.
- Cover photo: the one photo Ploqo shows on collection cards and featured sections for that product.
- Shared photo: a photo you did not tick for any colour. It shows for every colour.
- App block: a piece an installed app adds to your theme, placed from the theme editor.
- Thumbnail carousel: Refresh's slider layout, with one large photo and a strip of small photos under it.
- Featured collection: a Refresh home page section that shows products from one collection, or from all products.
Ploqo saves your colour photos and cover on the product itself in Shopify, so they stay in place if you change themes. You add the two app blocks again in the new theme. For the other free themes, see Ploqo's theme guides.
Give every colour its own photos
Ploqo groups your product photos by colour, locks one cover per product, and shows that cover on collection pages and the home page. No theme code to edit.
Get Ploqo on the Shopify App StoreMore Ploqo guides
Getting Started
Ploqo Theme Guides: Variant Photos on Every Free Theme
Ploqo gives each colour its own photos and locks one cover for the collection card and the home page. Pick your theme for a step-by-step guide with screenshots.
Theme Guides
Dawn Theme Variant Images: Give Each Colour Its Own Photos
In Dawn, picking a colour still shows every other colour's photos, and the collection card shows whatever photo is first. Here is how to fix both with Ploqo.
Theme Guides
Horizon Theme Variant Images: Photos and Covers per Colour
Horizon shows every colour's photos whichever colour a shopper picks, and the collection card shows the first photo. Here is how to fix both with Ploqo.
Theme Guides
Craft Theme Variant Images: Each Colour's Own Photos
Craft shows every photo for every colour and puts the first one on the collection card. Here is how to give each colour its own photos and lock a cover.