
Shopify Bulk Order Form: Quantity List With Buy Now
Shopify has no bulk order form. Here is a free quantity list for 4 or more products, with one Buy now button that sends the order straight to checkout.
By AjayCodeWiz · October 22, 2026 · 11 min read
The problem: a customer wants a few of each, in one go
You sell four related products. A customer wants one small and two medium, or twelve of one and six of another. On a normal Shopify store that means opening each product page, setting a quantity, adding it to the cart, and going back to do it again.
What you want is an order form: one list, one number box per product, and a single button at the bottom. That is the layout wholesale buyers, caterers, schools and repeat customers expect, and it is the one thing the default product page cannot show.
A merchant asked for exactly this on the Shopify Community. Four separate products (not variants), a quantity counter for each, and a Buy now button that adds everything and goes to checkout. The code an AI tool had given them displayed fine but would not work inside their theme.
I built it on a test store. Picking 1 of one snowboard and 2 of another, then clicking Buy now, opened checkout with both lines and a subtotal of $2,099.90.
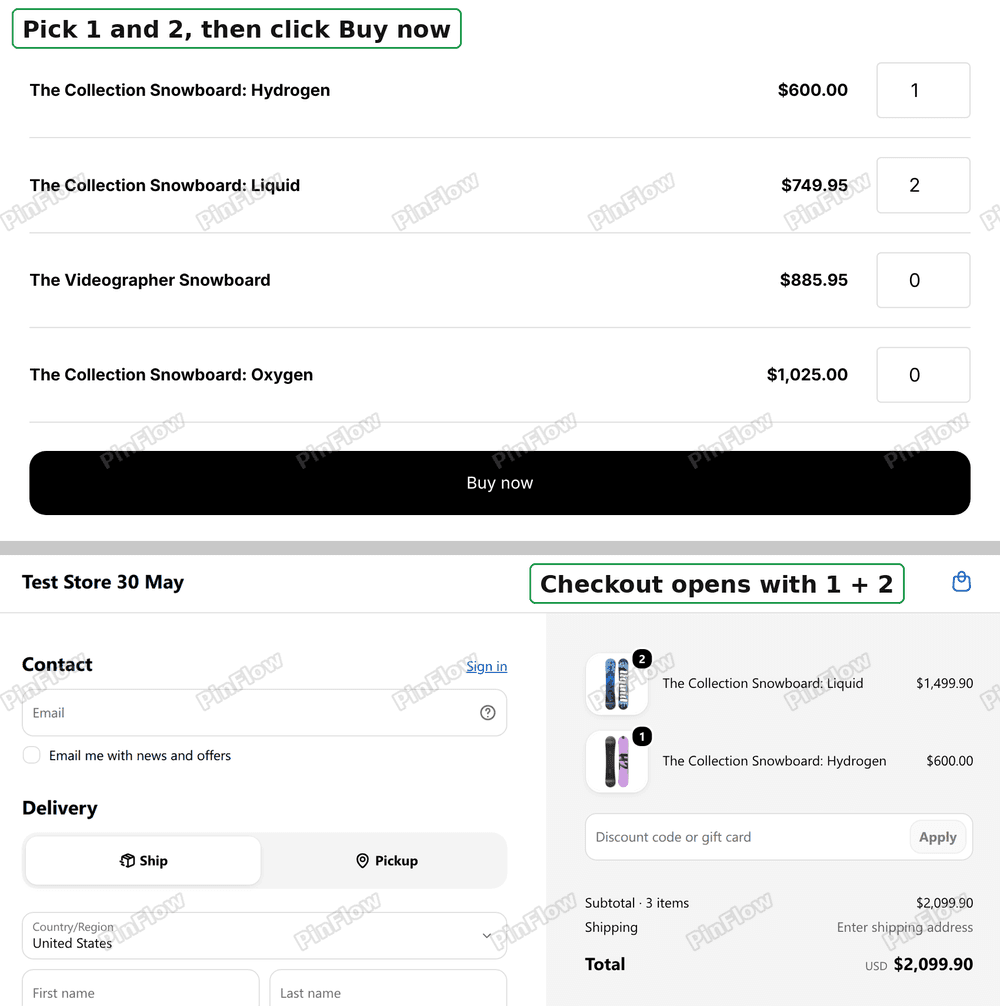 Quantities picked on the list, then checkout with those items
This article covers the two ways to add that list to your theme, what the button does when it is clicked, and the limits worth knowing before you put it on a live store.
Does Shopify have a bulk order form?
Not as a setting. A standard product page is built around one product and one quantity, and the cart page lists what was added but does not let a shopper add anything new.
There are three routes:
- An order form app. Several apps in the App Store render a table of products with a quantity per row. They are the right choice when you need search, hundreds of products or reorder history, and many charge a monthly fee.
- Shopify's wholesale features. Companies, catalogs and price lists change who sees which price. They do not draw a list of products with quantity boxes, so they solve a different problem. The B2B on Basic versus Plus article covers what each plan includes.
- A small section of your own. Free, one file or one paste, and you control how it looks. This is what the rest of this article builds.
The section route fits when the list is short: roughly 4 to 10 products that you pick yourself, such as a starter range, a set of sizes sold as separate products, or a short list of best sellers.
How the form works, in plain words
Every product in Shopify has at least one variant, and every variant has a number called its variant ID. A product with no options, such as a single sticker, still has one variant.
Shopify can build a ready-made cart from a link made of variant IDs and quantities, written like this:
/cart/44123:1,44125:2
That link means one of variant 44123 and two of variant 44125. Opening it creates a cart with those items and, by default, sends the shopper straight to checkout. Shopify calls this a cart permalink.
The order form is a small piece of code that does three things:
- It draws one row per product: the name, the price and a number box that starts at 0.
- When the shopper clicks Buy now, it reads every box.
- It skips the rows left at 0, joins the rest into a link like the one above, and opens it.
Nothing is saved on your store and no app runs. The theme draws the list and the browser follows the link.
Option 1: paste it into a Custom Liquid section
Liquid is the code Shopify themes are written in. A Custom Liquid section is a box in the theme editor where you paste your own Liquid, HTML and CSS. Dawn and the other free themes have one too. I tested this on Horizon.
This is the quickest route and needs no new files.
Step 1. From your Shopify admin, open Online Store. Then click Edit theme on the theme you are using.
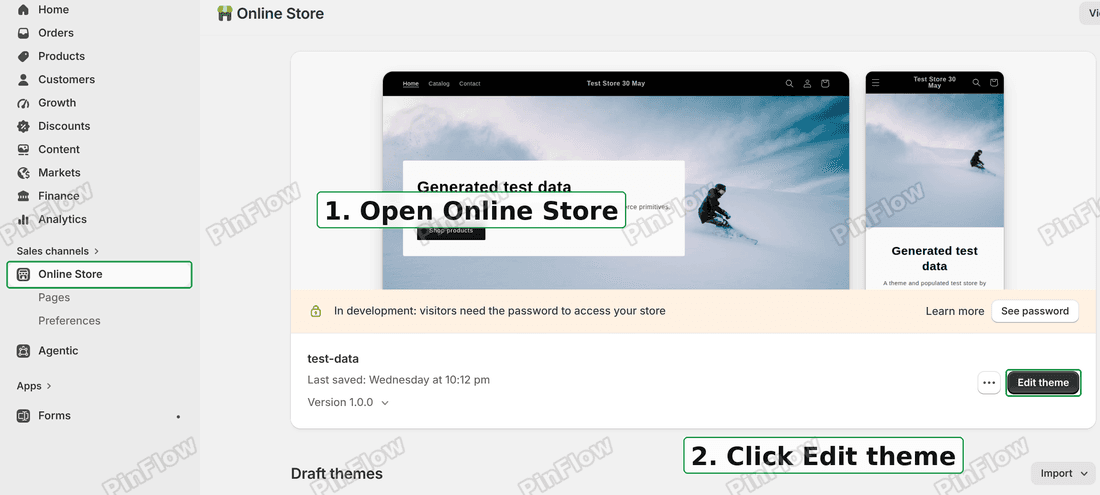 Online Store, then Edit theme
Step 2. The editor opens on your home page. Use the page picker at the top to choose the page where the list should go, then click Add section under Template in the left column.
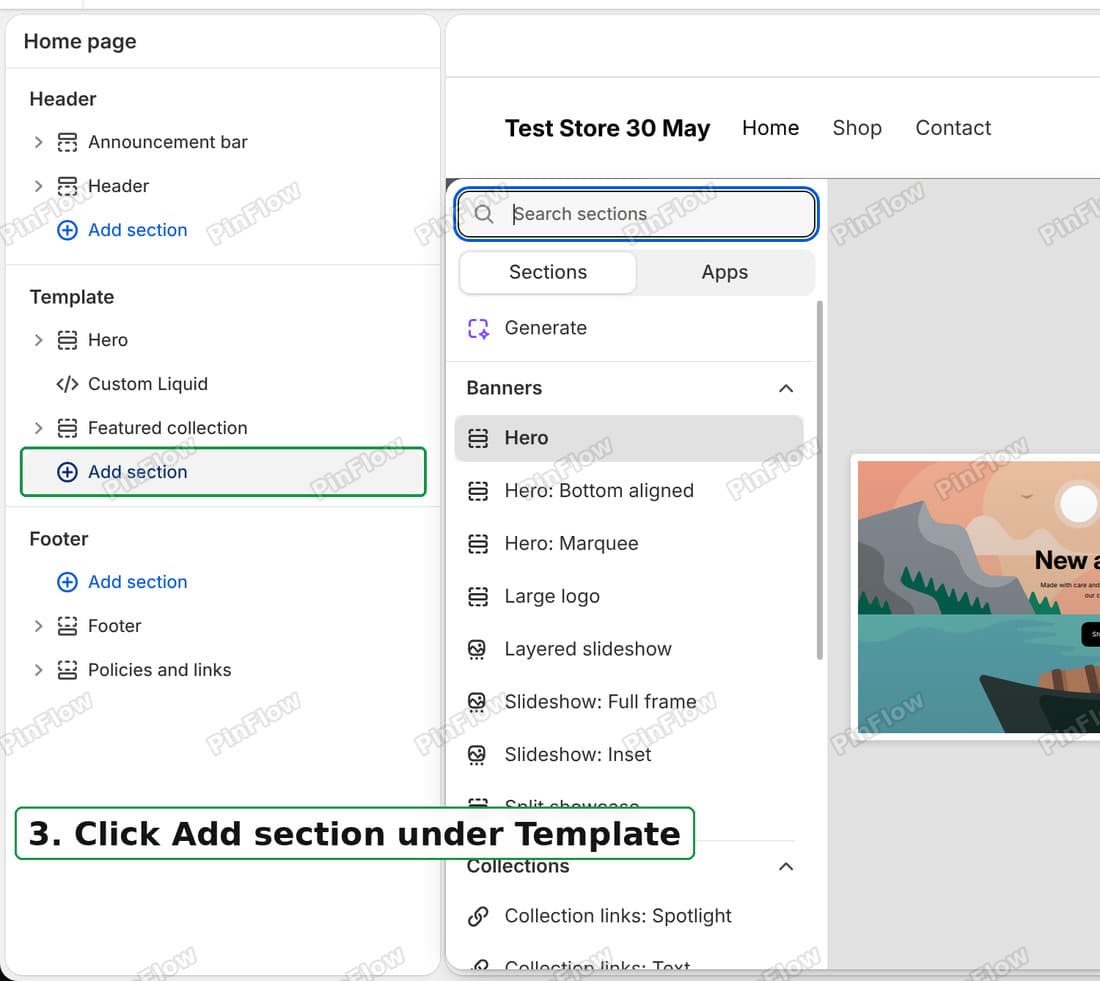 Add section under Template in the theme editor
Step 3. Search for Custom Liquid and click it.
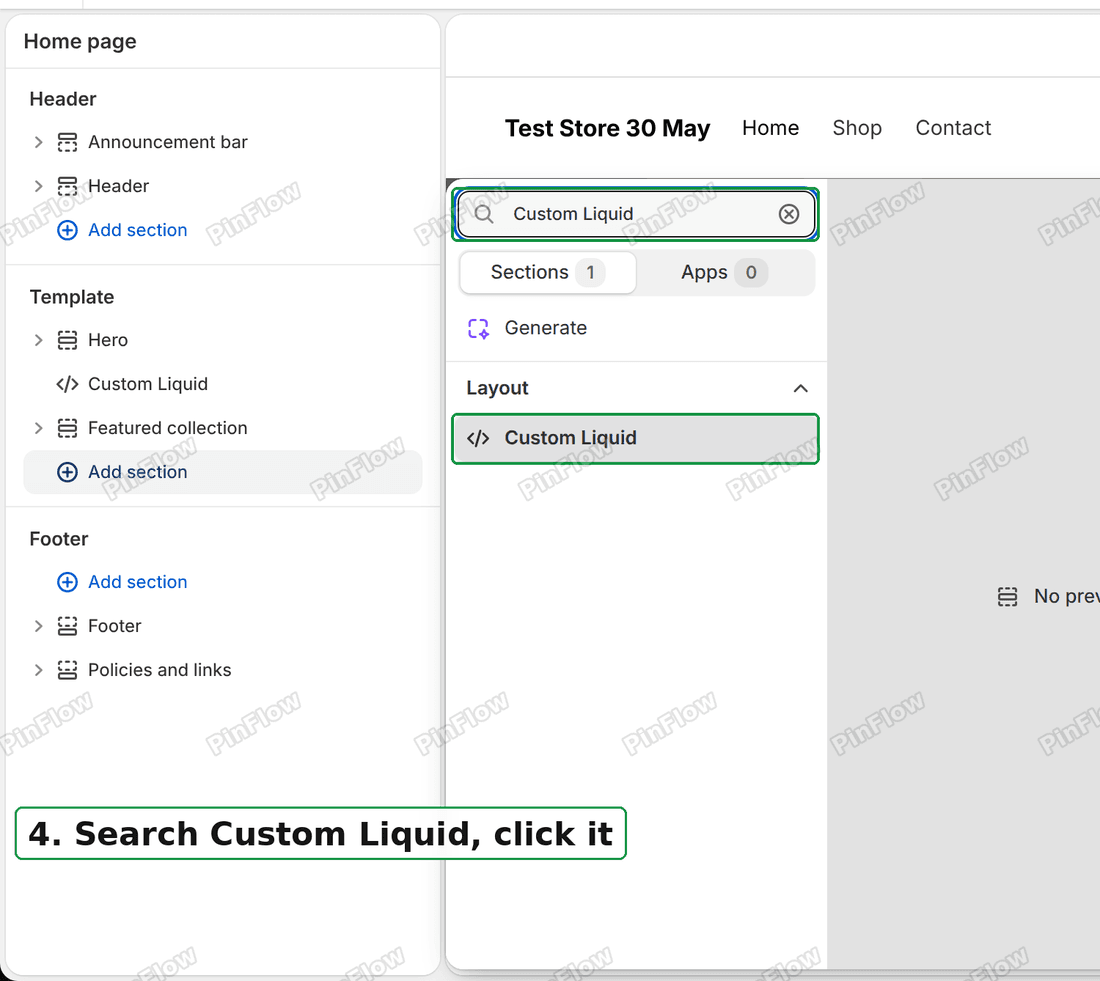 Custom Liquid in the section list
Step 4. Paste this code into the Liquid code box:
{%- assign handles = 'small,medium,large,xl' | split: ',' -%}
<div class="qty-list">
{%- for handle in handles -%}
{%- assign p = all_products[handle] -%}
{%- assign v = p.selected_or_first_available_variant -%}
{%- if v -%}
<div class="qty-list__row">
<span class="qty-list__name">{{ p.title }}</span>
<span class="qty-list__price">{{ v.price | money }}</span>
<input class="qty-list__qty" type="number" min="0" value="0" inputmode="numeric" aria-label="{{ p.title | escape }} quantity" data-variant="{{ v.id }}">
</div>
{%- endif -%}
{%- endfor -%}
<button type="button" class="button qty-list__buy">Buy now</button>
</div>
<style>
.qty-list { width: 100%; max-width: 800px; margin: 0 auto; }
.qty-list__row { display: grid; grid-template-columns: 1fr auto 80px; gap: 24px; align-items: center; padding: 16px 0; border-bottom: 1px solid rgba(0,0,0,.12); }
.qty-list__name, .qty-list__price { font-weight: 700; }
.qty-list__qty { box-sizing: border-box; width: 80px; padding: 10px; text-align: center; border: 1px solid rgba(0,0,0,.25); border-radius: 4px; background: #fff; }
.qty-list__buy { width: 100%; margin-top: 24px; }
</style>
<script>
document.querySelectorAll('.qty-list').forEach(function (box) {
box.querySelector('.qty-list__buy').addEventListener('click', function () {
var items = [];
box.querySelectorAll('.qty-list__qty').forEach(function (input) {
var qty = parseInt(input.value, 10);
if (qty > 0) items.push(input.dataset.variant + ':' + qty);
});
if (items.length) window.location.href = '/cart/' + items.join(',');
});
});
</script>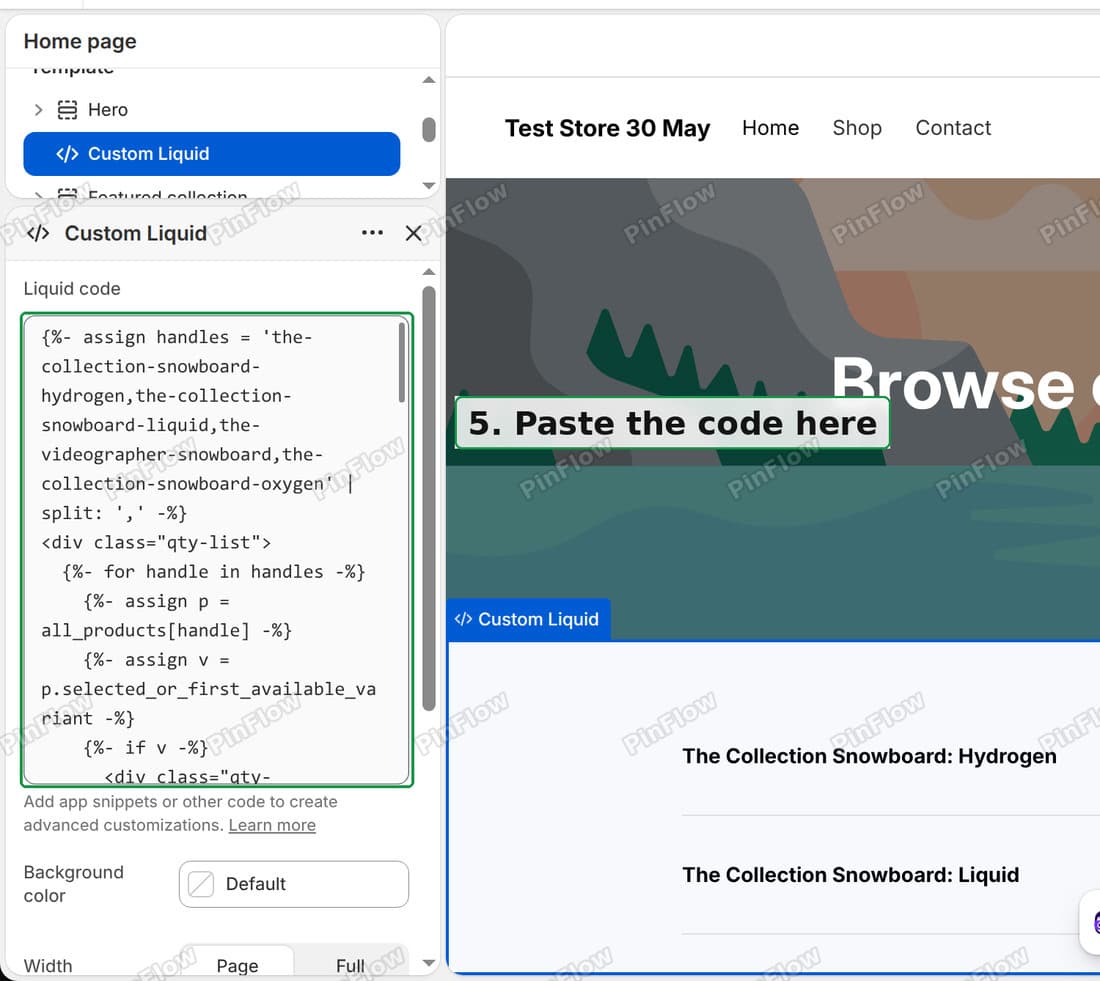 The code pasted into the Liquid code box
Step 5. Change the first line to your own products. A product's handle is the last part of its web address: the product at /products/small-sticker has the handle small-sticker. Put your handles between the quotes, separated by commas and with no spaces.
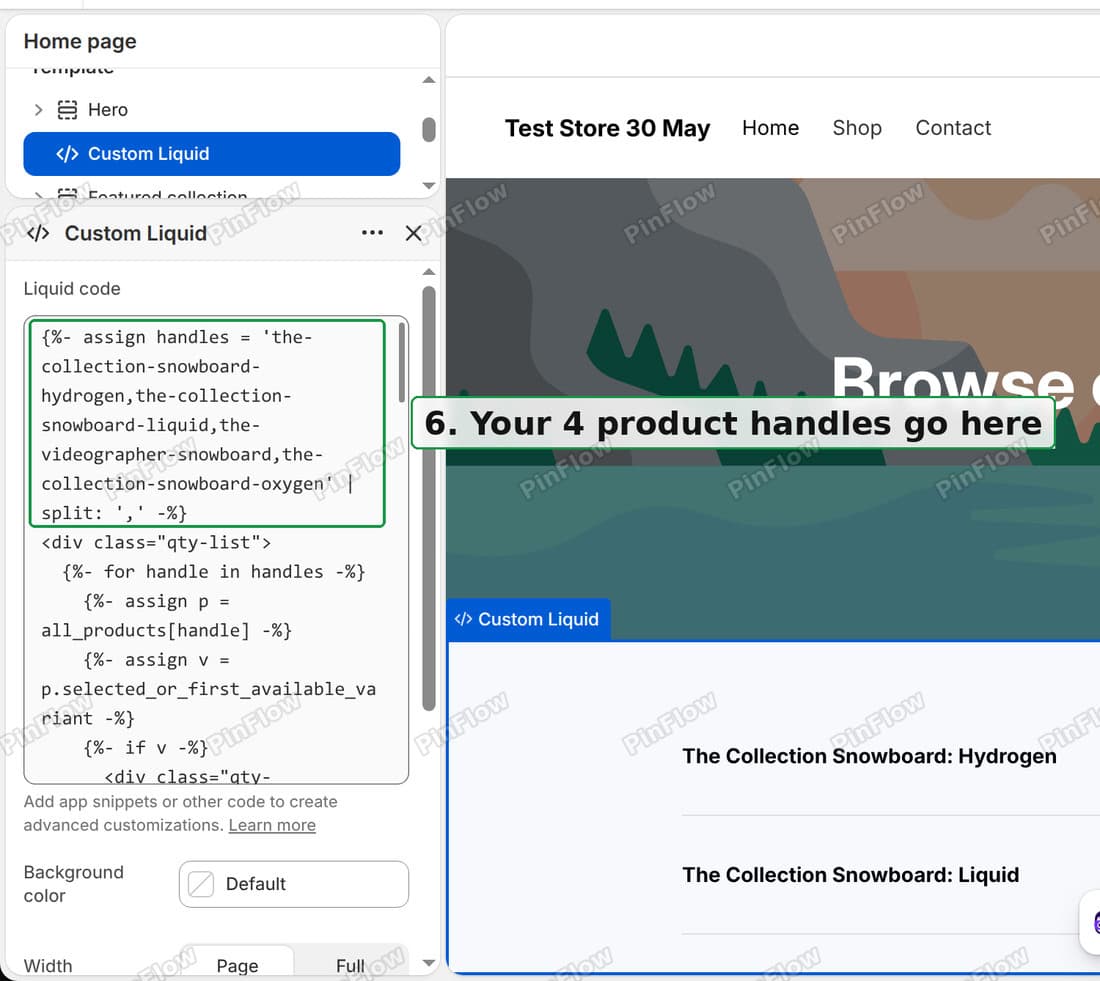 Product handles in the first line of the code
Step 6. Click Save in the top right.
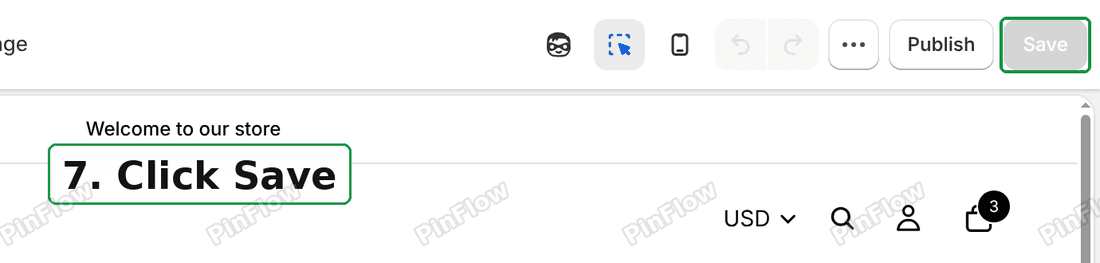 Click Save in the theme editor
The list now shows each product with its price and a box set to 0. Rows left at 0 are skipped, and Buy now opens checkout with everything else.
What each part of the code does
You do not need to edit anything below the first line, but it helps to know what you are pasting.
- The first line is your list of products. Add a handle to add a row, delete one to remove a row.
- The
forloop goes through the handles and draws one row each. If it cannot find a product, it leaves that row out instead of showing an error. - The
styleblock sets the look: a column for the name, one for the price, and an 80 pixel number box. - The
scriptblock runs when Buy now is clicked. It collects every box above 0 and opens the link.
Option 2: save it as its own section file
The same merchant came back with a fair question: can the code live in a proper file instead of a pasted box, so the theme stays organised and easy to find?
It can. A section file is one file in your theme's code that appears in Add section like any built-in section. The advantage is that you pick products from a list in the editor instead of typing handles, and you can reuse the section on any page.
I added this to the same Horizon test theme.
Step 1. Go to Online Store > Themes, click ... next to your theme, and click Edit code.
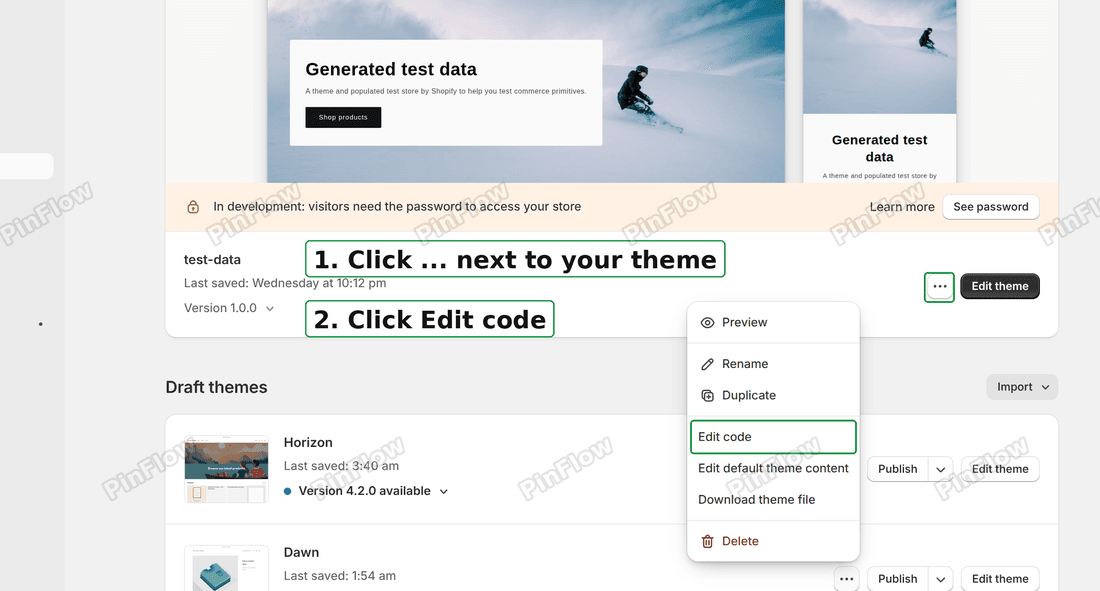 Edit code in the theme menu
Step 2. Open the sections folder, click the New file icon at the top, and name the file quantity-list.liquid.
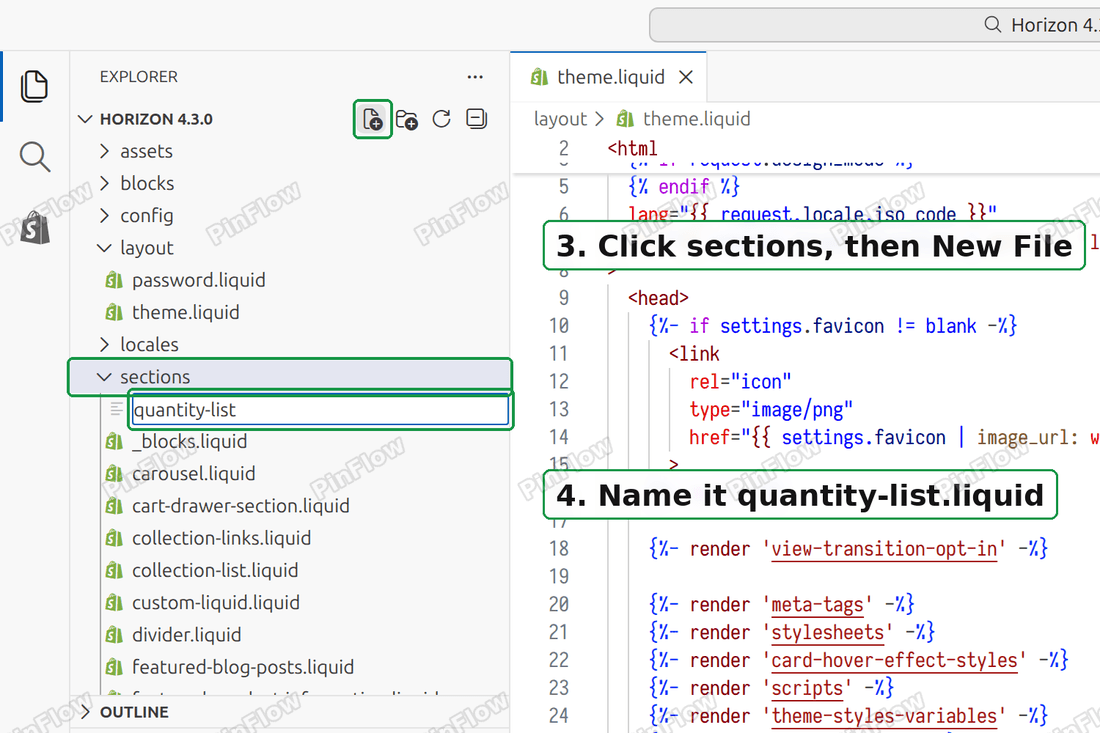 New file in the sections folder
Step 3. Paste this into the new file:
<div class="qty-list">
{%- for p in section.settings.products -%}
{%- assign v = p.selected_or_first_available_variant -%}
{%- if v -%}
<div class="qty-list__row">
<span class="qty-list__name">{{ p.title }}</span>
<span class="qty-list__price">{{ v.price | money }}</span>
<input class="qty-list__qty" type="number" min="0" value="0" inputmode="numeric" aria-label="{{ p.title | escape }} quantity" data-variant="{{ v.id }}">
</div>
{%- endif -%}
{%- endfor -%}
<button type="button" class="button qty-list__buy">{{ section.settings.button_label }}</button>
</div>
<style>
.qty-list { width: 100%; max-width: 800px; margin: 0 auto; padding: 40px 20px; box-sizing: border-box; }
.qty-list__row { display: grid; grid-template-columns: 1fr auto 80px; gap: 24px; align-items: center; padding: 16px 0; border-bottom: 1px solid rgba(0,0,0,.12); }
.qty-list__name, .qty-list__price { font-weight: 700; }
.qty-list__qty { box-sizing: border-box; width: 80px; padding: 10px; text-align: center; border: 1px solid rgba(0,0,0,.25); border-radius: 4px; background: #fff; }
.qty-list__buy { width: 100%; margin-top: 24px; }
</style>
<script>
document.querySelectorAll('.qty-list').forEach(function (box) {
box.querySelector('.qty-list__buy').addEventListener('click', function () {
var items = [];
box.querySelectorAll('.qty-list__qty').forEach(function (input) {
var qty = parseInt(input.value, 10);
if (qty > 0) items.push(input.dataset.variant + ':' + qty);
});
if (items.length) window.location.href = '/cart/' + items.join(',');
});
});
</script>
{% schema %}
{
"name": "Quantity list",
"settings": [
{ "type": "product_list", "id": "products", "label": "Products", "limit": 10 },
{ "type": "text", "id": "button_label", "label": "Button label", "default": "Buy now" }
],
"presets": [{ "name": "Quantity list" }]
}
{% endschema %}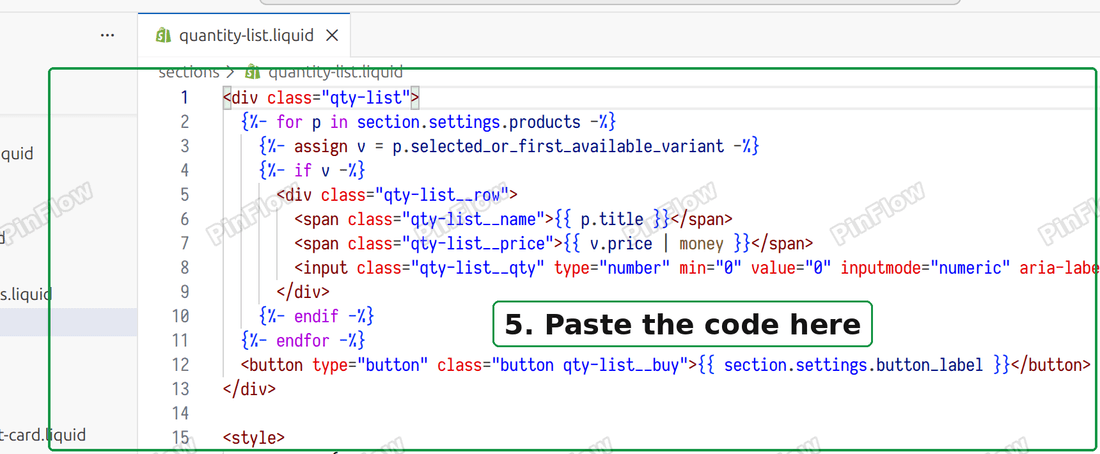 The code in the new section file
The block at the bottom, between the schema tags, is a short list of settings the theme reads to know what fields to show. It is what adds the Products picker and the Button label field to the editor. The limit of 10 is the most products the picker will accept. Raise it if you need a longer list.
Step 4. Click Save in the code editor.
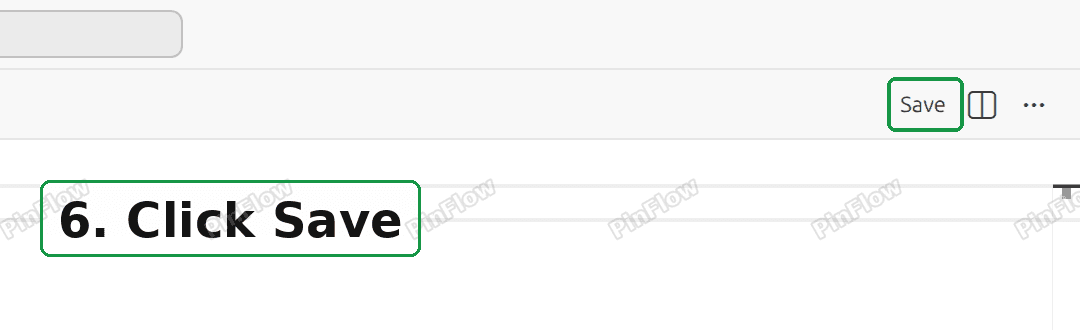 Save in the code editor
Step 5. Go back to Customize, click Add section under Template, search for Quantity list and click it.
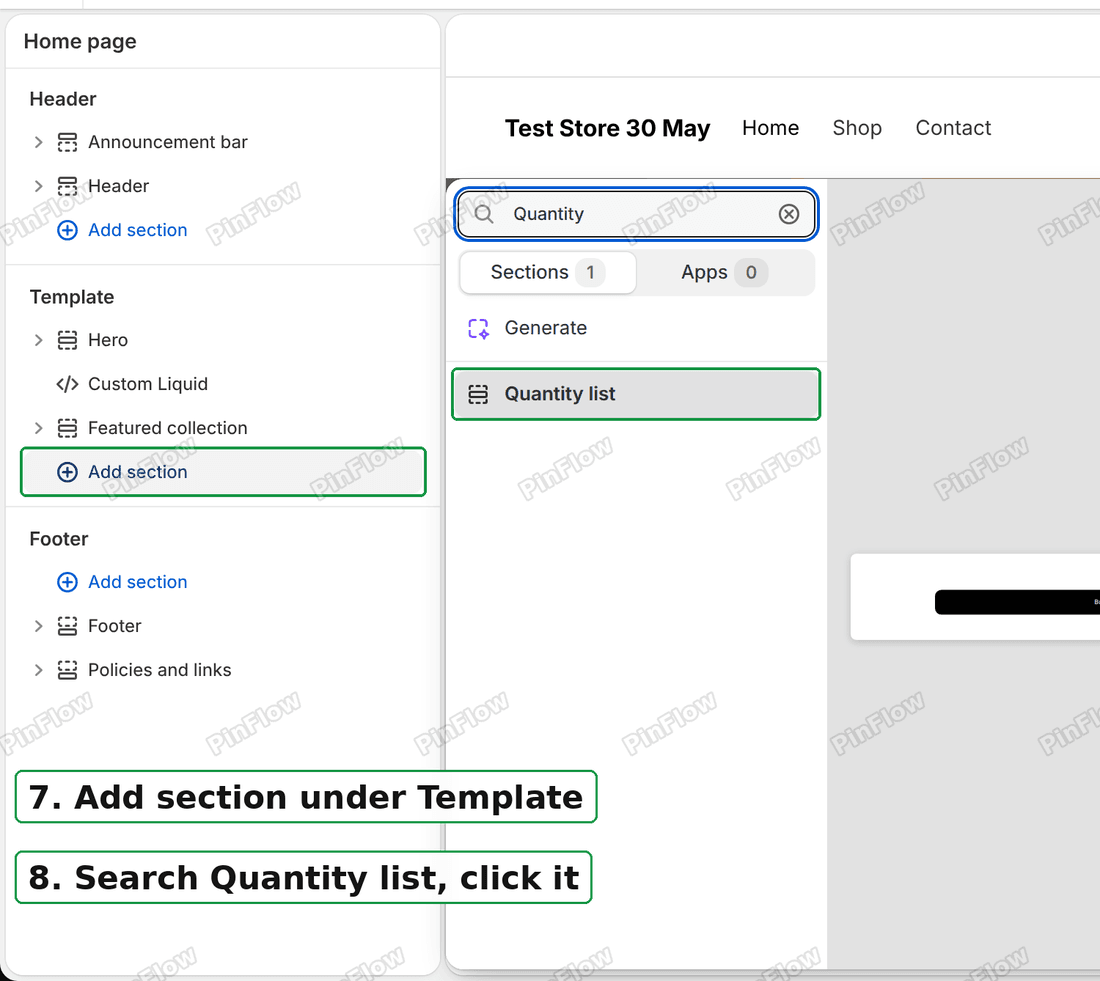 Quantity list in the section list
Step 6. Under Products, pick the products you want on the list. Edit the Button label if you would rather it said "Order now" or "Checkout".
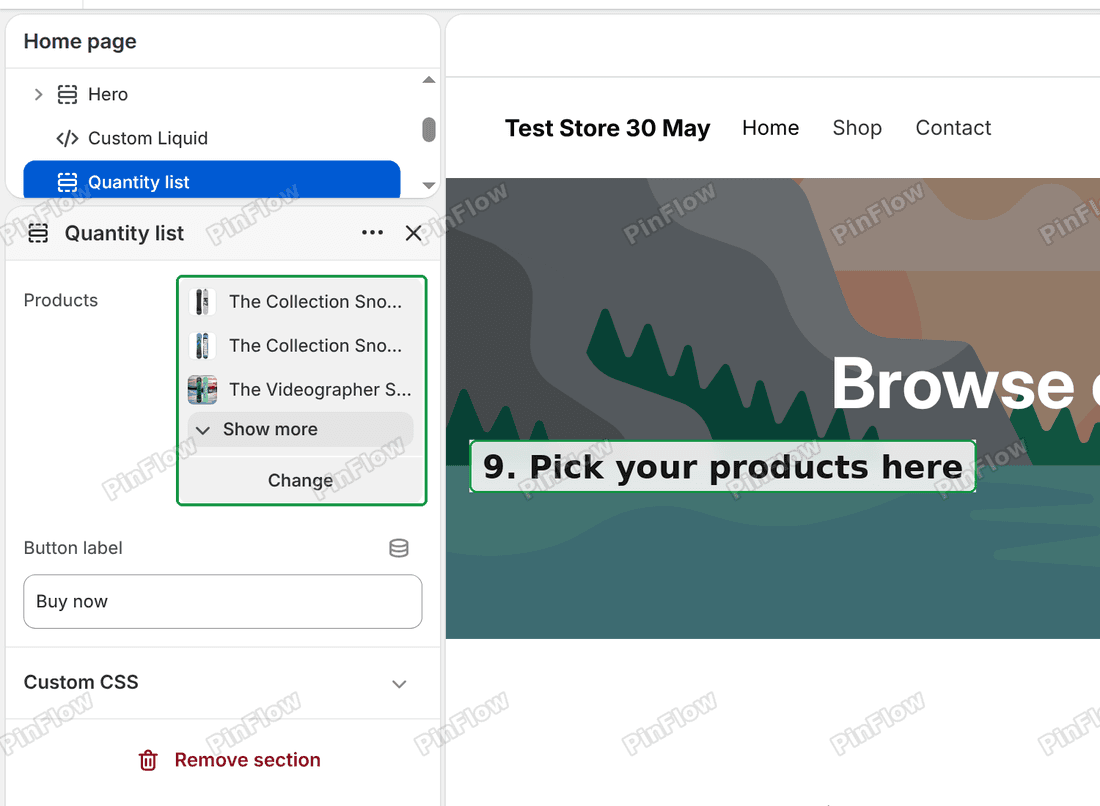 Products picker in the section settings
Step 7. Click Save.
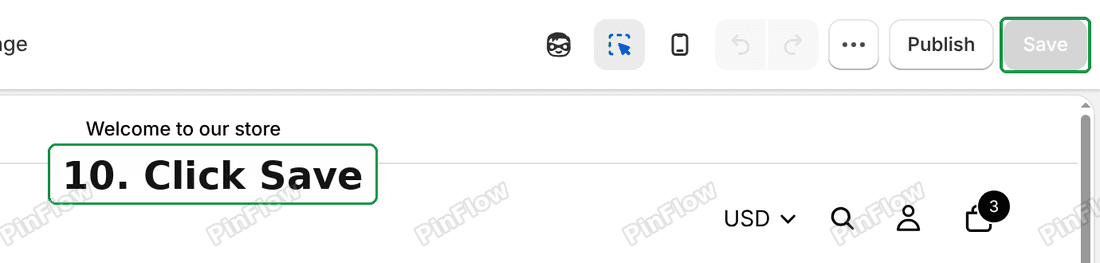 Click Save in the theme editor
If you used Option 1 first, remove the old Custom Liquid section from that page, or the list appears twice.
I checked this version too. Picking 1 of one product and 2 of another and clicking the button opened checkout with both, at a subtotal of $2,935.95.
Which option to choose
| Custom Liquid section | Section file | |
|---|---|---|
| Pick products by | Typing handles | A product picker |
| Reuse on other pages | Paste again each time | Add the section anywhere |
| Change the button text | Edit the code | A field in the editor |
| Best for | One list on one page | A list you will edit or reuse |
If you are not sure, start with Option 1. The code inside is the same in both, so you can move to Option 2 later.
What happens when a shopper clicks Buy now
These are the behaviours you can expect, and they matter when you decide where to put the list.
- Zero rows are ignored. Only boxes above 0 go into the link.
- Nothing selected does nothing. If every box is 0, the button does not respond, because there is no link to build. If your shoppers will click it anyway, add a line above the button telling them to enter a quantity.
- Checkout holds the list only. Shopify's current documentation for cart links says each link creates a new cart with only the link's items, replacing any cart the shopper already had. Items added earlier are not part of that order. That suits a dedicated order form page. For a page where people also browse and add other products, use the cart-based method in the bulk add to cart article instead.
- Sold out items are limited. The same documentation says that when an item is sold out or short on stock, Shopify adds only the quantity available or leaves the item out, so a shopper can receive less than they typed.
- The price shown is the first available variant's price. More on that below.
Limits to know before you publish
Products with several options. The list uses one variant per product, the first one available. A product with sizes or colours will show only that variant's price and add only that variant. If your products have options, this form needs a size picker on each row, which this code does not include. For several variants of a single product, the bulk add to cart article gives every variant its own box.
Subscriptions. Shopify's documentation lists selling plans (subscriptions and pre-paid plans) as unsupported in cart links. A product that can only be bought with a subscription will not work in this list.
No running total. The list does not add up what the shopper has picked. They see the total at checkout. A line that totals the rows as they type is possible but needs more script than this version carries.
Minimums and tiered prices. The list does not check order minimums or show quantity price breaks. Whatever rules you set up for checkout still apply when the shopper arrives. For ways to set a minimum, read how to set a minimum order on Shopify or how tiered pricing works.
A password-protected store. Cart links cannot bypass a storefront password, according to Shopify's documentation. If you test the form while your store is still locked, enter the password first.
Add a discount code to the link
Shopify's cart link documentation lists a discount parameter that applies a code when the shopper lands in checkout. To use it, change the last line of the script so it ends the link with your code:
if (items.length) window.location.href = '/cart/' + items.join(',') + '?discount=WHOLESALE10';Replace WHOLESALE10 with a real code from Discounts in your admin. I did not run this version on my test store, so try it with a single code and check the checkout total before you rely on it.
Where to find code like this
The merchant's second question was whether there is a book or site of ready-made Shopify code snippets. There is not an official collection of them. Two pages from Shopify are the best starting points:
- The Liquid reference lists every tag, filter and object a theme can use, with short examples.
- The sections page explains how section files and their settings fit together, which is the structure Option 2 uses.
When you ask an AI tool for theme code, name your theme and ask for a section file with a settings block rather than loose HTML and script. A section with a settings block shows up in the editor like any built-in section, so it fits into the theme instead of sitting on top of it.
If it is not working
Cannot find your product in the list? Check the handle for typos, and make sure the product is available on your Online Store sales channel. The code skips any product it cannot find.
Nothing happens when you click Buy now? Every box is probably still at 0. Type a number in at least one box and try again.
The list shows twice? The old Custom Liquid section is still on the page. Remove it in the editor and save.
Checkout shows a password page? Your storefront is locked. Enter the storefront password in that browser, then click Buy now again.
The button looks different from your other buttons? The code uses the theme's own button style, so it should match. If your theme names that style something else, change button in the button's class to the name your theme uses, or adjust the colours in the style block.
Prices look wrong? The row shows the price of the product's first available variant. If the product has several variants at different prices, the row can show a price that is not the one a shopper wants. See the limits above.
Questions merchants ask about this
Can I put the list on the home page? Yes. I placed it on the home page of my test store, right below the hero banner. Any page that has an Add section button in the editor works.
Do I need an app? Not for a short list. An app earns its fee when you need search across many products, saved reorder lists or customer-specific pricing.
Does it work on mobile? The number boxes ask phones for a numeric keypad, and the rows are a flexible grid. Check it on your own phone after you save, because themes differ in how they size buttons.
Can I add a product image to each row? Yes, by adding an image tag inside the row. That needs a small edit to the loop, and it is a good next step once the basic list works.
Order form or bulk add to cart?
The two articles on this blog solve neighbouring problems.
- This article: several different products, each with one quantity box, and a Buy now button that goes straight to checkout.
- Bulk add to cart: one product with many variants, a box for every variant, and the items added to the cart so the shopper can keep shopping.
Pick the one that matches how your customers order, and you will not need an app for either.
A better cart only helps the people who arrive
PinFlow turns your Shopify catalog into Pinterest pins and posts them on a schedule, so more of the right people reach the product page you just improved.
Get PinFlow on the Shopify App StoreMore Shopify fixes
More community-sourced Shopify guides, tested on a live store.
Themes & Storefront
Shopify Predictive Search: Show Product Photos in Dawn
Shopify cannot search by photo, but Dawn can show a product picture beside each match as shoppers type. Here is the setting that turns it on.
Themes & Storefront
Copy a Section to Another Page in Shopify (Theme Editor, No App)
Right-click a section in the theme editor, pick Copy, switch page with the page picker, then right-click a section there and pick Paste after. No app needed.
Themes & Storefront
Shopify Anchor Link: Button That Scrolls to a Section
Link a Shopify button to a section lower on the same page with an anchor link. Steps for the theme editor, no code files, plus the fix for a title hidden under the header.