
Shopify AI Section: Fix a Price Badge Hidden Behind the Image
You built a section with Shopify's AI section generator, but the price badge on each card sits behind the photo. Here is the Custom Liquid fix that brings it to the front without regenerating anything. Tested on a Dawn store.
By AjayCodeWiz · October 4, 2026 · 8 min read
The problem
A merchant on the Shopify Community used the AI section generator in the theme editor to build a row of cards. Each card has a photo, a title and a small price badge in the top right corner.
The badge was hidden behind the photo. Only a faint edge of it showed above the picture. The merchant did not want to generate the section again, because she had already changed its colours, spacing and card text and would have had to redo all of it.
The generator is the Generate option in the theme editor's Add section menu. You describe a section in plain words and Shopify builds it for you. It writes the section's code and its settings panel, so you can change colours and sizes without touching any code.
That works well until one detail is drawn in the wrong order. A badge that is behind the photo is that kind of detail.
I could not open the merchant's store, because it is password protected. So I built a similar section on a test store running Dawn 15.4.1, put the photo on top of the badge, and fixed it there. The steps below are the ones I posted in the forum.
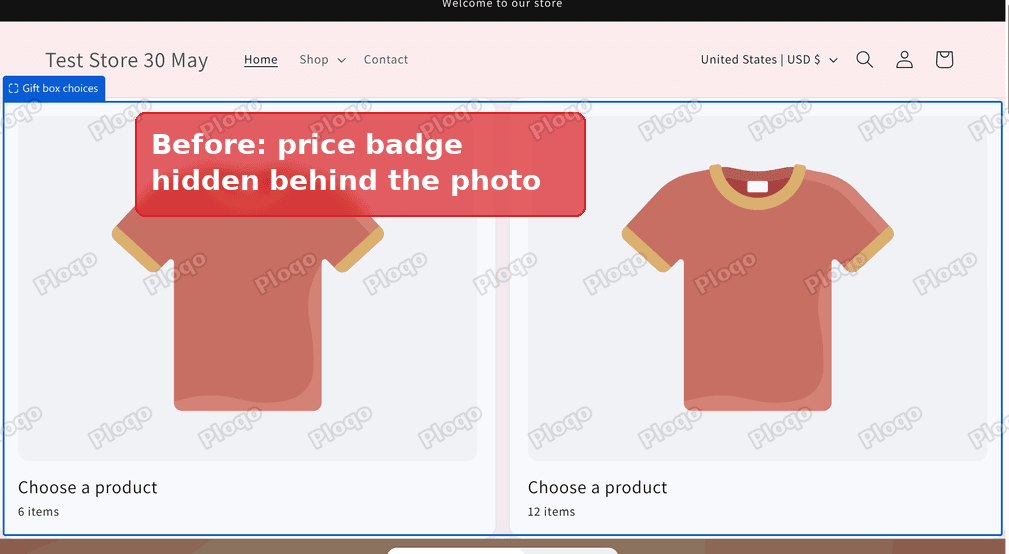 Before: the price badge is hidden behind the photo on both cards
Why the badge ends up behind the photo
Every item on a web page sits on a layer. When two items overlap, the one on the higher layer is drawn on top.
The number that sets the layer is called z-index. A bigger number is a higher layer. An item with no number is on the default layer.
If two overlapping items are on the same layer, the one that comes later in the page's code is drawn on top. A photo that comes after the badge in the code covers the badge, unless the badge has a higher number.
A price badge in the corner of a card is placed with a rule that lifts it out of the normal flow and pins it to the corner. It floats above the card. Whether it also floats above the photo depends on its layer number.
On the section I generated, the badge had a layer number of 1 and sat above the photo. I removed that number and gave the photo its own position, which is the situation on the merchant's store. The photo then covered the badge on both cards.
The AI wrote the code, so nothing on your side caused this. The generator decides the layer numbers, and it can leave one out.
The fix: give the badge a higher layer
The fix is one rule that gives the badge a high layer number, so it is drawn above the photo. The rest of the section does not change. Your colours, text and spacing stay as they are.
You paste the rule into a Custom Liquid section. Custom Liquid is a section with a box where you paste your own code. It is the quickest way to add a rule to a theme without opening any code files.
Here is the rule:
<style>
[class*="badge"], [class*="__price"] {
  z-index: 99 !important;
}
</style>
The selector is the part before the curly brackets. It points at the items the rule applies to. [class*="badge"] means any item whose class name contains the word badge. [class*="__price"] means any item whose class name contains __price.
The AI picks long, random class names for its sections, and I could not see the names on the merchant's store. Matching on the word is how the rule finds the badge without knowing the full name.
!important makes the rule win over the number the AI wrote, whatever that number is.
The steps, with screenshots
Step 1 and 2: open the theme editor
In your Shopify admin, go to Online Store. Then click Edit theme next to your current theme.
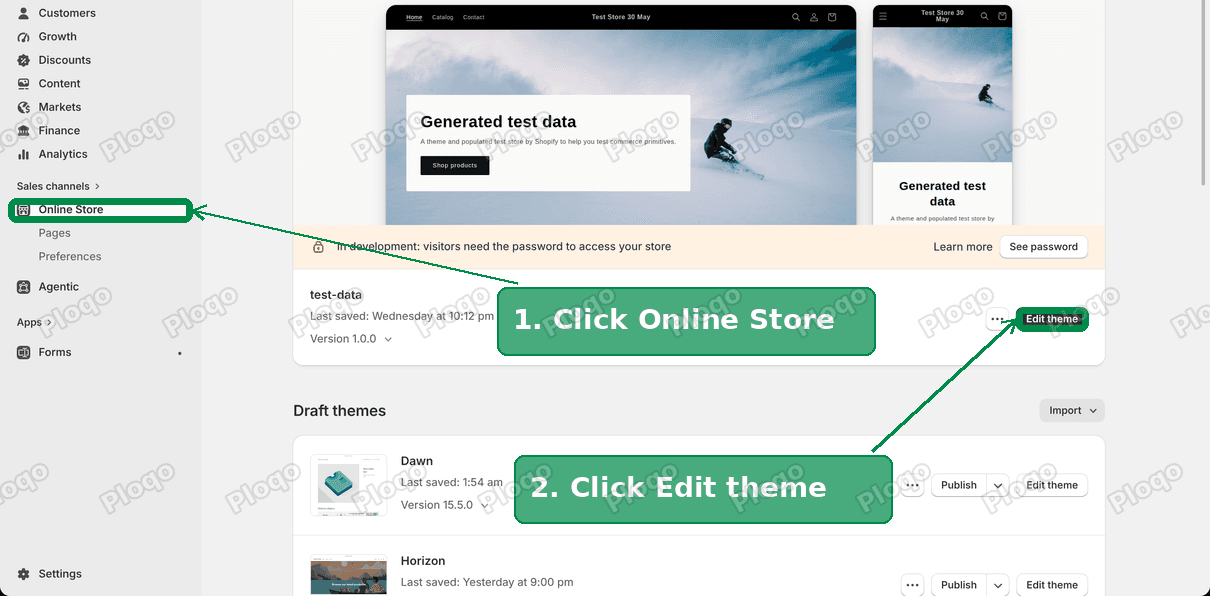 Go to Online Store, then click Edit theme next to your current theme
Step 3: click Add section
In the left list, click Add section. It sits just below your last section. A menu opens with a search box and the list of sections.
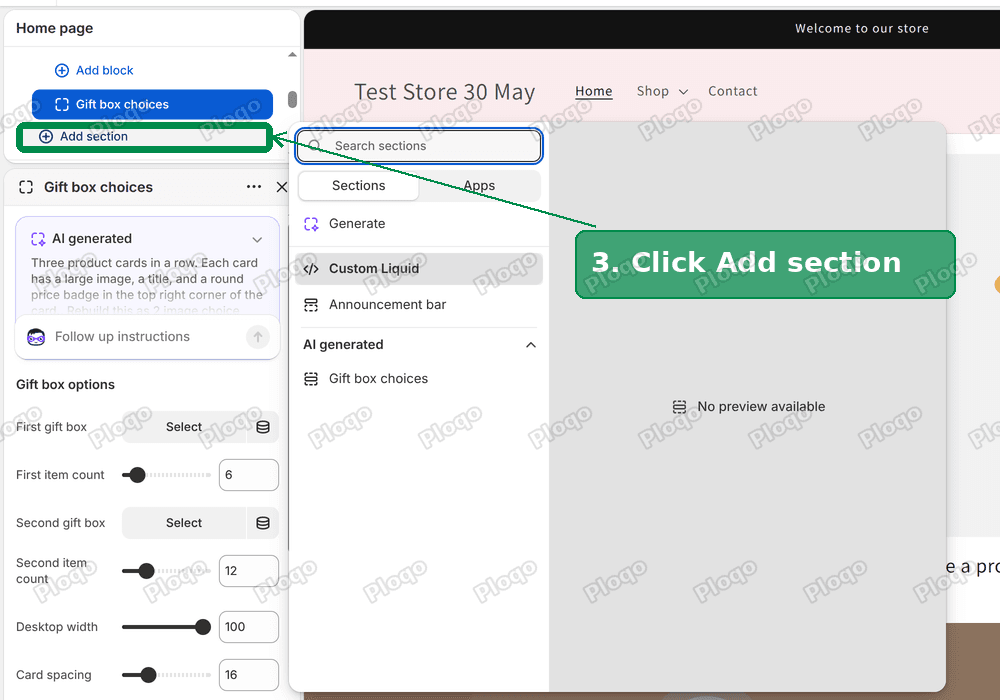 Click Add section in the left list
Step 4: choose Custom Liquid
Click Custom Liquid. It is near the top of the list, under Generate. The new section is added to the page and opens in the left panel.
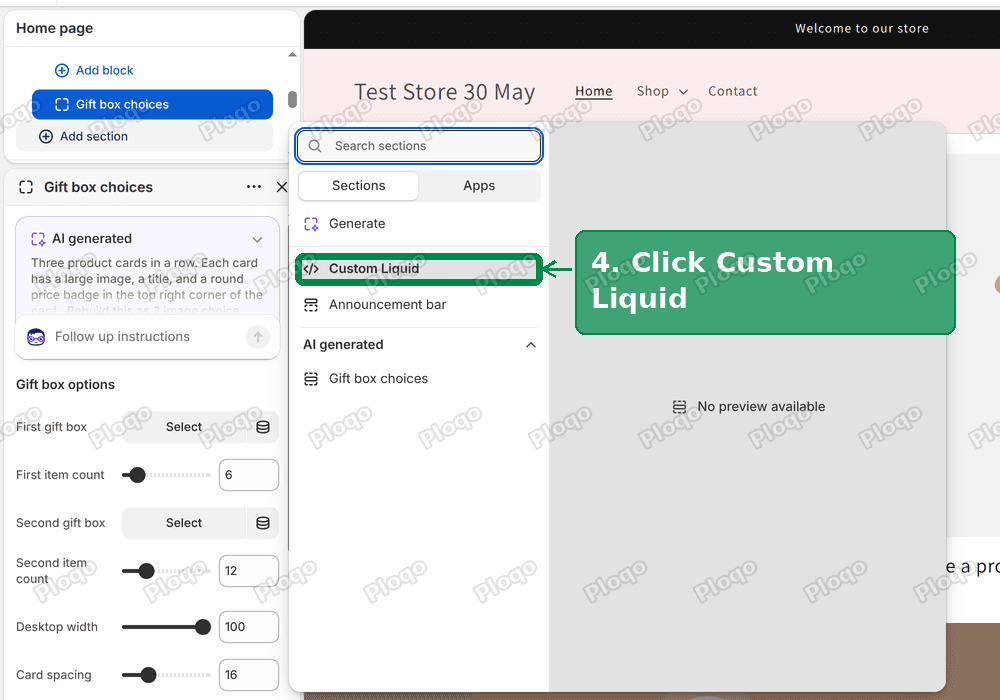 Click Custom Liquid in the section list
Step 5: paste the code
Click inside the Liquid code box and paste the rule from above. Include the <style> line at the top and the </style> line at the bottom.
The preview on the right updates as soon as you paste. The badge moves in front of the photo.
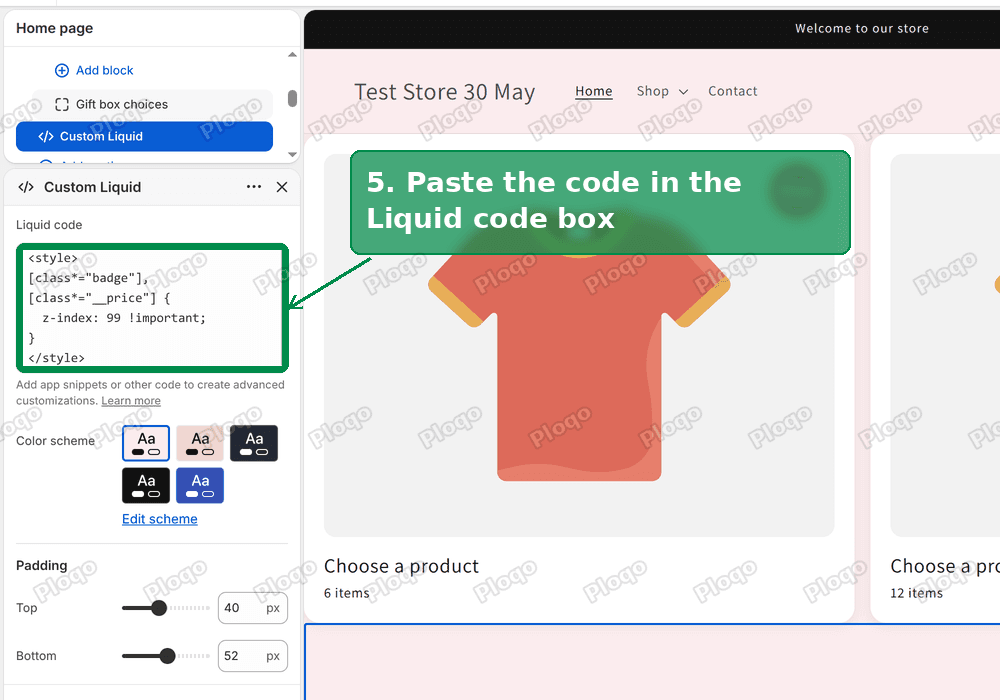 Paste the code in the Liquid code box
Step 6: set the padding to 0
A new Custom Liquid section comes with space above and below it. On my test store the defaults were 40 px on top and 52 px at the bottom. The section holds no visible content, so that space shows as an empty band on your page.
Scroll down in the left panel. Set Top and Bottom under Padding to 0.
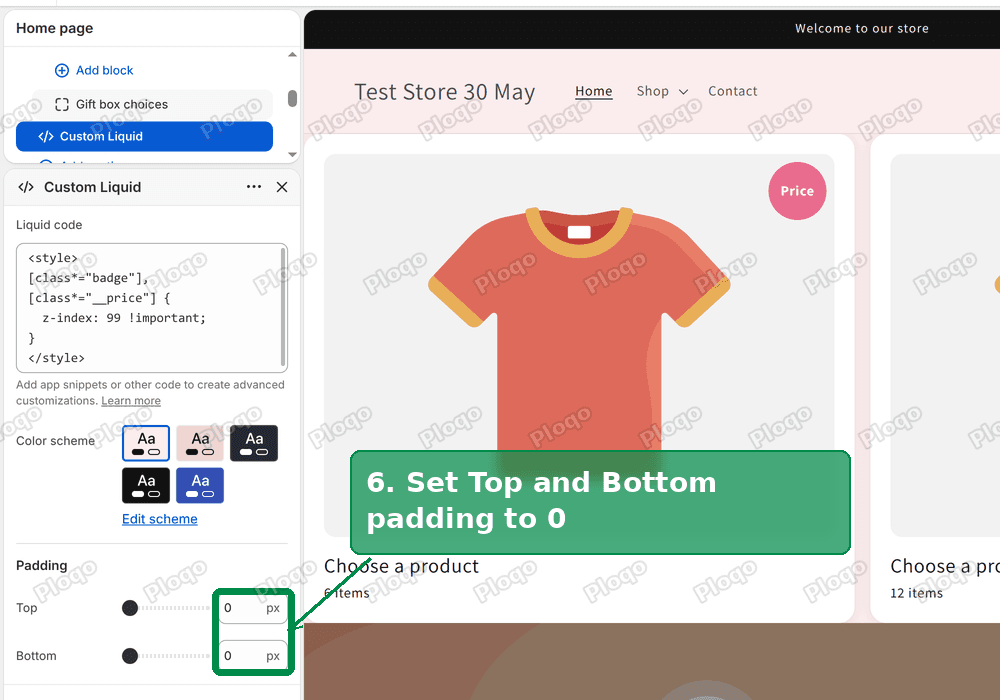 Set Top and Bottom padding to 0
Step 7: save
Click Save in the top right corner. The button is dark when you have changes to save.
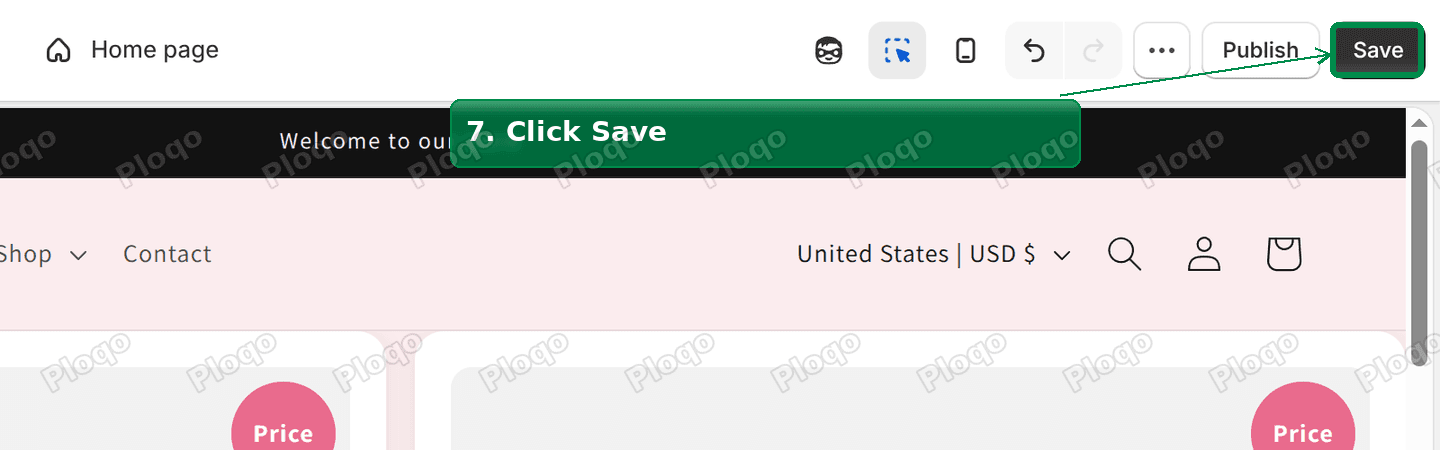 Click Save in the top right corner
Here is the result on my test store. The price badge sits on top of the photo on both cards.
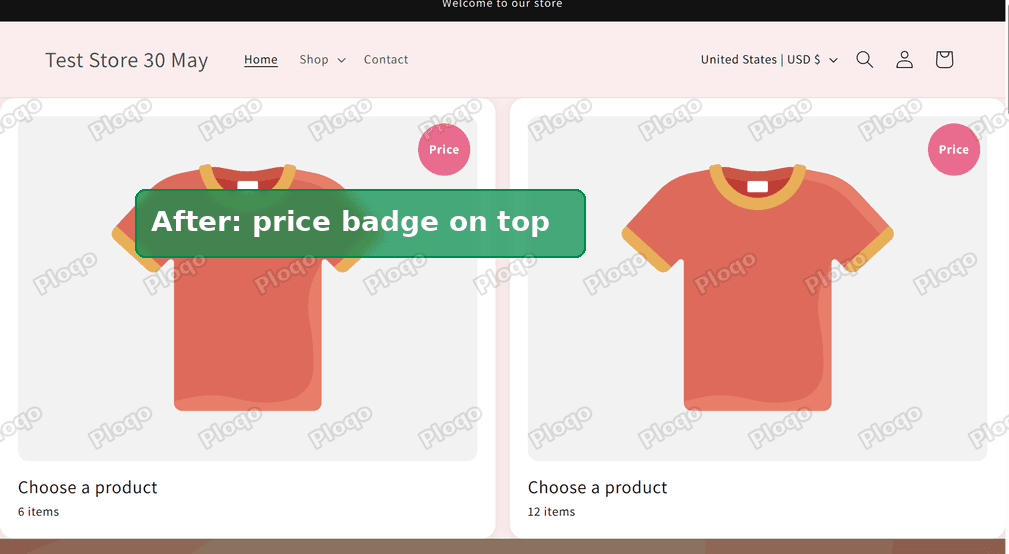 After: the price badge sits on top of the photo on both cards
Why not ask the AI to fix it?
Under your AI section's settings there is a box called Follow up instructions. You can type a change there, such as "bring the price badge to the front".
I tried it on my test section to see what a follow-up does. I asked for a different layout, and it rebuilt the whole section, including its settings. A three-card layout turned into a two-card layout with different options.
That is fine for a section you have just made. It is risky for one you have already adjusted, because your changes can go. The rule above does not touch the section, so nothing you set is lost.
If you do use the follow-up box, check the settings panel afterwards. Look at the colours, the spacing and the text on each card.
Where the code goes, and where it does not
The rule works from any section, because it applies to the whole page. I used a Custom Liquid section because it is available on every Dawn-based theme and needs no code editor.
Your theme may have another place for custom code. Many themes now have a Custom CSS box in Theme settings. If yours does, you can paste the rule there without the <style> lines, and you will not need the padding step. The guide to adding custom CSS in Shopify shows where to find it.
The Custom Liquid section also has a Custom CSS line near the bottom of its panel. I did not test the rule there, so use the Liquid code box as in the steps above.
How to check your own store
You do not need developer tools to see whether this is your problem.
- Open the page with your AI section on a computer.
- Look at the top right corner of each card.
- If you see a faint colour or an edge of the badge but no text, the photo is on top of it.
- Check a phone too. Cards often stack into one column on a small screen, and the badge can look different there.
If the badge is missing on every card and there is no edge at all, the problem is a different one. The badge may be switched off in the section's settings, or its colour may match the card background.
Layer terms that are easy to mix up
Z-index. A number that sets which of two overlapping items is drawn on top. A higher number is on top. It only works on items that are positioned, such as a badge pinned to a corner.
Layer. A plain word for a z-index level. Items on the same layer are drawn in page order, so the later one is on top.
Selector. The part of a rule that points at the items it applies to. Here, the words inside the square brackets.
Custom Liquid. A section with a code box. Anything you paste there is added to the page. Shopify's own wording is "Add app snippets or other code to create advanced customizations".
AI generated section. A section made with the Generate option. It has a card in its settings that shows the prompt you typed, and a Follow up instructions box.
If your problem is a menu covered by page content rather than a badge, it is the same idea with a different target. The dropdown menu behind page content guide explains it.
If you want a badge over a product photo for a sale or a sold out label, there is a native way for that. The sale badge percentage guide and the sold out overlay guide cover both.
For more on building your own sections, see the guide to custom sections in Shopify.
If it did not work
Is the badge still hidden after you save? Hard refresh your store. Press Ctrl and F5 on Windows, or Cmd and Shift and R on a Mac.
Does your badge use a different word in its class name? The rule looks for the words badge and __price. The AI may use a different word, such as tag or label. Right-click the badge on your store, click Inspect, and read the class name in the code that is highlighted. Replace badge in the rule with the word you see. For example, if you see price-tag, use [class*="price-tag"].
Did the rule also lift something else? The word badge appears in some theme class names, such as the labels on product cards. Raising their layer is harmless in most cases. If something now sits above a popup, lower the number from 99 to 10.
Is the Custom Liquid section on the right page? A section only affects the page it is on. If your AI section is on the home page, add the Custom Liquid section to the home page too. For a section that appears on several pages, add the rule in Theme settings instead.
Did you save a duplicate theme? If you worked in a duplicate, preview it. The live store changes only when you publish the duplicate.
Is the empty band still showing? Check that both padding values read 0. The slider and the number box must both show 0.
What to do
- Add a Custom Liquid section and paste the rule.
- Set the padding to 0 and save.
- Check each card on a computer and on a phone.
I confirmed on a Dawn 15.4.1 test store that the badge moved in front of the photo on both cards as soon as the rule was pasted.
Spending too long on manual Shopify busywork?
PinFlow turns your Shopify catalog into Pinterest pins and posts them on a schedule, automatically. Set it up once and let it run.
Get PinFlow on the Shopify App StoreMore Shopify fixes
More community-sourced Shopify guides, tested on a live store.
Themes & Storefront
Hide Shipping Calculated at Checkout on One Shopify Product
The line under Add to cart that says shipping is calculated at checkout shows on every product, gift cards included. Here is how to hide it on one product only, with the code, screenshots and the Eclipse theme steps.
Themes & Storefront
Shopify Dropdown Menu Behind Page Content (Z-Index Fix)
Your Shopify dropdown or mega menu opens, but the page title and products sit on top of its links and the menu closes before you can click. The fix is one Custom CSS rule in Theme settings. Tested on a Rebel store.
Themes & Storefront
Shopify Sales Counter: Show "X Sold" on Product Pages
Shopify has no built-in sales counter. Here is how to show a sold count on your product page and collection pages in the Dawn theme, using one product field and three lines of theme code.